Basic Operation
44
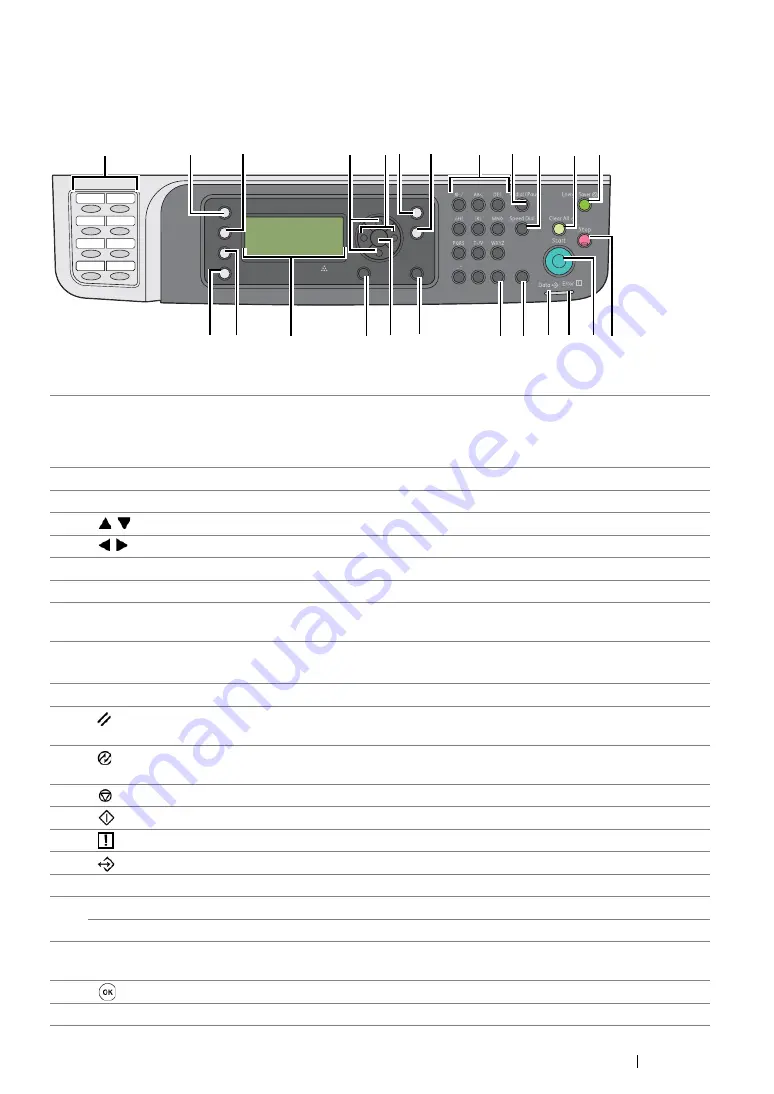
Operator Panel
The operator panel has a 4-line by 28-character liquid crystal display (LCD), light-emitting diodes
(LED), control buttons, one-touch buttons, and numeric keypad, which allow you to control the printer.
1
One-touch buttons
Calls up the stored fax number registered in the Address
Book. The first eight fax numbers in the Address Book are
assigned to the buttons in row order, starting from the top
corner.
2
Copy
button/LED
Moves to the top level of the Copy menu.
3
Scan
button/LED
Moves to the top level of the Scan menu.
4
buttons
Moves a cursor or highlight up or down.
5
buttons
Moves a cursor or highlight left or right.
6
Job Status
button/LED
Moves to the top level of the Job Status menu.
7
System
button/LED
Moves to the top level of the System menu.
8
Numeric keypad
DocuPrint M218 fw
•
Enters characters and numbers.
9
Redial/Pause
button
•
Re-dials a telephone number.
•
Inserts a pause during dialing.
10
Speed Dial
button
Calls up a stored telephone number.
11
(
Clear All
) button
Resets the current setting, and returns to the top level of
each service menu.
12
(
Energy Saver
) button/LED
Lights up in the Sleep mode. Press this button to exit the
Sleep mode.
13
(
Stop
) button
Cancels the current processing or pending job.
14
(
Start
) button
Starts a job.
15
(
Error
) LED
Lights up when the printer has an error.
16
(
Data
) LED
Lights up for incoming, outgoing, or pending jobs.
17
C
(
Clear
) button
Deletes characters and numbers.
18
#
button
Enters characters "(space)
&
(
)
".
C
(
Clear
) button
Deletes numbers.
19
Address Book
button
Pressing this button at the Fax menu, moves to the top
level of the Address Book menu.
20
button
Confirms the entry of values.
21
Back
button
Returns to the previous screen.
Copy
Fax
Scan
Address Book
Back
System
Job Status
DocuPrint M218 fw
3
2
4
5 6
7
8
9
10
11 12
13
14
15
16
17
19
20
21
23
24
22
1
18
Summary of Contents for DocuPrint M218 fw
Page 1: ...User Guide DocuPrint M218 fw...
Page 9: ...Contents 8...
Page 31: ...Product Features 30...
Page 65: ...Printer Management Software 64...
Page 197: ...Printing Basics 196...
Page 252: ...251 Scanning 5 Select any unused number and click Add...
Page 267: ...Scanning 266...
Page 433: ...Troubleshooting 432...
Page 437: ...Maintenance 436 5 Close the document cover...
Page 442: ...441 Maintenance 6 Place the toner cartridge slowly on the sheets of paper spread in step 3...
Page 463: ...Contacting Fuji Xerox 462...