Control Panel
29
Pr
od
uc
t Ove
rv
iew
2
10
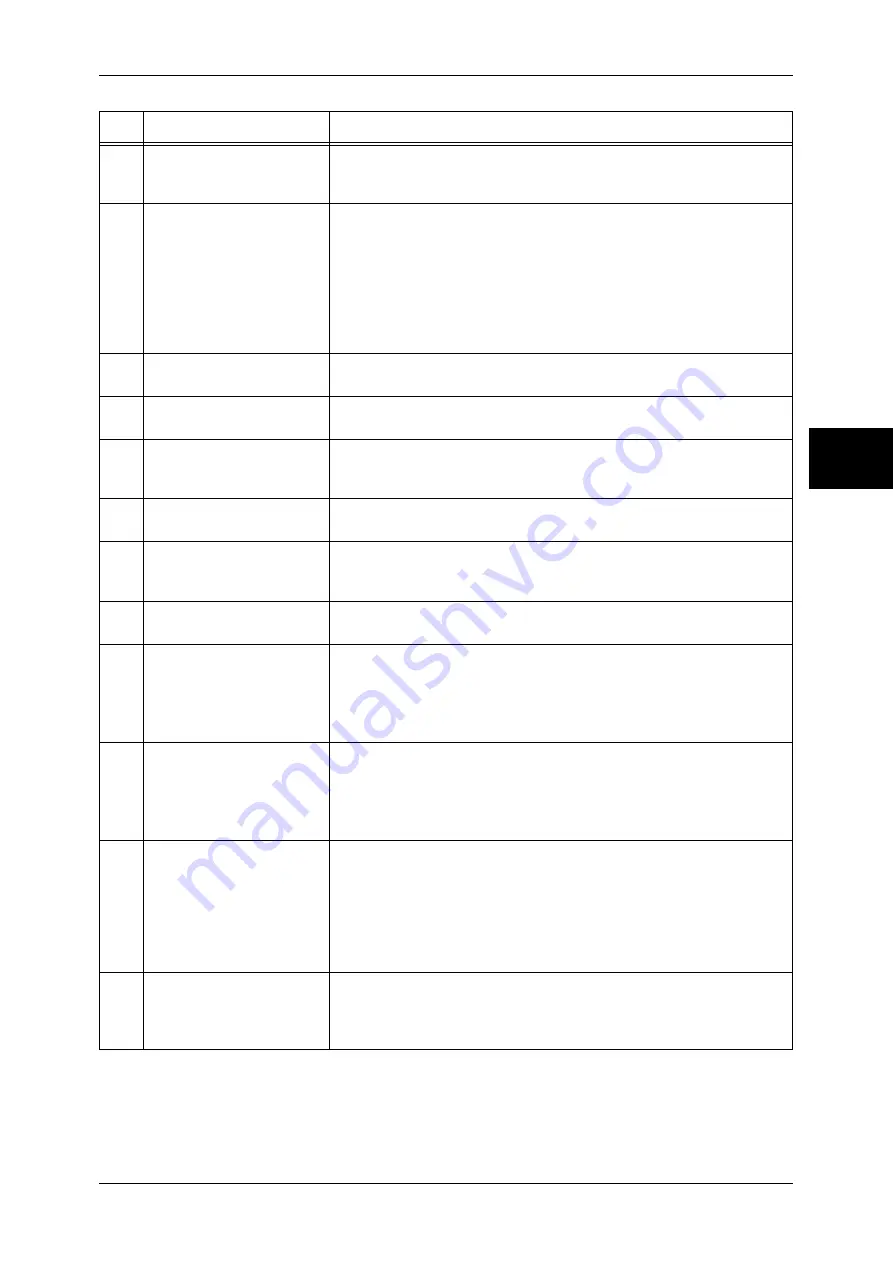
<Clear All> button
Returns the statuses of all displayed services to their default values.
The machine will be reset to this state after it is turned on.
In this manual, this button is indicated as the <Clear All> button.
11
<Interrupt> button/indicator Press this button to temporarily stop a continuous copy job or printing to
give another job higher priority. During an interrupt, the interrupt
indicator lights up. Pressing the <Interrupt> button again cancels the
interrupt and the previous operation is resumed.
In this manual, this button is indicated as the <Interrupt> button.
Some jobs cannot be executed during the interruption. For detail
information, refer to "Notes and Restrictions on the Interrupt Mode"
under "Chapter 17 Appendix" in the User Guide.
12
<Stop> button
Press this button to stop the current copy job or communications.
In this manual, this button is indicated as the <Stop> button.
13
<Start> button
Press this button to start copying or scanning.
In this manual, this button is indicated as the <Start> button.
14
Numeric keypad
Press these buttons to enter the number of copies, passwords and other
numerical values.
In this manual, these buttons are indicated as the “numeric keypad”.
15
<Speed Dial> button
Used to specify a destination phone number for fax or e-mail.
In this manual, this button is indicated as the <Speed Dial> button.
16
<C (Clear)> button
Press this button if you have entered the wrong numerical value with the
numeric keypad.
In this manual, this button is indicated as the <C> button.
17
<Dial Pause> button
Used to insert a pause into a destination number.
In this manual, this button is indicated as the <Dial Pause> button.
18
<Custom> buttons
(<Copy>, <Custom 2>,
<Custom 3> buttons)
Used to call their associated features.
To the buttons, you can assign [Language] or any features displayed on
the [All Services] screen.
For information on assigning features to buttons, refer to "Screen/Button
Settings" under "Chapter 11 System Settings" in the User Guide.
19
<All Services> button
Used to display the [All Services] screen.
In this manual, this button is indicated as the <All Services> button.
You can change the features that appear in the <All Services> screen.
For detail information, refer to "Screen Defaults" in "Chapter 11 System
Settings" in the User Guide.
20
One touch button panels
Panels for one touch buttons.
You can leaf through panels to display 001 to 030, 031 to 060, and 061
to 070. M01 to M20 are reserved for the stored programming feature.
These buttons correspond to jobs registered in 01 to 20.
Note •
This feature is not available for some models. An optional package is
necessary. For more information, contact our Customer Support
Center.
21
One touch buttons
Used to specify a destination in one operation. These buttons are
available for fax and iFax.
The one touch buttons are associated with address numbers 001 to
070.
No.
Component
Function


