background image


DXP HD 4K PLUS Series • Operation

25

Locking and Unlocking the Front Panel


(Executive Modes)

The matrix switchers have three levels of front panel security lock that limit the operation of 
the switcher from the front panel:

• 

Lock mode 0

 — The front panel is completely unlocked. All front panel functions are 

available. 

NOTE:

  Opening PCS sets the lock mode to 0.

• 

Lock mode 1

 — All changes are locked from the front panel (except for setting lock 

mode 2). Some functions can be viewed. When the DXP enters mode 1, the 

Video

 and 

Audio

 LEDs blink twice.

• 

Lock mode 2

 — Basic functions are unlocked. Advanced features, except for 

switching to lock mode 1, are locked and can only be viewed. When the DXP enters 
mode 2, the 

Esc

Video

, and 

Audio

 LEDs blink twice. This is the default mode.

Basic functions include:

• 

Making ties

• 

Saving and recalling presets

• 

Changing lock modes

Advanced functions include:

• 

Setting video and audio output mutes

• 

Setting the rear panel Remote RS 232 port protocol and baud rate

NOTE:

  The switcher is shipped from the factory in lock mode 2.

Selecting Front Panel Lock Mode 2 or Toggling between Lock Modes 2 and 0

NOTES:


• 

If the switcher is in lock mode 0 or 1, this procedure selects mode 2.

• 

If the switcher is in lock mode 2, this procedure selects mode 0 (unlocks the 
switcher).

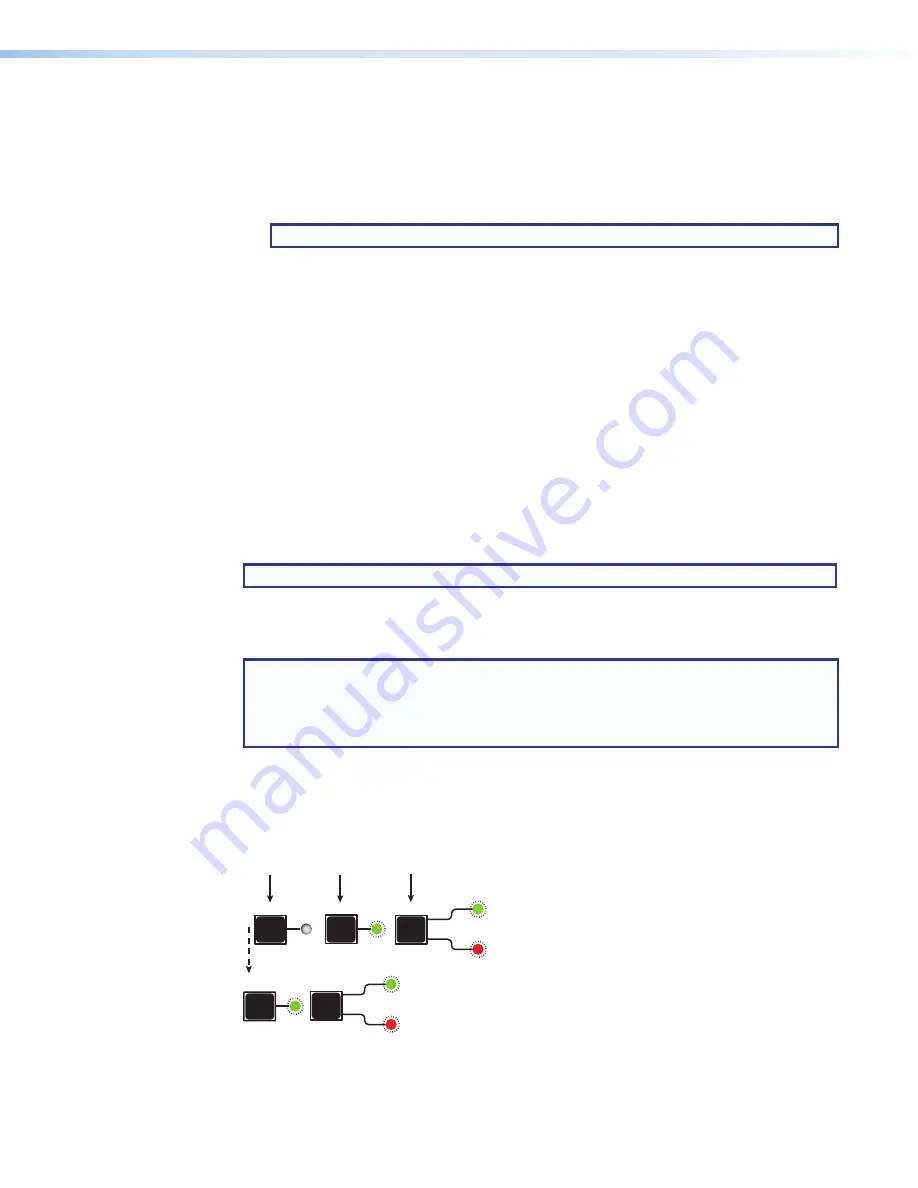
Toggle the front panel lock on and off by pressing and holding the 

Enter

I/O

, and 

Esc


buttons simultaneously until the following LEDs blink twice (approximately 3 seconds).

• 

The Esc, Video, and Audio LEDs blink twice if the DXP is now in lock mode 

2

.

• 

The Video and Audio LEDs blink twice if the DXP is now in lock mode 

0

.

I/O

ENTER

ESC

Press and 

hold 

simultaneously.

3 seconds

I/O

VIDEO

AUDIO

ESC

The LEDs blink twice.
Release the buttons.

VIDEO

AUDIO

Figure 24. 

Switching between Front Panel Lock Modes 0 and 2

Summary of Contents for DXP 44 4K PLUS

Page 1: ...User Guide DXP HD 4K PLUS Series Matrix Switchers 4K HDMI Switchers 68 2939 01 Rev A 05 18...

Page 2: ...encia 68 290 01 en el sitio web de Extron www extron com Instructions de s curit Fran ais AVERTISSEMENT Ce pictogramme lorsqu il est utilis sur le produit signale l utilisateur la pr sence l int rieur...

Page 3: ...TEGRATOR TeamWork TouchLink V Lock VideoLounge VN Matrix VoiceLift WallVault WindoWall XTP XTP Systems and ZipClip Registered Service Mark SM S3 Service Support Solutions Trademarks AAP AFL Accu Rate...

Page 4: ...nce must be corrected at the expense of the user NOTES For more information on safety guidelines regulatory compliances EMI EMF compatibility accessibility and related topics see the Extron Safety and...

Page 5: ...mples of computer or device responses used in this guide the character 0 is used for the number zero and O is the capital letter o Computer responses and directory paths that do not have variables are...

Page 6: ......

Page 7: ...Modes 2 and 0 25 Selecting Front Panel Lock Mode 2 or Toggling between Lock Modes 2 and 1 26 Switching from Lock Mode 1 to Lock Mode 0 26 Power Save Modes 26 Resetting 27 Resetting the System from the...

Page 8: ...vice Info Panel 68 Date Time Settings Panel 69 Passwords Panel 71 Configure This Device Panel 71 Reference Information 72 Mounting the Switcher 72 UL Guidelines for Rack Mounting 72 Rack Mounting Proc...

Page 9: ...der HDMI input equalization and output regeneration ensure reliable system operation Digital audio can be de embedded from any input and assigned to digital or analog stereo outputs The following mode...

Page 10: ...uthenticates and maintains continuous HDCP encryption between input and output devices to ensure quick and reliable switching in professional AV environments while enabling simultaneous distribution o...

Page 11: ...Software PCS The Extron PCS program provides a means of configuring multiple products using a single software application Front panel USB configuration port Enables setup configuration and firmware up...

Page 12: ...EDID tables for DXP HD 4K PLUS DXP 88 HD 4K PLUS 8 x 8 and DXP 84 HD 4K PLUS 8 x 4 SIS Variable X52 EDID Memory Slot Default EDID File Details 1 Input 1 store EXN_HDMI_1080p60_2Ch bin Manually populat...

Page 13: ...R POWER 12V A MAX AUDIO OUTPUTS OVER DTP2 SIG LINK DTP2 IN V C G 10V 50mA REMOTE STANDBY TIMER OFF G R CLASS 2 WIRING MPA 601 70V 70V OUTPUT L SUMMED SUMMED R R L POWER 12V 1 3A MAX INPUTS RS 232 1 2...

Page 14: ...soyez lectriquement reli la terre lorsque vous effectuez des connexions Les d charges lectrostatiques peuvent endommager l quipement m me si vous ne pouvez pas le sentir le voir ou l entendre DXP 88 H...

Page 15: ...of reset on the DXP switcher To initiate the different reset levels use a pointed object such as a small Philips screwdriver or a stylus to press and hold the button while the switcher is running or...

Page 16: ...o the ground contact DO NOT connect the sleeves to the negative contacts Pour l audio asym trique connectez les manchons au contact au sol Ne PAS connecter les manchons aux contacts n gatifs NOTE The...

Page 17: ...Twisted Pair Wires 1 2 3 4 5 6 7 8 Pins Crossover Cable Straight through Cable Pin 1 2 3 4 5 6 7 8 Wire Color White green Green White orange Blue White blue Orange White brown Brown Wire Color T568A T...

Page 18: ...Connect a ground wire between the DXP and the computer or control system Tx Rx G Tx Rx G Ground G Transmit Tx Receive Rx Transmit Tx Receive Rx Figure 5 Wiring the Remote RS 232 Connector See SIS Conf...

Page 19: ...r it 2 3 Place the LockIt lacing bracket onto the screw and slide it up against the HDMI connectors Tighten the screw to secure the bracket 3 ATTENTION Do not overtighten the HDMI connector mounting s...

Page 20: ...An input tied to two or more outputs An output can never be tied to more than one input Configuration One or more ties or sets of ties Current configuration The configuration that is currently active...

Page 21: ...many rear panel input and output connectors it actually has NOTE Although the DXP 44 and 84 both have eight input and eight output buttons not all these buttons are functional for making ties DXP HD 4...

Page 22: ...ets see Saving and Recalling Presets on page 22 C Output buttons The output buttons have the following functions Primary Select outputs Identify the selected outputs Secondary Save and recall presets...

Page 23: ...elect the 115200 baud rate for the Remote RS 232 With the Enter and I O buttons set the front panel lock mode With the Enter and Preset buttons place the switcher in serial port configuration mode Sel...

Page 24: ...which the green Input Signal and HDCP LEDs also light in order in a clockwise circling pattern If error free the self test ends with only one of the I O LEDs lit reflecting the previous selection of a...

Page 25: ...desired configuration is complete NOTES Only one input can be tied to any output If you tie an input to an output that is already tied to another input the older tie is broken in favor of the newer ti...

Page 26: ...cted I O AUDIO Lights red when audio is selected Figure 8 Selecting Audio or Video using the I O Button 3 Press the desired input button 1 The LED lights to indicate the selection Figure 9 Selecting a...

Page 27: ...input light green also see figure 12 INPUTS 1 5 2 6 3 7 4 8 OUTPUTS 1 5 2 6 3 7 4 8 Press and release an Input button The LED lights green to indicate that video outputs can be tied to or untied from...

Page 28: ...currently has Figure 15 shows an example of selecting an audio only tie to break INPUTS 1 5 2 6 3 7 4 8 OUTPUTS 1 5 2 6 3 7 4 8 Press and release an Input button The LED lights to indicate whether au...

Page 29: ...nd output buttons View ties by selecting an input Press an input button All button LEDs light for the outputs that are tied to the selected input INPUTS 1 5 2 6 3 7 4 8 OUTPUTS 1 5 2 6 3 7 4 8 Press a...

Page 30: ...ning on page 57 for more details The current configuration and all presets are stored in non volatile memory When power is removed and restored the current configuration is still active and all preset...

Page 31: ...t actual inputs or outputs on the DXP The LED blinks red to indicate that this preset is selected to save or recall The Enter LED blinks green to indicate the need to activate the save or recall 1 ENT...

Page 32: ...tput button until its LED stops blinking approximately 2 seconds NOTE If you want to mute an output but accidentally press an input button prior to pressing and holding the desired output this voids t...

Page 33: ...ing ties Saving and recalling presets Changing lock modes Advanced functions include Setting video and audio output mutes Setting the rear panel Remote RS 232 port protocol and baud rate NOTE The swit...

Page 34: ...s 1 and 2 Switching from Lock Mode 1 to Lock Mode 0 If the switcher is in lock mode 1 you cannot change it directly to lock mode 0 completely unlocked You must first place the switcher in lock mode 2...

Page 35: ...for SIS Commands page 51 PCS see the program help file Resetting the System from the Front Panel A system reset also known as a hard reset does the following Clears all ties and presets Clears all vid...

Page 36: ...ed stylus ballpoint pen or small screwdriver to press the button The table on the next page provides a summary of the reset modes ATTENTION Review the reset modes in the table on the next page careful...

Page 37: ...e factory defaults Sets port mapping to the factory default Turns DHCP off Turn event scripts off The Reset LED blinks four times in quick succession during the reset Mode 4 resets all IP settings to...

Page 38: ...5 2 Release the Reset button and then immediately press and release it again Nothing happens if the second momentary press does not occur within 1 second Selecting the Remote RS 232 Port Baud Rate NO...

Page 39: ...evices are plugged in and powered on The switcher is receiving power if the Reset Power LED is lit 2 Check to see if one or more outputs are muted 3 Ensure that an active input is selected for output...

Page 40: ...dium monitor 2 Demo Room 1 Lobby monitor 1 Editing Station 1 1 Input Sources 4K Blu Ray Player 1 Editing Station 2 Fill in the preset number and use colors dashes and so forth to make connecting lines...

Page 41: ...in the conference room output 4 to the overflow crowd Displayed in the Demo Room output 6 Displayed in the lobby output 8 The presenter has a presentation stored on PC 1 input 4 that is Displayed in t...

Page 42: ...ut Sources Output Destinations Preset Title Fill in the preset number and use colors or dashes and so on to make connecting lines Disregard or cross out the input and output boxes that do not apply to...

Page 43: ...e for more details Host and Matrix Switcher Communication SIS commands consist of one or more characters per field No special characters are required to begin or end a command sequence Commands can be...

Page 44: ...er initiates the Qik message when a front panel switching operation occurs Rprnn The switcher initiates the Rpr message when a memory preset is recalled from the front panel nn is the preset number Sp...

Page 45: ...command For example 24 Commands that give an E24 privilege violation error if not administrator level Connection Timeouts An Ethernet link disconnects after a designated period of no communications B...

Page 46: ...d lowercase text can be used interchangeably unless otherwise stated ASCII to Hex Conversion Table Space Figure 32 ASCII to Hexadecimal Character Conversion Table Verbose Mode The connection to a DXP...

Page 47: ...luding symbols and spaces are permitted X Analog audio and S PDIF output number 1 or 2 X HDCP Authorized device 0 block HDCP encryption 1 allow HDCP encryption default X Input HDCP status 0 no source...

Page 48: ...0 unlock the front panel 1 mode 1 complete front panel lockout 2 mode 2 tie configuration and preset management only default X2 Signal status 0 no signal detected 1 input signal detected X2 Verbose m...

Page 49: ...igits HH hour 00 to 23 mm minute 00 to 59 SS second 00 to 59 X3 Date and time view only In the format DAY DD MMM YYYY HH mm SS DAY day of the week Mon to Sun DD date 01 to 31 depending on the month MM...

Page 50: ...ed with sink EDID from the output DXP 84 01 08 input slot 09 12 automatically populated with sink EDID from the output DXP 88 01 08 input slot 09 16 automatically populated with sink EDID from the out...

Page 51: ...utputs X or X InX Vid Tie an HDMI input to all HDMI outputs Tie HDMI audio input to all audio only outputs audio output 2 only X InX Aud Tie HDMI audio input to all analog audio and S PDIF outputs aud...

Page 52: ...HDCP status EIHDCP X 1 X 2 X n HdcpI00 X 1 X 2 X n View the HDCP status for all inputs n the maximum number of inputs Verbose modes 2 and 3 EDID Commands NOTE See EDID Minder on page 3 for information...

Page 53: ...ut X HDCP to always encrypted View HDCP mode ESX HDCP X1 HdcpSX X1 View the HDCP mode Verbose modes 2 and 3 NOTES X Output number 1 through maximum number of outputs X Name 16 alphanumeric characters...

Page 54: ...video mute status X B X1 VmtX X1 View the mute setting of an output Verbose modes 2 and 3 Set HDMI video mute to all outputs X1 B VmtX1 Set mute of all outputs View all output mutes EVM X1 1 X1 2 X1...

Page 55: ...the volume level of an output OutX VolX1 Verbose modes 2 and 3 Audio Mute NOTE For outputs 1 2 X1 0 7 For outputs 3 8 X1 0 1 Set audio mute X X1 Z AmtX X1 Set the mute status of an output View audio...

Page 56: ...it ties that are part of the previous version may become part of the new preset View global HDMI preset EX1 01 1VC X 1 X 2 X 16 Vid View the inputs tied to each output for a global preset VgpX1 Out01...

Page 57: ...Reset individual room EX1 ZR ZprX1 Clear a room output configuration Room Presets NOTE n maximum number of outputs Save room preset X1 X1 RmmX1 SprX1 Save the current configuration to a room preset Re...

Page 58: ...tion Commands Front Panel Lockout Mode Executive Mode Set Front Panel Lockout mode X2 X ExeX2 Set the accessibility to front panel operation View Front Panel Lockout mode X X2 View the accessibility l...

Page 59: ...fans slow to save power Set power save mode EX2 PSAV PsavX2 Set the power save mode to X2 NOTE The switcher returns to normal mode X2 0 when you use the front panel issue the E0PSAV command connect v...

Page 60: ...the version number see the example below The firmware version is the current or active version Only the factory firmware version is loaded This replaces the updated firmware version The default factor...

Page 61: ...ss Set subnet mask24 EX3 CS Ips X3 Set the subnet mask View subnet mask ECS X3 View the subnet mask setting Set gateway IP address24 EX3 CG Ipg X3 Set the gateway IP address View gateway IP address EC...

Page 62: ...out E1TC X3 Pti1 X3 View the initial timeout value for any connection Device Name Set device name24 EX3 CN Ipn X3 Set the device name NOTES The first character must be a letter The last character must...

Page 63: ...ingle space Set administrator password EX4 CA Ipa X4 Set the administrator password Clear administrator password E CA Ipa Reset or clear the administrator password NOTES X3 Date and time In the format...

Page 64: ...port configuration Set serial port parameters EX4 X4 X4 X4 X4 CP CpnX4 CcpX4 X4 X4 X4 Set the baud rate parity data bits and stop bits for serial port X4 View port parameters EX4 CP X4 X4 X4 X4 MKP M...

Page 65: ...installation and communication For detailed information about configuring the device with PCS see the DXP HD 4K PLUS Series Help file Topics in this section include Software Installation Software Con...

Page 66: ...roduct Page on the next page Figure 34 PCS Download Link 3 Click the P link see figure 34 1 4 Locate PCS from the list of available software programs and click the Download link 2 to the right of the...

Page 67: ...der the field 2 Press Enter on the keyboard or select PCS from the drop down menu 3 Click the Download button 2 4 Submit any required information to start the download Note where the file is saved 5 O...

Page 68: ...indow Offline device configuration is not supported with the DXP HD 4K PLUS Series but the configuration screens and panels can still be viewed NOTES PCS versions prior to 2 0 do not have the Device D...

Page 69: ...lect the desired device 3 3 Click the Connect button 5 A new device configuration tab opens To edit communication settings from the Device Discovery panel 1 Click the Device Discovery tab 1 2 Click th...

Page 70: ...P IP tab see figure 38 1 2 In the IP Address field 2 enter the IP address of the desired device 3 If required enter the device password in the Password field 3 NOTE Select the Show Characters checkbox...

Page 71: ...ice tab 1 In the Start up drop down menu select New Configuration File The New Configuration File dialog box opens Figure 39 Configuration File Drop Down Menu NOTE The Open Configuration File option i...

Page 72: ...ron PCS Help from the Software menu in the top right corner Figure 41 Software Menu The DXP HD 4K PLUS Series Help file contains information about configuring the connected switcher To access the help...

Page 73: ...o a LAN or WAN using the rear panel LAN connector see Connecting to the LAN Port on page 9 2 On a connected PC open a web browser NOTES The internal web page does not support compatibility mode in Mic...

Page 74: ...The number of inputs displayed depends on the number of inputs available on the DXP HD 4K PLUS Series model Each input is identified by number in the left column For each input the following informat...

Page 75: ...ions Symbol Definition The display is HDCP compliant Either The display is connected and supports HDCP but is not currently encrypted or The display is connected supports HDCP and is currently encrypt...

Page 76: ...o 192 168 254 254 The subnet mask is set to 255 255 0 0 The default gateway is set to 0 0 0 0 To cancel pending changes Click the Cancel button The dialog box closes Device Info Panel The Device Info...

Page 77: ...n the firmware is uploading initializing then installing The DXP reboots then displays a message indicating that the firmware update is complete To cancel pending changes Click the Cancel button The d...

Page 78: ...the calendar heading 2 Click the drop down menu next to the calendar month and year 3 and select the desired month and year Click the OK button to accept the selected settings or the Cancel button to...

Page 79: ...is assigned 2 In the User Password field enter the new password 3 In the Confirm Password field directly under the User Password field enter the same password from the field above 4 Click the Apply b...

Page 80: ...maximum ambient temperature Tma specified by Extron Reduced air flow Install the equipment in the rack so that the amount of air flow required for safe operation of the equipment is not compromised M...

Page 81: ...ntifier and HHH refers to the host identifier Choosing IP Addresses If the computer and the DXP are directly connected or connected via their own independent network follow the guidelines below for ch...

Page 82: ...or the subnet mask The basic values depend on the class of IP address being used Class Name Subnet Mask Class A 255 0 0 0 Class B 255 255 0 0 Class C 255 255 255 0 See Subnetting a Primer on page 77 f...

Page 83: ...ou may need to install the Telnet client on your PC first Telnet allows you to input SIS commands to the DXP switcher from the PC via the Ethernet link and the LAN Starting Telnet Access the command p...

Page 84: ...Many SIS commands include the keyboard Esc key Consequently some confusion may exist between the Escape character and the Esc key When Telnet is first started the utility advises that the Escape chara...

Page 85: ...subset of a network a set of IP devices that have portions of their IP addresses in common It is not the purpose of this manual to describe TCP IP protocol in detail However some understanding of TCP...

Page 86: ...P address see figure 53 The octets of each address are compared or not depending on the value in the related subnet mask octet If a subnet mask octet contains the value 255 the related octets of the l...

Page 87: ...rab Emirates Dubai This Limited Warranty does not apply if the fault has been caused by misuse improper handling care electrical or mechanical abuse abnormal operating conditions or if modifications w...

Reviews: