


120
Advanced Media Setting
menu (in the
Roll Paper
menu)
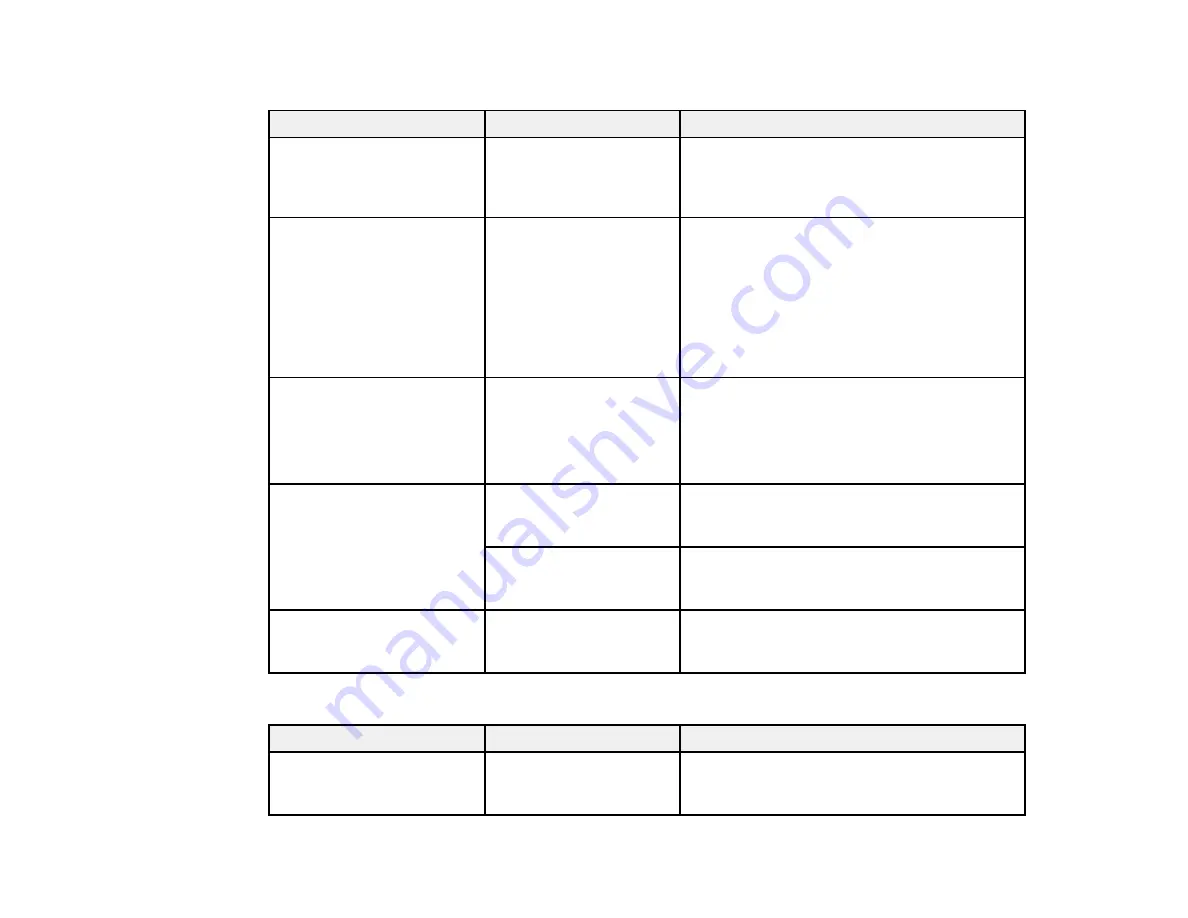
Setting
Options
Description
Platen Gap
1.6
2.1
2.6
Adjusts the distance between the print head
and the paper; displayed when
Custom
Paper
is selected as the
Paper Type
setting
Top/Bottom Margins
Standard
Top 3 mm/Bottom 3
mm
Top 15 mm/Bottom 15
mm
Top 45 mm/Bottom 15
mm
The
Standard
margins are as follows for the
top and bottom:
• CAD/line drawings: 3 mm
• Other: 30 mm
Select a different value as necessary.
Left and right margins are always 3 mm.
Back Tension
Auto
Standard
High
Extra High
Select
High
or
Extra High
if paper wrinkles
during printing
Drying Time
Drying Time per Pass
Select from 0 to 10 seconds for the amount of
time the print head pauses to allow drying
after each pass
Drying Time per Page
Select from 0 to 60 minutes for the amount of
time the printer pauses to allow drying after
each page is printed
Auto Cut
On
Off
Select
On
to automatically cut roll paper after
each page is printed, or select
Off
to cut paper
manually
Auto Sheet Feeder
menu
Setting
Options
Description
Media Adjust
Start
Prints an adjustment pattern to check and
adjust print quality or custom paper settings;
follow the on-screen instructions
Summary of Contents for SureColor F571
Page 1: ...Epson SureColor F571 User s Guide ...
Page 2: ......
Page 22: ...22 Make sure you have all of these items for assembly ...
Page 33: ...33 Parent topic Introduction to Your Printer ...
Page 67: ...67 1 Slide out the edge guides and remove the paper from the auto sheet feeder ...
Page 82: ...82 You can also place the same print data multiple times as shown here ...
Page 165: ...165 2 Open the ink tank cover 3 Open all of the ink tank caps 4 Remove the transportation cap ...
Page 166: ...166 5 Flip the transportation cap so the round ends face down ...
Page 167: ...167 6 Insert the round ends of the transportation cap as shown ...
Page 172: ...172 6 Insert the square ends of the transportation cap as shown ...


