Repairs
4.
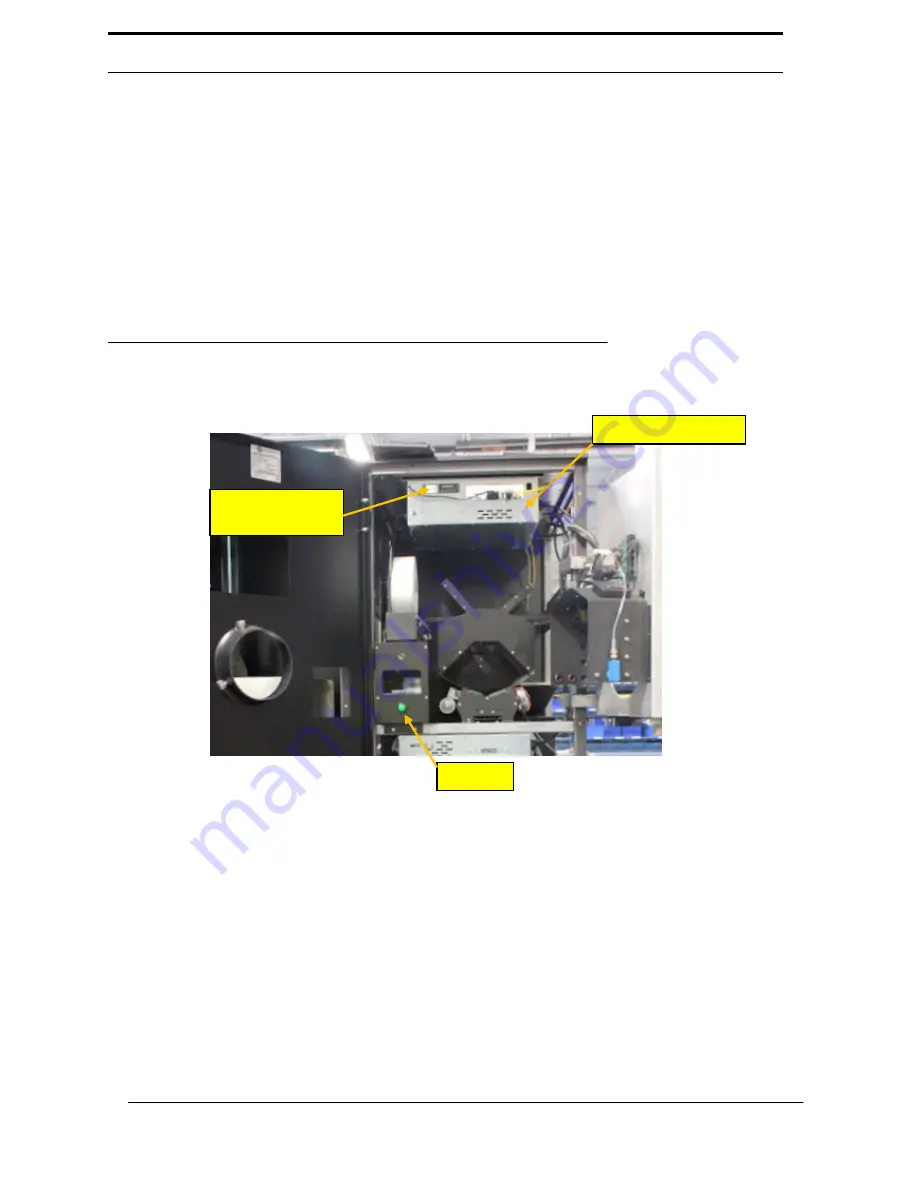
Remove the hard drive from the
RVM
Controller by opening the top bay on
the front of the
RVM
controller. See Figure 6-1
5.
Take the hard drive out of the machine, and set it aside.
6.
Unscrew the
RVM
Controller Box, and remove it from the machine.
7.
Install the existing hard drive into the new
RVM
Controller Box.
8.
Install new
RVM
Controller Box into the machine.
9.
Connect all of the data and electrical wires to the new
RVM
Controller.
10.
Flip the
RVM
Controller Box power switch to the “On” position, and wait for it
to power on. This may take a few moments.
FIGURE 6-1 RVM
Controller
6-7
RVM
Controller Box
Hard Drive
Access Panel
Printer
Summary of Contents for FLEX Dual
Page 1: ...FLEX Series ServiceManual March 16 2016...
Page 2: ......
Page 14: ...1 6 Chapter 1 Introduction Safety FLEX HDS LASER DANGER LABEL...
Page 21: ...1 13 Safety labels FLEX HDS ONLY RIGHT PANEL KEEP HANDS AWAY WARNING LABEL 1 13...
Page 28: ...Chapter 2 Specifications 2 6 Notes...
Page 50: ...RVM Controller Box 3 19 FIGURE 3 18 MC5 BoardLayout FIGURE 3 19 MD5 BoardLayout 3 22...
Page 57: ...3 26 Chapter 3 Hardware Components Notes...
Page 58: ......
Page 84: ...4 26 Chapter 4 RVM Software MC1 Board FLEX DFF FLEX DFF GDS AC MOTOR CONTROL BOX...
Page 85: ...4 27 Software Theory of Operation Notes...
Page 86: ...4 28 Chapter 4 RVM Software Notes...
Page 94: ...5 8 Chapter 5 Maintenance Notes...
Page 106: ...Chapter 6 Troubleshooting Repairs Notes 6 12...
Page 107: ...Repairs Notes 6 13...
Page 108: ...Chapter 6 Troubleshooting Repairs Notes 6 14...
Page 109: ...Repairs Notes 6 15...
Page 110: ...Chapter 6 Troubleshooting Repairs Notes 6 16...
Page 111: ...Repairs Notes 6 17...
Page 112: ...Chapter 6 Troubleshooting Repairs Notes 6 18...
Page 113: ...Repairs Notes 6 19...
Page 114: ...Chapter 6 Troubleshooting Repairs Notes 6 20...


