G424F(FE) Service Manual
Chapter 4. Engine Electrical System
114
2.
Turn the ignition switch OFF.
3.
Disconnect the battery ground cable.
4.
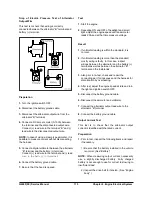
Disconnect the alternator output wire from the
alternator “B” terminal.
5.
Connect a DC ampere meter (0-100V) between
“B” terminal and the disconnected output wire.
Connect (+) lead wire to the terminal “B” and (-)
lead wire to the disconnected output wire.
NOTE:
Do not use clips or equivalent owing to high
current and Use bolts and nuts to tighten each
connecting part securely.
6.
Connect a volt meter (0-20V) between “B”
terminal and the ground.
Connect (+) lead wire to the alternator “B”
terminal and (-) lead wire to the proper position.
7.
Connect the engine tachometer and then battery
ground cable.
8.
Be sure that the hood is opened.
Test
1.
Be sure that voltmeter reading is identified with
battery voltage.
If voltmeter reading is 0V, it means short circuit of
wire between “B” terminal and the battery (-)
terminal, fusible link cut off or ground fault.
2.
Turn the headlight ON and start the engine.
3.
With the engine running at 2,500 rpm, turn ON the
high beam headlights, place the heater blower
switch at ”HIGH” measure the maximum output
current using a ammeter.
NOTE:
This test should be done as soon as
possible to measure the exact maximum current
because output current drops rapidly after starting
the engine.
Result
1.
Ammeter reading should be as same as the load.
If the reading is low even though the alternator
output wire is normal, remove the alternator from
the vehicle and inspect it.
Output current
As same as Elecrical load
NOTE:
Output current varies according to electrical
load or temperature of the alternator, so during test,
lack of electrical load causes impossibility of
measuring the rated output current. In this case, turn
on headlight to induce the battery discharging or
turn on other lights to increase the electrical load. If
alternator temperature or ambient temperature is too
high, it is impossible to measure the rated output
current, so prior to re-test, necessarily drop the
temperature.
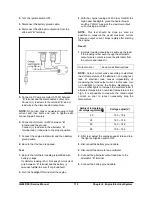
Ambient temperature
of voltage regulator(
℃
)
Voltage adjust(V)
-30
14.5 ~ 15.4
25
14.3 ~ 14.9
60
14.0 ~ 14.8
90
13.6 ~ 14.6
2.
After test, adjust the engine speed at idle and turn
the light and ignition switch OFF.
3.
Disconnect the battery ground cable.
4.
Disconnect the ammeter and voltmeter.
5.
Connect the alternator output lead wire to the
alternator “B” terminal.
6.
Connect the battery ground cable.
Summary of Contents for D20G
Page 2: ......
Page 5: ...Specifications TORQUE SPECIFICATIONS SB2004E00 D e c 1 9 9 8 ...
Page 14: ......
Page 16: ......
Page 138: ...Diesel Engine Engine System 124 NOTE The crankshaft must rotate freely by hand 02900058 ...
Page 254: ......
Page 256: ......
Page 260: ......
Page 341: ...4TNV98 4TNE98 Diesel Engine Section 3 Engine 87 4TNE98 Engine Figure 6 1 ...
Page 423: ...4TNV98 4TNE98 Diesel Engine Section 4 Fuel System 169 Fuel System Components Figure 7 1 ...
Page 477: ...4TNV98 4TNE98 Diesel Engine Section 7 Starter Motor 223 Starter Motor Troubleshooting ...
Page 494: ...4TNV98 4TNE98 Diesel Engine Section 8 Troubleshooting 240 Troubleshooting Charts ...
Page 495: ...4TNV98 4TNE98 Diesel Engine Section 8 Troubleshooting 241 ...
Page 496: ...4TNV98 4TNE98 Diesel Engine Section 8 Troubleshooting 242 ...
Page 498: ...4TNV98 4TNE98 Diesel Engine Section 8 Troubleshooting 244 4TNE98 Engine ...
Page 499: ...Service Manual G424FE LP Engine G424F LP Gasoline Engine G20G G25G G30G SB4320E00 Jan 2008 ...
Page 500: ......
Page 502: ......
Page 529: ...G424F FE Service Manual Chapter 2 Recommended Maintenance 29 ...
Page 534: ...G424F FE Service Manual Chapter 3 Engine Mechanical System 34 MAIN BEARINGS 0 50 UNDERSIZE ...
Page 584: ...G424F FE Service Manual Chapter 3 Engine Mechanical System 84 ...
Page 729: ...G424F FE Service Manual 229 Chapter 8 Basic Troubleshooting ...
Page 731: ...G424F FE Service Manual 231 Chapter 8 Basic Troubleshooting ...
Page 806: ......
Page 808: ......
Page 810: ......
Page 820: ...Power Train System Operation 14 Hydraulic System ...
Page 822: ...Power Train System Operation 16 Hydraulic System ...
Page 824: ...Power Train System Operation 18 Hydraulic System ...
Page 826: ...Power Train System Operation 20 Hydraulic System ...
Page 856: ......
Page 858: ......
Page 860: ......
Page 930: ......
Page 932: ......
Page 934: ......
Page 936: ......
Page 1018: ......
Page 1023: ...A374081 01 ELECTRIC SCHEMATIC MODEL D20 25 30G EM0K2 EM0K3 Cummins B3 3 ...
Page 1024: ...A654030 00 ELECTRIC SCHEMATIC MODEL D20 25 30G EM0QM EM0QN Yanmar 4TNE98 Tier 3 ...
Page 1025: ...A604500 00 ELECTRIC SCHEMATIC MODEL G20 25 30G EM0QF EM0QG GM G424F Non Certi LP ...
Page 1026: ...A604510 00 ELECTRIC SCHEMATIC MODEL G20 25 30G EM0QH EM0QJ GM G424F Non Certi GAS ...
Page 1027: ...A604516 00 ELECTRIC SCHEMATIC MODEL G20 25 30G EM0QY EM0QZ GM G424FE Tier 3 LP ...
Page 1028: ......
Page 1030: ......
Page 1059: ...Safety Section 29 Lean away from the direction of fall Lean forward ...
Page 1071: ...General Section 41 Typical Example Side Shifter Serial Number If Equipped ...


