12
ENGLISH
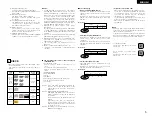
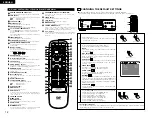
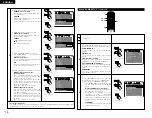
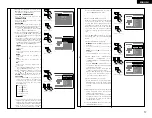
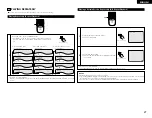
(3) Names and Functions of Remote Control Unit Buttons
q
POWER ON/POWER OFF buttons
Press this to switch the power between on and standby.
w
SKIP buttons
Use these to skip to the beginnings of tracks or chapters.
8
: Reverse direction
9
: Forward direction
e
STOP button (
2
)
r
DISPLAY button
Press this to display the ON-SCREEN.
t
SUBTITLE button
Press this to switch the DVD’s subtitle language.
y
Cursor buttons/ENTER button
Use the
•
and
ª
buttons to select in the vertical direction.
Use the
0
and
1
buttons to select in the horizontal
direction.
Press the ENTER button to select the item selected with
the cursor buttons.
u
LIGHTING button
Press this to light the opal-colored buttons.
i
PICTURE ADJUST button
Press this to adjust the picture quality to suit your tastes.
o
PURE DIRECT MEMORY button
Use this to make various settings to achieve higher
quality sound.
!0
Number buttons
Use these to input numbers.
Use the +10 button to input numbers of 10 or over.
Example: To input 25
!1
REPEAT button
Press this to play tracks repeatedly.
!2
A-B repeat button (A-B)
Use this to repeat sections between two specific points.
!3
SETUP button
Press this to display the default setting screen.
!4
PAGE -/PAGE + buttons
Use these to selected the desired still picture on DVD
audio discs containing browseable still pictures.
!5
RANDOM button
Press this to play the tracks on the video or music CD in
random order.
!6
STILL/PAUSE button (
3
)
!7
NTSC/PAL button
Use this to switch the set’s video output format
(NTSC/PAL).
!8
OPEN/CLOSE button
!9
SLOW/SEARCH buttons
Use these for slow playback and searching.
6
: Reverse direction
7
: Forward direction
@0
PLAY button (
1
)
@1
ANGLE button
Press this to switch the angle.
@2
AUDIO button
For DVDs, press this to switch the audio language. For
video CDs, press this to switch the channel between
“LR”, “L” and “R”.
@3
TOP MENU button
@4
MENU button
@5
RETURN button
Press this to return to the previous menu screen.
@6
ZOOM button
Press this to enlarge the image.
@7
DIMMER button
Use this to adjust the brightness of the main unit’s display.
Can be switched in 4 steps, from OFF to always on.
+10
+10
5
REMOTE CONTROL UNIT
RC-552
POWER
ON
POWER
OFF
OPEN /
CLOSE
NTSC /
PAL
DISPLAY
SUBTITLE
ANGLE
SKIP
SLOW / SEARCH
MENU
RETURN
PURE DIRECT
MEMORY
PICTURE
ADJUST
DIMMER
ZOOM
PROG/DIR
CLEAR
CALL
MARKER
REPEAT
A-B
RANDOM
V.S.S.
SETUP
PAGE
-
PAGE
+
1
2
3
4
5
6
7
8
9
0
SEARCH MODE
AUDIO
STOP
PLAY
STILL / PAUSE
TOP MENU
+10
ENTER
q
w
e
r
t
y
u
i
o
!0
!1
!2
!3
!4
!5
#3
#2
#1
#0
@9
@8
@7
@6
@5
@4
@3
@2
@1
@0
!9
!8
!7
!6
@8
PROGRAM/DIRECT button (PROG/DIR)
Press this to switch between the normal play,
programmed play.
@9
CLEAR button
Press this to clear numbers that you have input.
#0
CALL button
Press this to check the program contents.
#1
MARKER button
Press this to mark places you want to see again.
#2
SEARCH MODE button
Press this to change the search mode to search for
groups or titles, tracks or chapters when selecting
sections of discs directly using the number buttons.
#3
V.S.S. button
Sets the virtual surround sound. (Functions when playing
DVDs recorded in Dolby Digital with two or more
channels.)
7
CHANGING THE DEFAULT SETTINGS
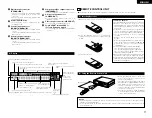
REMOTE SENSOR
DVD AUDIO-VIDEO PLAYER
DVD-A1
OPEN / CLOSE
PLAY
STOP
DVD
OPTICAL
COAXIAL
SOURCE
POWER
PURE DIRECT
DVD AUDIO
AL24 PLUS
OFF
MODE 1
MODE 2
REMOTE SENSOR
B
1
2
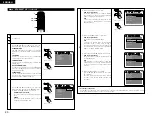
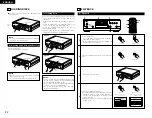
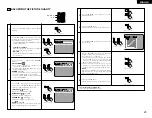
In the stop mode, press the SETUP button.
• The setup (default settings) screen appears.
NOTE:
• For some menus, the initial values can be changed
during playback.
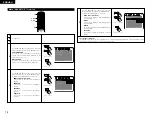
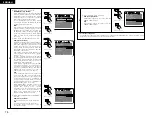
DISC SETUP
Use this to set the language to be used when playing the disc.
If the set language is not offered on that disc, the discs
default language is set.
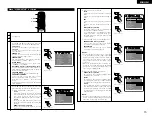
OSD SETUP
Use this to set the language for the default setting
screen and messages displayed on the TV screen
(“PLAY”, etc.).
VIDEO SETUP
Use this to set the DVD-A1's screen mode.
(TV aspect, TV type and AV1 video output.)
AUDIO SETUP
Use this to set the DVD-A1's audio output mode.
(Digital and LPCM output settings.)
RATINGS
Use this to disable playback of adult DVDs so that
children cannot watch them. Note that playback of
adult DVDs cannot be disabled if the rating level is not
recorded on the DVD, but that it is possible to disable
playback of all DVDs.
OTHER SETUP
These include special settings CAPTIONS and
COMPRESSION.
3
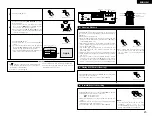
Use the
0
and
1
cursor buttons to select the desired
setting item, then press the ENTER button.
Select “DISC SETUP”. (See page 13.)
Select “OSD SETUP”. (See page 14.)
Select “VIDEO SETUP”. (See page 15.)
Select “AUDIO SETUP”. (See page 16.)
Select “RATINGS”. (See page 19.)
Select “OTHER SETUP” (See page 20.)
D I SC SE TUP
SE L EC T :
DE C I S I ON : ENT E R BUT TON
D I AL OG
D I SC MENUS
E X I T SE TUP
SUBT I T L E
ENGL I SH
ENGL I SH
ENGL I SH
B
✽
To exit the setup mode
Use the
ª
cursor button to select “EXIT SETUP”, then press the ENTER button. It is also possible to quit
by pressing the SETUP button on the remote control unit.
SETUP
Remote control unit
2
Make the initial settings to suit your usage conditions before starting playback.
The initial settings are retained until they are next changed, even if the power is turned off.
POWER
ON
POWER
OFF
OPEN /
CLOSE
NTSC /
PAL
DISPLAY
SUBTITLE
ANGLE
SKIP
SLOW / SEARCH
MENU
RETURN
PURE DIRECT
MEMORY
PICTURE
ADJUST
DIMMER
ZOOM
PROG/DIR
CLEAR
CALL
MARKER
REPEAT
A-B
RANDOM
V.S.S.
SETUP
PAGE -
PAGE +
1
2
3
4
5
6
7
8
9
0
SEARCH MODE
AUDIO
STOP
PLAY
STILL / PAUSE
TOP MENU
+10
ENTER
3
2
1
3
POWER
ON
1
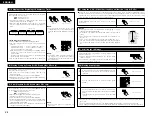
Turn on the power.
• Press the power button, the power indicator lights
and the power turns on.
POWER
Main unit
Remote control unit
ENTER
Remote control unit
Summary of Contents for DVD-A1
Page 121: ...121...

