


122
Installing System Components
1
Unpack the expansion card and prepare it for installation.
For instructions, see the documentation accompanying the card.
2
Turn off the system, including any attached peripherals, and disconnect
the system from the electrical outlet.
3
Open the system. See "Opening the System" on page 83.
4
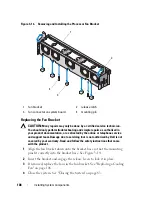
Open the expansion-card guide latch and remove the filler bracket at the
back of the system. See Figure 3-21.
NOTE:
Keep this bracket in case you need to remove the expansion card.
Filler brackets must be installed over empty expansion-card slots to maintain
FCC certification of the system. The brackets also keep dust and dirt out of the
system and aid in proper cooling and airflow inside the system.
5
Install the expansion card:
a
If the expansion card is 24.13 cm (9.5 in), align its front edge with the
front card guide. See Figure 3-21.
b
Position the expansion card so that the card-edge connector aligns
with the expansion-card connector on the expansion-card riser board.
c
Insert the card-edge connector firmly into the PCIe card connector
until the card is fully seated.
d
When the card is seated in the connector, close the expansion-card
latch. See Figure 3-21.
6
Connect any expansion-card cables for the new card.
See the documentation that came with the card for information about its
cable connections.
7
Close the system. See "Closing the System" on page 83.
8
Reconnect your system and peripherals to their electrical outlets, and turn
on the system.
Summary of Contents for DX6000
Page 1: ...Dell DX6000 Systems Hardware Owner s Manual ...
Page 78: ...78 Using the System Setup Program and UEFI Boot Manager ...
Page 154: ...154 Installing System Components ...
Page 188: ...188 Jumpers and Connectors ...
Page 190: ...190 Getting Help ...
Page 198: ...202 Index ...


