


Installing System Components
119
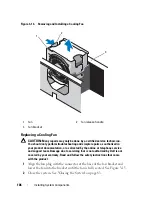
Figure 3-20. Removing and Installing the Cable Retention Bracket
Installing the Cable Retention Bracket
CAUTION:
Many repairs may only be done by a certified service technician.
You should only perform troubleshooting and simple repairs as authorized in
your product documentation, or as directed by the online or telephone service
and support team. Damage due to servicing that is not authorized by Dell is not
covered by your warranty. Read and follow the safety instructions that came
with the product.
1
Insert the hooks and tabs of the cable retention bracket into the slots in
the chassis wall and slide the bracket back until the latch engages.
2
Install the cooling fan bracket. See "Replacing the Fan Bracket" on
page 108.
3
Install the cooling shroud. See "Installing the Cooling Shroud" on
page 104.
1
cable retention bracket
2
release latch
3
hooks (3)
4
right chassis wall
5
chassis slots (6)
6
tab (3)
2
4
1
6
5
3
Summary of Contents for DX6000
Page 1: ...Dell DX6000 Systems Hardware Owner s Manual ...
Page 78: ...78 Using the System Setup Program and UEFI Boot Manager ...
Page 154: ...154 Installing System Components ...
Page 188: ...188 Jumpers and Connectors ...
Page 190: ...190 Getting Help ...
Page 198: ...202 Index ...


