Processor Liquid-Cooling Assembly
73
1
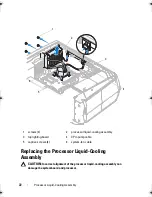
Align the screw holes on the processor liquid-cooling assembly with the
screw holes on the chassis.
2
Replace the screws that secure the processor liquid-cooling assembly to the
chassis.
NOTE:
The original thermal grease can be reused if the original processor
and processor liquid-cooling assembly are reinstalled together. If either the
processor or the processor liquid-cooling assembly is replaced, use the
thermal grease provided in the kit to ensure that thermal conductivity is
achieved.
3
Apply thermal grease between the processor liquid-cooling assembly and
the processor.
4
Tighten the captive screws that secure the processor liquid-cooling
assembly to the system board.
5
Connect the system fan cable and the CPU pump cable to the connectors
on the top lighting-board.
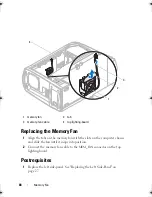
Postrequisites
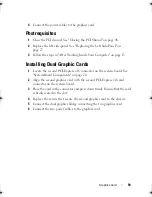
1
Close the PCI shroud. See "Closing the PCI Shroud" on page 46.
2
Replace the left side-panel. See "Replacing the Left Side-Panel" on
page 27.
3
Follow the steps in "After Working Inside Your Computer" on page 15.
book.book Page 73 Wednesday, May 16, 2012 2:37 PM
Summary of Contents for Alienware Aurora R4
Page 16: ...16 Before you Begin ...
Page 24: ...24 Technical Overview ...
Page 28: ...28 Left Side Panel ...
Page 31: ...Hard Drive s 31 2 Follow the steps in After Working Inside Your Computer on page 15 ...
Page 32: ...32 Hard Drive s ...
Page 36: ...36 Hard Drive Fan Assembly ...
Page 39: ...Optical Drive s 39 2 Follow the steps in After Working Inside Your Computer on page 15 ...
Page 40: ...40 Optical Drive s ...
Page 56: ...56 PCI Fan Assembly ...
Page 62: ...62 Graphics Card ...
Page 69: ...Memory Fan 69 2 Follow the steps in After Working Inside Your Computer on page 15 ...
Page 70: ...70 Memory Fan ...
Page 74: ...74 Processor Liquid Cooling Assembly ...
Page 81: ...Processor 81 ...
Page 82: ...82 Processor ...
Page 88: ...88 Power Supply ...
Page 92: ...92 Coin Cell Battery ...
Page 98: ...98 System Board Assembly ...
Page 102: ...102 Master I O Board ...
Page 106: ...106 Top Lighting Board ...
Page 108: ...108 Right Side Top Panel 2 Remove the screw that secures the right side top panel ...
Page 112: ...112 Right Side Top Panel ...
Page 116: ...116 Right Side Middle Panel ...
Page 120: ...120 Right Lighting Board ...
Page 135: ...Back Bezel 135 1 screws 2 2 back bezel 3 tabs 1 2 3 ...
Page 140: ...140 WiFi Bluetooth Assembly ...
Page 144: ...144 Top I O Panel ...
Page 158: ...158 System Setup Utility ...
Page 162: ...162 Specifications ...

