


Contents
11
30 Back Bezel
. . . . . . . . . . . . . . . . . . . . . . .
133
Prerequisites
. . . . . . . . . . . . . . . . . . . . . . .
133
Removing the Back Bezel
. . . . . . . . . . . . . . . .
133
Replacing the Back Bezel
. . . . . . . . . . . . . . . .
136
Postrequisites
. . . . . . . . . . . . . . . . . . . . . .
136
31 WiFi/Bluetooth Assembly
. . . . . . . . . . .
137
Prerequisites
. . . . . . . . . . . . . . . . . . . . . . .
137
Removing the WiFi/Bluetooth Card
. . . . . . . . . . .
137
Replacing the WiFi/Bluetooth Card
. . . . . . . . . . .
138
Postrequisites
. . . . . . . . . . . . . . . . . . . . . .
138
32 Top I/O Panel
. . . . . . . . . . . . . . . . . . . . .
141
Prerequisites
. . . . . . . . . . . . . . . . . . . . . . .
141
Removing the Top I/O Panel
. . . . . . . . . . . . . . .
141
Replacing the Top I/O Panel
. . . . . . . . . . . . . . .
142
Postrequisites
. . . . . . . . . . . . . . . . . . . . . .
143
33 System Setup
. . . . . . . . . . . . . . . . . . . . .
145
Overview
. . . . . . . . . . . . . . . . . . . . . . . . .
145
Entering System Setup
. . . . . . . . . . . . . . . . . .
145
System Setup Screens
. . . . . . . . . . . . . . .
145
System Setup Options
. . . . . . . . . . . . . . .
146
book.book Page 11 Wednesday, May 16, 2012 2:37 PM
Summary of Contents for Alienware Aurora R4
Page 16: ...16 Before you Begin ...
Page 24: ...24 Technical Overview ...
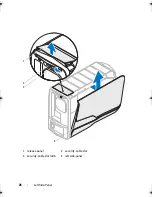
Page 28: ...28 Left Side Panel ...
Page 31: ...Hard Drive s 31 2 Follow the steps in After Working Inside Your Computer on page 15 ...
Page 32: ...32 Hard Drive s ...
Page 36: ...36 Hard Drive Fan Assembly ...
Page 39: ...Optical Drive s 39 2 Follow the steps in After Working Inside Your Computer on page 15 ...
Page 40: ...40 Optical Drive s ...
Page 56: ...56 PCI Fan Assembly ...
Page 62: ...62 Graphics Card ...
Page 69: ...Memory Fan 69 2 Follow the steps in After Working Inside Your Computer on page 15 ...
Page 70: ...70 Memory Fan ...
Page 74: ...74 Processor Liquid Cooling Assembly ...
Page 81: ...Processor 81 ...
Page 82: ...82 Processor ...
Page 88: ...88 Power Supply ...
Page 92: ...92 Coin Cell Battery ...
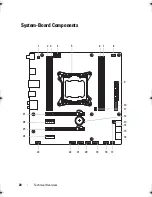
Page 98: ...98 System Board Assembly ...
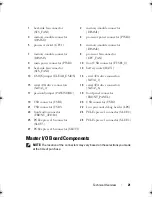
Page 102: ...102 Master I O Board ...
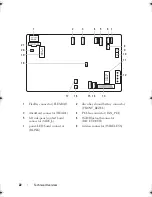
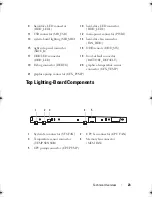
Page 106: ...106 Top Lighting Board ...
Page 108: ...108 Right Side Top Panel 2 Remove the screw that secures the right side top panel ...
Page 112: ...112 Right Side Top Panel ...
Page 116: ...116 Right Side Middle Panel ...
Page 120: ...120 Right Lighting Board ...
Page 135: ...Back Bezel 135 1 screws 2 2 back bezel 3 tabs 1 2 3 ...
Page 140: ...140 WiFi Bluetooth Assembly ...
Page 144: ...144 Top I O Panel ...
Page 158: ...158 System Setup Utility ...
Page 162: ...162 Specifications ...