


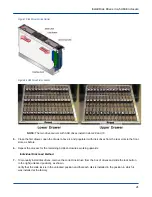


Figure 9. Install the Disk Individually
8. Starting with the lower drawer in the lowest empty 5U84 enclosure, open the drawer and begin populating the
drives from rear to the front, starting with slot labeled “83” and work towards the slot “42.”
9. Carefully slide each drive down into position and press down while sliding the latch to the locked position,
towards the rear of the enclosure as shown.
Move the lock button to the left to verify that it has reset.
10. Press the button on each drawer slide to release the drawer, then slide the drawer back into the enclosure.
11. Repeat the process for the upper drawer, starting with slot “41” and working towards the slot “0.”
12. Close the drawer and secure the two drawer latches with a T-20 Torx screwdriver (rotate until the arrow points
to the lock icon).
13. If During Initial Rack Installation: Until the rack is in its final position, repeat for the second enclosure only,
working from the lower drawer upwards.
Install the disk drives in only the two lowest 5U84 (SSU) enclosures, until the rack is in its final position.
14. When the Rack Is in its Final Position: After the rack is located in its final position, continue populating all
the drives for the configuration.
IMPORTANT: Any drive bay not occupied by a populated drive carrier must have a dummy drive
carrier installed.
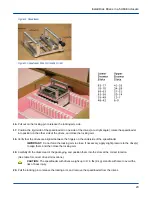
Speedloader Multiple Disk Load Method
15. Use the speedloader to capture the disk drives in the box and install them in the enclosure.
Verify that each disk is installed in the position in which it was installed at the factory.
Install Disk Drives in a 5U84 Enclosure
22


