


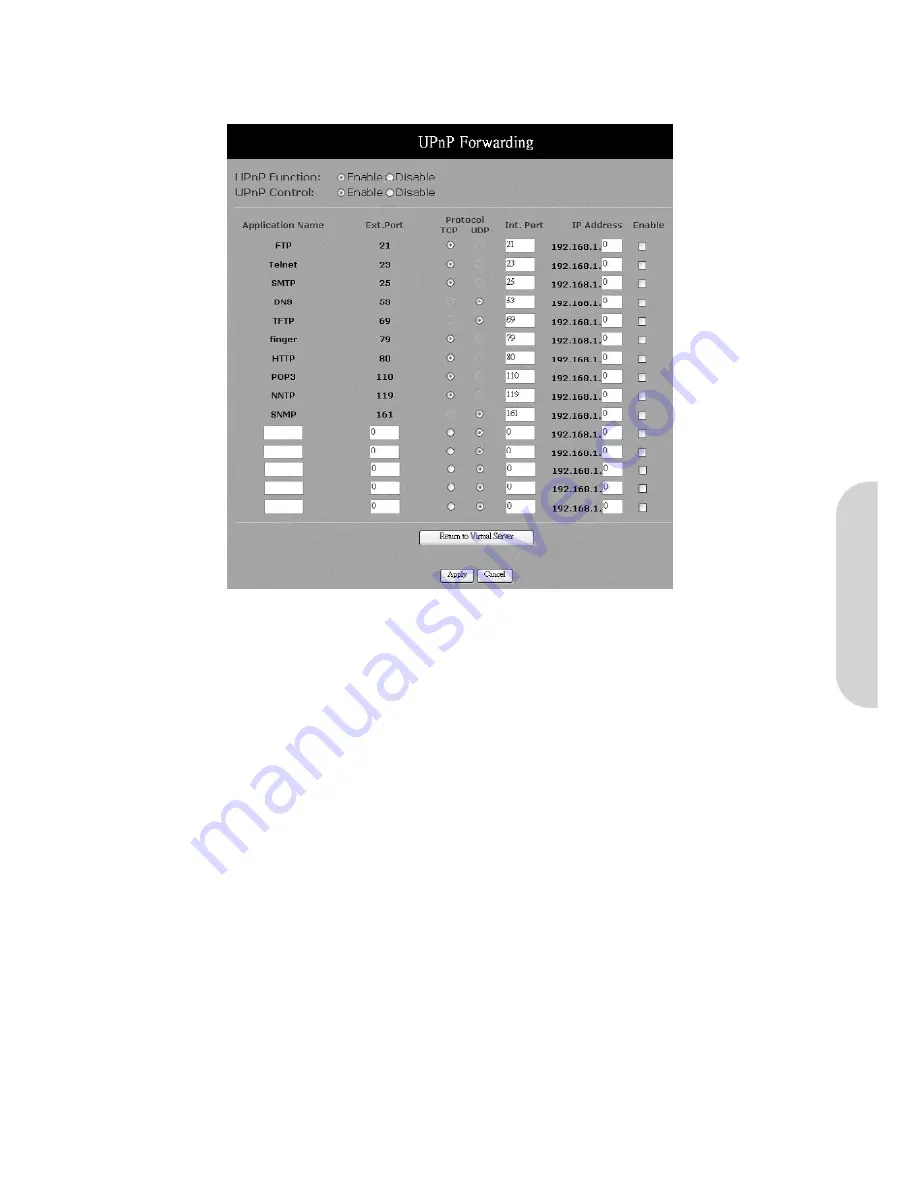
UPnP Forwarding
UPnP (Universal Plug and Play) is a standard introduced from Microsoft and UPnP Forum for interoperability. Currently, this function supported by this device allows you to
set virtual server from a Windows OS that supports UPnP, such as Windows XP.
Figure 31. UPnP
•
UPnP Function:
Check “
Enable
” will allow LAN side PCs that support UPnP to set virtual server.
• Before enabling the UPnP Forwarding, ensure that the server computers have been configured with fixed IP Addresses.
• Ensure that the “
Private IP Address
” of the router is set to the default value of 192.168.1.1.
•
Application Name:
UPnP has ten pre-set forwarding rules, which are for well-known applications. In addition, users can add their own rules.
•
Ext. Port:
Most applications usually use their individual port number for incoming and outgoing data packets. However, some applications may use
different port numbers for incoming and outgoing data packets. In this case, you have to enter the port number used by the incoming data packets.
•
Protocol:
Specify the protocol type as “
TCP
” or “
UDP
” which is used by specific service.
•
Int. Ports:
Most applications usually use their individual port number for incoming and outgoing data packets. However, some applications may use
different port numbers for incoming and outgoing data packets. In this case, you have to enter the port number used by the outgoing data packets.
•
Enable:
Check to make this forwarding setting active.
•
IP Address:
Enter the appropriate IP Addresses of the service computers in the “
Redirect IP Address
” locations.
Example:
If the service port number
80~80
(representing an HTTP web address) is entered in “
Ports
” and
192.168.1.100
is entered in “
Redirect IP
Address
”, then all HTTP requests from external internet users will be directed to the PC/server with the 192.168.1.100 fixed IP Address.
Click the “
Apply
” button after making any changes, or click the “
Cancel
” button to exit the screen without saving any changes.
ENGLISH
18


