14 Servicing & Parts Replacement
45
14 Servicing & Parts Replacement
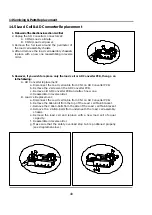
14.1 Platform Safety Overload Adjustment
1. Make sure that the Main Power switch is OFF & that the scale is unplugged.
2. Remove the platter from the platform.
3. Place 1/2 the scale capacity on the right -rear corner of the platform making sure
not to obstruct the Allen -bolt.
4. Adjust the Allen-bolt until it touches the screw underneath it on the upper case.
5. Repeat steps 3 & 4 for the other 3 corners of the platform.
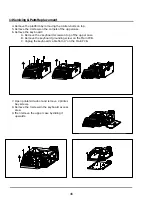
14.2 Removing the Upper Case
1. Make sure that the Main Power switch is OFF & that the scale is unplugged.
2. Remove the platter from the platform & all labels & backing paper from the printer.
3. Remove the display stalk:
A. Unscrew the 2 screws from underneath the column base.
B. Lift & remove the display stalk from the column base.
Summary of Contents for LP-2G
Page 2: ......
Page 8: ......
Page 11: ...1 General 3 Note Specifications are subject to change without notice ...
Page 46: ...11 Network Options 38 11 Network Options Refer to Network manual ...
Page 66: ...16 Troubleshooting 58 16 2 Versioning Changes ...
Page 69: ...17 Schematic Diagrams 61 17 3 Main PCB ...
Page 70: ...17 Schematic Diagrams 62 17 4 Ethernet Memory Expansion PCB ...
Page 71: ...17 Schematic Diagrams 63 17 5 Power Supply PCB ...
Page 72: ...18 Exploded Views 64 18 Exploded Views 18 1 Scale ...
Page 73: ...18 Exploded Views 65 18 2 Printer Assembly ...
Page 74: ......
Page 89: ...Appendix C 85 ...
Page 90: ...Appendix C 86 ...
Page 91: ...Appendix C 87 ...
Page 92: ...Appendix C 88 ...
Page 93: ...Appendix C 89 ...
Page 94: ...Appendix C 90 ...
Page 95: ...Appendix C 91 ...
Page 96: ...Appendix C 92 ...
Page 97: ...Appendix C 93 ...
Page 98: ...Appendix C 94 ...
Page 99: ...Appendix C 95 ...
Page 100: ...Appendix C 96 ...
Page 101: ...Appendix C 97 ...
Page 102: ...Appendix C 98 ...
Page 103: ...Appendix C 99 ...
Page 104: ...Appendix C 100 ...

