12 Self Test Mode
42
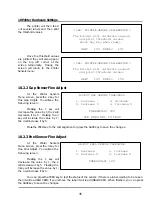
< PRINTER PEEL-OFF TEST >
SENSOR CHECK : UNBLOCKED
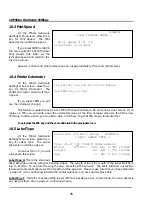
< PGM: FLASH MEMORY SIZE >
Non-Volatile Memory = 4096 kbytes
Used Memory = 4 kbytes
Free Memory = 4092
ESC = Any Key
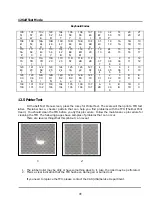
< SET: FLASH MEMORY TEST >
1.Check Flash Memory Links
2.Check Flash Memory Records
3.Check Flash Memory Index Table
4.Check Flash Memory Fragmentation
5.Defragment NV Memory
12.6 Peel Off Test
At the Self Test Menu
screen, press the 5 key for Peel-
Off Test. The scale will then
display the Printer Peel-Off Test
screen.
If you lay flat a piece of
paper on the left side of the Peel
Bar, you will see the UNBLOCKED status change to BLOCKED. Once you remove the paper, you will see
the status return to UNBLOCKED. If you do not experience that behavior, run the Gap/Peel calibration
and test again. If the problem persists, you may need to change the Peel Sensor Assembly.
12.7 Flash Memory Size Test
At the Self Test Menu
screen, press the 6 key for Flash
Memory Size. The scale will then
display the Flash Memory Size
screen. This reports the memory
size for the Flash RAM only.
Non-Volatile:
This is the total size
of your Flash memory and is directly related to PLU capacity. The value is in kilobytes. Remember that
1024 kilobytes = 1 megabyte.
For PLU capacity, see section 15.4.
Used:
This reports the amount of memory that is in used.
Free:
This value reports the amount of free memory available for PLUs or label formats.
12.8 Flash Memory Test
At the Self Test Menu
screen, press the 7 key for Flash
Memory Test. The scale will then
display the Flash Memory Test
screen.
Options 1 through 3 are
self-correcting. If you use any of
these options they will report their respective statuses and then return to this screen. Also, these test are
done at initialization (power -ON) and thus are usually self-correcting.
Options 4 and 5 may need to be done temporarily depending on scale use. Option 4 tests to
see how fragmented the memory has become. Fragmentation is caused by repeatedly deleting and
creating entire PLUs (
not editing
). What this will eventually do is to limit the total number of PLUs that you
may program. To correct this problem, select option 5 and this will put all of your free memory in one
contiguous section so that you may have access to you full PLU capacity.
Under normal operation,
these things need not be done.
Summary of Contents for LP-2G
Page 2: ......
Page 8: ......
Page 11: ...1 General 3 Note Specifications are subject to change without notice ...
Page 46: ...11 Network Options 38 11 Network Options Refer to Network manual ...
Page 66: ...16 Troubleshooting 58 16 2 Versioning Changes ...
Page 69: ...17 Schematic Diagrams 61 17 3 Main PCB ...
Page 70: ...17 Schematic Diagrams 62 17 4 Ethernet Memory Expansion PCB ...
Page 71: ...17 Schematic Diagrams 63 17 5 Power Supply PCB ...
Page 72: ...18 Exploded Views 64 18 Exploded Views 18 1 Scale ...
Page 73: ...18 Exploded Views 65 18 2 Printer Assembly ...
Page 74: ......
Page 89: ...Appendix C 85 ...
Page 90: ...Appendix C 86 ...
Page 91: ...Appendix C 87 ...
Page 92: ...Appendix C 88 ...
Page 93: ...Appendix C 89 ...
Page 94: ...Appendix C 90 ...
Page 95: ...Appendix C 91 ...
Page 96: ...Appendix C 92 ...
Page 97: ...Appendix C 93 ...
Page 98: ...Appendix C 94 ...
Page 99: ...Appendix C 95 ...
Page 100: ...Appendix C 96 ...
Page 101: ...Appendix C 97 ...
Page 102: ...Appendix C 98 ...
Page 103: ...Appendix C 99 ...
Page 104: ...Appendix C 100 ...

