Adjusting Cropping Frames (ScanGear)
"Cropping" is the act of selecting the area you want to keep in an image and discarding the rest when
scanning it.
On the
Basic Mode
tab and
Advanced Mode
tab, you can specify cropping frames (scan areas) on the
image(s) displayed in the Preview area of the screen.
When you perform a scan, each area specified with a cropping frame will be scanned as a separate image.
Note
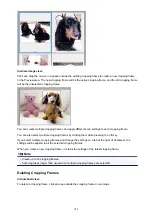
• In whole image view, you can specify multiple cropping frames on the preview image.
• Refer to "Adjusting Cropping Frames in the Image Stitch Window" for your model from Home of the
Online Manual
for how to adjust cropping frames with IJ Scan Utility.
Initial Cropping Frame
In thumbnail view:
No cropping frame is specified. You can drag the mouse over a thumbnail to specify a cropping frame.
In whole image view:
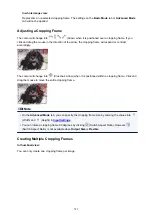
An active cropping frame is automatically specified around the preview image. You can drag the cropping
frame in the Preview area to specify the area.
Note
• You can change the auto crop setting in the
Preferences
dialog box. Refer to
Cropping Frame on
Previewed Images
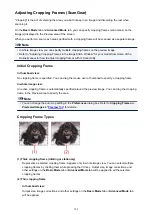
Cropping Frame Types
(1) Thick cropping frame (rotating or stationary)
Represents a selected cropping frame. Appears only in whole image view. You can select multiple
cropping frames by clicking them while pressing the Ctrl key. Output size, image corrections, and
other settings on the
Basic Mode
tab or
Advanced Mode
tab will be applied to all the selected
cropping frames.
(2) Thin cropping frame
In thumbnail view:
Output size, image corrections, and other settings on the
Basic Mode
tab or
Advanced Mode
tab
will be applied.
782
Summary of Contents for Pixma MG6821
Page 27: ...Using the Machine Printing Photos from a Computer Copying Originals Printing Photos 27...
Page 160: ...Loading Paper Loading Plain Paper Photo Paper Loading Envelopes 160...
Page 183: ...Replacing Ink Replacing Ink Checking Ink Status 183...
Page 189: ...When an ink tank is out of ink replace it immediately with a new one Ink Tips 189...
Page 226: ...Safety Safety Precautions Regulatory Information 226...
Page 231: ...Main Components and Their Use Main Components Power Supply Using the Operation Panel 231...
Page 232: ...Main Components Front View Rear View Inside View Operation Panel 232...
Page 256: ...Note The effects of the quiet mode may be less depending on the print quality settings 256...
Page 272: ...Language selection Changes the language for the messages and menus on the touch screen 272...
Page 283: ...Network Connection Network Connection Tips 283...
Page 331: ...5 Delete Deletes the selected IP address from the list 331...
Page 379: ...Printing Area Printing Area Other Sizes than Letter Legal Envelopes Letter Legal Envelopes 379...
Page 410: ...Note Selecting Scaled changes the printable area of the document 410...
Page 421: ...Related Topic Changing the Printer Operation Mode 421...
Page 443: ...Adjusting Color Balance Adjusting Brightness Adjusting Intensity Adjusting Contrast 443...
Page 449: ...Adjusting Intensity Adjusting Contrast 449...
Page 529: ...Printing Using Canon Application Software My Image Garden Guide Easy PhotoPrint Guide 529...
Page 707: ...707...
Page 725: ...725...
Page 764: ...Adjusting Cropping Frames ScanGear 764...
Page 792: ...Scanning starts then the scanned image appears in the application 792...
Page 799: ...Scanning Tips Resolution Data Formats Color Matching 799...
Page 837: ...If icon is displayed Go to check 4 Cannot Find Machine During Wireless LAN Setup Check 4 837...
Page 990: ...1660 Cause A ink tank is not installed What to Do Install the ink tank 990...

