background image

47

5

Registering S

torage Servers and Camera Servers

Camera Summary - Add, Edit or Delete a Location/Zone

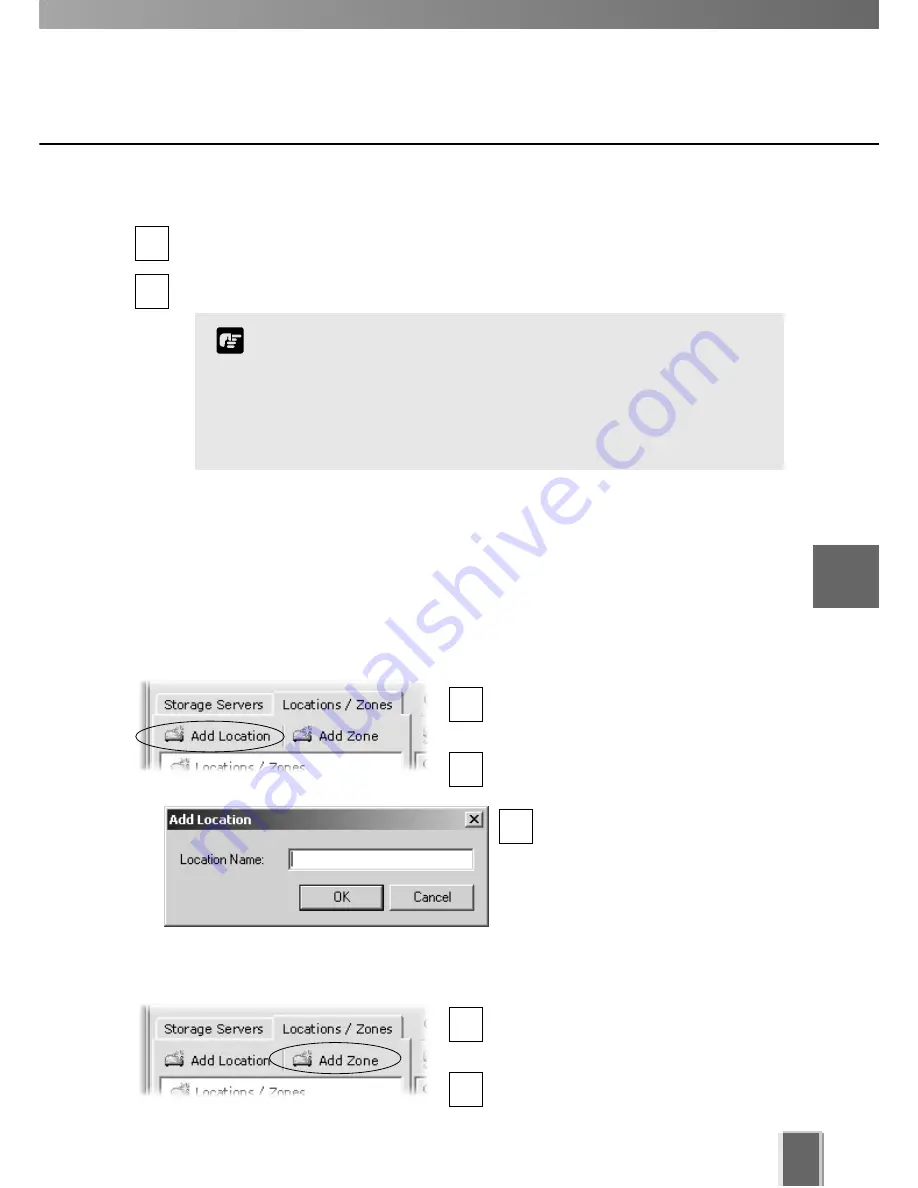
You can easily add a new location to your system, then add zones to the new location 
folder. For example, a location could be a supermarket and zones inside that location can
include cash register areas, supermarket aisles and entrances.

Step 1: Click the Add Location button on the Locations / Zones tab

In the Camera Summary window, select
the 

Locations / Zones

tab if it is not

already selected.

Click the 

Add Location

button.

The 

Add Location 

dialog opens.

Enter the name of the new 
location (up to 20 characters),
then click the 

OK

button.

Step 2: Click the Add Zone button on the Locations / Zones tab

In the Camera Summary window, select
the 

Locations / Zones

tab if it is not

already selected.

Click the 

Add Zone

button.

The 

Add Zone 

dialog opens.

Click a Storage Server in the list to highlight it and select 

Delete

from the 

Edit 

menu.

Alternatively, press the 

Delete

key on your keyboard.

A confirmation dialog will open. Click 

Yes

to continue or 

No

to cancel the operation.

A deleted Storage Server is removed from the list and the Master
Storage Server no longer recognizes it. If it was running when
removed from the list, it will continue to run. It can be re-added to
the system with all associations to Camera Servers intact and can
also be added to a different Master Storage Server. If this is done,
all Location, Zone, thumbnail and Layout information for cameras
associated with this Storage Server will be lost.

Note

1

3

2

1

2

1

2

To delete a Storage Server:

Summary of Contents for K-64

Page 1: ...Ver 1 1 Network Camera Recording and Monitoring System N Ne et tw wo or rk k V Vi id de eo o R Re ec co or rd de er r V VK K 6 64 4 V VK K 1 16 6 v v1 1 1 1 S St to or ra ag ge e S Se er rv ve er r V Vi ie ew we er r ...

Page 2: ...orporation in the United States and other countries QuickTime is a trademark of Apple Computer Inc Apache is a trademark of the Apache Software Foundation Windows is legally recognized as Microsoft Windows Operating System Pentium is a trademark of Intel Corporation All other company or product names used in this manual are trademarks or registered trademarks of their respective holders Copyright ...

Page 3: ...ver 18 When using multiple Storage Servers 18 Installation Procedures 19 Starting up the Installer 19 Upgrading from Version 1 0 20 Chapter 2 Configuring the Storage Server Storage Server Configuration 22 Launching Procedure 22 Adjusting the Storage Server Settings 22 How the Storage Server manages disk space 24 Setting up Event Notifications 25 Set up a user to receive Event Notification emails 2...

Page 4: ...ver Dialog 51 Set up camera position and saved video 52 Add a Camera Server Set connection details 53 Camera Summary Edit Camera Server Settings 55 Edit and Remove Camera Servers 57 Camera Summary Edit Camera Server 57 Camera Summary Remove Camera Server 58 Saving Configuration Changes 59 Camera Summary When you have finished configuration 59 Chapter 6 Configuring Recording Schedules Configure Nor...

Page 5: ...TION Chapter 8 Using the Viewer Operator Login Viewing Screen Example 94 Starting the Viewing Screen 96 Launching Procedure 96 Viewing Screen Menu bar 98 Menu Bar Functions 98 Chapter 9 Working with Video Windows Selecting Cameras for Viewing 100 About the Camera Selection Area 100 About Camera Thumbnails 100 Selecting Locations and their Zones 101 Basic Video Window Functions 102 Creating scaling...

Page 6: ...the Timeline 126 Timeline Overview 126 Monitoring Live Video in relation to the Timeline 127 Using the Timeline to examine play and extract video 128 Daylight Savings Indicator 130 Extracting video to save to another location 131 Viewing and Searching Events 132 About Live Events 132 Display the Live Events Log if not displayed 133 Overview of Alert Parameters 133 Searching Events 134 Selecting Cr...

Page 7: ...amera Servers and playback recorded video stored on Storage Servers Video resolution can be as high as 640 x 480 pixels 30 fps for NTSC and 768 x 576 pixels 25fps for PAL depending on Camera Servers installed The following table shows each product and license number The VK 16 Viewer is identical to the VK 64 Viewer Storage Server Viewer VK 64 Up to 64 cameras can be registered VK 16 Up to 16 camer...

Page 8: ...IP networks installations of cameras can be performed easily In addition it is possible to flexibly install new cameras and change installation locations of cameras VB C50iR VC C50i VC C50iR VB150 VB101 VB C50i MONITOR MONITOR View live and recorded video Viewer Operator Capabilities View Live Video View Events View Recorded Video PLAYBACK P L A Y B A C K P L A Y B A C K ...

Page 9: ...ings Storage Server Settings View Live Video View Events View Recorded Video View live and recorded video Viewer Operator Capabilities View Live Video View Events View Recorded Video Receives and records video Plays back recorded video to Viewers Application Function Storage Server Stores recorded information for later retrieval and viewing in the Viewer Viewer Lets users view recorded information...

Page 10: ... to your camera and Camera Server manuals for connection details Set up Network Cameras 1 Camera servers t P 12 VC C50i VB150 Install Storage Server and Viewer 2 Install the Storage Server and Viewer on one computer or install the Viewer on other computers on the network that will access recorded video from the Storage Server Configure the Storage Server via the Storage Server Configuration utilit...

Page 11: ...es Monitor live video and play back pre recorded events in the Viewer application From here you can customize the Viewing Area and save Layouts Configure Recording Settings 3 Create and save Viewer Layouts 4 Pre recorded video from Storage Server Live video from Camera Servers ...

Page 12: ...ater VB101 Ver 3 0 Rev 68 or later If using a VB101 you can make use of a single camera connected with VK 64 at a time If using a VB150 with multiple cameras there are restrictions on frame rate Refer to your VB150 User s Manual for details Note Firmware Upgrade You should ensure the firmware version used is as indicated in the above table The latest information concerning firmware can be found on...

Page 13: ... SP4 recommended Windows 2000 Server with SP4 Windows XP Professional with SP2 Windows Server 2003 Standard Edition Memory 768MB RAM or greater 1GB RAM or greater For more than 48 Camera Servers 1 5GB or greater required Hard Disk The requirements for Storage Server will vary according to the environment you will use number of Camera Servers setting of recording frame rate etc It is also dependent...

Page 14: ...ti virus software is installed the audio stream may be delayed or the audio stream may be temporarily interrupted Note Using the Storage Server with Windows XP SP2 If your Storage Server is not installed on the same PC as your Viewer you will need to change your Windows firewall settings for the Storage Server on the PC with Windows XP SP2 After installation of the Storage Server on a PC with Wind...

Page 15: ...Chapter 1 Installation This chapter outlines the installation of the Storage Server and Viewer PART 1 INSTALLATION CONFIGURATION ...

Page 16: ...deo Viewer View live and recorded video Viewer Receives video and controls camera Receives video and records footage Install Storage Server and Viewer on one PC and Viewer on several other PCs VB C50i Server Viewer Viewer Viewer It is highly recommended that Storage Servers and Viewers be used on private networks Having many Viewers accessing the same Camera Servers and Storage Servers will affect...

Page 17: ...he Storage Server 2 Storage Server View live and recorded events Viewer More than one Storage Server can be added to a network Viewers can receive playback video from more than one Storage Server Receives video and controls camera View playback video from Storage Server 1 and 2 View playback video from Storage Server 2 View playback video from Storage Server 1 Storage Server Storage Server Viewer ...

Page 18: ...ld be Master Storage Server Play Video to Viewer Save Camera Server information Save Zones and Locations Save Viewer Layouts Play video to Viewer Play video to Viewer Storage Server 2 Storage Server 3 Load Camera Server information Load Zones and Locations Load Viewer Layouts 1 2 It is recommended that all Viewers within a system use the same Storage Server as a Master Storage Server This ensures ...

Page 19: ...License Agreement screen appears Read the agreement carefully Click the radio button I accept the terms in the license agreement and then click the Next button to continue Enter your License Key s and click the Next button Your License Key is indicated on the About License Key included in the package 1 2 3 1 Installation Types and number of licenses you can install vary according to the product yo...

Page 20: ...rage Server is installed it will be automatically started after installation Note Upgrading from Version 1 0 When installing over an earlier version VK 64 will attempt to use settings from your previous installation It is important to verify your settings after installation You cannot use v1 1 Viewer with a v1 0 Storage Server nor can you use a v1 0 Viewer with a v1 1 Storage Server When installin...

Page 21: ...rver This chapter shows Administrators how to start and stop the Storage Server if necessary It also explains how to configure the Camera Server proxy for the Storage Server set disk space used set event notifications and configure users ...

Page 22: ...indows treats as a fixed drive Removable drives and network drives are not supported unless the drives are explicitly allowed to be treated by Windows as fixed drives To check the type of drive right click on the drive within Windows Explorer select Properties and note the Type displayed Note Adjusting the Storage Server Settings The Storage Server Configuration dialog Settings tab allows you to c...

Page 23: ...er Recorded Video Settings 1 2 3 In the Disk drive settings field set Drive Select the disk drive to configure from the drop down menu Maximum disk space used Tick the box and enter a value in Megabytes MB or Gigabytes GB for example D 50 GB This establishes the maximum disk space used for all video files on the specified drive 1 2 Low disk space notification threshold Enter a percent value When r...

Page 24: ... Space Used is set the warning can also be triggered when the disk space available for writing goes below the given percentage of the Maximum Disk Space Used on the drive if the warning has not already been triggered as above For example if the Maximum Disk Space Used is set to 80GB and a setting of 10 the warning would be generated when the available space reduces to 8GB For disk space management...

Page 25: ...fication and select a priority Events of that priority and above will lead to notification emails Select a suitable event priority from the drop down menu for each event type listed The priority of an event created by a manual recording using Record Now t P 111 will always be Priority 1 It cannot be changed from this dialog The events associated with Recording engine started Data file set and User...

Page 26: ... is laid out in the following manner Users list Lists all users who can access the Storage Server Add Edit Remove Allows you to add users edit passwords and remove users Use the Add button to add users to this field There is no limit to the number of users you can add Click Apply to save changes Users who have Operator status cannot configure register and change Camera Servers or configure and cha...

Page 27: ...up to 20 characters The Confirm Password field will become active Re enter the password When you have finished click OK The dialog will close and the user will appear in the user list Step 3 Assign user status to Administrator if necessary In the user list under Administrator tick the box to give the new user full access to Network Video Recorder configuration functions otherwise leave unchanged C...

Page 28: ...he Edit button below the user list to bring up the Edit User dialog Step 2 Change user details In the Edit User dialog enter the new password for the user up to 20 characters The Confirm Password field will become active Re enter the new password Changes are kept when you click OK 1 2 User Management tab Remove Users Click to select user then click the Remove button Click a user entry in the user ...

Page 29: ...Chapter 3 Starting the Viewer This chapter describes how to start and login to the Viewer and connect to the Storage Server ...

Page 30: ...the Login button Proceed to Chapter 4 After a moment the Login dialog appears Launching Procedure Double click the Viewer desktop icon Alternatively from the Windows Start menu select Programs WebView Livescope Network Video Recorder VK Series v1 1 Viewer After launching the Network Video Recorder VK 64 v1 1 start up screen appears The default User Name is admin The default Password is NVR 1 2 ...

Page 31: ...el button during launch the Connect to Master Storage Server dialog will appear A different Master Storage Server can be selected by overwriting the existing Host Name or IP address and Port number with another Setting the Master Storage Server If you are unsure of the address to use see your System Administrator Enter a Storage Server address and Port number Enter a Host Name or IP address for a ...

Page 32: ...ponse buffering Proxies which are configured to perform response buffering may lead to delays in sending small amounts of data such as events from the Storage Server to the Viewer Squid is an example of a proxy which does not perform response buffering so it is recommended for use between the Viewer and Storage Server The Apache proxy server does perform response buffering so is not recommended No...

Page 33: ...Chapter 4 System Configuration Before You Begin This chapter gives a brief overview of the Viewer Configuration process which is outlined in Chapters 5 to 7 This is intended for Administrators ...

Page 34: ...trators can alter Viewer configuration and preferences If you are a user with Operator privileges proceed to Chapter 8 Chapter 8 and following chapters explain the various controls and functions in the Viewing Screen Note Configuration settings made by Administrators are not protected from other Administrators making changes to these settings from another Viewer The last settings made to a Storage...

Page 35: ...uration and Preferences screen To open the Configuration and Preferences screen In the Menu Bar select View Configuration The menu bar is located at the top left of the Viewing screen Select the menu bar item View Configuration The Configuration and Preferences screen opens with the Storage and Camera Server Summary window displayed An example configuration is shown below 4 System Configuration Be...

Page 36: ...he Viewer configuration process via the Configuration and Preferences Screen The first step is to register Storage Servers and Camera Servers with the Viewer You will also need to create Locations and Zones These tasks are done in the Camera Summary window For recording video set up Normal and Special Day Recording Schedules in the Recording Schedules window Register Storage and Camera Servers 1 S...

Page 37: ...er Settings window Monitor live camera images and play back pre recorded events in the Viewer application From here you can customize the Viewing Area and save Layouts 4 System Configuration Before You Begin Pre recorded video from Storage Server Create and Save Viewer Layouts 4 Set up Viewer Settings optional 3 Live video from Camera Servers ...

Page 38: ...nd search for existing Camera Servers on the network This is discussed in Chapter 5 Recording Schedule set up recording schedules for each known camera and specify events for triggering recording You can also set special day schedules such as public holidays This is discussed in Chapter 6 Viewer Settings set up event priorities and change the live video frame rate The current Master Storage Server...

Page 39: ...39 4 System Configuration Before You Begin Storage and Camera Summary windows Recording Schedule Viewer Settings ...

Page 40: ......

Page 41: ...Chapter 5 Register Storage Servers and Camera Servers This chapter outlines how to register Storage Servers and Camera Servers and to manage Locations and Zones This is intended for Administrators ...

Page 42: ... Camera Server Summary window The window consists of two sub windows which are opened by their respective tabs Storage Servers and Locations Zones Tree Area Summary Area Locations Zones tab selected Storage Servers tab selected Click and drag scrollbar s to view any portions of the Summary Area that are not visible t P 46 t P 47 ...

Page 43: ...ardless of which tab is selected Find Camera Servers Allows you to initiate a network search for unlisted camera servers on the LAN Add Camera Server Allows you to add a new Camera Server to the system Edit Camera Server Allows you to edit an existing Camera Server s settings Remove Camera Server Allows you to remove a Camera Server from the system Storage Server and Location Zone options Click an...

Page 44: ...o one Zone and a number of Zones can be grouped into a Location The diagram below illustrates an example of physical Locations and Zones on a VK 64 network which could be the Internet Local Area Network or both Viewer access is via the Location and Zone drop down menus Once configured Locations and Zones are selected from the Viewing Screen Camera Selection area When you select other locations the...

Page 45: ...re are four cameras in the Zone This tab containing six thumbnail images indicates that there are six cameras in the Zone 5 Registering Storage Servers and Camera Servers The Location Zone hierarchy is independent of the grouping of cameras into Storage Servers For example a single Storage Server may record video from multiple Locations and cameras from a single Location can be recorded to multipl...

Page 46: ...the list or click to highlight it and click the Edit button The Edit Storage Server dialog appears with the selected server entry displayed Modify the entry and click OK to close and save changes This function lets you change the network address used to access a particular Storage Server in case the address has changed The entry for the Master Storage Server cannot be edited or deleted Note 1 3 2 ...

Page 47: ...Locations Zones tab In the Camera Summary window select the Locations Zones tab if it is not already selected Click the Add Zone button The Add Zone dialog opens Click a Storage Server in the list to highlight it and select Delete from the Edit menu Alternatively press the Delete key on your keyboard A confirmation dialog will open Click Yes to continue or No to cancel the operation A deleted Stor...

Page 48: ... You will be prompted to confirm deletion Click Yes to continue or No to cancel the operation If you want to add a Zone to another location not listed you must first create the Location before you add the Zone Each Location name must be unique and each Zone name within a Location must be unique There is no fixed limit on the number of Zones and Locations that can be added Note 1 2 1 2 Enter the na...

Page 49: ...Camera Servers button In the Camera Summary window click the Find Camera Servers button which is located above the right hand panel in both the Storage Servers and Location Zones window The Search Results dialog opens and a list of detected Camera Servers will appear 49 5 Registering Storage Servers and Camera Servers Configure Camera Summaries When you initiate the Find Camera Servers function yo...

Page 50: ... dialog where you can configure settings for the Camera Server Alternatively double click an item to bring up the Add Camera Server dialog Using the Add Camera Server dialog is discussed on the following pages You can also launch the Add Camera Server dialog in the following manner Click the Add Camera Server button in the Camera Summary window This will bring up the Add Camera Server dialog discu...

Page 51: ...amera Server connected and the number of cameras that have been set up Differences are in the way camera selection is presented The Add Camera Server dialog for a VB C50i VB C50iR VB C10 VB C10R VB101 or VB150 with the Video Input set to Single will display a single camera in a single tab The Add Camera Server dialog for VB150 with the Video Input set to Multiple will show one or more cameras as t...

Page 52: ...r saved video or select Do not record Select a drive on the Storage Server to save video One or more inputs may show The states for these can be inverted Adjust camera angle Set backlight compensation The Viewer does not store its own names for camera servers or sensors It displays names which are configured and stored on the Camera Server Please refer to your VB User s Manual for more details on ...

Page 53: ...add a Camera Server you must specify how VK 64 can connect to the camera server as follows Step 1 Enter Host Name User Name and Password Enter the Host Name or IP address then enter the port number for the Camera Server Enter a User Name and Password for connecting to the Camera Server Details will be kept on the Storage Server for use in recording 1 2 Using the Add Camera Server Dialog This is th...

Page 54: ...r of 64 camera servers that can be registered on one Storage Server with VK 64 or 16 cameras with Network Video Recorder VK 16 v1 1 Note Step 4 Select the input state for the camera server In the Camera Server Settings field one or more Input boxes may display depending on the camera server setup If a sensor input is received you can swap its value from on to off with respect to the operation of s...

Page 55: ... the camera from the drop down menu In the Zone field select a zone for the camera from the drop down menu If necessary click the Add button to add another Location or Zone The respective Add Location or Add Zone dialog will appear for you to enter details When you have entered details click the OK button to close the dialog and return to the previous dialog When you add a Zone in the Add Zone dia...

Page 56: ...r to the center of the image a zoom in or zoom out control will appear Hold down the mouse on to zoom in Hold down the mouse on to zoom out Step 4 Select a hard drive for saving video In the Drive menu select a hard disk drive on the Storage Server When you have finished configuration click the OK button to close the dialog and return to the Camera Summary screen If you do not wish to manually con...

Page 57: ...ialog as the Add Camera Server appears detailing all the aspects of the Camera Server as discussed on previous pages Step 1 Select a Camera Server In the Camera Server list click a server to highlight it Step 2 Click the Edit Camera Server button Click the Edit Camera Server button to bring up the Edit Camera Server dialog This dialog is identical to the Add Camera Server dialog you can also doubl...

Page 58: ... 1 Select a Camera Server In the Camera Server list click a server to highlight it Step 2 Click the Remove Camera Server button Click the Remove Camera Server button you can also press the Delete key on your keyboard A confirmation dialog will appear Click Yes to continue or No to cancel the operation You can add deleted Camera Servers so long as they are still connected to the network However pre...

Page 59: ...ations you have made If you wish to return to the Viewer select View Viewing Screen from the menu bar Saving changes to the Camera Summary window will save changes to your Master Storage Server and other affected Storage Servers Other Viewers which use the same Storage Server as a Master Storage Server will receive your changes the next time data is read from the Master Storage Server that is when...

Page 60: ......

Page 61: ...Chapter 6 Configuring Recording Schedules This chapter details how to configure recording schedules for cameras on the network This is intended for Administrators ...

Page 62: ...ecording Schedules tab and ensure the Normal Schedule radio button is set The Normal Recording Schedule consists of Storage Server drop down menu Used to select which Storage Server schedule to edit When the Recording Schedules window is first opened the first Storage Server in the list is shown with its associated schedule to the right Schedule Area Used to set up standard day to day recording se...

Page 63: ...amera schedule time bars Selecting multiple items and dragging or moving While holding down the Ctrl key click on individual schedule items to select them You can adjust or move multiple schedule items to new positions Drag either end to adjust duration an arrow displays as shown above or place mouse over schedule item a hand icon appears and drag items to a new location You can also create multip...

Page 64: ... release the mouse button Alternatively right click anywhere in the Schedule Area alongside a camera name and click Add Schedule from the context menu The Add Schedule Item dialog appears as shown on the following page You can also click and drag an area covering several cameras to bring up the Add Schedule Item multiple cameras dialog This allows you to easily set schedules for multiple cameras O...

Page 65: ... Camera angle can be changed by moving your mouse pointer in the Preview area to display controls and clicking to pan tilt and zoom t P 56 Select a camera angle for recording Set recording resolution Set External Outputs to On or Not Specified This applies to the duration of the schedule item Set Night Mode VB C50i VB C50iR and VB150 only Configuration is discussed on the following pages Set frame...

Page 66: ...All Day button if you want 24 hour recording The Start and End times will be set at 00 00 and 00 00 respectively Step 2 Select the days for recording In the Repeat on area tick the days you wish to repeat the recording period you set in the Times area above If you have defined any special day schedules such as public holidays such schedules will override normal schedule times for the whole day Tim...

Page 67: ...ional Select recording based on a motion or sensor event Click the On motion detection box if you want recording activated when motion is detected during this time period Click the On sensor event box if you want recording activated from a sensor during this time period Click the Settings button to modify the settings for each of these functions other wise the previous or default settings will app...

Page 68: ...on from the drop down menu of available camera angles to retain a live preview from that angle Alternatively move your mouse pointer in the Preview area to display controls and clicking to pan tilt and zoom t P 56 Click the Backlight compensation drop down menu to set the backlight compensation to On or Off or High Medium Low or Off for VB C50i VB C50iR Selecting Not Specified accepts whatever bac...

Page 69: ...r schedule If settings are enabled on the Camera Server they take precedence over any settings made in VK 64 This may cause some confusion if your VK 64 recording schedules fail to record with the correct camera preset You should disable such Camera Server features if you wish VK 64 settings to take precedence Refer to your camera server manual for more information on their settings Note Step 5 Se...

Page 70: ...k the Settings button Tick each box to enable the functions Default settings are then enabled Click Settings to change the default settings for each option The motion detection settings are dependent on the quality settings of the Camera Server When setting motion detection parameters it should be ensured that the quality setting of the Camera Server is the same as the quality setting that will be...

Page 71: ... Activate external outputs Set a priority for events triggered by motion The Motion Detection function is not suited to applications where high levels of reliability are demanded Therefore we recommend that you do not use this function for monitoring or other purposes if consistently high levels of reliability are required Canon accepts no liability whatsoever for faults etc resulting from the use...

Page 72: ... Analysis Frame Rate refers to how many frames per second are used for detecting motion A lower value will decrease the processing load on the server and allow more Camera Servers to have motion detection Tip In the Active Region field adjust the region where motion detection is triggered By default the Active Region is the full area Click one of the corner or edge handles and hold down the mouse ...

Page 73: ... not met the specified duration in order to trigger an event Red color bar The amount of change that meets the defined detection conditions and motion is detected triggering an event i e the required amount of motion has been detected for the specified duration Configure Motion and Sensor Settings 73 Area Ratio marker You can set the amount of motion required before the red color bar is displayed ...

Page 74: ...nd Med or Med and High depending on the range setting 1 2 Set the Area Ratio Click and drag the Area Ratio slide bar to any position from 0 to 100 This establishes the proportion of image inside the Active Region dotted frame allowed before motion is detected When you drag the slide bar the black vertical line in the Detection Indicator will move to reflect the change in specified Area Ratio Set t...

Page 75: ... full requested duration of post event recording may not be available Frame rate frame size and network delays may have an effect on when the last frame is recorded and thus affect the actual duration of the recording Note 6 Configuring Recording Schedules About motion detection on different camera servers When using motion detection on the camera server the situation differs depending on the type...

Page 76: ...tings button The Sensor Event Settings dialog opens Click a tab to modify that sensor s settings The Sensor Name is indicated below Night Mode is available for VB C50i VB C50iR camera servers or VC C50i VC C50iR cameras connected to camera server VB150 allowing you to see video in dark conditions You can choose to have it Enabled Disabled or Not specified External Outputs such as light switches ca...

Page 77: ...er in the Preview area to display controls and clicking to pan tilt and zoom t P 56 After the camera has been controlled the preset will be set to Custom You cannot modify the sensor name identified as the External Device Input Name in the VB Camera Server configuration which is obtained from the Camera Server and therefore outside the scope of VK 64 configuration Note Click the Backlight drop dow...

Page 78: ... and load on the Camera Server and the Storage Server may reduce the actual frame rate recorded Note If the before and after event fields are set to 0 seconds video will still be recorded while the sensor is activated Shorter pre event recording will reduce memory usage Longer pre event recording with insufficient memory may lead to the use of disk based virtual memory which will greatly reduce pe...

Page 79: ...window consists of two buttons Save Schedule and Discard Changes Click Save Schedule to keep all your settings The settings are then saved to the Storage Server Click Discard Changes to cancel any modifications you have made If you wish to return to the Viewing Screen select View Viewing Screen from the menu bar 6 Configuring Recording Schedules ...

Page 80: ...the Special Day Schedule radio button is set The Special Day Recording Schedule consists of Storage Server Select a Storage Server from the list to edit add schedules for that server Associated Locations and Zones are displayed in the Schedule Area Schedule Type selector Allows you to select a schedule type These are user defined schedules such as Public Holidays and Long Weekends Days selector Al...

Page 81: ...Normal Recording Schedule but only covers a single day On a special day this schedule will override the Normal Recording Schedule from 00 00 hrs to 24 00 hrs To have a special day schedule run over a long weekend Fri Sat Sun all three days must be added to the list of days to use the schedule Note Click and drag the scroll bar s to view more schedules if necessary 6 Configuring Recording Schedules...

Page 82: ...the number of schedule types that can be added To launch the dialog and add a schedule type Step 1 Click the Add button below the Schedule Type list Click the Add button This will bring up the Add Schedule Type dialog Step 2 Enter a name Enter a name in the Schedule Name area for example Company Holidays Click the Add button to add the schedule type The dialog will close The new name will appear i...

Page 83: ...al Day Schedule window click a schedule type in the Schedule Type list to select it Click the Edit button This will bring up the Edit Schedule Type dialog Overwrite the existing name For example you may wish to change the name Company Holidays to Company Special Days Click the OK button to save your changes The dialog will close 2 1 2 1 If you delete a schedule type where there are dates associate...

Page 84: ...on below the Days field This will bring up the Select Date calendar Click a day in the calendar to select it and then click OK to close the calendar shown below Click the Add button again to add another day to the same schedule type if you wish Added days are shown in the Days list see example on next page Other calendar selection methods are shown on the next page Click to scroll back through the...

Page 85: ... with the schedule type Click the Delete button below the Days list to remove the day from the schedule type If you attempt to associate the same day with different special day schedules you will be given a warning and asked to delete the other entry before creating a new one Expired days are listed in italics Note To select another year click the current year and scroll up or down using the up do...

Page 86: ...chedules window consists of two buttons Save Schedule and Discard Changes Click Save Schedule to keep all your settings The settings are then saved to the Storage Server Click Discard Changes to cancel any modifications you have made If you wish to return to the Viewing Screen select View Viewing Screen from the menu bar 86 ...

Page 87: ...Chapter 7 Configuring Viewer Settings This chapter outlines how to configure settings that are specific to the Viewer This is intended for Administrators ...

Page 88: ...Storage Server Click the Viewer Settings tab to display the window This window consists of Live Video Viewing Settings Select from a list of frame rates for live viewing Master Storage Server The current Storage Server is indicated Event Notification Settings Set operator notification and adjust duration in seconds set operator acknowledgement recognition of an event and set an audio alert Event N...

Page 89: ...ated in the Live Events Log in the Viewing Screen Select a frame rate from the drop down menu Lower frame rates ensure less load on the network and Viewer This may lead to higher frame rates for recording and may allow a larger number of Video Windows to be viewed Enable larger Video Window captions in the Viewer The current Master Storage Server is indicated here Color Priority Red Highest Orange...

Page 90: ... assigned to a Viewer at any one time The selected Master Storage Server is indicated in the Viewer Settings window If you wish to change the Master Storage Server Close the Viewer and then re launch it When the start up splash screen opens click the Cancel button at the bottom of the screen A dialog will appear for you to enter a different Storage Server Refer to Chapter 3 page 31 for more detail...

Page 91: ...level will be shown at the top of the Video Window for the period selected If you select 0 the color bar will light up without flashing Tick the Requires operator acknowledgement box for the event When an event occurs it will flash in the Live Events Log and the audio alert will sound if specified until the operator double clicks on the event that is the notification time will not apply to the eve...

Page 92: ...w consists of two buttons Save Changes and Discard Changes Click Save Changes to keep all your settings The Viewer settings are then saved to the local disk the computer the Viewer resides on Click Discard Changes to cancel any modifications you have made If you wish to return to the Viewer select View Viewing Screen from the menu bar ...

Page 93: ...Chapter 8 Using the Viewer Operator Login This chapter outlines how to start the Viewer and gives a brief overview of the Viewing Screen PART 2 USING THE VIEWER APPLICATION ...

Page 94: ...y determine a camera position Viewing Area for Video Windows Video Windows can be re sized They can also be arranged into a uniform grid Date indicator Darker area indicates available recorded video Timeline Colored bars indicate events that can be selected and viewed Click and drag the Time bar to go back or forwards in time Camera Name Name of camera currently selected Playback controls Click th...

Page 95: ...xtract a segment of video to save as another file Return to Live t Click to return the Timeline playhead to the current time If you click this button while playing recorded video the selected Video Window will return to live video Incremental Time controls Scroll forwards through the current day or jump forward incrementally by day or week Timeline playhead Click and drag to positions on the Timel...

Page 96: ...escope Network Video Recorder VK Series v1 1 Viewer The application window appears Wait until it clears itself before continuing Starting the Viewing Screen 96 Before you can use the Viewing Screen make sure you have a password Access is setup by your System Administrator If you have Administrator privileges you can also configure Network Video Recorder settings Note If a connection error occurs y...

Page 97: ...ameras on the network will appear as thumbnail images in the Camera Selection Area on the top of the screen These can be dragged onto the Viewing Area for monitoring If your Administrator has already created a Layout for you then the Viewing Area will display the first Personal Layout or first Shared Layout if there are no Personal Layouts as shown in the example on the previous pages Your VK 64 U...

Page 98: ...rrent Layout Launches the Event Search dialog Selects the Configuration and Preferences Screen if the Viewing Screen is open Selects the Viewing Screen if the Configuration and Preferences Screen is open Hides the Menu Bar and Title Bar to allow more display room for Video Windows Clicking the Esc key restores the Viewer to its previous state i e before selecting the Full Screen mode Hides Video W...

Page 99: ...Chapter 9 Working with Video Windows This chapter shows you how to create Video Windows for viewing in the Viewing Area and how to adjust camera angles ...

Page 100: ...anaged by users with Administrator privileges You must have Administrator privileges in order to modify settings Note About Camera Thumbnails When a Location is selected zones within that location appear as thumbnail folders to the right of the Location and Zone menus A scrollbar at the base of the Camera Selection Area can be used to scroll the display of thumbnails Each Zone is grouped into came...

Page 101: ...section to the right Step 2 Select a Zone from the menu or thumbnail folder region Click the Zone drop down menu or on the down arrow A list of pre configured zones appears Click a zone in the list Once a Zone is selected from the drop down menu the Camera Selection Area for the selected Zone moves to the left Alternatively click the scrollbar located under the Camera Selection Area Drag it to the...

Page 102: ...k the thumbnail image and while holding down the mouse button drag its boundary anywhere onto the Viewing Area the thumbnail becomes an outline which is re sized when you drag it over the Viewing Area Release the mouse button The re sized outline becomes a live Video Window 102 1 2 3 Basic Video Window Functions An error message will appear in the Video Window if there is a connection problem Refe...

Page 103: ... Video Window menu button and select Video Display Size Choose from one of the size options in the sub menu Small Medium Large or Raw A right click action on the Video Window will also bring up the same menu Move a Video Window Click anywhere on a Video Window and drag it to any position in the Viewing Area 103 1 2 For best performance on the Viewer such as to view as many Video Windows as possibl...

Page 104: ... Windows There are various ways you can manage the layout of Video Windows in the Viewing Area and this is discussed in the next chapter In the Viewer the number of Video Windows you can display simultaneously will depend on your video card the resolution and quality settings of the camera and the Live Video Viewing Settings frame rate set in the Viewer Settings window of the Configuration and Pre...

Page 105: ...s you want selected as shown below Only windows contained within the area of selection are selected i e dragging around part of an image will not select it Basic Video Window Functions Video Windows from different zones and locations can be displayed in the same Layout You can copy and paste a multiple selection of Video Windows at one time which can be pasted into and saved as a new Layout Tip If...

Page 106: ...tor displays a time date stamp in the title bar for recorded footage Event indicator displays a colored bar across the top of the Video Window Pan tilt and zoom controls when the Video Window is double clicked or the Video Window menu item Get camera control is selected controls appear to enable pan tilt and zoom Live Events Log When configured it displays when you launch the Viewer Double click a...

Page 107: ...n individual camera Video Windows can be re sized repositioned or closed The lightning symbol in the lower right hand corner indicates live video Title bar The title bar consists of menu camera name and live or recorded status Video display conditions Event Indicator Color Priority Red Highest Orange High Yellow Medium Light Green Low Dark Green Lowest For recorded video the time date indicator ma...

Page 108: ... down the mouse on to zoom out When you have finished select Release Camera Control from the Video Window menu If Pan Tilt and Zoom are active in a Video Window you can only drag the window by clicking and holding the title bar When you have control the camera can be controlled either by clicking or moving the mouse while holding the left button down The latter method provides finer control If a c...

Page 109: ...Pan Tilt controls Click to nudge or click and hold for continuous movement Click and drag range finder or click away from it to reposition Click and drag Zoom slider To display select View Camera Control from the VK 64 menu bar If a Video Window is not selected the preview window will be blank Click on a Video Window to display a range finder in the Camera Control Panel A full area panorama is giv...

Page 110: ... displays the video window in its original size 1 2 Enable Backlight Compensation Backlight compensation is a camera feature used to compensate for camera views with strong backlighting i e viewing a dark image against a strong backlight It can be enabled from the Video Window menu It is not to be confused with Shade Correction t P 112 To enable backlight compensation While Camera Control is activ...

Page 111: ...ecord Now function records at the maximum frame rate Extended recording time will use additional disk space on the Storage Server Excessive use of this function should not be performed without first checking with an administrator The Record Now function is only enabled if a Storage Server is configured for the camera Recording will be for approximately one minute The actual duration of recorded vi...

Page 112: ...ete key It is recommended you install the Admin Viewer in advance Shade Correction cannot be applied to multiple Video Windows If you enable it on a Video Window it will be removed from any other Video Window Shade correction is performed by using image processing within the Viewer and not on the Camera Server It can be used on live or recorded video see below Note About Shade Correction Shade Cor...

Page 113: ...Chapter 10 Arranging and Saving Video Window Layouts This chapter details how to create and save Video Window Layouts and Layout Sequences ...

Page 114: ...ns existing Layouts are displayed and divided into two sections Shared Layouts and Personal Layouts as shown in this example Shared Layouts lists layouts created by Administrators that cannot be modified by Operators however Operators can save layouts under a new name in the Personal Layouts list below Shared Layouts Personal Layouts Layout menu options To create a new layout if a previously saved...

Page 115: ...red or Personal layout folder the Create Folder button is available It allows you to create a sub folder for that item When you select a sub entry further buttons are activated 115 10 Arranging and Saving Video Window Layouts Create a new folder Move an item to another folder Move an item up or down within a folder Delete an item or folder containing items Edit an item name Copy an item to another...

Page 116: ...der to highlight it then click the Edit button The respective Layout Name or Folder Name dialog will appear for you to overwrite a new name Click an item or folder to highlight it then click the Delete button A confirmation dialog will appear Click Yes to continue or No to retain the item or folder If you have Operator status you will not be able to delete a shared layout or layout sequence You ca...

Page 117: ... and click OK The item is saved to that folder Alternatively click the New Folder button to create a new folder to save the item to for example if you wish to save an Administrator shared layout to a personal folder Once you have saved an item the name will appear next to the Layout button in the Viewing Area 1 Administrator s Save Layout dialog Operator s Save Layout dialog 2 Opening a previously...

Page 118: ...layouts In the Duration menu select a set duration of display time for each layout or enter a custom time overwriting the existing time 1 2 3 4 Opening and running a layout sequence To start the layout sequence select it from the Layout menu When a layout sequence is running further options are available in the Layout menu Click Edit Layout Sequence to change settings in the currently running layo...

Page 119: ...rid of dots where you can re size Video Windows of higher priority while reducing others of lower priority Small Grid Medium Grid and Large Grid creates a small medium or large grid where you can place Video Windows in a tile like manner Use smaller grids to place more Video Windows or larger grids to view footage at a glance or from a distance Video Window sizes in grids can be increased to cover...

Page 120: ...he boundary will re size Release the mouse button The selection boundary will become a Video Window and snap into alignment along the grid closest to it To re size the Video Window click any corner and drag the image outwards to snap to a larger grid area Create and align more Video Windows Drag more thumbnail images onto the Viewing Area grid and re size them to suit your viewing requirements as ...

Page 121: ...ended in the Layout Area Although you can add more the number of Video Windows you can display simultaneously will depend on your video card the speed of your computer the maximum frame rate configured with Viewer setting the video size and video quality coming from the Camera Server and the size of each Video Window displayed Note 10 Arranging and Saving Video Window Layouts ...

Page 122: ... Video Windows fully shown here will fill the screen area The Small Grid Medium Grid and Large Grid are set to 160x120 320x240 and 640x480 respectively The PAL versions of the VB C50i VB C50iR provide images at 192x144 384x288 and 768x576 If you want to display the images at these full resolutions use the Custom Grid size to set the grid sizes accordingly This is recommended when viewing a large n...

Page 123: ...custom size for displaying Video Windows Set a custom grid Select Custom Grid from the Layout Grids sub menu The Custom Grid dialog appears Values are given in pixels In the Horizontal or Vertical field overwrite the existing value with a custom value or use the up down arrows to select a value When you adjust the value in one field you ll notice the value change in the other field This is because...

Page 124: ...or displaying more Video Windows as shown below in the Large Grid example Pressing the Esc key returns the menu bar You can also select to hide Video Window Captions the Camera Control and Live Events The number of Video Windows in the display size achieved is dependent on the screen resolution A higher resolution will result in more Video Windows displayed 124 View t t Camera Selector View t t Ti...

Page 125: ...Chapter 11 Using the Timeline and Viewing Events This chapter shows you how to use the Timeline for live and pre recorded viewing as well as view and search events ...

Page 126: ...meline Video Window Playback controls Previous Event Rewind Nudge Back Play Pause Nudge Forward Fast Forward Next Event Camera name Click to scroll back hours by days or by weeks Darker areas indicate recorded video for this period Events for non selected cameras Video Windows are indicated in weaker colors as secondary events Playhead region Playback controls Click in this area of the Playhead sh...

Page 127: ...with selected cameras Video Windows in the Viewing Area are indicated in stronger colors as primary events Extract recorded video to save as another file Click to jump to a specified date time Click to search for past events Click to return the Playhead to the Live position if it has been moved Click to scroll forward hours by days or by weeks Color Priority Red Highest Orange High Yellow Medium L...

Page 128: ...all Video Windows that have been selected Click in the Event Display Area of the Timeline Click in the Event Display Area of the Timeline The Playhead will move to that location and playback of recorded video commences from that time Playheads of different cameras can be controlled separately that is you can rewind video in one window to a defined time and then select a different Video Window and ...

Page 129: ... the time selected If no Video Windows are selected only the timeline is moved Using the calendar is shown below Click and drag the time bar to move through the Timeline Click to scroll back through the months Alternatively click the current month and a month selector will appear To select another year click the current year and scroll down or back up using the up down arrows Click to scroll forwa...

Page 130: ...ed Time Zoom in and out of the Timeline Click Zoom In to zoom into a time period in the Event Display Area The Timeline will expand and you can examine time in more detail Click Zoom Out to zoom outwards from the Timeline Click an event to select it When you click an event to select it the associated Video Window will display the event s To get information about events move your mouse pointer over...

Page 131: ...dow and time period then click Extract Video Click a Video Window to highlight it then click and drag a time period for it in the Timeline Click the Extract Video button The Extract Video dialog opens In the Date field click each segment and overwrite with desired date Alternatively click the down arrow to use the calendar In the From and To field click the time segments and overwrite with desired...

Page 132: ... a previous session Re size the window to a custom size Click the corners or edges and drag the window out to a new size Release the mouse button When you launch the Viewer again the Live Events Log will retain the size you selected The bell icon is replaced by a dot icon when the event is acknowledged by double clicking Click and drag scroll bar to view events To maximize double click title bar o...

Page 133: ...iguration and Preferences Screen You must have Administrator privileges in order to modify priorities Note To acknowledge and view an event A new event entry will appear at the top of the Live Events Log list and will flash for a defined period if configured If Operator Acknowledgement is required the event will flash indefinitely if not acknowledged In the Live Events Log double click on the even...

Page 134: ... Event Search button On the Timeline click the Event Search button The Event Search dialog opens Select a Priority Select a state of event Select a type of event Select a Location and Zone Enter a search start date and time Enter a search end date and time Enter a keyword for particular events Search Results area Double click an event to view it in the Video Window or click an event to highlight i...

Page 135: ...you cannot go past today s date Alternatively click the down arrow next to each date panel to bring up the calendar Click off the calendar to close it again In the Event Search dialog you can also scroll through time using the up down arrows Click an hours minutes or seconds segment to highlight it and then click the up or down arrow Step 2 Select an event keyword In the Description field enter a ...

Page 136: ...in a Video Window You can also double click an event to view it in a Video Window Clicking Cancel stops any searching and closes the dialog Viewing and Searching Events When you have finished viewing an event in a Video Window click the Return to Live t t button in the Timeline to return the Video Window to live viewing Note Step 6 Select a Priority Select a Priority from the drop down list Step 4...

Page 137: ...Appendix A Troubleshooting VK 64 This appendix outlines possible solutions to VK 64 operating issues ...

Page 138: ...trol from the Video Window menu Alternatively check if you are actually looking at recorded video the title bar will be gray not black The Record Now feature is gray in one Video Window menu however it is enabled in other Video Window menus Situation You click to bring up the Video Window menu and Record Now is gray disabled but other Video Windows have the function enabled Solution When the camer...

Page 139: ...e Configuration and Preferences screen and selecting the Viewer Settings tab Select a suitable frame rate that does not affect the performance of the Viewer i e lower frame rates are ideal if you have many Video Windows open in the Viewing Area No presets sensors or external devices appear for the camera Situation You have opened the Video Window menu for a particular camera and no presets are ava...

Page 140: ...b the selected camera will have more than one listing Click the listing which has an associated Storage Server listed beside it and then click Remove Camera Server Make sure you save your changes to permanently remove the deleted camera Timeline The following issues may arise during normal operation of the Timeline in the Viewer The Playback controls are inactive Situation You attempt to click any...

Page 141: ...Start Storage Server button t P 22 The Configuration and Preferences screen takes a long time to open Situation When you switch from the Viewing Screen to the Configuration and Preferences screen a Please wait message appears and remains on screen for a long time Solution You may have a lot of cameras to disconnect from as waiting time is dependent on disconnecting from each camera Camera Server o...

Page 142: ...message appears Solution You have Operator status Only Administrators can access the Configuration and Preferences screen Cannot see cameras on the Camera Summary window Situation You are viewing a list of cameras on the Camera Summary window and some cameras are not visible Solution Only cameras associated with the item selected on the Storage Server tab or the Locations Zones tab will be shown A...

Page 143: ...Appendix B Example Operating Conditions This appendix outlines example Storage Server and Camera Server situations ...

Page 144: ...ables For example images of an empty corridor would typically be smaller than these values and images of a very intricate pattern such as a crowded shopping mall would typically be larger than these Example of frame sizes with VB150 Example of frame sizes with VB C50i 160x120 320x240 640x480 30 40 50 70 80 90 3 8 4 4 5 0 6 6 8 1 11 8 11 1 13 3 15 1 20 3 25 4 37 3 36 4 43 4 49 2 67 0 85 5 128 0 Eve...

Page 145: ...rs are being recorded continuously at 5 frames per second all day every day the disk requirements would be approximately 100GB per day 15KB x 5fps x 16 cameras x 60 seconds x 60 minutes x 24 hours 103680000KB per day However when determining hard disk sizes it is important to take into account that there needs to be some overhead For example if the Maximum file size duration t P 23 is configured t...

Page 146: ... 10 Disk Drive Disk Capacity Free Disk Space Max Disk Space Used Camera Server No C Drive 100GB 50GB 40GB 19 units D Drive 200GB 200GB 200GB 19 units The Storage Server manages its disk space according to the following rules Low Disk Warning Level When case 1 or 2 below is satisfied the Storage Server generates event notification 1 When the Storage Server disk space used exceeds the following valu...

Page 147: ...g video files when the Threshold Level is reached recording will stop at the time when the Limit Level is achieved Storage Server resumes recording when the free disk space rises above the Limit Level 1 When the Storage Server disk space used exceeds the following value a Setting value of Maximum disk space used 2 When free disk space falls below the following value b Number of camera 1 32MB The f...

Page 148: ...range of VB C10 cameras Number of cameras Resolution Quality Frame Rate 16 16 16 16 16 16 32 32 32 32 32 32 48 48 48 48 48 48 64 64 64 64 64 64 320x240 320x240 320x240 640x480 640x480 640x480 320x240 320x240 320x240 640x480 640x480 640x480 320x240 320x240 320x240 640x480 640x480 640x480 320x240 320x240 320x240 640x480 640x480 640x480 3 4 5 3 4 5 3 4 5 3 4 5 3 4 5 3 4 5 3 4 5 3 4 5 30 30 10 10 10 5...

Page 149: ...cond at 640x480 is the maximum frame rate provided by the Camera Servers not a limitation of the Storage Server These are samples from a specific configuration As many factors can influence the actual performance possible including networking equipment disk write speed complexity of camera image etc the actual performance of VK 64 recording in a specific installation will vary Please be sure to co...

Page 150: ...ideo in and Drive when you register camera servers The following files are saved in their respective folders that reside on the PC on which the Storage Server or Viewer is installed Log files Recorded data Drive WebView NVR videofiles Event data Drive WebView NVR eventfiles Log Path PC location Storage Server System Drive Documents and Settings All Users Application Data Canon WebView NVR logs Sto...

Page 151: ...Index ...

Page 152: ...ate camera position 56 Camera Control Panel 109 Camera Servers 12 Add camera server 43 Edit camera server 43 Find camera server 43 Remove camera server s 43 Setting up Camera Servers 18 Camera Summaries configure 46 Configuration 33 About Locations and Zones 44 Add a Location and Zone 47 Camera Summary configure 46 Configuration Preferences Screen 38 Configuration Process 36 Configure Viewer Setti...

Page 153: ... 96 Layout Sequences 118 Layouts 114 About the Layout menu 114 Layout Grids 119 Layout Sequences 118 Organizing Layouts Layout Sequence 115 Saving a Layout Layout Sequence 117 Shared and Personal Layouts 114 Live Events Log 132 Locations and Zones 44 Add Locations and Zones 47 Search events by 135 Viewer select Locations and Zones 101 Login dialog 30 Low disk space threshold 23 M Manual recording ...

Page 154: ...ents 134 Event Search button 134 View Event in Camera 136 Sensitivity motion detection 74 Setting disk drive 23 Setting recorded video 23 Setting the Master Storage Server 31 Setting up Event Notifications 25 Setting up the Camera Servers 18 Setting up Users 26 Setup camera position 56 Shade Correction 112 Special Day Recording 80 Starting VK 64 Viewer 30 96 Storage Server Add Storage Server dialo...

Page 155: ... Video Windows 105 Shade Correction 112 Video Display Size 110 Video Window States 106 Viewer 34 Alert duration 88 Camera Thumbnails 100 Change Storage Server 64 Configure Viewer Settings 88 Example Viewer Screen 94 Launching Procedure 30 Login 97 Operator acknowledgement 91 Select Location and Zone 101 Selecting Cameras for Viewing 100 Show hide task areas 124 Starting the Viewing Screen 96 Viewe...

Page 156: ... 5990 Côte de Liesse Montréal Québec H4T 1V7 If you have any questions call the CANON CANADA Customer Information Centre toll free at 1 800 OK CANON 652 2666 Canada only MEXICO CANON MEXICANA S DE R L DE C V Periferco Sur No 4124 Col Ex Rancho de Anzaldo C P 01900 México D F México CENTRO Y SURAMERICA CANON LATIN AMERICA INC 6505 Blue Lagoon Drive Suite 325 Miami FL 33126 USA ASIA CANON SINGAPORE ...

Reviews: