background image

2

2

2-42

2-42

Technical Explanation > Image Formation System > Basic Configuration > Image Formation Process

Technical Explanation > Image Formation System > Basic Configuration > Image Formation Process


Image Formation Process

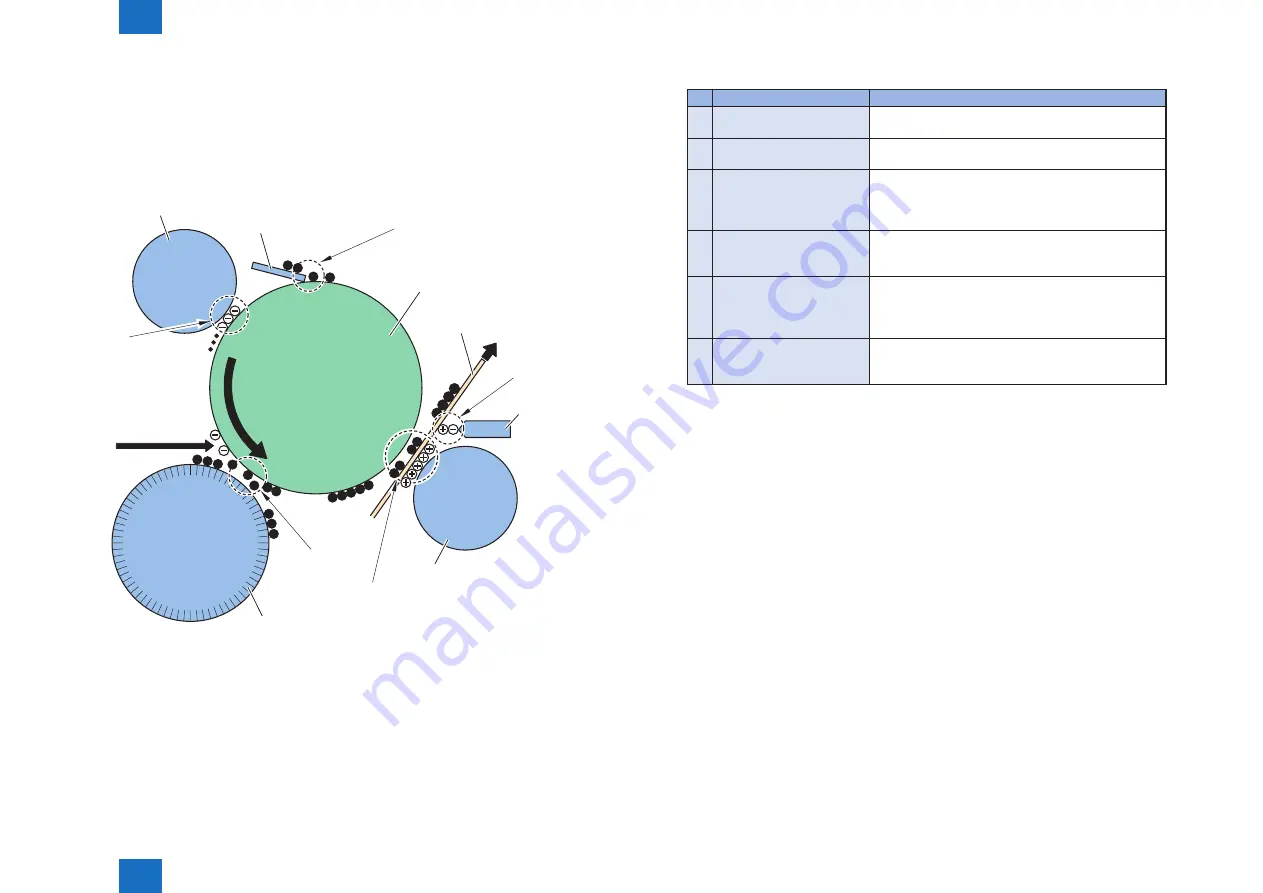
The image formation system of this machine consists of the Photosensitive Drum, Primary 
Charging Roller, Developing Cylinder, Transfer Charging Roller, Static Eliminator and 
Cleaning Blade, and the image formation process around the Drum Unit mainly consists of 
the 6 blocks.

[1]

[4]

[6]

Cleaning Blade

Primary charging roller

[2]

[3]

[5]

Photosensitive drum

Static eliminator

Transfer charging roller

Paper

Developing cylinder

F-2-64

Image formation block

Description

[1] Primary charging block

To evenly make the surface of the Photosensitive 

Drum negatively-charged.

[2] Laser exposure block

To neutralize electric charge by scanning laser beam 

on the drum surface to create latent image.

[3] Developing block

To create visible image by attaching toner that has 

been negatively charged from the Developing Cylinder 

to the latent static latent image on the surface of the 

Photosensitive Drum.

[4] Transfer block

To apply positively-charged potential from the back 

side of paper to transfer toner on the drum to the 

paper.

[5] Separation block

To separate paper from the Photosensitive Drum by 

elastic force of paper and make the paper easy to be 

separated by applying negatively-charged potential 

from the back side of paper.

[6] Drum cleaning block

To remove residual toner on the surface of the drum 

by the Cleaning Blade to be collected into the Waste 

Toner Box.

T-2-27

Summary of Contents for 1730

Page 1: ...RUNNER 1750 1740 1730 Series Service Manual Revision 1 September 26 2011 Product Overview Technical Explanation Periodical Service Disassembly Assembly Adjustment Troubleshooting Error Code Service Mode Installation Appendix ...

Page 2: ...information as the need arises In the event of major changes in the contents of this manual over a long or short period Canon will issue a new edition of this manual The following paragraph does not apply to any countries where such provisions are inconsistent with local law Trademarks The product names and company names used in this manual are the registered trademarks of the individual companies...

Page 3: ...switch closing the front door and closing the delivery unit door which results in supplying the machine with power 2 In the digital circuits 1 is used to indicate that the voltage level of a given signal is High while 0 is used to indicate Low The voltage value however differs from circuit to circuit In addition the asterisk as in DRMD indicates that the DRMD signal goes on when 0 In practically a...

Page 4: ...nication test function of E RDS 1 5 Specifications 1 6 Specifications 1 6 Weight and Size 1 7 Productivity Print speed 1 7 Paper type 1 7 Pickup 1 7 Parts Name 1 8 External View 1 8 Cross Sectional View 1 10 Operation 1 11 Power Switch 1 11 Description of Control Panel 1 11 2 Technical Explanation Basic Configuration 2 2 Functional Configuration 2 2 Basic sequence 2 2 Original Exposure and Feed Sy...

Page 5: ... Various Controls 2 37 Controlling the Laser Activation Timing 2 37 Controlling the Intensity of Laser Light 2 39 Controlling the Laser Scanner Motor 2 39 Controlling the Laser Shutter 2 39 Image Formation System 2 40 Basic Configuration 2 40 List of Image Formation Specifications 2 40 Major Components in image formation system 2 41 Image Formation Process 2 42 Basic Sequence 2 43 Initial rotation...

Page 6: ...on and preparation in advance 2 77 E RDS setting items 2 80 Steps to E RDS settings 2 80 Initializing E RDS settings 2 82 COM LOG Report 2 82 FAQ 2 83 Troubleshooting 2 84 Error code and strings 2 86 3 Periodical Service List of periodically replacement parts consumable parts and locations for cleaning 3 2 periodically replacement parts 3 2 Consumable parts 3 2 4 Disassembly Assembly Preface 4 2 O...

Page 7: ...39 Removing the Copyboard Glass 4 40 Procedure 4 40 When Replacing the Copyboard Glass 4 41 Removing the ADF Reading Glass 4 42 When Replacing the ADF Reading Glass 4 43 Removing the ADF Unit 4 43 Procedure 4 43 Removing the Reader Unit 4 44 Preparation 4 44 Procedure 4 44 Removing the Reader Controller PCB 4 46 Preparation 4 46 Procedure 4 46 Removing the CIS Unit 4 47 Preparation 4 47 Procedure ...

Page 8: ...4 75 Fixing System 4 79 Location 4 79 Removing the Fixing Assembly 4 79 Procedure 4 79 Removing the Fixing Drive Unit 4 81 Preparation 4 81 Procedure 4 81 Pickup Feed System 4 83 Location 4 83 Removing the Cassette Feed Roller 4 83 Procedure 4 83 Removing the Cassette Separation Roller 4 85 Procedure 4 85 Removing the Cassette Pickup Roller 4 86 Procedure 4 86 Removing the Cassette Pickup Idler Ge...

Page 9: ...03 6 5 Solid white TYPE 04 6 5 4dot 6space dot 6space TYPE 06 07 6 6 Troubleshooting items 6 7 List of Troubleshooting Items 6 7 Image Failure 6 7 Toner soiling at the back side of paper 6 7 Soiling at the leading trailing edge of paper 6 7 Poor transfer of the image hollow character 6 8 Image smear toner bleed condensation 6 8 Large curl of paper 6 9 Paper jam in solid image when the leading edge...

Page 10: ...Counters 8 43 LMS 8 43 Configuration 8 43 Outline 8 44 Details 8 44 Method of confirming license option 8 44 Inactivity of the transmitted license 8 44 Erasing a License 8 46 E RDS 8 47 Configuration 8 47 REPORT 8 47 Configuration 8 47 Details 8 48 DOWNLOAD 8 52 Download 8 52 CLEAR 8 52 Configuration 8 52 DISPLAY 8 53 Configuration 8 53 ROM 8 53 Configuration 8 53 TEST MODE 8 53 Outline 8 53 Confi...

Page 11: ...l Circuit Diagram 2 10 VI General Circuit Diagram 3 10 VII General Circuit Diagram 4 10 VIII General Circuit Diagram 5 10 IX General Circuit Diagram 6 10 X General Circuit Diagram 7 10 XI General Circuit Diagram 8 10 XII General Circuit Diagram 9 10 XIII General Circuit Diagram 10 10 XIV List of User Mode XV Common Settings XV Timer Settings XV Adjustment Cleaning XVI Report Settings XVI Copy Sett...

Page 12: ...Update Firmware XXV Volume Control XXV Backup Data XXVI ...

Page 13: ...tem Turn power switch ON Power Supply Safety of Toner Notes When Handling the Lithium and Ni MH Batteries Notes Before it Works Serving Points to Note at Cleaning Notes On Assembly Disassembly Safety Precautions imageRUNNER 1750 1740 1730 Series ...

Page 14: ...TH DHHS RADIATION PERFORMANCE STANDARD 21CFR CHAPTER 1 SUBCHAPTER J A different description may be used for a different product Laser Safety When servicing the area around the laser assembly be sure to turn off the main power The machine s covers that can reflect laser light are identified by means of a warning label Figure If you must detach a cover showing the label be sure to take extra caution...

Page 15: ... F 0 3 Power Supply 1 As a general rule do not use extension cords Using an extension cord may result in a fire or electrical shock If an extension cord must be used however use one for local rated voltage and over untie the cord binding and insert the power plug completely into the extension cord outlet to ensure a firm connection between the power cord and the extension cord 2 The socket outlet ...

Page 16: ...ien gemäß der Anleitung beseitigen Notes Before it Works Serving At servicing be sure to turn OFF the power source according to the specified steps and disconnect the power plug Points to Note at Cleaning When performing cleaning using organic solvent such as alcohol be sure to check that the component of solvent is vaporized completely before assembling Notes On Assembly Disassembly Follow the it...

Page 17: ...1 1 Product Overview Product Overview Product Lineup Features Specifications Parts Name ...

Page 18: ...750 imageRUNNER 1740 imageRUNNER 1730 Print Speed 50ppm 40ppm 30ppm imageRUNNER 1750 1740 1730 Underlined 2 digit numeric figures indicate print speed ppm print per minute F 1 1 T 1 1 T 1 2 F 1 2 Option Pickup Delivery Image Reading System Options 1 2 3 4 6 7 5 No Product name Remarks and condition 1 imageRUNNER 1750 1740 1730 2 ADF Access Handle A1 3 Staple Finisher H1 4 Cassette Module Y1 Up to ...

Page 19: ... Interface Kit B1 4 Super G3 Fax Board AJ1 5 System Upgrade RAM C1 512MB 6 PCL Printer Kit AL1 512MB is required for RAM When using 256MB RAM System Upgrade RAM C1 is required 7 PS Printer Kit AL1 512MB is required for RAM When using 256MB RAM System Upgrade RAM C1 is required 8 Barcode Printing Kit B1 PCL Printer Kit AF1 is required 9 Color Send Kit Z1 512MB is required for RAM When using 256MB R...

Page 20: ... which accommodates paper up to A4 size Highly durable OPC drum is adopted User replaceable F 1 5 Canon s first B W MFP of toner supply type which accommodates paper up to A4 size Low running cost Improved maintainability Fixing Assembly and Drum Unit can be replaced by the user Replacement time for consumable parts and options by the service technician has been significantly reduced Performance F...

Page 21: ...AX send reception function of Direct send is available Restrictions Encryption secure pint is not supported A device doesn t enter Sleep when a secure print job is submitted Not collaborated with device authentication Job selection and password input are necessary even after device authentication F 1 6 F 1 7 Caution Job is erased by power OFF ON A secure print job can be submitted to a device up t...

Page 22: ... 91 to 105g m2 3 hole paper 4 hole paper Envelope No 10 COM10 ISO B5 Monarch ISO C5 DL Only when the option Cassette Unit Y1 is installed and the option Envelope Cassette D1 is installed in the 2nd cassette Paper type Multi purpose Tray Plain paper 64 to 90g m2 Recycled paper 64 to 90g m2 Heavy paper 91 to 128g m2 3 hole paper 4 hole paper Bond paper 90g m2 Transparency Label paper Envelope No 10 ...

Page 23: ... 21 21 2 sided Plain paper 64 90 48 37 39 37 30 28 Heavy paper 91 105 42 37 39 37 30 28 106 128 A5 R STMT R 1 sided Plain paper 64 90 25 25 25 25 25 25 Heavy paper 91 105 25 25 25 25 25 25 106 128 17 17 17 2 sided Plain paper 64 90 22 22 22 22 22 22 Heavy paper 91 105 22 22 22 22 22 22 106 128 T 1 6 T 1 7 Paper type See the table below for custom paper size Type Feeding direction mm Width directio...

Page 24: ...ront view Left side 14 13 12 11 10 5 4 3 2 1 6 7 8 9 1 ADF Left Cover 8 ADF Front Lower Cover 2 ADF Rear Cover 9 Reader Front Cover 3 ADF Upper Cover 10 Control Panel Unit 4 Side Guides 11 Front Cover 5 Original Feed Tray 12 Cassette 6 ADF Front Upper Cover 13 Left Cover 7 Original Delivery Tray 14 Reader Left Cover F 1 8 ...

Page 25: ... Controller Cover 8 Right Rear Fan Cover 3 Rear Cover 9 Right Front Fan Cover 4 Right Rear Cover 10 Support Column Cover 5 Multi purpose Tray Pickup Unit 11 Reader Right Front Cover 6 Right Front Cover 12 Reader Right Rear Cover F 1 9 Delivery Assembly 1 2 3 4 5 6 1 Reader Bottom Cover 2 Delivery Inner Cover 3 Delivery Outer Cover 4 Delivery Stopper 5 Inner Rear Cover 6 Reverse Tray F 1 10 ...

Page 26: ...elivery Reverse Roller 23 Multi purpose Tray Pickup Roller 6 ADF Pickup Roller 24 Multi purpose Tray Separation Pad 7 ADF Separation Pad 25 Vertical Path Roller 8 ADF Delivery Roller 26 Separation Roller Cassette 9 ADF Reverse Roller 27 Feed Roller Cassette 10 Drum Unit 28 Pickup Roller Cassette 11 Reverse Roller 29 Primary Charging Roller 12 Expansion Delivery Kit 30 Developing Assembly 13 Delive...

Page 27: ...ng ON OFF the Power Switch Be sure to turn OFF the main power switch when turning OFF the power The conventional shut down sequence process is not needed After turning OFF the power after turning OFF the Main Power Switch do not turn ON the main power switch again unless the screen disappears Do not turn OFF the power during downloading F 1 12 Description of Control Panel Control Panel 11 10 12 13...

Page 28: ...y Scan or Direct Print Scan Option Key System Monitor System Monitor Touch Panel Display 1 To enable SEND function Simple Send Expansion Kit Y1 is required 2 To enable FAX function Super G3 Fax Board AG1 is required Settings Registration Menu 1 Common Settings 6 Copy Settings 2 Timer Settings 7 Communications Settings 3 Adjustment Cleaning 8 Printer Settings 4 Report output 9 Address Book Settings...

Page 29: ...planation Technical Explanation Basic Configuration Original Exposure and Feed System Main Controller Laser Exposure System Image Formation System Fixing System Pickup Feed System External Auxiliary System Embedded RDS ...

Page 30: ...Main Controller DC Controller Option Board Controller System Duplexing Feed Delivery Transfer Pickup Fixing Fixing System Image Formation System Pickup Feed System Laser Exposure System Cassette Laser Scanner Unit F 2 1 Basic sequence Sequence at Power On Reader Backwarding Main power switch ON SREADY STBY Scanner motor LED CIS HP sensor Shading position Shading position Forwarding Print sequence ...

Page 31: ...reflection sensor AB Inch In ADF mode Main scanning direction by photo interrupter on ADF Sub scanning direction by photo interrupter on ADF ADF original pickup method Auto pickup delivery method ADF setting direction of original Original tray pickup face up stacking ADF setting position of original Original tray pickup center reference ADF separation method of original Upper separation by separat...

Page 32: ...unit 1 Cross Section Pickup roller Separation pad Feed roller Registration roller Lead roller 1 Lead roller 2 Reversal roller Delivery reversal roller Delivery roller Original pickup tray Platen guide Original delivery tray Delivery reversal flapper 2 Delivery reversal flapper 1 Delivery reversal roller upper Item Specification function Pickup roller Picks up the original Feed roller Separates and...

Page 33: ...Drives the delivery reversal flapper 1 Roller release solenoid SL8 Separates the delivery reversal roller from the mating delivery reversal roller during upstream reversal feed of the original Lead sensor PS25 Photo interrupter Detects the original read timing Registration sensor PS26 Photo interrupter Detects the original leading edge looping timing Stay sensor PS27 Photo interrupter Detects the ...

Page 34: ...03 Connector for power supply from host machine power supply unit J904 Connector for original size detection sensor 1 and 2 J905 Connector for reader motor J906 Connector for feed motor and delivery reversal motor of ADF J907 Connector for communication with main controller PCB of host machine J908 Connector for registration solenoid and pickup solenoid and flapper solenoid 1 and 2 J909 Connector ...

Page 35: ...eading edge of original 1 CIS position check CIS HP sensor HP F 2 9 F 2 10 Basic Sequence at Start Key ON Book mode 1 original Reverse Forward SCRW SCFW STBY STBY Start key ON Reader motor M10 LED CIS HP sensor PS24 Black shading and White shading Leading edge of original Shading position Shading position Trailing edge of original Copyboard glass reading start position 1 Moves to the start positio...

Page 36: ...start position 1 Black shading and White shading and Original scan CIS HP sensor HP Copyboard glass reading start position F 2 13 F 2 14 ADF Operation Mode ADF has four operation modes Operation mode names and outline of operations and associated print modes are given in the following table Operation mode name Outline of operation Associated print mode Forward pickup delivery Picks up reads and th...

Page 37: ...al Reading 2nd original Pickup and Formation of loop 1st original Delivery 2nd original Reading 2nd original Delivery End of job F 2 15 Forward Pickup Reversal Delivery Double sided original Double sided print Operation The original flows as shown below Note This operation is performed for all single sided originals irrespective of whether original width are the same or different Operation of doub...

Page 38: ...posure and Feed System Basic Operation ADF Operation Mode 1st original Reversal 2nd original Reading End of job 1st original Delivery 2nd original Feeding to upstream reversal path 2nd original Reversal and Formation of loop 2nd original Reading of reverse side 2nd original Feeding to downstream reversal path 2nd original Delivery F 2 17 ...

Page 39: ...e Contact image sensor CIS ADF open closed detection sensor PS23 Reader motor M10 drive signal Controls the rotation and its direction and speed of motor CIS HP sensor PS24 Detects that the contact image sensor CIS is at the home position ADF open closed detection sensor PS23 Detects the open or close status of the ADF F 2 18 Reader Motor Control Reader motor driver IC15 turns on off the reader mo...

Page 40: ... constant speed 4 Deceleration area Upon detection of the trailing edge the motor decelerates rapidly and stops 2 Backward Movement after Image Scan After image scan the carriage moves back to the contact image sensor CIS shading position at the constant speed 160 mm sec F 2 20 Contact Image Sensor CIS Outline The original is exposed to light and read using the contact image sensor CIS to read the...

Page 41: ...rming gain correction for the input brightness signal Driver circuit 11 Original scan sensor channel x11 3 2 1 4 6 8 p i x e l s 5 1 4 8 p i x e l s F 2 22 Enlargement Reduction Magnification Change in Main Scanning Direction In book mode or ADF mode In the main scanning direction image is read at 100 thereafter the data is subjected to processing by the main controller PCB to suit the selected re...

Page 42: ...plate LTRR LGL Upper left corner of original Sub scanning direction STMTR Size plate Main scanning direction Original size detection sensor 1 PS22 Original size detection sensor 2 PS21 F 2 23 Outline of Original Size Detection When the ADF is closed at 18 degrees the ADF open closed detection sensor PS23 turns on The output levels of the original size detection sensor 1 PS22 and original size dete...

Page 43: ...l size may be identified because the sensor output level does not change in the following cases When the black original When the original is a book its thickness does not allow the ADF to close fully making it difficult to detect the sensor level change When the ADF is not closed fully the sensor level change is not detected after lapse of the above time out time 2 seconds F 2 26 Original sizes ar...

Page 44: ...F Setting value 0 AB size 1 Inch size When both the original size detection sensor 1 PS22 and the original size detection sensor 2 PS21 detect no original sensor output levels do not change select the following service mode to change the original size to be detected SCAN READER OPTION BODY UNK A5R Setting value 0 Undefined size 1 A5R or STMTR Dust Detection Control Overview In ADF mode the machine...

Page 45: ... is performed at position A 2 The dust detection position moves to position B to perform the dust detection process there 3 The dust detection position moves to position C to perform the dust detection process there 4 a The dust free position is determined as the original read position in the order of priority A B C 4 b If dust is detected at all of positions A B and C position A is determined as ...

Page 46: ...N Dust detection correction control F 2 29 Image Processing Overview Major specifications and functions of the image processing system are as follows Original reading sensor array Number of lines 1 Number of pixels Total 5148 incl 5104 effective pixels Shading correction Shading correction Performed for each job Shading adjustment Performed in the Service mode Reader controller PCB Original readin...

Page 47: ...xel voltage levels by the A D converter F 2 31 Outline of Shading Correction The original reading sensor outputs are necessary even for the following reasons even when the density of the original is uniform 1 Variation in sensitivity among original reading sensor pixels 2 Variation in light intensity of rod lens array The machine performs shading correction to even out the original reading sensor ...

Page 48: ... CIS gain and offset correction SCAN READER FUNCTION CCD CCD ADJ DF white level adjustment SCAN READER FUNCTION CCD DF WLVL1 Original glass scan SCAN READER FUNCTION CCD DF WLVL2 Stream reading scan SCAN READER FUNCTION CCD DF WLVL3 Original glass scan SCAN READER FUNCTION CCD DF WLVL4 Stream reading scan Control of ADF Original Size Detection by ADF The size of the original set on the ADF is dete...

Page 49: ...ction sensor PS32 LGL ON ON LTRR ON OFF STMTR or undefined size OFF OFF LGL OFF ON When both the original width detection sensor PS31 and the original length detection sensor PS32 detect no original select the following service mode to change the original size to be detected SCAN FEEDER OPTION UNK A5R Setting value 0 Undefined size 1 A5R or STMTR Final Detection of Original Size The original lengt...

Page 50: ...oller loops the pickup solenoid SL5 turns on to raise the pickup unit Then the registration solenoid SL4 turns on and the feed motor M11 turns to rotate the registration roller feeding the original Original Pickup roller Shutter Shutter Separation pad Feed roller Delivery reversal motor M12 Pickup solenoid SL5 F 2 34 Reversal Operation Reversal operation is performed in the duplex printing mode or...

Page 51: ...oller from applying pressure to the paper 1 The flapper solenoid 1 turns off and the flapper solenoid 2 turns on to feed the original to the upstream reversal path SL7 SL6 Delivery reversal flapper 1 Flapper solenoid 1 OFF Delivery reversal flapper 2 Flapper solenoid 2 ON 2 After being fed by the specified distance in the upstream reversal path the original stops SL6 Delivery reversal flapper 2 Fl...

Page 52: ...stream reversal path SL7 Delivery reversal flapper 1 Flapper solenoid 1 ON 2 After being fed by the specified distance in the downstream reversal path the original stops Reversal roller 3 The reversal roller turns in the reverse direction to deliver the original Delivery roller F 2 38 F 2 39 F 2 40 Delivery Operation After being read the original is delivered to the original delivery tray using th...

Page 53: ...he specified time after the original was detected by the registration sensor Lead sensor delay jam PS25 When the lead sensor cannot detect the original within the specified time Lead sensor stationary jam PS25 When the trailing edge of the original cannot be detected after lapse of the specified time after the original was detected by the lead sensor Stay sensor delay jam PS27 When the stay sensor...

Page 54: ...r Q ty Estimated life 1 ADF Pickup Roller Unit FM4 7732 1 80 000 sheets 2 ADF Separation Pad FL3 5538 1 80 000 sheets Periodical Servicing None Perform as needed When replacing the parts Part name Operation Reference Contact image sensor CIS CIS gain and offset correction DF white level adjustment Refer to page 5 3 Copyboard glass Input the value of label on the copyboard glass DF white level adju...

Page 55: ...ttery for image backup at power failure to backup for 1 hour by 2 hour charging F 2 44 T 2 15 Main controller PCB J8109 J8106 J8202 J8115 J8200 J8201 J8114 BAT1 J8102 J8124 J8134 J8142 J8143 J8112 J8125 J8116 J8119 J8117 J8150 J8104 J8111 SW3 Jack Function Jack Function J8104 USB port J8134 Connector to connect to FAX J8106 Slot to connect to SO DIMM J8142 Connector to connect to Laser Scanner J81...

Page 56: ... A A A PC Original Copy Print output Scan Image data Other iR machine SEND FAX PullScan E Mail PDL Print F 2 46 Image Processing Module Configuration Processes image data for output to the printer unit Printer unit output image processing block Reader unit input image processing block Processes the image data read by the reader unit Main Controller PCB Reader Controller PCB DC Controller PCB SO DI...

Page 57: ...or diffusion To compression expansion editing block Edge emphasis Enlargement reduction intensify to density conversion density adjustment F adjustment gamma correction Main controller PCB Reader unit F 2 48 Compression Expansion Edit Processing Block Main controller PCB to printer unit output image processing block Enlargement reduction Rotation Integration Compression Expansion Reader image proc...

Page 58: ...tput Image Processing Main controller PCB To DC controller PCB Compression expansion editing block Binary density conversion Enlargement reduction Smoothing F 2 50 Image Data Flow of Copy Function Main controller PCB Image processing block for printer unit Image processing block for reader unit Reader unit Data compression Data rotation Data expansion SO DIMM DC controller PCB F 2 51 ...

Page 59: ... Function Image processing block for reader unit Reader unit Main controller PCB Data rotation Data expansion Resolution conversion SO DIMM USB2 0 To network compression data Ethernet port F 2 52 Image Data Flow of FAX Transmission Function Image processing block for reader unit Image processing block for FAX Super G3 Fax Board Main controller PCB Data rotation Data compression Data expansion SO D...

Page 60: ...eption Function Image processing block for printer unit Image processing block for fax Super G3 Fax Board Main controller PCB Data compression Data rotation Data expansion SO DIMM DC controller PCB F 2 54 Image Data Flow of PDL Function Rendering processing block Compression expansion editing block Processing block for printer unit DC controller PCB Main controller PCB SO DIMM Ethernet PDL F 2 55 ...

Page 61: ...planation Main Controller Service Tasks Periodical Servicing Technical Explanation Main Controller Service Tasks Periodical Servicing Service Tasks Periodically Replaced Parts None Consumable Parts None Periodical Servicing None ...

Page 62: ...e number of rotation Approx 36732 rpm 31715 rpm 2 speed control Type of bearing Oil Polygon mirror The number of facet 6 Φ40 Controls Synchronous control Main scanning direction synchronous control Laser intensity control APC control Others Laser ON OFF control Laser scanner motor control Laser shutter control T 2 17 T 2 18 T 2 19 T 2 20 Main Configuration Parts 1 2 4 3 Name Function 1 Laser Unit ...

Page 63: ...ame Function Image signal DATA C C laser image data signal entry DATA C C laser image data signal entry DATA B B laser image data signal entry DATA B B laser image data signal entry DATA A A laser image data signal entry DATA A A laser image data signal entry DATA D D laser image data signal entry DATA D D laser image data signal entry Laser control signal CTRL0 0 A B laser control signal CTRL0 1 ...

Page 64: ...start key is ON the machine drives D laser After BD PCB detects D laser the machine performs the APC laser intensity control of each laser Oncethe BD signal reaches the specified cycle the machine is ready to print Image data is output from the main controller based on the synchronous signal and laser isemitted corresponding to it In the case of A4 1 sheet PRINT STBY STBY INTR Laser scanner motor ...

Page 65: ... 1 0 1 OFF Forcible output 0 0 1 Forcible output Forcible output 1 1 0 Forcible output OFF Forcible output OFF 0 1 0 ON For APC control OFF 1 0 0 OFF ON For APC control 0 0 0 Discharge APC reset Fixed when laser is not used Discharge APC reset Fixed when laser is not used C laser D laser Laser control signal Laser status CNT1 0 CNT1 1 CNT1 2 C Laser D Laser 1 1 1 Image data output Image data outpu...

Page 66: ...er is formed inside image PCB Image data written in the line memory is read out by the readable signal RE_A RE_B RE_ C RE_D according to the 4 phase differences formed inside the delayPCB based on the BD synchronous signal BD_SYNCH and is sent to the laser driver J8143 BD_SYNCH 6 3 RE_A 2 3 RE_B 2 3 RE_C 2 3 RE_D 2 5 1 J8142 4 BD signal Main Controller PCB F 2 60 1 Synchronous PCB 4 VDO 2 Delay PC...

Page 67: ...machine controlsthe rotation speed by referring to the laser scanner motor rotation speed signal FG signal During image formation it controls the laser scanner motor rotationspeed based on BD signal Laser scanner motor rotation speed is controlled by speed up signal ACC signal and speed down signal DEC signal ACC DEC FG J208 DC Controller PCB F 2 61 Controlling the Laser Shutter Laser Shutter Cont...

Page 68: ...h Roller Diameter 10 Developing Developing method Dry 1 component toner projection development AC bias constant voltage control approx 800Vp p DC bias control approx 250 to 650V DC bias switch control Variable by density setting and Environment Sensor Detection Developing Cylinder OD Diameter 20 Toner Magnetic negative toner Toner level detection mechanism Toner detection by Toner Level Detection ...

Page 69: ... Photosensitive Drum 5 Waste Toner Feed Screw To feed toner that was collected by the Cleaning Blade into the Waste Toner Box 6 Photosensitive Drum To create image on the surface of Photosensitive Drum 7 Static Eliminator To make the back side of paper negatively charged to separate the paper from the Photosensitive Drum 8 Transfer Roller To make the back side of paper positively charged to transf...

Page 70: ... charging block To evenly make the surface of the Photosensitive Drum negatively charged 2 Laser exposure block To neutralize electric charge by scanning laser beam on the drum surface to create latent image 3 Developing block To create visible image by attaching toner that has been negatively charged from the Developing Cylinder to the latent static latent image on the surface of the Photosensiti...

Page 71: ...er Clutch CL2 Transfer Bias Static Eliminator Bias F 2 65 Sequence at printing Primary Charging AC Bias Main Motor M2 Primary Charging DC Bias Laser Developing AC Bias Developing DC Bias Developing Cylinder Clutch CL2 Transfer Bias Static Eliminator Bias Image formation sequence 1st sheet Image formation sequence 2nd sheet and later Sheet to sheet sequence Registration ON Registration ON Image wri...

Page 72: ...r Ejection Part Brush Roller Cleaning Blade Primary Charging Roller 1 M2 Main Motor 1 Main Motor drive signal Drum Unit Detection Charging AC bias is applied at Power on recovery from sleep state or opening closing the door to detect the Drum Unit by the return value F 2 68 Primary Charging Bias Control This machine performs direct charging by the Charging Roller AC bias is applied to the Primary ...

Page 73: ...2 Developing Assembly Toner Sensor CL2 Sleeve Clutch M2 Main Motor 1 Sleeve Clutch drive signal 2 Main Motor drive signal 3 Developing Assembly Toner Sensor detection signal F 2 70 Developing Bias Control DC bias and AC bias are applied to the Developing Cylinder 3 Density Setting Main Controller PCB Photosensitive drum Developing cylinder 2 Environment sensor 1 HVT PCB Developing AC bias control ...

Page 74: ...oping Assembly The Developing Clutch is turned On and the Main Motor M2 is driven 1 When output result of Developing Assembly Toner Sensor TS2 changes from H to L while the above conditions are satisfied To drive the Hopper Motor M6 intermittently to rotate for 1 sec and stop for 1 sec 1 The screw of Developing Assembly is driven by the Main Motor therefore supplying toner while the Main Drive Mot...

Page 75: ...riven to supply toner 2 When the Hopper Level Sensor detects presence of toner the machine resumes normal operation When the Hopper Level Sensor failed to detect presence of toner for more than 60 sec it is determined that there has been no replacement of a Toner Container Replacement when the power is turned ON When the Front Cover is opened closed the machine determines that a Toner Container ha...

Page 76: ... Transfer bias control signal 3 Environment sensor detection signal Transfer bias constant current controll Transfer bias which is applied to the Transfer Roller is controlled by the Transfer Bias Control Circuit in the DC Controller PCB to make constant current Transfer bias level control Transfer bias changes output value of transfer bias according to the environment detected by the Environment ...

Page 77: ...s at paper feed is strengthened Also the leading edge margin is set to 4 5mm Special Mode E Background density adjustment mode To darken the density of background such as watermark Off Default Normal control On The background density is darkened by strengthening the transfer bias T 2 30 Waste Toner Box Overview The toner which was not transferred to the paper but attached on the Photosensitive Dru...

Page 78: ... waste toner after the Waste Toner Full Sensor detected presence of a Waste Toner Box the counter of the Waste Toner Box is cleared When replacing a Waste Toner Box before the alert be sure to clear the following in service mode COUNTER DRBL 1 WST TNR Special full level detection When attaching a Waste Toner Container that has been used by the other machine or the counter information is lost for s...

Page 79: ...thod On demand fixing Fixing speed 139mm sec 1 1 speed high 0 8 acceleration 137mm sec 1 1 speed 133mm sec 1 1 speed slow 3 1 deceleration Fixing Heater Ceramic Heater Control temperature 208 deg C plain paper 1 Temperature Control Main Thermistor Sub Thermistor Cleaning mechanism Cleaning Roller Edge temperature rising control Down sequence Fixing Arch Control Loop Sensor Protection function Main...

Page 80: ...er image on paper is fixed by applying heat pressure Pressure Roller H1 H2 Fixing Heater Ceramic Heater TH1 Main Thermistor Engaged with the heater Temperature control and abnormal temperature rising detection TH2 Sub Thermistor Engaged with the heater Temperature control abnormal temperature rising detection edge temperature rising cooling control TP1 Thermoswitch A kind not engaged with the heat...

Page 81: ...ssembly to reduce time to start printing Flying Startl Print Temperature Control This is a control to increase fixing temperature to the target level and keep it during printing Startup initial rotation temperature control Print temperature control Paper interval temperature controll Down Sequence Control This is a control to prevent fixing failure due to temperature increase at the edge or temper...

Page 82: ...ng Motor is controlled at half speed to start operation The control continues for 10 sec at most until the machine receives a command to start printing F 2 79 Print temperature control Startup initial rotation temperature control A fixing temperature is increased to a printable temperature after receiving a command to start printing Print temperature control To set optimal target temperature to pr...

Page 83: ...ontrol temperature deg C 1 sided print 1st side of 2 sided print 2nd side of 2 sided print Normal Speed Low Speed Normal Speed Low Speed Plain paper 64 to 90g m2 Paper type 215 155 210 150 Heavy paper 1 91 to 105g m2 215 155 210 150 Heavy paper 2 106 to 128g m2 175 170 Bond paper 175 170 Transparency 150 Envelope 180 175 Special Mode N Medium 1 195 150 185 145 Special Mode N High 2 180 145 170 140...

Page 84: ...60 degrees C Operation Increasing paper interval to make longer temperature control at a temperature lower than that of normal print to reduce fixing temperature in 4 stages at most Fixing mode Stages LGL A4R LTRR A5R B5R EXE R STMTR Custom size Envelope Plain paper 64 to 90g m2 Heavy paper 1 91to 105g m2 Special Mode N Medium Normal 43 40 30 50 40 30 25 23 1 25 25 20 20 2 20 20 18 18 3 15 15 15 1...

Page 85: ...rature control for plain paper mode Auto to increase fixing performance Default This is a mode to switch between the normal temperature control and N1 mode 1 according to the environment temperature humidity Manual Medium to increase fixing performance Special Mode N Medium mode temperature control Manual High to increase fixing performance Special Mode N High mode 2 temperature control Special Mo...

Page 86: ...fer Roller drive speed of the Fixing Motor is reduced by 3 1 against the process speed The reduced speed is maintained until the paper creates an arch and the Arch Sensor is turned ON 2 After the Arch Sensor has been detected ON for consecutive 50msec or longer drive speed of the Fixing Motor is increased by 0 8 against the process speed The increased speed is maintained until the paper arch disap...

Page 87: ...000 When the Main Thermistor detects lower than 140 deg C for consecutive 400msec or longer Required E004 Thermistor disconnection detection error 0000 When removal of the connector J214 is detected for consecutive 30msec Not required E014 Error in rotation of Fixing Motor M1 0001 Detection is performed every 100msec since the start of drive and there has been no lock detection signal in 2sec Not ...

Page 88: ...eight Cassette 64 to 105g m2 Multi purpose Tray 64 to 128g m2 Paper size switching Cassette Auto switching Multi purpose Tray Manual switching Supported size for 2 sided print Cassette 210mm to 356mm 105g m2 Multi purpose Tray 210mm to 356mm 105g m2 3 2 sided print method Through path 1 Setting method when the size detection patterns are overlapped page 2 64 2 Long length paper is supported To mak...

Page 89: ...uplex Feed Sensor PS17 Cassette Paper Level Sensor B PS9 Loop Sensor PS19 Fixing Paper Sensor PS11 Registration Sensor PS20 Transparency Sensor PS12 Pre Registration Sensor SW2 Cassette Size Detection Switch NOTE Transparency detection of this machine is performed by the Transparency Sensor PS20 which is a flag type sensor Uneven speed at the time of transparency feed is detected to judge whether ...

Page 90: ...echnical Explanation Pickup Feed System Overview Paper Path Technical Explanation Pickup Feed System Overview Paper Path Paper Path Pickup From Cassette Reversing Point Delivery Point Pickup From Manual Feeder F 2 87 ...

Page 91: ... Plate When pickup takes place the Cassette Pickup Solenoid SL1 is turned ON so that the Pickup Roller is moved down When the Pickup Roller comes in contact with the surface of paper the paper is picked up by rotation of the roller Only a single paper picked up is moved to the feed path by the Feed Roller and the Separation Roller and moved as far as the Registration Roller by the Vertical Path Ro...

Page 92: ...2 Length Detection Size Length 1 2 3 4 A5 R 210 0 ON ON STMT R 215 9 ON ON B5 R 257 0 ON EXEC R 267 0 ON ON 16K R 270 0 ON ON LTR R 279 4 ON ON A4 R 297 0 ON ON ON LGL 355 6 ON No cassette In addition presence of the cassette is detected when the size switch is pushed If no switch is pushed it is judged as no cassette F 2 90 T 2 43 Rear Guide Plate Cassette Size Switch SW2 Rear Detection Rink Sett...

Page 93: ... OFF OFF 100 to 50 ON OFF OFF Approx 50 to approx 50 sheets ON ON OFF Approx 50 sheets or less ON No papers Tray Paper Flag Cassette Paper Sensor PS15 Cassette Paper Level Sensor A PS16 Cassette Paper Level Sensor B PS17 Paper Level Flag Lifter Gear T 2 45 F 2 92 OFF OFF OFF ON ON ON Cassette Paper Level Sensor B Cassette Paper Level Sensor A If the paper is full If the paper is approx half If the...

Page 94: ... 2 94 Lifter Control When Cassette is set The Lifting Plate is raised until the Cassette Lifting Plate Detection Sensor PS14 is turned ON During pickup The behavior is determined in accordance with the detection when the Cassette Pickup Solenoid SL3 is turned ON and the detection by the Cassette Lifting Plate Detection Sensor PS14 executed 100msec later 100msec later after Cassette Pickup Solenoid...

Page 95: ...S7 is referred When Multi purpose Tray Paper Sensor PS7 is ON Execute the pickup operation again If the Pre Registration Sensor PS12 is not turned ON after the start of re pickup operation a delay jam is notified When Multi purpose Tray Paper Sensor PS7 is OFF Terminate the pickup operation Paper Detection Presence absence of paper is detected by the Multi purpose Tray Paper Sensor PS7 When absenc...

Page 96: ...se the difference in paper size is small A4 R LTR R A5 R STATEMENT R B5 R EXEC R 16K R In case of envelope paper size mismatch is not detected because detection by the Registration Sensor PS11 is not stable when feeding the envelope Delivery Assembly Delivery Acceleration Control Since elasticity of bond paper is low delivery speed is increased when feeding the bond paper to improve the stackabili...

Page 97: ...erse Sensor PS6 as a reference Then reverse operation starts PS6 M4 Reverse Roller Duplex Reverse Stop Position 25 mm F 2 100 F 2 101 Duplex Re pickup Control If it is possible to secure necessary paper interval by estimating the paper interval with the preceding paper when the Duplex Feed Sensor PS8 is ON the paper is re picked up to the pre registration If the necessary paper interval cannot be ...

Page 98: ...ensor PS19 3 0A07 Power on Fixing Paper Sensor PS19 3 0108 Delay Delivery Sensor PS5 3 0208 Stationary Delivery Sensor PS5 3 0A08 Power on Delivery Sensor PS5 3 010A Delay Reverse Sensor PS6 3 020A Stationary Reverse Sensor PS6 3 0A0A Power on Reverse Sensor PS6 3 010B Delay Transparency Sensor PS20 3 020B Stationary Transparency Sensor PS20 3 0A0B Power on Transparency Sensor PS20 3 010D Delay Du...

Page 99: ... Item Parts No Q ty Life Remarks 1 Multi purpose Tray Pickup Roller FL2 3897 1 150 000 sheets 2 Multi purpose Tray Separation Pad FL3 4890 1 150 000 sheets 3 Cassette Pickup Roller FB6 3405 1 500 000 sheets Same as estimated product life 4 Cassette Feed Roller FC6 7083 1 80 000 sheets Replace with Cassette Separation Roller 5 Cassette Separation Roller FC6 6661 1 80 000 sheets Replace with Cassett...

Page 100: ...Sensor S2 T 2 50 Fan Overview Location of Fans FM4 FM1 FM8 FM7 FM5 FM3 FM2 FM6 No Name Function Error codes FAN1 Delivery Cooling Fan Rear To cool the Delivery Assembly E822 0004 E822 0005 FAN2 Delivery Cooling Fan Center To cool the Delivery Assembly E822 0002 E822 0003 FAN3 Delivery Cooling Fan Front To cool the Delivery Assembly E822 0000 E822 0001 FAN4 Power Supply Cooling Fan To cool power su...

Page 101: ...speed 2 At the time of jam error the driving state right before jam error is continued 3 Upper gray band sequence at 1 sided lower black band sequence at 2 sided print 4 Fan is not driven at 1 sided print It is driven at full speed from the 2nd side at 2 sided print F 2 105 Power supply Internal power supply 3 3V 24VU 24VR 5VR 3 3V 3 3V 5VC 3 3V 3 3V 24VR 5VC 5VR 3 3V 24VR 5VR 24VR 24VU 24VR 24VU ...

Page 102: ...n control panel Occurrence of job Occurrence of service call Press of energy saving key Lapse of 5 seconds after completion of job 5 seconds after completion of job or network communication Network alarm FAX reception Press of power switch on control panel Standby mode The mode that can start operation immediately and all the power is supplied in this mode Energy saver mode The mode to turn OFF ju...

Page 103: ...uxiliary System Service Tasks Periodical Servicing Conditions to operate the heater Drum Heater When the Environment Switch is turned ON At standby ON At printing OFF When the Main Power Switch is turned OFF ON At sleep state ON T 2 52 Service Tasks Periodically Replaced Parts None Consumable Parts None Periodical Servicing None ...

Page 104: ... system without attaching any extra hardware equipment Service cautions 1 After performing the following service actions it is necessary to perform initializing E RDS settings CLEAR ERDS DAT and communication test E RDS COM TEST Failure to do so will result that the counter transmitting value to the UGW may become unusual RAM clear of MNCON PCB SRAM Board Also after replacing the main controller b...

Page 105: ...rmation item 3 Is there a proxy server If there is a proxy server in use find out the following Proxy server address Port No for proxy server Information item 4 Is proxy server authentication required If proxy server authentication is required find out the following User name and password required for proxy authentication 3 Network settings Based on the results of the information obtained in 2 Adv...

Page 106: ... IP Settings IPv4 Settings DNS Server buttons 2 Set the DNS settings based on the result obtained in 2 Advance preparations Information item 2 1 Select DNS Server Address Settings F 2 112 F 2 113 2 Select Primary DNS Server and enter the IP address of the primary DNS server Example 172 001 016 010 3 If the secondary DNS server is installed select Secondary DNS Server and enter the IP address of th...

Page 107: ...n item 3 a Use Proxy to On b Enter the server address c Enter port Number Validation 1 to 65 535 d If proxy server authentication is required Touch Set Authentication F 2 115 F 2 116 e Set the following items based on the result obtained in 2 Advance preparations Information item 4 Set Use Proxy Authentication to On Enter User name and Password and touch the OK button f Touch the OK button 3 Touch...

Page 108: ...atest loggings retained Max 128 characters for Error information CLEAR ERDS DAT Initialization of E RDS SRAM data SRAM data of E RDS is initialized and returned to the factory setting value at shipment CLEAR CA KEY Initialization of CA certificate When the power is turned OFF ON after execution the CA certificate in the factory setting is automatically installed REPORT REPORT OUTPUT ERDS COM LOG L...

Page 109: ... 1 Start Service Mode 2 Select CLEAR CA KEY and touch the OK button 3 Reboot the device CAUTION If a key and a CA certificate have been registered in order to use a function other than E RDS it is necessary to register again from Remote UI 4 Start Service Mode See 1 for the procedure 5 Select E RDS E RDS SWITCH and set value 1 then touch OK NOTE This operation enables the communication function wi...

Page 110: ...default CA certificate file it is required to delete the certificate file after E RDS initialization and install the factory default CA certificate file For detailed procedures see Steps to E RDS settings step 3 COM LOG Report A report of communication error log information on five affairs can be output Report output procedure 1 Start Service Mode For the procedures see Steps to E RDS settings ste...

Page 111: ...ice mode counter postServiceCallLog when the service log was obtained from the device At transmission of an alarm log and service mode counter postAlarmLog when the alarm log was obtained from the device NOTE The retry data will be sent at interval of 5 n minutes n retries 5 10 15 minutes up to 30 minutes No 4 Q How many log data can be stored A Up to 5 log data can be saved The data size of error...

Page 112: ... from another PC connected to same network Request the user to ping the main unit from a PC connected to same network Does the main unit respond YES Proceed to Step 4 NO Confirm the details of the main unit s IP address and subnet mask settings F 2 120 4 Confirm DNS connection a Select Additional Functions User Mode System Settings Network Settings TCP IP Settings IPv4 Settings DNS Settings DNS Se...

Page 113: ... settings has changed If RGW ADDRESS or RGW PORT settings has changed restore initial values For initial values see E RDS setting items No 3 Symptom Registration information of an E RDS is once deleted from the UGW server and is re registered after that If a communication test is not performed then device information on the UGW becomes invalid Causes When registration of the E RDS is deleted from ...

Page 114: ...e end of the message this indicates that there has been an error in the HTTPS communication method Try again after a period of time If the error persists check the UGW status with the UGW administrator 10 8xxx 0201 8xxx 0202 8xxx 0203 8xxx 0204 8xxx 0206 Server schedule is invalid During the communication test there has been some kind of error in the schedule values passed from UGW When the error ...

Page 115: ...error occurred Check that the value of URL of UGW RGW ADDRESS is https a01 ugwdevice net ugw agentif010 No Code Error strings Cause Remedy 27 8xxx 2046 Server certificate expired The route certificate registered with the device has expired Certificate other than that initially registered in the user s operating environment is being used but has not been registered with the device The device time a...

Page 116: ...3 3 Periodical Service Periodical Service List of periodically replacement parts consumable parts and locations for cleaning ...

Page 117: ...0 000 sheets Every 160 000 sheets Every 180 000 sheets 1 Image Formation System Waste Toner Container FM4 8035 1 100 000 sheets DRBL 1 WST TNR Specified with 6 original 2 Transfer Roller FM4 6522 1 180 000 sheets DRBL 1 TR ROLL 3 Static Eliminator FL3 4857 1 90 000 sheets DRBL 1 SP SC EL 4 Fixing System Fixing Unit 120V FM4 6495 230V FM4 8050 1 160 000 sheets DRBL 1 FX UNIT 5 Pickup system Cassett...

Page 118: ...acement parts consumable parts and locations for cleaning Consumable parts 11 10 5 6 4 3 2 1 7 8 9 1 Static Eliminator 2 Transfer Roller 3 Multi purpose Tray Pickup Roller 4 Multi purpose Tray Separation Pad 5 Fixing Assembly 6 Waste Toner Container 7 Cassette Separation Roller 8 Cassette Feed Roller 9 Developing Assembly 10 ADF Separation Pad 11 ADF Pickup Roller Unit F 3 1 ...

Page 119: ...bly Disassembly Assembly Preface List of Parts List of Connectors External Cover Internal System Original Exposure Feed System Controller System Laser Exposure System Image Formation System Fixing System Pickup Feed System ...

Page 120: ...nsportation of the printer remove the cartridge if required When the cartridge is out of the printer put it in a protective bag even in a short period of time to prevent the adverse effect of light 3 Reassembling procedures are followed by the reverse of disassembly unless otherwise specified 4 Note the length diameters and locations of screws as you remove them When reassembling the printer be su...

Page 121: ...er to page 4 52 6 ADF Front Upper Cover 7 Original Delivery Tray 8 ADF Front Lower Cover 9 Reader Front Cover Refer to page 4 33 10 Control Panel Unit Refer to page 4 36 11 Front Cover Refer to page 4 24 12 Cassette F 4 1 No Name Reference 13 Left Cover Refer to page 4 27 14 Reader Left Cover 1 2 3 4 5 6 No Name Reference 1 Reader Bottom Cover Refer to page 4 36 2 Delivery Inner Cover Refer to pag...

Page 122: ...ge 4 24 4 Right Rear Cover Refer to page 4 26 5 Multi purpose Tray Pickup Unit 6 Right Front Cover Refer to page 4 25 7 Right Door Unit Refer to page 4 26 8 Right Rear Fan Cover 9 Right Front Fan Cover 10 Support Column Cover Refer to page 4 32 11 Reader Right Front Cover 12 Reader Right Rear Cover F 4 3 T 4 3 Internal View 1 2 3 No Name Reference 1 Right Inner Cover Refer to page 4 29 2 Developin...

Page 123: ...y Assembly List of Parts List of Main Unit List of Main Unit 1 2 3 4 F 4 5 No Name Reference Adjastment during parts replacement 1 ADF Pickup Unit Refer to page 4 53 2 ADF Unit Refer to page 4 43 3 Reader Unit Refer to page 4 44 4 Operation Panel Unit Refer to page 4 36 T 4 5 ...

Page 124: ...n Unit 7 6 5 2 4 3 1 F 4 6 No Name Reference Adjastment during parts replacement 1 Fixing Drive Unit Refer to page 4 81 2 Right Door Unit Refer to page 4 26 3 Transfer Unit 4 Multi purpose Tray Unit 5 Fixing Assembly Refer to page 4 79 6 Pre registration Guide Unit 7 Casstte Pickup Unit Refer to page 4 87 T 4 6 ...

Page 125: ...loping Assembly Refer to page 4 69 6 Main Drive Unit Refer to page 4 73 F 4 7 T 4 7 Electrical Components ADF Unit Sensor PS26 PS27 PS25 PS28 PS29 PS30 PS31 PS32 No Name Main Unit Reference Adjastment during parts replacement PS26 Registration Sensor ADF Pickup Unit PS27 Stay Sensor ADF Pickup Unit PS25 Lead Sensor ADF Pickup Unit PS28 Reversal Sensor ADF Pickup Unit PS29 Timing Sensor ADF Pickup ...

Page 126: ...d ADF Pickup Unit M11 Feed Motor ADF Pickup Unit M12 Delivery Reversal Motor ADF Pickup Unit SL5 Pickup Solenoid ADF Pickup Unit SL6 Flapper Solenoid 2 ADF Pickup Unit F 4 9 T 4 9 Reader Unit PCB3 M10 PS22 PS21 PS24 PS23 No Name Main Unit Reference Adjastment during parts replacement PS24 CIS HP Sensor Reader Unit PS23 ADF Open Closed Detection Sensor Reader Unit PCB3 Reader Controller PCB Reader ...

Page 127: ...6 M5 M7 M1 M2 F 4 11 No Name Main Unit Reference Adjastment during parts replacement M4 Reverse Feed Motor Delivery Reverse Unit M3 Waste Toner Motor Main Unit M9 Lifter Motor Casstte Pickup Unit M8 Pickup Motor Main Unit M6 Hopper Motor Hopper Unit M5 Bottle Motor Hopper Unit M7 Duplex Feed Motor Main Drive Unit M1 Fixing Motor Fixing Drive Unit M2 Main Motor Main Drive Unit T 4 11 ...

Page 128: ...Heat Exhaust Fan Front Right Door Unit FM7 Delivery Cooling Fan Front Main Unit FM8 Developing Cooling Fan Rear Main Unit FM4 Power Supply Cooling Fan Main Unit FM3 Delivery Cooling Fan Front Delivery Reverse Unit FM1 Delivery Cooling Fan Rear Delivery Reverse Unit FM2 Delivery Cooling Fan Center Main Unit F 4 12 T 4 12 Clutch CL2 CL1 No Name Main Unit Reference Adjastment during parts replacement...

Page 129: ...lenoid Casstte Pickup Unit SL1 Multi purpose Tray Pickup Solenoid Multi purpose Tray Unit SL2 Reverse Feed Solenoid Right Door Unit F 4 14 T 4 14 Heater Speaker THM2 THM1 TP1 H2 H1 SP1 No Name Main Unit Reference Adjastment during parts replacement THM1 Fixing Thermistor Fixing Assembly THM2 Sub Thermistor Fixing Assembly TP1 Fixing Thermoswitch Fixing Assembly H2 Sub Heater Fixing Assembly H1 Fix...

Page 130: ... Manual Feeder Paper Sensor Multi purpose Tray Unit PS12 Pre registration Sensor Main Unit PS11 Registration Sensor Main Unit PS8 Duplex Feed Sensor Right Door Unit PS9 Arch Sensor Transfer Unit PS18 Fixing Pressure Release Sensor Fixing Assembly PS19 Fixing Paper Sensor Fixing Assembly THU1 Environment Sensor Main Unit PS2 Waste Toner Full Sensor Main Unit PS3 Waste Toner Motor Rotation Sensor Ma...

Page 131: ...ry Reverse Unit PS1 Front Cover Sensor Main Unit PS20 Transparency Sensor Casstte Pickup Unit TS2 Developing Assembly Toner Sensor Developing Assembly PS13 Cassette Pickup Sensor Casstte Pickup Unit PS14 Cassette Lifting Plate Sensor Casstte Pickup Unit PS17 Cassette Paper Level Sensor B Casstte Pickup Unit PS16 Cassette Paper Level Sensor A Casstte Pickup Unit PS15 Cassette Paper Sensor Casstte P...

Page 132: ...e Main Unit Reference Adjastment during parts replacement PCB4 Control Panel CPU PCB Operation Panel Unit Refer to page 4 36 PCB7 Leser Driver PCB Laser Scanner Unit PCB5 HVT PCB Main Unit Refer to page 4 60 PCB6 Power Supply PCB Main Unit Refer to page 4 62 PCB10 FAX PCB Main Unit PCB2 Main Controller PCB Main Unit Refer to page 4 58 PCB1 DC Controller PCB Main Unit Refer to page 4 57 F 4 19 T 4 ...

Page 133: ...Controller PCB J301 PCB5 HVT PCB J210 PCB1 DC Controller PCB J2213 FM2 Delivery Cooling Fan Center J210 PCB1 DC Controller PCB J21 J40 J2300 FM1 Delivery Cooling Fan Rear J210 PCB1 DC Controller PCB J21 J40 J2214 FM3 Delivery Cooling Fan Front J210 PCB1 DC Controller PCB J21 J2210 PS4 Delivery Paper Full Sensor J210 PCB1 DC Controller PCB J21 J2211 PS5 Delivery Sensor J210 PCB1 DC Controller PCB J...

Page 134: ...J8 J2217 PS7 Multi purpose Tray Paper Sensor J213 PCB1 DC Controller PCB J20 J2233 M8 Pickup Motor J213 PCB1 DC Controller PCB J13 J2241 SW2 Cassette Size Detection Switch J213 PCB1 DC Controller PCB J9 J2234 SL3 Cassette Pickup Solenoid J213 PCB1 DC Controller PCB J9 J2235 M9 Lifter Motor J213 PCB1 DC Controller PCB J9 J2236 PS13 Cassette Pickup Sensor J213 PCB1 DC Controller PCB J9 J2237 PS14 Ca...

Page 135: ...2206 PS3 Waste Toner Motor Rotation Sensor J209 PCB1 DC Controller PCB J22 J2207 M3 Waste Toner Motor J209 PCB1 DC Controller PCB J15 J3 J2209 TS2 Developing Assembly Toner Sensor J209 PCB1 DC Controller PCB J15 J2204 PS1 Front Cover Sensor J209 PCB1 DC Controller PCB J15 J2205 PS2 Waste Toner Full Sensor J209 PCB1 DC Controller PCB J15 J60 J2302 FM7 Developing Cooling Fan Front J209 PCB1 DC Contr...

Page 136: ...S J211 PCB1 DC Controller PCB J6 J2227 M6 Hopper Motor J211 PCB1 DC Controller PCB J2228 CL1 Registration Clutch J211 PCB1 DC Controller PCB J2229 CL2 Developing Cylinder Clutch J211 PCB1 DC Controller PCB J2230 M7 Duplex Feed Motor J211 PCB1 DC Controller PCB J7 J2231 PS11 Registration Sensor J211 PCB1 DC Controller PCB J7 J2232 PS12 Pre registration Sensor T 4 21 ...

Page 137: ... Supply PCB J204 PCB1 DC Controller PCB J8112 PCB2 Main Controller PCB J205 PCB1 DC Controller PCB J105 PCB6 Power Supply PCB J215 PCB1 DC Controller PCB J01 Laser Scanner Motor J8106 PCB2 Main Controller PCB SO DIMM J8114 PCB2 Main Controller PCB J3 PCB4 Control Panel CPU PCB J8125 PCB2 Main Controller PCB J106 PCB6 Power Supply PCB J8134 PCB2 Main Controller PCB J1002 PCB10 FAX PCB J8142 PCB2 Ma...

Page 138: ...ize Sensor 2 J905 PCB3 Reader Controller PCB J922 M10 Reader Motor J911 PCB3 Reader Controller PCB J923 PS24 CIS HP Sensor J911 PCB3 Reader Controller PCB J924 PS23 ADF Open Closed Detection Sensor J101 PCB6 Power Supply PCB J2510 J2502 PS18 Fixing Pressure Release Sensor J101 PCB6 Power Supply PCB J2510 J2501 PS19 Fixing Paper Sensor J101 PCB6 Power Supply PCB J2510 J2511 H1 H2 Fixing Heater Sub ...

Page 139: ...CB3 Reader Controller PCB J926 SL4 Registration Solenoid J908 PCB3 Reader Controller PCB J927 SL5 Pickup Solenoid J909 PCB3 Reader Controller PCB J930 PS29 Timing Sensor J909 PCB3 Reader Controller PCB J931 PS30 Original Set Sensor J909 PCB3 Reader Controller PCB J932 J939 PS31 Original Width Detection Sensor J909 PCB3 Reader Controller PCB J932 J940 PS32 Original Length Detection Sensor J910 PCB3...

Page 140: ...nal Feed Tray Refer to page 4 52 6 ADF Front Upper Cover 7 Original Delivery Tray 8 ADF Front Lower Cover 9 Reader Front Cover Refer to page 4 33 10 Control Panel Unit Refer to page 4 36 11 Front Cover Refer to page 4 24 12 Cassette F 4 24 No Name Reference 13 Left Cover Refer to page 4 27 14 Reader Left Cover 1 2 3 4 5 6 No Name Reference 1 Reader Bottom Cover Refer to page 4 36 2 Delivery Inner ...

Page 141: ...Refer to page 4 24 4 Right Rear Cover Refer to page 4 26 5 Multi purpose Tray Pickup Unit 6 Right Front Cover Refer to page 4 25 7 Right Door Unit Refer to page 4 26 8 Right Rear Fan Cover 9 Right Front Fan Cover 10 Support Column Cover Refer to page 4 32 11 Reader Right Front Cover 12 Reader Right Rear Cover F 4 26 T 4 26 Internal View 1 2 3 No Name Reference 1 Right Inner Cover Refer to page 4 2...

Page 142: ...sembly Assembly External Cover Internal System Removing the Rear Cover Procedure Removing the Front Cover Procedure 1 Open the Front Cover 1 2 Remove the Front Cover 1 2 Screws 2 2 Pins 3 x2 1 2 2 3 F 4 28 Removing the Rear Cover Procedure 1 Remove the Rear Cover 1 6 Screws 2 2 Hooks 3 2 2 2 3 x6 1 F 4 29 ...

Page 143: ...nternal System Removing the Right Front Cover Procedure Removing the Right Front Cover Procedure NOTE The following shows the 3 claws 1 and 2 bosses 2 of the Right Front Cover 1 1 2 2 F 4 30 1 Open the Front Cover 1 and Right Door Unit 2 and remove the screw 3 1 2 3 F 4 31 2 Remove the Right Front Cover 1 3 Claws 2 2 Bosses 3 x3 2 3 3 1 F 4 32 ...

Page 144: ...the 2 claws 1 1 boss 2 and 1 hook 3 1 1 2 3 F 4 33 1 Open the Right Door Unit 1 2 Remove the Right Rear Cover 2 1 Screw 3 2 Claws 4 1 Boss 5 1 Hook 6 3 1 4 4 2 6 5 x2 F 4 34 Removing the Right Door Unit Preparation 1 Remove the Right Front Cover Refer to page 4 25 2 Remove the Right Rear Cover Refer to page 4 26 Procedure 1 Pull out the cassette 2 While holding the Right Door Unit remove the 2 Doo...

Page 145: ...ire Saddle 2 2 Connectors 3 5 Screws 4 x3 1 4 3 4 x2 x2 x2 2 2 3 F 4 36 Removing the Left Cover Preparation 1 Remove the Rear Cover Refer to page 4 24 2 Remove the Delivery Outer Cover Refer to page 4 29 Procedure 1 Open the cassette 1 and remove the Left Cover 2 while lifting the host machine 1 Screw 3 5 Claws 4 4 Hooks 5 CAUTION When lifting the host machine hold the rear side of the bottom of t...

Page 146: ...er Internal System Removing the Inner Rear Cover Procedure x5 1 4 4 2 3 5 5 F 4 38 Removing the Inner Rear Cover Preparation 1 Remove the Rear Cover Refer to page 4 24 2 Remove the Delivery Outer Cover Refer to page 4 29 3 Remove the Left Cover Refer to page 4 27 Procedure 1 Remove the Inner Rear Cover 1 1 Claw 2 6 Hooks 3 1 2 3 3 3 F 4 39 ...

Page 147: ...Procedure 1 Open the Front Cover 1 and remove the Delivery Outer Cover 2 1 Claw 3 3 Hooks 4 1 2 3 4 F 4 40 Removing the Delivery Inner Cover Preparation 1 Remove the Rear Cover Refer to page 4 24 2 Remove the Delivery Outer Cover Refer to page 4 29 3 Remove the Left Cover Refer to page 4 27 4 Remove the Inner Rear Cover Refer to page 4 28 Procedure 1 Remove the Control Panel Unit 1 2 Remove the De...

Page 148: ...r 1 when assembling 2 1 F 4 42 Removing the Right Inner Cover Preparation 1 Remove the Toner Cartridge Refer to page 4 68 2 Remove the Waste Toner Container Refer to page 4 67 3 Remove the Drum Unit Refer to page 4 68 4 Remove the Developing Assembly Refer to page 4 69 5 Remove the Front Cover Refer to page 4 24 6 Remove the Right Front Cover Refer to page 4 25 Procedure 1 Return the Toner Cartrid...

Page 149: ...embly Assembly External Cover Internal System Removing the Right Inner Cover Procedure 2 Remove the Right Inner Cover 1 4 Hooks 2 1 Claw 3 1 2 2 3 2 F 4 44 CAUTION Be sure to fit the 2 hooks 1 at the upper side of the Right Inner Cover into the 2 holes 2 of the Support Column Cover when assembling 1 1 1 2 2 F 4 45 ...

Page 150: ...page 4 24 6 Remove the Right Front Cover Refer to page 4 25 7 Remove the Right Inner Cover Refer to page 4 30 Procedure 1 Remove the Left Inner Cover 1 3 Screws 2 x3 1 2 2 F 4 46 Removing the Support Column Cover Preparation 1 Remove the Rear Cover Refer to page 4 24 2 Remove the Delivery Outer Cover Refer to page 4 29 3 Remove the Left Cover Refer to page 4 27 4 Remove the Inner Rear Cover Refer ...

Page 151: ... Cover Refer to page 4 24 2 Remove the Delivery Outer Cover Refer to page 4 29 3 Remove the Left Cover Refer to page 4 27 4 Remove the Inner Rear Cover Refer to page 4 28 Procedure 1 Open the Right Door Unit 1 and remove the ADF Unit 2 2 Remove the Reader Right Rear Cover 3 1 Screw 4 2 Hooks 5 1 2 3 4 5 F 4 48 3 Remove the Reader Right Front Cover 1 1 Claw 2 2 Hooks 3 1 2 3 4 Remove the Reader Lef...

Page 152: ...ove the Reader Front Cover 1 2 Screws 2 4 Bosses 3 1 3 2 3 3 2 F 4 51 Removing the Reader Rear Cover Preparation 1 Remove the ADF Unit Refer to page 4 43 2 Remove the Rear Cover Refer to page 4 24 3 Remove the Delivery Outer Cover Refer to page 4 29 4 Remove the Left Cover Refer to page 4 27 Procedure 1 Open the Right Door Unit 1 and remove the Reader Right Rear Cover 2 1 Screw 3 2 Hooks 4 1 2 3 4...

Page 153: ...bly Assembly External Cover Internal System Removing the Reader Rear Cover Procedure 2 Remove the Reader Rear Cover 1 1 Connector 2 2 Screws 3 1 Protrusion 4 3 Hooks 5 x2 4 1 3 3 5 5 5 2 F 4 53 CAUTION Put the harness 1 through the part in the Rear Guide where the harness is to be passed A when assembling 1 A F 4 54 ...

Page 154: ...4 33 7 Remove the Right Front Cover Refer to page 4 25 8 Remove the Support Column Cover Refer to page 4 32 Procedure 1 Remove the Reader Bottom Cover 1 4 Hooks 2 2 2 1 F 4 55 Removing the Control Panel Unit Preparation 1 Remove the Rear Cover Refer to page 4 24 2 Remove the Delivery Outer Cover Refer to page 4 29 3 Remove the Left Cover Refer to page 4 27 4 Remove the Inner Rear Cover Refer to pa...

Page 155: ... Removing the Control Panel Unit Procedure Disassembly Assembly External Cover Internal System Removing the Control Panel Unit Procedure 2 Disconnect the Flat Cable 1 1 Guide 2 1 2 F 4 57 3 Remove the Control Panel Unit 1 4 Screws 2 1 Hook 3 x2 x2 2 2 2 1 2 3 F 4 58 ...

Page 156: ...l System Removing the Control Panel Unit Procedure Disassembly Assembly External Cover Internal System Removing the Control Panel Unit Procedure CAUTION Be sure to pass the Flat Cable 1 through the guide 2 of the Control Panel Lower Rear Cover 1 2 2 1 F 4 59 ...

Page 157: ...r to page 4 50 2 ADF Pickup Roller Unit ADF Upper Cover Unit Refer to page 4 51 3 ADF Upper Cover Unit ADF Unit Refer to page 4 48 4 ADF Pickup Tray ADF Unit Refer to page 4 52 5 ADF Pickup Unit ADF Unit Refer to page 4 53 6 ADF Unit Main Unit Refer to page 4 43 7 Reader Unit Main Unit Refer to page 4 44 8 Copyboard Glass Reader Unit Refer to page 4 40 9 CIS Unit Reader Unit Refer to page 4 47 10 ...

Page 158: ...Removing the Copyboard Glass Procedure CAUTION Place the removed Copyboard Glass on a cloth etc to avoid damaging the bottom sheet When removing the Copyboard Glass take care not to touch the glass surface If the surface becomes dirty clean it with lint free paper F 4 61 1 Open the ADF Unit 1 2 Remove the Glass Retainer Plate 2 2 Screws 3 x2 1 3 2 3 Remove the Copyboard Glass 1 1 F 4 62 F 4 63 ...

Page 159: ...ce mode SCAN READER FUNCTION CCD DF WLVL1 The white level during BOOK mode is read checking the transmission of the glass for BOOK mode 2 Place a sheet of paper which is normally used by the user on the ADF and execute the following service mode SCAN READER FUNCTION CCD DF WLVL2 The white level during DF mode stream reading is read checking the transmission of the glass for stream reading reading ...

Page 160: ...h the glass surface If the surface becomes dirty clean it with lint free paper 1 Open the ADF Unit 1 2 Remove the Glass Retainer Plate 2 2 Screws 3 1 x2 3 2 F 4 65 3 Remove the ADF Reading Glass 1 1 CAUTION When removing the ADF Reading Glass take care not to touch the glass surface Attached soiling may cause white line black line in the images If soiling is attached clean it with lint free paper ...

Page 161: ... DF mode stream reading is read checking the transmission of the glass for stream reading reading both sides of the chart 3 Place a sheet of paper which is normally used by the user on the Copyboard Glass and execute the following service mode SCAN READER FUNCTION CCD DF WLVL3 The white level during BOOK mode is read checking the transmission of the glass for BOOK mode 4 Place a sheet of paper whi...

Page 162: ...over Refer to page 4 29 4 Remove the Left Cover Refer to page 4 27 5 Remove the Inner Rear Cover Refer to page 4 24 6 Remove the Delivery Inner Cover Refer to page 4 29 7 Remove the Reader Front Cover Refer to page 4 33 8 Remove the Right Front Cover Refer to page 4 25 9 Remove the Support Column Cover Refer to page 4 32 10 Remove the Reader Bottom Cover Refer to page 4 36 11 Remove the Control Pa...

Page 163: ...osure Feed System Removing the Reader Unit Procedure 2 Pass the Flat Cable 1 through the hole A of the plate and downward 3 Remove the 2 Screws 2 1 2 A x2 4 Remove the Reader Right Front Fixation Plate 1 and the Reader Right Rear Fixation Plate 2 4 Screws 3 x4 1 2 3 3 F 4 72 F 4 73 5 Remove the Reader Unit 1 4 Screws 2 x4 1 2 F 4 74 ...

Page 164: ...age 4 43 2 Remove the Rear Cover Refer to page 4 24 3 Remove the Delivery Outer Cover Refer to page 4 29 4 Remove the Left Cover Refer to page 4 27 5 Remove the Reader Rear Cover Refer to page 4 34 6 Remove the Copyboard Glass Refer to page 4 40 Procedure 1 Remove the Reader Controller PCB 1 1 Harness Retainer 2 3 Connectors 3 2 Flat Cables 4 2 Screws 5 x2 x5 1 2 3 3 3 4 4 5 5 F 4 75 CAUTION Fit t...

Page 165: ...the CIS Unit Procedure Removing the CIS Unit Preparation 1 Remove the Copyboard Glass Refer to page 4 40 Procedure CAUTION Be sure not to touch the document reading part A of the CIS Unit when disassembling assembling A F 4 77 1 Move the CIS Unit 1 to the center 1 F 4 78 2 Remove the CIS Unit 1 1 Harness Retainer 2 1 Flat Cable 3 2 Shafts 4 1 1 2 3 4 F 4 79 ...

Page 166: ...sion of the glass for BOOK mode 2 Place a sheet of paper which is normally used by the user on the ADF and execute the following service mode SCAN READER FUNCTION CCD DF WLVL2 The white level during DF mode stream reading is read checking the transmission of the glass for stream reading reading both sides of the chart 3 Place a sheet of paper which is normally used by the user on the Copyboard Gla...

Page 167: ...ing the ADF Upper Cover Unit Procedure Disassembly Assembly Original Exposure Feed System Removing the ADF Upper Cover Unit Procedure 2 Remove the ADF Upper Cover Unit 1 1 Link 2 2 Shafts 3 3 3 2 1 F 4 81 3 Return the Pickup Upper Guide 1 to the original position 1 F 4 82 ...

Page 168: ...ng the ADF Separation Pad Procedure Removing the ADF Separation Pad Procedure CAUTION Be sure not to touch the surface of the pad when disassembling assembling 1 Open the ADF Upper Cover Unit 1 and remove the ADF Separation Pad 2 2 Claws 3 x2 3 1 2 F 4 83 CAUTION Be sure to fit the spring 1 of the ADF Separation Pad into the 2 bosses 2 when assembling 2 1 2 F 4 84 ...

Page 169: ...up Roller Unit Procedure Removing the ADF Pickup Roller Unit Preparation 1 Remove the ADF Upper Cover Unit Refer to page 4 48 Procedure CAUTION Be sure not to touch the surface of the roller when disassembling assembling 1 Remove the Pickup Upper Cover Lower Guide 1 2 Claws 2 3 Hooks 3 1 2 2 3 x2 F 4 85 2 Remove the Pickup Roller Unit 1 1 Clip 2 1 Bushing 3 1 Spring 4 2 3 4 1 F 4 86 ...

Page 170: ...Procedure CAUTION Be sure to install the 4 flags 1 of the ADF Pickup Roller Unit under the 2 flags 2 of the Upper Cover Unit when assembling Hook the 2 edges 3 of the spring on the 2 grooves A when assembling 1 1 2 1 3 3 A A F 4 87 Removing the ADF Pickup Tray Procedure 1 Open the ADF Upper Cover Unit 1 and remove the ADF Rear Cover 2 2 Screws 3 1 Claw 4 2 Boss 5 x2 2 3 5 1 4 F 4 88 ...

Page 171: ...Remove the ADF Pickup Tray Unit 1 2 Shafts 2 1 Connector 3 1 Wire Saddle 4 1 2 2 3 4 F 4 89 Removing the ADF Pickup Unit Preparation 1 Remove the ADF Upper Cover Unit Refer to page 4 48 2 Remove the ADF Pickup Tray Refer to page 4 52 Procedure CAUTION Be sure not to touch the surface of the Static Eliminator 1 the Separation Pad 2 and the Feed Roller 3 when disassembling assembling 1 2 3 F 4 90 ...

Page 172: ...em Removing the ADF Pickup Unit Procedure 1 Remove the Reader Controller Cover 1 2 Claws 2 x2 1 2 2 Remove the 5 connectors 1 and the Grounding Wire 2 of the ADF Harness 1 Screw 3 x5 2 3 1 1 1 F 4 91 F 4 92 3 Open the ADF Unit 1 4 Open the White Plate 2 and remove the 3 screws 3 x3 3 1 2 5 Remove the ADF Front Cover 1 4 Hooks 2 1 1 2 2 2 F 4 93 F 4 94 ...

Page 173: ...al Exposure Feed System Removing the ADF Pickup Unit Procedure 6 Close the White Plate 1 and the ADF 2 1 2 7 Remove the 4 screws 1 1 1 x4 F 4 95 F 4 96 8 Remove the ADF Pickup Unit 1 1 Hook 2 CAUTION When removing the ADF Pickup Unit be careful that the ADF Unit becomes open due to its own weight becoming smaller F 4 97 1 2 F 4 98 ...

Page 174: ...DF Pickup Unit Procedure Disassembly Assembly Original Exposure Feed System Removing the ADF Pickup Unit Procedure CAUTION When installing the ADF Pickup Unit be sure to open the ADF Lower Guide 1 and hook the hook 2 at the lower side on the hole A of the White Plate 1 2 A F 4 99 ...

Page 175: ...e 4 58 4 DC Controller PCB Main Unit Refer to page 4 57 F 4 100 T 4 29 Removing the DC Controller PCB Preparation before Replacement 1 Request the user to backup the user data using remote UI 2 If possible output the data of the unprocessed jobs After replacing the DC Controller PCB the data of the unprocessed jobs will be deleted 3 Print out the list of the service mode setting value in the servi...

Page 176: ...test at this time check the service mode item list SERVICE DATA LIST printed out in advance and enter the values on the list 5 Turn OFF and then ON the main power By turning OFF and then ON the power the value entered in each service mode item becomes enabled 6 Upon completion of the replacement work request the user to restore the user data Removing the Main Controller PCB Preparation before Repl...

Page 177: ...e power plug from the outlet power is still supplied between SO DIMM and Secondary Battery Unit for backup of the image memory When the SW3 of the Main Controller PCB is pressed while image is backed up all the contents in the memory are cleared therefore be sure to output all data in the memory before pressing it 1 2 3 Remove the SO DIMM PCB 1 1 F 4 103 F 4 104 4 Remove the Lower Controller Cover...

Page 178: ...vice mode item described on the service label Since the values recorded on the service label may not be the latest at this time check the service mode item list SERVICE DATA LIST printed out in advance and enter the values on the list 3 Turn OFF and then ON the power By turning OFF and then ON the power the value entered in each service mode item becomes enabled 4 Upon completion of the replacemen...

Page 179: ... HVT PCB Procedure CAUTION Be sure to fit the 2 edges 2 of the plate of the HVT PCB into the 2 rails 1 on the host machine side when assembling 1 2 1 2 1 2 F 4 109 CAUTION Be sure that the 7 contact points 1 of the HVT PCB are in contact with the 7 Contact Springs 2 of the High Voltage Main Guide when assembling 1 2 1 2 1 1 2 2 F 4 110 ...

Page 180: ...eft Cover Refer to page 4 27 4 The Fax unit removes and the installation is and removes the Fax unit in case of needing Procedure 1 Remove the Fixing Connector 1 1 2 Remove the Power Switch Button Unit 1 2 Screws 2 1 Switch Alarm 3 1 2 3 x2 F 4 111 F 4 112 3 Remove the Power Supply PCB 1 3 Screws 2 6 Connectors 3 2 3 3 2 x6 x3 1 NOTE After installing the Power Switch Arm 1 be sure to check that th...

Page 181: ...r Scanner Unit Main Unit Refer to page 4 63 F 4 115 T 4 30 Removing the Laser Scanner Unit Preparation 1 Remove the Rear Cover Refer to page 4 24 2 Remove the Delivery Outer Cover Refer to page 4 29 3 Remove the Left Cover Refer to page 4 27 4 Remove the HVT PCB Refer to page 4 60 Procedure CAUTION Be sure not to disassemble the Laser Scanner Unit because it requires adjustment 1 Remove the Laser ...

Page 182: ... front CAUTION When disassembling assembling be careful not to touch the PCB 4 installed in the Laser Scanner Unit Touching the PCB may change the adjustment value as the PCB is equipped with laser intensity adjustment volume resistor x3 3 4 2 1 4 Remove the Laser Scanner Unit 1 2 Sponges 2 3 Connectors 3 1 2 3 3 x3 F 4 117 F 4 118 CAUTION Be sure to fit the 3 bosses 1 of the Laser Scanner Unit in...

Page 183: ...r 1 003 If the number on the service label is 1 enter 999 145 146 147 136 148 149 150 SW No PRINT PRINT NUMERIC 136 Laser horizontal scanning direction write position adjustment A PRINT PRINT NUMERIC 145 Laser horizontal scanning direction magnification ratio adjustment A B PRINT PRINT NUMERIC 146 Laser horizontal scanning direction magnification ratio adjustment A C PRINT PRINT NUMERIC 147 Laser ...

Page 184: ... parts replacement 1 Separation Static Charge Eliminator Transfer Unit Refer to page 4 72 2 Transfer Roller Transfer Unit Refer to page 4 71 3 Drum Unit Main Unit Refer to page 4 68 4 Waste Toner Box Main Unit Refer to page 4 67 5 Toner Cartridge Main Unit Refer to page 4 68 6 Hopper Unit Main Unit Refer to page 4 75 7 Developing Assembly Main Unit Refer to page 4 69 8 Main Drive Unit Main Unit Re...

Page 185: ...r Procedure Disassembling Procedure 1 Open the Front Cover 1 turn the Lock Lever 2 and then remove the Waste Toner Container 3 1 3 2 2 Remove the lid 1 attached on the surface of the Waste Toner Container and cover the opening A of the container with the lid to prevent spills 1 1 A F 4 122 F 4 123 Assembling Procedure 1 Install the Waste Toner Container 1 turn the Lock Lever 2 and then close the F...

Page 186: ...cedure 1 Open the Front Cover 1 release the Toner Cartridge Lock Lever 2 and then remove the Toner Cartridge 3 2 1 3 F 4 125 Removing the Drum Unit Preparation 1 Remove the Waste Toner Container Refer to page 4 67 Procedure CAUTION Be sure not to touch the drum 1 of the Drum Cartridge when disassembling assembling 1 Be sure to block light to the removed Drum Cartridge using paper 1 1 F 4 126 F 4 1...

Page 187: ... Lever 2 2 Release the Drum Cartridge Lock Lever 3 and then remove the Drum Cartridge 4 1 4 3 2 F 4 128 Removing the Developing Assembly Preparation 1 Remove the Waste Toner Container Refer to page 4 67 2 Remove the Drum Unit Refer to page 4 68 Procedure CAUTION Place paper 1 and then place the Developing Assembly Be sure not to tilt the Developing Assembly to prevent toner from spilling from the ...

Page 188: ...ormation System Removing the Developing Assembly Procedure CAUTION Be sure not to touch the Developing Cylinder 1 when disassembling assembling 1 F 4 130 1 Remove the Developing Assembly Replacement Inner Cover 1 2 Claws 2 3 Hooks 3 x2 1 3 3 2 F 4 131 2 Remove the Developing Assembly 1 1 Edge Saddle 2 1 Connector 3 1 2 3 F 4 132 ...

Page 189: ...mbling Procedure CAUTION Be sure not to touch the surface of the Transfer Roller when disassembling assembling F 4 133 1 Open the Right Door Unit 1 hold the grips 2 at the front and rear and then remove the Transfer Roller 3 1 3 2 F 4 134 Assembling Procedure 1 Install the Transfer Roller 3 by fitting the protrusion 1 of the Transfer Roller Holder into the hole 2 of the Transfer Unit 1 2 3 2 Close...

Page 190: ...o touch the surface of the Transfer Roller when disassembling assembling F 4 136 1 Open the Right Door Unit 1 and remove the Separation Static Eliminator 2 1 2 F 4 137 Assembling Procedure 1 Install the Separation Static Eliminator 3 by fitting the 3 protrusions 1 of the Transfer Unit into the grooves 2 of the Separation Static Eliminator 2 2 3 1 CAUTION Be sure to hook the claw 1 of the grip on t...

Page 191: ...the Right Rear Cover Refer to page 4 26 3 Remove the Waste Toner Container Refer to page 4 67 4 Remove the Drum Unit Refer to page 4 68 Procedure 1 Disconnect the 2 Connectors 1 and remove the Wire Saddle 2 x2 1 2 2 Disconnect the Relay Connector 2 from the hole 1 of the plate 1 Connector 3 1 2 3 F 4 140 F 4 141 3 Move the Harness Guide 1 1 Boss 2 2 Hooks 3 1 Connector 4 1 4 1 2 3 4 Remove the Reg...

Page 192: ...n Drive Unit Procedure CAUTION When assembling the Registration Clutch be sure to align the cut off 1 of the clutch with the protrusion 2 of the Drive Unit 1 2 F 4 144 5 Remove the Drive Unit 1 6 Screws 2 x6 1 2 2 F 4 145 CAUTION Be sure to fit the bearing 1 of the Drive Unit into the hole 2 of the plate on the host machine side when assembling 1 2 F 4 146 ...

Page 193: ...ing Assembly Refer to page 4 69 8 Remove the Front Cover Refer to page 4 24 9 Remove the Fixing Assembly Refer to page 4 79 10 Remove the Right Front Cover Refer to page 4 25 11 Remove the Right Inner Cover Refer to page 4 30 12 Remove the Left Inner Cover Refer to page 4 29 13 Remove the Inner Rear Cover Refer to page 4 24 14 Remove the Delivery Inner Cover Refer to page 4 29 15 Remove the HVT PC...

Page 194: ...ng it is recommended to install the Toner Container when there is no problem with it F 4 150 CAUTION When removing the Hopper Unit be sure not to spill toner from the Toner Supply Mouth 1 and the Toner Open Close Shutter 2 1 2 F 4 151 x4 2 3 4 4 4 4 1 Assembling Procedure 1 Install the Hopper Unit 1 1 Connector 2 1 Edge Saddle 3 4 Screws 4 NOTE Since installation of the Toner Container decreases t...

Page 195: ...h 1 and the Toner Open Close Shutter 2 1 2 F 4 154 CAUTION When installing the Hopper Unit with toner inside be sure to install it after removing the Support Column Cover There is a high possibility of toner scattering during the work if it is not removed Removing the Support Column Cover Refer to page 4 32 2 3 4 4 4 4 1 x4 F 4 155 2 Install the High Voltage Upper Guide 1 1 Boss 2 4 Hooks 3 1 3 3 ...

Page 196: ...A part of the High Voltage Lower Guide A A 1 1 F 4 159 F 4 158 5 Install the Laser Scanner Unit 6 Install the HVT PCB 7 Install the Delivery Inner Cover 8 Install the Inner Rear Cover 9 Install the Left Inner Cover 10 Install the Right Inner Cover 11 Install the Right Front Cover 12 Install the Fixing Assembly 13 Install the Front Cover 14 Install the Developing Assembly 15 Install the Drum Unit 1...

Page 197: ...acement 1 Fixing Drive Unit Main Unit Refer to page 4 81 2 Fixing Assembly Main Unit Refer to page 4 79 F 4 160 T 4 32 Removing the Fixing Assembly CAUTION Be sure to start removing the Fixing Assembly after it is cooled down enough The Fixing Assembly right after printing may cause burn injury Be sure not to disassemble the Fixing Assembly because it requires adjustment Procedure Disassembling Pr...

Page 198: ...sembly Procedure 2 Release the 2 Fixing Lock Levers 1 and remove the Fixing Assembly 2 1 1 2 F 4 162 Assembling Procedure 1 Install the Fixing Assembly by putting the 2 edges A of the bottom of the Fixing Assembly into the 2 Fixing Rails 1 CAUTION Be sure that the lock of the 2 Fixing Lock Levers is released when installing F 4 163 1 A A F 4 164 ...

Page 199: ...Door Unit F 4 165 Removing the Fixing Drive Unit Preparation 1 Remove the Rear Cover Refer to page 4 24 2 Remove the Right Rear Cover Refer to page 4 26 3 Remove the Waste Toner Container Refer to page 4 67 4 Remove the Drum Unit Refer to page 4 68 5 Remove the Main Drive Unit Refer to page 4 73 6 Remove the Fixing Assembly Refer to page 4 79 Procedure 1 Disconnect the 2 Connectors 1 and remove th...

Page 200: ...ystem Removing the Fixing Drive Unit Procedure 2 Remove the DC Controller Unit 1 3 Screws 2 2 Hooks 3 x3 1 3 2 3 Open the DC Controller Unit 1 3 Wire Saddles 2 1 Edge Saddle 3 1 Connector 4 1 2 3 4 x4 F 4 167 F 4 168 4 Remove the Fixing Drive Unit 1 6 Screws RS Tightening 2 1 Screw with washer 3 x6 1 2 2 2 2 2 3 F 4 169 ...

Page 201: ...Refer to page 4 91 3 Multi purpose Tray Pickup Roller Transfer Unit Refer to page 4 88 4 Casstte Pickup Unit Main Unit Refer to page 4 87 5 Cassette Pickup Idler Gear Casstte Pickup Unit Refer to page 4 87 6 Cassette Feed Roller Casstte Pickup Unit Refer to page 4 83 7 Cassette Separation Roller Casstte Pickup Unit Refer to page 4 85 8 Cassette Pickup Roller Casstte Pickup Unit Refer to page 4 86 ...

Page 202: ...ve the Cassette Feed Roller 2 1 2 Assembling Procedure CAUTION Be sure to install the Cassette Feed Roller 1 to the shaft at the upper side and the Cassette Separation Roller 2 to the shaft at the lower side when assembling 1 2 F 4 174 F 4 173 1 Install the Cassette Feed Roller 2 by aligning the protrusion A of the Feed Roller Shaft with the groove 1 of the Cassette Feed Roller 1 2 A 2 Return the ...

Page 203: ...e sure not to touch the surface of the roller when disassembling assembling F 4 176 Disassembling Procedure 1 Remove the cassette 1 1 F 4 177 2 Release the claw 1 of the Cassette Separation Roller and remove the Cassette Separation Roller 2 1 2 Assembling Procedure CAUTION Be sure to install the Cassette Feed Roller 1 to the shaft at the upper side and the Cassette Separation Roller 2 to the shaft...

Page 204: ...ion Roller 2 by aligning the protrusion A of the Separation Roller Shaft with the groove 1 of the Cassette Separation Roller A A 1 2 2 Return the cassette to the original position F 4 180 Removing the Cassette Pickup Roller Procedure CAUTION Be sure not to touch the surface of the roller when disassembling assembling 1 Remove the cassette 2 Remove the Fixation Pin 1 and remove the Cassette Feed Ro...

Page 205: ... the Cassette Pickup Roller Refer to page 4 86 Procedure CAUTION Be sure not to touch the surface of the roller when disassembling assembling 1 Remove the Cassette Pickup Idler Gear 1 1 Claw 2 1 2 F 4 182 Removing the Cassette Pickup Unit Preparation 1 Remove the Right Front Cover Refer to page 4 25 2 Remove the Right Rear Cover Refer to page 4 26 3 Remove the Right Door Unit Refer to page 4 26 Pr...

Page 206: ...addle 4 1 Screw RS Tightening 5 4 Screws Tapping 6 CAUTION When pulling out the Pickup Unit 1 at disassembly assembly be sure not to cause open circuit by making the harness 2 get caught in the A part 1 2 A F 4 184 x5 6 1 2 5 3 4 6 F 4 185 Removing the Multi purpose Tray Pickup Roller Procedure Disassembling Procedure CAUTION Be sure not to touch the surface of the roller when disassembling assemb...

Page 207: ...ay Pickup Roller Procedure 1 Open the Multi purpose Tray Pickup Tray 1 1 2 Remove the Pickup Roller Cover 1 2 Claws 2 x2 2 2 1 F 4 188 F 4 189 3 Release the 2 claws 1 of the Pickup Roller Holder on the right and left and move the 2 Pickup Roller Holder 2 1 1 2 x2 4 Lower the Multi purpose Tray Separation Pad 1 and remove the Multi purpose Tray Pickup Roller 2 1 2 F 4 190 F 4 191 ...

Page 208: ...ure Assembling Procedure 1 Install the Pickup Roller 1 by aligning the protrusion A of the new Pickup Roller with the groove B of the Pickup Roller Holder 2 Pickup Roller Holders 2 2 1 2 A B 2 Install the Pickup Roller Cover 2 by aligning the 2 grooves A of the Pickup Tray Cover with the 2 shafts 1 of the Pickup Roller Cover 2 A 1 F 4 192 F 4 193 3 Close the Multi purpose Tray Pickup Tray 1 1 F 4 ...

Page 209: ...page 4 88 Procedure Disassembling Procedure CAUTION Be sure not to touch the surface of the pad when disassembling assembling F 4 195 1 Lower the Multi purpose Tray Pickup Tray 1 release the 2 bosses 2 of the Multi purpose Tray Separation Pad and then remove the Multi purpose Tray Separation Pad 3 1 2 3 Assembling Procedure 1 Install the Multi purpose Tray Separation Pad 1 by aligning the 3 protru...

Page 210: ...Preparation 1 Remove the Fixing Assembly Refer to page 4 79 2 Remove the Rear Cover Refer to page 4 24 Procedure 1 Remove the Reverse Tray 1 3 Hooks 2 1 2 2 Disconnect the connector 1 and remove the Wire Saddle 2 the Edge Saddle 3 and the 2 screws 4 x2 x2 1 2 3 4 F 4 198 F 4 199 3 While putting the connector 1 into the inside of the host machine remove the Delivery Reverse Unit 2 2 Bosses 3 1 Hook...

Page 211: ...5 5 Adjustment Adjustment Overview Adjustment when Replacing the Parts Image Position Adjustment ...

Page 212: ...e 5 5 RAM PCB Refer to page 5 5 Laser Exposure System Laser Scanner Unit Refer to page 5 5 Image Position Adjustment This section describes remedies when adjusting the basic image position Item Specification value Reference Left Edge Margin Adjustment 1 sided 2 5 1 5 mm 2 sided 2 5 2 0 mm 10 8 6 5 4 2 0 2 5 1 5mm 2nd side of double sided copy 2 5 2 0mm Refer to page 5 6 T 5 1 F 5 1 Item Specificat...

Page 213: ...of paper which is normally used by the user on the ADF and execute the following service mode SCAN READER FUNCTION CCD DF WLVL4 The white level during DF mode stream reading is read checking the transmission of the glass for stream reading reading both sides of the chart When Replacing the Copyboard Glass Execute the following in the service mode CAUTION Be sure to execute the White Plate data adj...

Page 214: ...the user on the ADF and execute the following service mode SCAN READER FUNCTION CCD DF WLVL4 The white level during DF mode stream reading is read checking the transmission of the glass for stream reading reading both sides of the chart NOTE Be sure that size of a paper to be used in the foregoing steps is the one that the ADF can be read Main Controller System Before Replacing the Main Controller...

Page 215: ...OFF and then ON the power the value entered in each service mode item becomes enabled 6 Upon completion of the replacement work request the user to restore the user data When Replacing the RAM PCB CAUTION Even after turning OFF the main power switch and disconnecting the power plug from the outlet power is still supplied between SO DIMM and Secondary Battery Unit for backup of the image memory Whe...

Page 216: ...5 2 0mm Image left edge Increase the value an increase of 10 will increase the margin width by 1 mm Decrease the value a decrease of 10 will decrease the margin width by 1 mm NOTE Be sure to perform the following procedure for right edge margin adjustment Service mode PRINT PRINT NUMERIC 055 Reference target value 1st side 0 5mm or larger 2nd side 0 5mm or larger F 5 6 Leading Edge Non image Width...

Page 217: ...Service mode PRINT PRINT NUMERIC 035 Cassette 1 Service mode PRINT PRINT NUMERIC 036 Cassette 2 option Service mode PRINT PRINT NUMERIC 037 Cassette 3 option Service mode PRINT PRINT NUMERIC 038 Cassette 4 option 10 8 6 5 4 2 0 1st side of copy 2 5 1 5mm 2nd side of copy 2 5 1 5mm Image edge Increase the value an increase of 10 will increase the non image width by 1 mm Decrease the value a decreas...

Page 218: ...ng A4 size paper Draw straight lines Feeding direction 10mm 210mm 297mm 10mm 10mm 10mm 10mm When using LTR size paper Draw straight lines Feeding direction 10mm 216mm 279mm F 5 9 F 5 10 Squareness Adjustment 1 Create a test sheet place it on the ADF and make a copy of it 2 Check the image squareness at the leading edges of the test sheet and copied paper Measure dimensions A and B and obtain the d...

Page 219: ...5 12 Adjustment of Image Magnification Factor for Sub Scanning Section 1 Create a test sheet place it on the ADF and make a copy of it 2 Compare the feed directional length of the image on the test sheet with that of the image on the copied paper If the difference between them is not within specification make an adjustment in the service mode Standard value A4 size paper 277 1mm LTR size paper 259...

Page 220: ...backward with reference to the scale marks Adjusting screw 5 After completion of the adjustment tighten the adjusting screw you loosened in step 4 F 5 13 F 5 14 Leading Edge Registration Adjustment 1 Create a test sheet place it on the ADF and make a copy of it 2 Compare the leading edge registration of the test sheet with that of the copied paper If required adjust the leading edge registration t...

Page 221: ...6 6 Troubleshooting Troubleshooting Initial Check Test Print Troubleshooting items Software to Be Upgraded and Upgrading Method ...

Page 222: ...ck for electrical continuity of the Thermoswitch T 6 1 Item No Check Itemsl Check Pickup Feed 1 Check for foreign particle such as paper lint 2 Check if paper dust is accumulated on the Pickup Feed Separation Roller Check for wear scar soiling or deformation 3 Check for wear scar soiling or deformation on the Registration Roller Paper Path Roller 4 Check for wear scar soiling or deformation on the...

Page 223: ... 03 Solid black Yes Yes Yes Yes SELECT NO 04 Solid white Yes SELECT NO 05 For R D SELECT NO 06 4dot 6space vertical Yes Yes Yes Yes SELECT NO 07 dot 6space horizontal Yes Yes Yes Yes SELECT NO 08 For R D SELECT NO 09 For R D Operation Procedure 1 Service Mode TEST MODE numeric keypad 3 PG 2 Enter the PG number with the numeric keypad and press the Start key 3 Select 1 sided SGL 0 or 2 sided DBL 1 ...

Page 224: ... 02 Check item Check method Assumed cause Transfer failure Check the evenness of halftone density Check whether uneven image or foggy image appears Transfer system failure or transfer roller failure is considered Black line Check whether black lines appear on the image Laser light path failure grid failure developing system failure cleaning drum failure or transfer roller failure is considered Whi...

Page 225: ...image Developing system failure is considered Uneven pitch Check whether lines appear on the image in the horizontal scanning direction Drum failure developing system failure laser exposure system failure or drive related failure is considered Uneven density rear front Check the density difference between the front and rear sides Drum failure or developing system failure is considered F 6 3 T 6 6 ...

Page 226: ...e developing system failure cleaning drum failure or transfer roller failure is considered White line Check whether white lines appear on the image Developing system failure is considered Uneven pitch Check whether lines appear on the image in the horizontal scanning direction Drum failure developing system failure laser exposure system failure or drive related failure is considered Uneven density...

Page 227: ... side of paper Location Fixing Assembly circumference of Pressure Roller iR2545 2535 94mm iR2530 2525 2520 78 5mm Transfer Roller roller circumference 50mm T 6 9 F 6 6 Cause Fixing Assembly Toner on the paper comes off and adheres to the Pressure Roller and then the toner adheres to the back side of the paper Transfer Roller Toner remains on the Drum that has stopped at the time of paper jam and t...

Page 228: ...nt in paper by having the paper left untouched in a low humidity environment Because of insufficient transfer output due to highly resistive paper caused by increased moisture content in paper by having the paper left untouched in a high humidity environment F 6 8 F 6 9 Condition Paper left untouched in a low humidity environment Paper left untouched in a high humidity environment Field Remedy Use...

Page 229: ...ode N Manual select Strong Selecting Special Mode O or N Strong makes a wider leading edge margin and avoids paper jam by separation failure Selecting Special Mode N Strong also improves paper curl however it reduces productivity Jam with thin paper 63g cm2 or lighter Location Photosensitive Drum Fixing Assembly Cause Separation performance drops due to weak rigidity of paper which causes paper ja...

Page 230: ... fitted into the escape hole but Z folded when closing the Right Cover Unit which pushes the Right Door out and the gear at the Right Door side is not fully engaged with the gear at the machine side resulting in abnormal noise Condition When reattaching a belt of the Right Cover Unit Field Remedy Be sure to secure the lower belt to the Right Cover Unit as follows Front side Check that the belt is ...

Page 231: ...Controller PCB UST System software CPU CPU Flash ROM CPU F 6 12 Host machine Target PCB Category Target system software File type Remarks Main Controller PCB iR1750 1740 1730 Boot USTUPDATE_ iR1750_40_30_BOOT_ vXXXX There are 2 types of Main Controller PCB CAUTION When upgrading the firmware of Boot and Bootable lang simultaneously be sure to first upgrade Boot Program USTUPDATE_ iR1750_40_30_boot...

Page 232: ...X jobs After the output you pull a network cable out of the host machine 2 You connect the host machine to the PC with a USB cable 3 Turn ON the Power Switch of the PC and start UST 4 When turning On the Power Switch a wizard is displayed to add a new hardware and click Cancel 5 Enter Download mode from User mode 6 System Settings Update Firmware Yes NOTE Usually you enter Download mode from User ...

Page 233: ...he instruction on the screen select Next NOTE Selecting firmware of a wrong model does not display Select by printer name F 6 17 F 6 16 11 Following the instruction on the screen select Start 12 Following the instruction on the screen select Yes 13 The following screen is displayed UPDATING FIRMWARE is displayed on the Control Panel of this machine F 6 18 F 6 19 F 6 20 ...

Page 234: ...n OFF the power during the download writing process Do not turn OFF the power supply during the download writing process of system software It can cause faulty startup after turning ON the power 14 As the following screen is displayed when upgrading is completed the power switch automatically turns OFF and then ON 15 You connect a network cable with the host machine F 6 21 ...

Page 235: ...7 7 Error Code Error Code Overview Error Code Jam Code Alarm Code ...

Page 236: ...he product These are classified into 3 codes as follows Code type Explanation Reference Error code This code is displayed when an error occurs on the machine Refer to page 7 3 Jam code This code is displayed when a jam occurs inside the machine Refer to page 7 12 Alarm code This code is displayed when a function of the machine is malfunctioned Refer to page 7 15 T 7 1 ...

Page 237: ...ly Description 1 The Main Thermistor detected a temperature lower than 115 deg C for 400 msec or longer on end 6 0 seconds after the Main Thermistor detected 100 deg C 2 The Main Thermistor detected a temperature lower than 150 deg C for 400 msec or longer on end 6 0 seconds after the Main Thermistor detected 140 deg C Remedy 1 Go through the following to clear the error CLEAR ENGIN ERRCLR in Serv...

Page 238: ...nd the Developing Assembly Description When the Developing Assembly Toner Sensor TS2 detected toner absent and the Hopper Toner Sensor TS1 detected toner present the Hopper Motor M6 was rotated 194 times with intermissions of 1 second but the Developing Assembly Toner Sensor TS2 could not detect toner present If paper is being fed the error occurs after the paper has been delivered Remedy 1 Check ...

Page 239: ...cuted three times If paper is being fed the error occurs after the paper has been delivered Remedy 1 Replace the DC Controller PCB PCB1 Ecode Detail Code Item Description E197 0000 Title Laser Driver PCB communication error Description Error in communication with the Laser Driver PCB communication data failure Remedy 1 Check the Laser Scanner Unit connector 2 Replace the Laser Scanner Unit 3 Repla...

Page 240: ...gnment Plate HP Sensor S4 although the Front Alignment Motor M4 was driven for 10 mm Remedy 1 Check the connector connection of the Front Alignment Plate HP Sensor S4 or the Front Alignment Motor M4 2 Check for open circuit of the Harness of the Front Alignment Plate HP Sensor S4 or the Front Alignment Motor M4 3 Replace the Front Alignment Plate HP Sensor S4 4 Replace the Front Alignment Motor M4...

Page 241: ...heck the connector connection of the Gripper HP Sensor S7 or the Gripper Motor M7 2 Check for open circuit of the Harness of the Gripper HP Sensor S7 or the Gripper Motor M7 3 Replace the Gripper HP Sensor S7 4 Replace the Gripper Motor M7 5 Replace the Finisher Controller PCB Ecode Detail Code Item Description E575 8004 Title Gripper Motor M7 clock error Description When the Gripper Motor M7 was ...

Page 242: ...dy 1 Disconnect and then connect the connector J209 on the DC Controller PCB PCB1 to check the connection 2 Replace the Power Supply Cooling Fan FM4 3 Replace the DC Controller PCB PCB1 Ecode Detail Code Item Description E805 0000 Title Heat Exhaust Fan Rear FM6 error Description A lock signal was detected for 5 seconds while the Heat Exhaust Fan Rear FM6 was being stopped The same status was dete...

Page 243: ...ont FM3 Description A lock signal was detected for 5 seconds while the Delivery Cooling Fan Front FM3 was being driven The same status was detected again after executing an error retry Remedy 1 Disconnect and then connect the connector J210 on the DC Controller PCB PCB1 to check the connection 2 Replace the Delivery Cooling Fan Front FM3 3 Replace the DC Controller PCB PCB1 Ecode Detail Code Item ...

Page 244: ...at the time of transmission 0101 Tx Rx The modem speed differs from that of the other party s machine 0102 Tx Fallback was not available at the time of transmission 0103 Rx EOL could not be detected for 5 seconds at the time of reception 15sec in the case of CBT 0104 Tx RTN or PIN was received at the time of transmission 0106 Rx While waiting for a procedure signal at the time of reception the sig...

Page 245: ...ure signal exceeded the limit 0765 Tx After PPS EOP was sent at ECM transmission no meaningful signal was received and the retry count of the procedure signal exceeded the limit 0767 Tx After PPS EOP was sent at ECM transmission DCN was received 0768 Tx After PPS EOP was sent at ECM transmission the retry count of the procedure signal exceeded the limit or T5 time over 60sec occurred 0769 Tx After...

Page 246: ...n Registration Sensor PS11 3 0107 Delay Fixing Paper Sensor PS19 3 0207 Stationary Fixing Paper Sensor PS19 3 0A07 Power on Fixing Paper Sensor PS19 3 0108 Delay Delivery Sensor PS5 3 0208 Stationary Delivery Sensor PS5 3 0A08 Power on Delivery Sensor PS5 3 010A Delay Reverse Sensor PS6 3 020A Stationary Reverse Sensor PS6 3 0A0A Power on Reverse Sensor PS6 3 010B Delay Transparency Sensor PS20 3 ...

Page 247: ...ment Registration sensor first document PS26 4 0045 Delay first document Lead sensor first document PS25 4 0046 Stationary first document Lead sensor first document PS25 4 0049 Delay first document Stay sensor first document PS27 4 004A Stationary first document Stay sensor first document PS27 4 004B Delay first document Reversal sensor first document PS28 4 004C Stationary first document Reversal...

Page 248: ...S1 5 1500 STP Stapler HP sensor Stapler edging sensor S11 S12 5 1401 Door open Inlet sensor S1 5 1404 Door open Delivery sensor S2 5 1301 Power on Inlet sensor S1 5 1304 Power on Delivery sensor S2 5 2F77 Error 1 5 2F30 Error 1 5 2F37 Error 1 5 2F83 Error 1 5 2F75 Error 1 5 2F40 Error 1 5 2F31 Error 1 1 The state is recovered by opening and closing the Door or turning OFF and then ON the power sup...

Page 249: ...7 7 7 15 7 15 Error Code Alarm Code Alarm Code Details Error Code Alarm Code Alarm Code Details Alarm Code Alarm Code Details In this machine there are no alarm codes for service technician ...

Page 250: ...8 8 Service Mode Service Mode Outline Details of Service Mode ...

Page 251: ... conditions for the control signals sent from the exchange FAX Do not use SCAN These setting items are for image adjustment in scanning PRINT These setting items are for image adjustment in printer assembly and for special mode for the field related measures NETWORK Use it to confirm the contents of the installed CA certificates CODEC This is a setting items related to CODEC SYSTEM This is a setti...

Page 252: ...gistering Setting Data Enter data using the keypad and then press OK 6 Press the Stop Additional functions Reset key to end the service mode 033 4 Selecting a Bit Switch Select the bit using the left arrow right arrow on the touch panel SSSW SSSW 000000000 000000000 Operation at the time of Bit SW Operation at the time of Parameter 033 SSSW 000000000 033 SSSW 000000001 1 Selecting Service Mode F 8...

Page 253: ...the label Service Label behind the rear cover right F 8 3 Service Label The item of service kabel is described below In this machine the output of the service label does not support FACTORY 1 2 3 FACTORY 1 2 3 034 xxx ADJ X MG xxx 035 xxx 036 xxx W PLT X xxx 037 xxx W PLT Y xxx 038 xxx W PLT Z xxx 054 xxx 50_RG xxx 136 xxx 50_GB xxx 140 xxx 100_RG xxx 141 xxx 100_GB xxx 142 xxx MTF3 M1 xxx 143 xxx...

Page 254: ...n Method SW31 not used SW32 00000000 not used SW33 00000000 counter function settings SW34 00000011 waste toner full display setting SW35 00001000 e RDS function settings SW36 00000000 Settings to disable auSend SW37 11111111 Display settings for initialization menu after parts replacement 1 SW38 SW50 not used T 8 1 Details SSSW SW01 List of Functions Bit Function 1 0 0 service error code output n...

Page 255: ...ors occur frequently because of an echo when reception is from overseas T 8 4 NOTE Any of the following error code may be indicated because of an echo at time of reception 0005 0101 0106 0107 0114 0200 0201 0790 SSSW SW04 List of Functions Bit Function 1 0 0 not used 1 Check CI frequency Yes No 2 the number of final flag sequences of protocol signals 2 1 3 Reception mode after CFR signal transmiss...

Page 256: ...d 1 Conversion from mm to inch text mode execute do not execute 2 Conversion from mm to inch text photo mode execute do not execute 3 transmit bit 33 and thereafter for DIS signal prohibit do not prohibit 4 Recording paper length availability declared in DIS signal A4 size Arbitrary size 5 not used 6 not used 7 not used T 8 6 Detailed Discussions of Bit 1 Use it to enable disable millimeter inch c...

Page 257: ... by transmission reception set do not set The machine will stop the ongoing communication if the transmission reception of a single original page takes 32 min or more To use the timer for a purpose other than this function refer to the tables that follow and select an appropriate time length Selecting Not set for Bit 7 specifies the timeout period per page by the combination of the following 2 Bit...

Page 258: ...chine for G3 communication if declare is selected the machine will indicate that it reads and records at an inch configuration resolution using the DIS DCS or DTC signal T 8 13 T 8 14 SSSW SW15 List of Functions Bit Function 1 0 0 not used 1 not used 2 Reception of call through caller ID display line main unit line Yes No 3 not used 4 not used 5 not used 6 Detection of continuous signal at fax tel...

Page 259: ...cts the transmission telephone number displayed on reports after the completion of transmission When Called number is selected the telephone number the fax called is displayed on reports When Other fax number is selected the telephone number sent from the other fax the CSI signal data is displayed on reports Detailed Discussions of Bit 2 At 1 on this Bit ignore the void CSI if received and if the ...

Page 260: ...When Detect with the new method is selected tone is detected for 3 5 seconds before call origination in order to discriminate between dial tone and voice If dial tone is detected and the time since line seizure is 3 5 seconds or longer call origination takes place immediately If the time since line seizure is less than 3 5 seconds call origination takes place after waiting for 1 second If the time...

Page 261: ...acement menu When 1 is selected the menu is displayed When 0 is selected the menu is not displayed SSSW SW35 List of Functions Bit Function 1 0 0 e RDS function ON OFF Yes No 1 not used 2 ScanToMeia function enable disable enable disable 3 MediaPrint function enable disable enable disable 4 IC card authentication management function ON OFFYes No 5 Handling of a scan job at device logout Default 0 ...

Page 262: ...layed Not displayed 1 To display the menu of Initialization after replacement of the Fixing Assembly Displayed Not displayed 2 To display the menu of Initialization after replacement of Cassette 1 Feed Roller Separation Roller Displayed Not displayed 3 To display the menu of Initialization after replacement of Cassette 2 Feed Roller Separation Roller Displayed Not displayed 4 To display the menu o...

Page 263: ...vice Mode SSSW Details Service Mode Details of Service Mode SSSW Details Tray Pickup Roller Separation Pad Detailed Discussions of Bit 7 You can set to display hide the menu of Initialization after replacement of the Transfer Static Eliminator ...

Page 264: ...ker from the start of transmission to DIS SERVICEMAN 1 generate the monitor sound of the telephone line using the speaker from the start of communication to the end of it SERVICEMAN 2 generate the monitor sound of the telephone line2 Option OFF do not generate the monitor sound of the telephone line using the speaker T 8 27 007 ATT transmission level Use it to set the transmission level ATT Raise ...

Page 265: ...120 230V 025 Answering machine connection function signal detection time 0 to 999 027 preamble detection time length for V21 low speed flag 20 x 10ms 051 Hooking detection threshold 053 Setting of DTMF call origination count at remote reception of fax 055 acquisition period of environmental log data 0 to 480 60min 0 no data acquisition 056 Display the type of soft counter 1 101 Fixed 057 Display t...

Page 266: ...art of Communication The time to shift to transmission after automatic dialing can be set The timing to start communication after connecting to the other party is delayed by the specified period of time 010 line connection identification length Use it to set the time for identifying the line connection Raise this parameter if errors occur frequently at time of communication because of the conditio...

Page 267: ...the Counter Check screen which appears in response to a press on the Counter key When 0 is selected count type will not be indicated 056 Use it to indicate the type of software counter 1 of the control panel The type of soft counter 1 cannot be changed 057 Use it to change the type of soft counter 2 of the control panel to suit the needs of the user 058 Use it to change the type of soft counter 3 ...

Page 268: ...7 TotalB Bk2 1 1 1 160 TotalB Bk L 161 TotalB Bk S 1 1 1 162 TotalB1 2 sided 1 1 1 163 TotalB2 2 sided 1 1 1 164 LB 2 sided 165 SB 2 sided 1 1 1 201 Copy Total1 1 202 Copy Total2 1 No Counter type Print system Bk 1 sided 2 sided Local copy PDL print FAX print Report print Local copy PDL print FAX print Report print 203 Copy L 204 Copy S 1 205 CopyA Total1 1 206 CopyA Total2 1 207 CopyA L 208 CopyA...

Page 269: ...nt S 1 1 1 413 Copy Print 2 1 1 1 414 Copy Print 1 1 1 1 421 Copy Print Bk L 422 Copy Print Bk S 1 1 1 701 Recieved print Total1 1 702 Recieved print Total2 1 703 Recieved print L 704 Recieved print S 1 709 Recieved print Bk1 1 710 Recieved print Bk2 1 715 Recieved print Bk L 716 Recieved print Bk S 1 725 Recieved print Bk L 2 sided 726 Recieved print Bk S 2 sided 1 801 Report print Total1 1 802 R...

Page 270: ... reception protocol level can be set T 8 30 064 Communication termination timer at POP reception protocol level Communication termination timer at POP reception protocol level can be set 065 Communication termination timer at FTP transmission protocol level Communication termination timer at FTP transmission protocol level can be set 066 Communication termination timer from start to completion of ...

Page 271: ...ing edge trimming length when performing fax operation using the ADF 0 1 mm 146 30 Trailing edge trimming length when performing fax operation using the ADF 0 1 mm 147 10 Left right frame length when performing fax operation using the ADF 0 1 mm 148 25 Leading edge frame length when performing copy operation using the ADF 0 1 mm 149 164 Not used 165 4 Leading edge frame length when performing SEND...

Page 272: ... scanning direction ADJ Y DF 0 25 to 25 1 0 1mm Adjustment of horizontal scanning position at DF stream reading STRD POS 100 1 to 200 Adjustment of CCD CIS scan position at stream reading mode with DF Item1 Item2 Item3 Item4 Initial setting Appropriate guideline Description READER ADJUST ADJ XY ADJ X MG 0 10 to 10 1 0 1 Fine adjustment of magnification ratio in vertical scanning direction at copyb...

Page 273: ...justment at test print scanning Item1 Item2 Item3 Item4 Initial setting Appropriate guideline Description READER FUNCTION INSTALL STRD POS not used CCD CCD ADJ Gain adjustment of analog processor block DF WLVL1 ADF white level adjustment platen board cover scan stream reading scan DF WLVL2 ADF white level adjustment platen board cover scan stream reading scan MTF CLC not used DF WLVL3 ADF white le...

Page 274: ...FEED CHK 0 3 Checking the passage of paper for ADF CL CHK not used CL ON not used FAN CHK not used FAN ON not used SL CHK 0 4 Checking the ADF solenoid SL ON Starting the solenoid operation MTR ON Starting the motor operation ROLL CLN not used FEED ON Checking the passage of paper with ADF OPTION UNK A5R 0 0 Detected as custom paper size 1 Detected as A5 R STMT R The setting to detect a custom pap...

Page 275: ...0 1mm 145 Leading edge trimming length when performing fax operation using the ADF 0 1 mm As the value is incremented by 1 the leading edge non image width is increased by 0 1mm 146 Trailing edge trimming length when performing fax operation using the ADF 0 1 mm As the value is incremented by 1 the trailing edge non image width is increased by 0 1mm 147 Left right frame length when performing fax ...

Page 276: ...e continues to display 0 minimum or FFFF maximum there may be some problem on main controller PCB Appropriate guideline 1 to 2047 SCAN READER DISPLAY CCD TARGET G Target value of shading for green If the scanned image has some failure check the target value of shading for green If the machine continues to display 0 minimum or FFFF maximum there may be some problem on main controller PCB Appropriat...

Page 277: ... used Bit4 Not used Bit5 Read Sensor PS25 1 Document present 0 No document Bit6 Timing Sensor PS29 1 Document present 0 No document Bit7 Registration Sensor PS26 1 Document present 0 No document Bit8 Delivery Reverse Sensor PS27 Bit9 Lower Reverse Sensor PS28 1 Document present 0 No document Bit10 Not used Bit11 Not used Bit12 Not used Bit13 Document Set Sensor PS30 1 Document present 0 No documen...

Page 278: ...canning direction at copyboard reading 0 1mm shift of image scan start position toward the front direction by 1 increment in the setting value NOTE If changing the setting value of this item be sure to Note the changed value on the reader s service label SCAN READER ADJUST CCD W PLT X White label data entry with standard white plate SCAN READER ADJUST CCD W PLT Y White label data Y entry with stan...

Page 279: ...LEAR R CON Clearing of the backup area for the reader in the main controller Clear the backup area for the reader in the main controller SCAN READER FUNCTION MISC R SCANLAMP The test checks to see if the scanning lamp is on or not Execute the when replacing the CIS unit SCAN READER OPTION BODY SENS CNF Setting of the document detection sensor placement The setting of document detection size is sel...

Page 280: ... 0 Feed Motor M11 1 Delivery Reversal Motor M12 SCAN FEEDER FUNCTION FEED CHK Checking the passage of paper for ADF Specify a paper feed mode to check passage of paper by the DF Select SCAN FEEDER FUNCTION FEED ON to execute this 0 1 sided feed mode 1 2 sided feed mode 2 not used 3 not used SCAN FEEDER FUNCTION SL CHK Checking the ADF solenoid Specify a solenoid to perform a solenoid check Select ...

Page 281: ...normal paper 63 7 0 to 14 Temperature adjustment UP DOWN mode For thick paper 64 2 0 to 4 Mode for preventing the end temperature rise 65 0 0 to 2 Mode for reducing sand image 66 0 0 to 3 Temperature Humidity sensor fixed mode 67 133 Not used 134 212 0 to 255 Laser light intensity adjustment normal speed 135 183 0 to 255 Laser light intensity adjustment low speed 136 1000 488 to 1511 Adjustment of...

Page 282: ... size group special standard size paper entry CAS3 U2 0 32 G LTR R 23 K LGL R 0 default CAS3 U3 0 Not used CAS3 U4 0 28 B OFI 0 default CAS4 CAS4 U1 0 26 OFI 37 M OFI 24 FLSP 25 A FLSP 42 FA4 34 G LGL 0 default Cassette 4 paper size group special standard size paper entry CAS4 U2 0 32 G LTR R 23 K LGL R 0 default CAS4 U3 0 Not used CAS4 U4 0 28 B OFI 0 default T 8 36 T 8 37 Service Soft Switch Set...

Page 283: ... value makes the margin at the trailing edge larger 055 Margin adjustment at the right edge of the copy Adjust the margin at the right edge of the copy Increasing the value makes the margin at the right edge larger 056 Margin adjustment at the left edge of the copy Adjust the margin at the left edge of the copy Increasing the value makes the margin at the left edge larger 058 Adjustment of the reg...

Page 284: ...t by using the temperature humidity sensor But when there is an image trouble at the point of changing the environment fix the temperature and the humidity and do not allow the change of the high pressure output 0 Normal 1 Fixed environment of LL Temperature of 18 deg C and humidity of 20 2 Fixed environment of NN Temperature of 18 28 deg C and humidity of 20 75 3 Fixed environment of HH Temperatu...

Page 285: ...he value to adjust the primary offset 1 for AC 154 Adjustment of the registration loop volume Thick paper Incrementing the value by 1 feeds the paper 0 1 mm further and increases the registration loop volume 155 Adjustment of the registration loop volume Special paper Incrementing the value by 1 feeds the paper 0 1 mm further and increases the registration loop volume 156 Adjustment of the registr...

Page 286: ...de S postcard mode Envelop mode 0 2 15 C 3 11 12 to 15 C in steps of 3 C 12 14 15 C 180 Temperature adjustment UP DOWN mode Special mode N The temperature adjustment offset relative to the target temperature of fixing in special mode N can be changed in steps of 3 C Use this parameter when the fixing performance is low or when it is necessary to prevent the paper from slipping or being curled 0 2 ...

Page 287: ... bit2 1 bit3 1 OFF 3 0 or 1 Item SW No Bit Setting ranges Default value Description NETWORK SW 5 4 0 or 1 00 RW SNMP canon_user access rights bit4 0 bit5 0 RW bit4 0 bit5 1 RO bit4 1 bit5 0 Disabled bit4 1 bit5 1 OFF 5 0 or 1 6 7 Not used 6 7 Not used 8 SEND 4 0 0 or 1 1 Rotation specifications of fax Rotation specifications of I Fax transmission 0 Comply with rotation specifications of e mail 1 C...

Page 288: ...et the e mail reception interval with POP when there are 2 or more e mails in the mail server Unit msec 32 33 Not used 34 0 10 120 0 To set the timeout value at IEEE802 1X authentication Unit sec When the setting value is 0 30msec is set 35 50 Not used Confirmation of contents of CA certificate Selecting the service mode NETWORK CERTIFICATE CA CERTIFICATE enables confirmation of the contents of th...

Page 289: ... Functions Bit Function 1 0 0 1 2 3 4 5 6 To import export via USB Startup in USB import export mode Normal startup 7 T 8 44 T 8 45 T 8 46 Detailed Discussions of Bit 6 When 1 is set startup is executed in USB import export mode SW03 List of Functions Bit Function 1 0 0 To display daylight saving time Daylight saving time Normal 1 2 3 4 5 6 7 Detailed Discussions of Bit 0 Display whether it is on ...

Page 290: ... NAVI Selection screen for reception mode Hidden Display 6 To set the display of installation NAVI Setting screen for IP address Hidden Display 7 T 8 49 T 8 50 Detailed Discussions of Bit 1 When 1 is set Setting screen for date and time of the installation NAVI can be hidden Detailed Discussions of Bit 2 When 1 is set Registering user telephone number of the installation NAVI can be hidden Detaile...

Page 291: ...shed with a maintenance supplies counter set DRBL 1 which can be used to gain rough measures of when to replace supplies The counter set increments by one on counting each sheet Maintenance counter list Item Counter Explanation TOTAL Total counter SERVICE1 Service total counter 1 SERVICE2 Service total counter 2 TTL Total counter COPY Total copy counter PDL PRT PDL print counter FAX PRT Fax print ...

Page 292: ...art just replaced and the counter will be cleared individually T 8 53 LMS Configuration Group Item Default Setting range Description INACTIVE ST SEND not used TR SEND not used ST BRDIM 0 0 1 To display installation state of BarDIMM when transfer is disabled TR BRDIM The 24 digits of license transfer numbers are displayed ST ERDS 0 0 1 To display installation state of third party expansion function...

Page 293: ...d in the license does not exist in the target device When an optional function included in the license is a slave option and a master option is not validated When an incorrect license key is entered When a license key is illegally altered Method of confirming license option Confirmation could be made whether the license option is active or not in the SACTIBAT FUNCTION item by outputting the SPEC R...

Page 294: ...key to fix the setting 2 Display LMS 3 Press the OK key and display LMS INACTIVE 4 Display ST SEND 5 Press the OK key OK SEND 001 1 Press 2 from the numeric keypad and press OK F 8 5 6 Press 2 using the numeric key and press the OK key CAUTION The 24 digits of license transfer numbers are displayed so you take the memo Because it cannot maintain the number displaying with the thing of this place l...

Page 295: ... OK key to fix the setting 2 Display LMS 3 Press the OK key and display LMS ERASE 4 Display SEND 5 Press the OK key 6 Turn OFF ON the power of the main unit For Reference There is no function to display the license registration numbers in the main unit Therefore when there is a possibility to restore the license after erasing it make sure that a user has written down the license registration numbe...

Page 296: ...nterval of sending the counter information to the server using a third party expansion function of E RDS COM TEST Execution of communication test An attempt is made to connect to UGW judges whether connection is successful and displays COM TEST OK or COMTEST NG as the judgment result COM LOG Details of communication test result The log of errors in communication with UGW is displayed The error inf...

Page 297: ... 2009 14 10 001 F 8 7 System Dump List Use it to check the history of communications both successful and error CLEAR DATE 10 16 2009 TX A4 RX A4 33600 21600 9600 14400 14400 9600 STD MH G3 1 3 2 3 4 5 6 7 8 9 000 0 0 0 0 0 0 0 0 0 0 0 0 0 0 0 0 0 0 0 0 0 0 0 0 0 0 0 0 0 0 0 0 0 0 0 0 0 0 0 0 0 PRINT 7 0 0 7 0 0 0 0 0 7 2 0 0 10 16 2009 13 00 0001 B4 B4 31200 19200 7200 12000 12000 7200 FINE MR ECM...

Page 298: ...OL RATE 3429 baud DATA RATE 28800 bps V 34 TX LVL REDUCTION 0 ERR ABCODE 00 ERR SECTXB 00 ERR SECRXB 00 Rx bit 1 00000100 01110111 01011111 00100011 00000001 10101001 00000001 bit 56 bit 57 00000001 00000001 00000100 00000000 00000000 bit 96 Tx bit 1 00000000 01000010 00011111 00100001 00000001 00000001 00000001 bit 56 bit 57 00000001 00000001 00000100 00000000 00000000 bit 96 Rx NSF CSI DIS CFR M...

Page 299: ...on 0 Manual feed tray 1 Cassette 1 2 Cassette 2 3 Cassette 3 4 Cassette 4 7 Duplex 10 Paper size Error history description ERR Item Explanation 1 Number The larger the number of an error the more recently it has occurred 2 Error date Date of error occurrence 3 Error time 4 Error recovery time 5 Location 3 Main unit 5 Finisher 6 Error code Error code 4 digit code for a definition of the code Error ...

Page 300: ...00 COUNTER E RDS BAR DIMM SERCHABLE PDF eAM eLA PS BODY No ENGINE CODE SIZE TYPE PRODUCT NAME TOTAL TTL COPY FAX PRT PDL PRT RPT PRT MEDIA PRT PICT PRT TONER YELLOW TONER MAGENTA TONER CYAN TONER BLACK OPTYION ROM USB MEMORY SD CARD USB SERIAL No MAC ADDRESS NUMBER OF LOGS ACTIVITY FAX ACTIVITY PRINTJOB ACCOUNT COPY PDL PRINT RX PRINT REPORT MEDIA PICT BRIDGE JAM SERVICE CALL ENVIROMENT ALARM COUN...

Page 301: ...ontroller before the card reader is demounted ERR E719 Clears card reader errors PWD Clears the system administrator s password FILE SYSTEM Not used Group Item Description FORMAT USB MEMORY Format the USB memory LICENSE DRIVE Clears the drive for license file FMT SD 512 Format the 512MB SD card 1024 Format the 1204MB SD card 2048 Format the 2048MB SD card CA KEY Initializes an installed CA certifi...

Page 302: ... example SPDTYPE Line 1 45cpm Line 2 T 8 63 ROM Configuration The table below lists the items of ROM display mode that are supported Group Item Description ROM MAIN Bootable Displays the version number of the PROGRAM ROM mounted on the main controller PCB MAIN2 Boot Displays the version of the ROM BOOT mounted on the main controller PCB OPROM Not used ECONT Displays the version number of the ROM m...

Page 303: ... SIGNAL TX TEST 14400bps 5 DTMF TEST 0 9 DTMF transmission test 0 G3 SIGNAL TX TEST 300bps 1 G3 SIGNAL TX TEST 2400bps 2 G3 SIGNAL TX TEST 4800bps Group subgroup Item 1 Item2 Item3 Explanation 3 G3 SIGNAL TX TEST 7200bps 4 G3 SIGNAL TX TEST 9600bps 5 G3 SIGNAL TX TEST TC7200bps 6 G3 SIGNAL TX TEST TC9600bps 7 G3 SIGNAL TX TEST 12000bps 8 G3 SIGNAL TX TEST 14400bps 9 G3 SIGNAL TX TEST TC9600bps G3 ...

Page 304: ...he START key 4 Specify the paper drawer main unit then press the START key Main unit cassette ST_C 0 2nd cassette OP_C 1 Manual feed tray MLT 2 5 Specify the paper eject slot then press the START key Tray 1 1_OUT 0 Tray2 2_OUT 1 6 Select a paper type then press the OK key Plain paper PLN 0 Thick paper TCK 1 Thin paper OHP 2 7 A test pattern is output MODEM Test 4 MODEM TEST These tests test modem ...

Page 305: ...To select a different frequency F 8 14 F 8 15 Keypad Frequency 1 462Hz 2 1100Hz 3 1300Hz 4 1500Hz 5 1650Hz 6 1850Hz 7 2100Hz NOTE The frequency and the output level of individual frequencies are in keeping with the output level set in service mode G3 Signal Transmission Test A press on 4 on the keypad from the MODEM test menu selects the G3 signal transmission test In this test the following G3 si...

Page 306: ... jack and the speaker by pressing the start key The Baud rate can be changed with the keypad and the Speed can be changed with the left right arrow key Keypad Baud rate 0 3429baud 1 3200baud 2 3000baud 3 2800baud 4 2743baud 5 2400baud F 8 16 T 8 70 Left right arrow keyTransmission speed 2400bps 4800bps 7200bps 9600bps 12000bps 14400bps 16800bps 19200bps 21600bps 24000bps 26400bps 28800bps 31200bps...

Page 307: ...h toner 1 Without toner DEV Developing Assembly Toner Sensor TS2 output value 0 With toner 1 Without toner TEP Environment Sensor THU1 Temperature output value Temperature in the machine HUM Environment Sensor THU1 Humidity output value Humidity in the machine COPY Copy confirmation sensor MP Manual Feeder Paper Sensor PS7 0 OFF 1 ON RE Pre registration Sensor PS12 0 OFF 1 ON RP Loop Sensor PS9 0 ...

Page 308: ...nel LCD also displays the on hook or off hook state of an external telephone set as detected The touch panel LCD displays from left to right CI CI frequency hook port and FC with indications of 1 ON and 0 OFF Test menu 2 Press numeric keypad key 2 on the LINE DETECT menu to select test menu 2 When the CNG signal is detected on the telephone line connection terminal the touch panel LCD display chan...

Page 309: ...9 9 Installation Installation How to check this Installation Procedure Installation Option Installation Sequence Drum Heater D1 Copy Card Reader F1 System Upgrade RAM C1 ...

Page 310: ...rness Push Insert Plug in Turn on Sound Check Check Visual Check Claw Remove Checking instruction F 9 1 F 9 2 Installation This machine is installed by the user For details of installation procedure refer to the User s Manual Option Installation Sequence When installing options of this machine be sure to note the following points 1 When installing the Drum Heater D1 be sure to install it first 2 W...

Page 311: ...Port Interface Kit B1 and the Super G3 Fax Board AJ1 in that order If a Fax Board is already installed be sure to perform installation after removing it Checking the Contents 1 Low Voltage Power Supply PCB X 1 2 Environment Heater Harness X 1 3 Environment Drum Heater Unit X 1 F 9 3 Check Items when Turning OFF the Power Check that the power of the host machine is OFF 1 Turn OFF the Power Switch o...

Page 312: ... Remove the Rear Cover 1 6 Screws 2 2 Hooks 3 2 2 2 3 x6 1 2 Open the Front Cover 1 and remove the Delivery Outer Cover 2 1 Claw 3 3 Hooks 4 1 2 3 4 F 9 5 F 9 6 3 Open the cassette 1 and remove the Left Cover 2 while lifting the host machine 1 Screw 3 5 Claws 4 4 Hook 5 CAUTION When lifting the host machine be sure to hold the rear side of the bottom of the Reader Unit F 9 7 x5 1 4 4 2 3 5 5 F 9 8...

Page 313: ... Installing 1 Turn the Lock Lever 1 and remove the Waste Toner Container 2 1 2 2 Open the Right Door Unit 1 release the Drum Cartridge Lock Lever 2 and then remove the Drum Cartridge 3 CAUTION Be sure not to touch the drum 1 of the Drum Cartridge 1 F 9 10 F 9 9 CAUTION Be sure to block light to the removed Drum Cartridge using paper 1 1 F 9 11 1 2 3 F 9 12 ...

Page 314: ...mbly Replacement Inner Cover 1 2 Claws 2 3 Hooks 3 1 2 2 3 x2 4 Remove the Developing Assembly 1 1 Connector 2 1 Edge Saddle 3 CAUTION Place paper 1 where the Developing Assembly is to be placed When removing the Developing Assembly be careful not to spill toner from the Toner Duct 2 1 2 F 9 14 F 9 13 CAUTION Be sure not to touch the Developing Cylinder 1 1 F 9 15 1 3 2 F 9 16 ...

Page 315: ...ition and remove the Developing Pressure Plate 1 The removed Developing Pressure Plate will not be used 2 Screws 2 The removed screws will be used in Installing the Environment Drum Heater step 6 4 Protrusions 3 x2 1 2 3 3 3 NOTE If a Fax Box Unit is installed remove it F 9 17 6 Remove the Power Supply Fan Unit 1 1 Wire Saddle 2 1 Connector 3 2 Screws 4 1 2 3 4 x2 7 Remove the Fixing Connector 1 1...

Page 316: ...p 2 1 2 3 x2 9 Pull out the Low Voltage Power Supply PCB 1 3 Screws 2 The removed screws will be used in Installing the Environment Drum Heater step 1 6 Connectors 3 2 3 3 2 x6 x3 1 F 9 20 F 9 21 Installing the Environment Drum Heater 1 Install the Low Voltage Power Supply PCB 1 included in the package 3 Screws 2 Use the screws removed in Before Installing step 9 6 Connectors 3 3 3 2 2 x6 x3 1 2 I...

Page 317: ...works by operating the Power Switch 2 Be sure to set the Power Switch at OFF position 2 1 F 9 24 3 Connect the Fixing Connector 1 1 F 9 25 4 Connect one of the connectors 1 of the Environment Heater Harness and pass the other connector 2 through the opening A of the plate and into the inside of the Host Machine B CAUTION Be sure not to touch the surface of the Transfer Roller F 9 26 NOTE Remove th...

Page 318: ...e Plastic Film Sheet of the Drum Heater and the Supply Mouth of the Developing Assembly with lint free paper so that there is no grease left F 9 28 F 9 29 7 Align the 4 positioning protrusions 1 on the Environment Drum Heater Unit with the 4 positioning holes 2 on the Host Machine and install the Environment Drum Heater Unit 3 2 Screws 4 Use the screws removed in Before Installing step 5 1 2 1 1 3...

Page 319: ...n installing the Super G3 Fax Board AJ1 at the same time be sure to install this equipment first In addition if the standard Fax Board is installed be sure to remove it before installing this equipment This equipment and the USB Application 3 Port Interface Kit B1 cannot be used at the same time Checking the Contents Copy Card Reader F1 1 Card Reader Unit X 1 2 Screw RS tight M4x10 X 1 3 Toothed w...

Page 320: ...that display in the Control Panel and the Power Supply Lamp are turned off then disconnect the power plug Installation Outline Drawing F 9 33 Installation Procedure Assembling the Card Reader 1 Remove the Card Reader Lower Cover 1 from the Card Reader Unit The removed Card Reader Lower Cover and screw will not be used 1 Screw 2 1 2 2 Remove the Card Reader Fixation Plate 1 from the Card Reader Uni...

Page 321: ...ed washer will be used in step 5 1 Screw 2 1 Toothed Washer 3 2 1 3 1 4 Install the Card Reader Lower Mounting Plate 1 on the Card Reader Unit 1 Screw 2 Use the screw removed in step 2 1 Edge Saddle 3 1 3 2 F 9 36 F 9 37 5 Install the Grounding Wire 1 on the Card Reader Unit 1 Screw 2 Use the screw removed in step 3 1 Toothed Washer 3 Use the toothed washer removed in step 3 1 2 3 1 6 Pass the Car...

Page 322: ...the Rear Cover 1 6 Screws 2 2 Hooks 3 2 2 2 3 x6 1 2 Open the Front Cover 1 and remove the Delivery Outer Cover 2 1 Claw 3 3 Hooks 4 1 2 3 4 F 9 40 F 9 41 3 Open the cassette 1 and remove the Left Cover 2 while lifting the host machine 1 Screw 3 5 Claws 4 4 Hooks 5 CAUTION When lifting the host machine be sure to hold the rear side of the bottom of the Reader Unit F 9 42 x5 1 4 4 2 3 5 5 F 9 43 ...

Page 323: ...ntroller Cover 1 7 Screws 2 4 Hooks 3 x7 1 2 3 3 3 3 2 2 2 NOTE If a Fax Box Unit is installed remove it 5 Remove the Lower Controller Cover 1 2 Screws 2 2 Hooks 3 1 2 2 3 3 x2 F 9 44 F 9 45 6 Open the Right Door Unit 1 and open the DADF Unit 2 1 2 7 Remove the Reader Right Rear Cover 1 1 Screw 2 The removed screws will be used in Installing the Card Reader Kit step 12 1 2 F 9 46 F 9 47 ...

Page 324: ... Procedure Installing the Card Reader Kit 8 Remove the Reader Right Front Cover 1 The removed Reader Right Front Cover will not be used 1 Claw 2 2 Hooks 3 1 2 3 F 9 48 Installing the Card Reader Kit 1 Install the Option Mounting Plate 1 1 Screw TP M3x4 2 1 2 2 Install the Card Reader Fixation Plate 1 1 Hook 2 1 Screw TP M3x4 3 2 1 3 F 9 49 F 9 50 ...

Page 325: ...3 Install the Reader Right Front Cover 1 included in the package 1 Boss 2 2 Screws TP M3x4 3 x2 2 1 3 4 Pass the Card Reader Harness 1 through the hole A in the Reader Right Front Cover and pull it out from the B part of the cover A B 1 F 9 51 F 9 52 5 Install the Card Reader Unit 1 2 Screws TP M4x8 2 1 x2 2 6 Install the Card Reader Lower Cover 1 1 Screw Binding M4x6 2 1 2 F 9 53 F 9 54 ...

Page 326: ...ord Guide 1 and remove the Cord Guide Cover 2 2 1 8 Install the Card Reader Harness 1 1 Connector 2 1 Wire Saddle 3 2 Edge Saddles 4 CAUTION When installing the Card Reader Harness be sure to connect the connector 2 without Ferrite Core 1 to the Card Reader Unit 1 2 F 9 56 F 9 55 3 2 1 4 x3 9 Pass the Card Reader Harness 1 through the Cord Guide 2 and install the Cord Guide Cover 3 1 2 3 F 9 57 F ...

Page 327: ...ctor 3 1 Edge Saddle 4 x8 2 1 4 3 2 2 11 Cut off the A part of the Reader Right Rear Cover with nippers 3 Joints 1 A 1 1 CAUTION Be sure to check that there is no burr F 9 59 F 9 60 12 Pass the Card Reader Harness 1 through the A part of the Reader Right rear Cover and return the Reader Right Rear Cover 2 to its original position 2 Protrusions 3 1 Screw 4 Use the screws removed in Removing the Cov...

Page 328: ... Rear Cover with nippers 3 Joints 1 1 1 A CAUTION Be sure to check that there is no burr 15 Return the removed covers to their original positions Lower Controller Cover Upper Controller Cover Left Cover Cassette Delivery Outer Cover Front Cover F 9 62 16 Pass the Card Reader Harness 1 through the A part of the Rear Cover and return the Rear Cover 2 to its original position 2 Hooks 3 6 Screws 4 x6 ...

Page 329: ... the main power switch 3 Enter service mode 4 Get in Service Mode ACC CARD and enter the card number to use 1 to 2000 Enter the smallest card number of the cards used by the user From the entered number up to 1000 cards can be used 5 Turn main power switch off and on again 6 Press Additional Functions to enter user mode 7 Select System Settings Department ID Management ON and perform various setti...

Page 330: ...wer Check that the power of the host machine is OFF 1 Turn OFF the Power Switch of the host machine 2 Be sure that display in the Control Panel and the Power Supply Lamp are turned off then disconnect the power plug Installation Outline Drawing F 9 64 F 9 65 Installation Procedure Removing the Covers 1 Remove the Rear Cover 1 6 Screws 2 2 Hooks 3 2 2 2 3 x6 1 2 Open the Front Cover 1 and remove th...

Page 331: ...he cassette 1 and remove the Left Cover 2 while lifting the host machine 1 Screw 3 5 Claws 4 4 Hooks 5 CAUTION When lifting the host machine be sure to hold the rear side of the bottom of the Reader Unit F 9 68 x5 1 4 4 2 3 5 5 F 9 69 Before Installing 1 Remove the Upper Controller Cover 1 7 Screws 2 4 Hooks 3 x7 1 2 3 3 3 3 2 2 2 2 Remove the SO DIMM PCB 1 1 F 9 70 F 9 71 ...

Page 332: ...stallation System Upgrade RAM C1 Installation Procedure Installing the SO DIMM Installing the SO DIMM 1 Install the SO DIMM 1 to slot of the removed SO DIMM 1 2 Return the removed parts to their original positions Upper Controller Cover Left Cover Delivery Outer Cover Front Cover Rear Cover F 9 72 ...

Page 333: ... Service Tools General Timing Chart General Circuit Diagram List of User Mode Appendix ...

Page 334: ... A As an addition when making an electrical check NA 3 Test Chart FY9 9196 A For checking and adjusting images A each service engineer is expected to carry one B each group of 5 service engineers is expected to carry one C each workshop is expected to carry one T 10 1 Oils and Solvents Name Uses Composition Remarks Alcohol cleaning e g glass plastic rubber external covers fluoride family hydrocarb...

Page 335: ...ingle sided print 2 sheets cassette STBY LSTR STBY INTR PRINT Start key ON Developing AC bias Primary charging DC bias Developing DC bias Transfer bias Static eliminator bias Developing cylinder clutch CL2 Laser Pickup motor M8 Cassette pickup solenoid SL3 Cassette pickup sensor PS13 Registration sensor PS11 Registration clutch CL1 Fixing motor M1 Delivery sensor PS5 Main motor M2 Fixing heater H1...

Page 336: ...d sensor PS8 Fixing motor M1 Delivery sensor PS5 Fixing heater H1 Sub heater H2 Sequence Developing AC bias Primary charging DC bias Developing DC bias Transfer bias Static eliminator bias Developing cylinder clutch CL2 Laser Pickup motor M8 Cassette pickup solenoid SL3 Cassette pickup sensor PS13 Registration sensor PS11 Registration clutch CL1 Reverse feed motor M4 Reverse feed solenoid SL2 Main...

Page 337: ...N DCT L GND L GND 5VR 5VR J1 H N 24VR1 P GND 5VR L GND L GND L GND ESS1 ESS2 3 3VR L GND 5VC P GND 24VR2 24VR1 24VR1 GND GND GND GND RELAY ON ENV HEATER ON J8104 7 1 6 5 4 3 2 8 9 J207 12 11 8 1 2 3 4 5 6 7 9 10 J106 9 8 2 3 4 5 6 1 7 J105 2 3 4 5 1 J108 7 1 6 5 4 3 2 8 9 J205 2 3 4 1 J109 24VR2 5VR 1 3 2 J102 2 1 J03 2 3 4 1 J2 2 3 4 1 J107 10 9 7 6 5 4 3 2 1 8 11 12 J8125 2 3 4 5 1 J903 8 1 2 3 ...

Page 338: ... J2303 1 2 3 4 5 6 J60L J60LH J2302H J2303H 3 2 1 J2302 1 2 3 J2204 1 2 3 1 2 3 4 J2209 29 28 27 26 25 24 23 22 21 20 19 18 17 16 15 14 13 12 11 10 9 8 7 6 5 4 3 2 1 J301 1 2 3 4 5 6 7 8 9 10 11 12 13 14 15 16 17 18 19 20 21 22 23 24 25 26 27 28 29 J202 13 12 11 10 9 8 2 3 4 5 6 1 7 J203 1 2 3 4 5 6 7 8 J216 J3DH 1 2 3 J3L 12 11 10 9 8 2 3 4 5 6 1 7 J206 9 8 2 3 4 5 6 1 7 J1 10 9 8 2 3 4 5 6 1 7 J...

Page 339: ... J2238 3 2 1 J20LH 1 2 3 4 J20L 1 2 3 4 J20D 1 2 3 4 5 6 J2233 5 4 3 2 1 6 1 2 3 J2214 J2214H J2215H 1 2 3 4 3 2 1 J2213H 1 2 3 4 5 J2241 4 3 2 1 J2230 1 2 3 4 J2225 10 9 8 2 3 4 5 6 1 7 J6D 1 2 3 J2223 17 16 15 14 13 12 11 10 9 8 2 3 4 5 6 1 7 J8D 1 2 J14D 2 1 J2218 17 16 15 14 13 12 11 10 9 8 2 3 4 5 6 1 7 J8L 1 2 3 J5L 1 2 J2226 J2226H J14LH 1 2 J14L J2218H J2220H 1 2 3 J2217 1 2 3 1 2 3 J2219 ...

Page 340: ...T RXD OP CST RETRY CNT OUT0 PWM DATA D GND DATA C DATA D DATA C GND DATA A GND DATA B DATA A DATA B GND PPRTST PSTS RAW BD0 GND N C LASER CND PPO3 PRTS PCTS PPRDY PPOWER PRESET PCPRDY IMG SYS RST PDOWNLOAD PPI0 PLIVEWAKE RAW BD0 PCMD GND GND GND GND GND GND IMG1L GATX IMG1L GARX GND INT IMG1L TOP LASER CND LASER CND GND Laser Scanner Motor 13 12 11 10 9 8 2 3 4 5 6 1 7 J208 11 27 26 25 24 23 22 21...

Page 341: ...XBUS DATA4 EXBUS DATA5 EXBUS DATA6 EXBUS DATA7 GND EXBUS ADDR0 EXBUS ADDR1 EXBUS ADDR2 EXBUS ADDR3 GND MODEM CS RESET MODEM EXBUS ADDR4 EXBUS ADDR5 EXBUS ADDR6 MODEM SNSI 3 3V 3 3VR GND 24V 5VC VOUT 2 VOUT 1 USB USB LAN MODEM_WE MODEM_OE 1 2 J1008 2 1 J1003 2 3 1 J1004 1 2 3 4 5 6 J8115 20 18 16 1 2 3 4 5 6 7 8 9 10 11 13 15 17 19 21 23 12 14 22 J8114 20 18 16 1 2 3 4 5 6 7 8 9 10 11 13 15 17 19 2...

Page 342: ...uit Diagram 6 10 General Circuit Diagram 6 10 1 2 3 4 5 6 7 8 9 10 1 2 3 4 5 6 7 8 9 10 F E D C B A F E D C B A P 6 CARD REDER COUNT 5VC GND 1 2 J8124 CARD REDER TX CARD REDER RX Card Reader Secondary Battery PCB2 Main Controller PCB 1 2 3 4 5 6 7 J8117 1 2 3 4 5 J8119 1 2 3 4 5 J10 1 2 3 4 5 6 7 8 J8116 F 10 8 ...

Page 343: ...DGT3 K DGT6 K RTN1 K RTN2 ESS KEY CONTRAST KEY 5V VR VOLTAGE GND YD FRAME LP DATA LATCH XSCL DISP OFF 5V GND CONTRAST ADJ N C N C N C N C D3 D2 D1 D0 5V 5V GND GND GND ANODE N C CATHODE X1 Y1 X2 Y2 System Key PCB 1 2 3 4 5 6 7 8 J669 J670 K DGT2 L DGT2 K DGT0 L DGT0 L RTN0 L DGT1 K DGT1 K RTN0 Touch Panel 1 2 3 4 J662 1 2 3 4 J661 1 2 3 J668 20 18 16 1 2 3 4 5 6 7 8 9 10 11 13 15 17 19 12 14 J666 ...

Page 344: ...Sensor 2 M10 Reader Motor PS23 ADF Open Close Sensor 24V 24V LEDB1 LEDG1 LEDR1 LEDB2 LEDG2 LEDR2 GND 3 3V CIS 3 3V CIS VREF MODE CIS SP GND CS CLK GND VIN0 VIN1 VIN2 VIN3 VIN4 VIN5 VIN6 VIN7 VIN8 VIN9 VIN10 A B B A 1 2 3 J921 3 2 1 5 4 3 2 1 6 3 2 1 J920 1 2 3 J923 1 2 3 4 5 6 J904 3 4 5 6 1 2 J922 2 3 4 1 J905 3 2 1 J924 1 2 3 4 5 6 J911 22 14 12 39 37 35 33 31 29 27 25 23 21 19 17 15 13 11 10 9 ...

Page 345: ... J912 MT902 1 2 3 J947 J947H J956H 4 3 2 1 J957 1 2 3 4 J956 3 2 1 J948 J937H 3 2 1 PS32 Document Length Detection Sensor 3 2 1 J940 1 2 3 PS31 Document Width Detection Sensor 1 2 3 J939 6 5 4 3 2 1 J929 1 2 3 4 5 6 J928 1 2 3 J930 MT901 12 11 10 9 8 2 3 4 5 6 1 7 J909 1 2 3 4 5 6 M11 Feed Motor 6 5 4 3 2 1 Delivery Reverse Motor M12 3 2 1 J931 3 2 1 PS30 Document Set Sensor 1 2 3 PS29 Timing Sens...

Page 346: ...tte Lifting Plate Detection Sensor PS101 Cassette Paper Sensor PS102 Cassette Retry Sensor PS103 Cassette Paper Level Sensor A PS104 Cassette Paper Level Sensor B PS105 Cassette Right Cover Sensor PS106 Cassette Size Detection Switch To Lower Cassette Module To Upper Cassette Module or Host Machine SW101 1 2 3 4 5 J1805D 1 2 3 J1001L J1001LH 4 1 2 3 J1802DWH MT1 4 1 2 3 J1802LWH MT2 18 17 16 15 14...

Page 347: ...ack Bypass Standard Settings On Off Paper Size Inch size LTR LGL STMT EXEC A B size A4 A5 B5 Irregular Size X 5 9 16 24 3 4 140 mm 630 mm Y 3 15 16 8 1 2 99 mm 216 mm Envelope No 10 COM10 ISO B5 Monarch ISO C5 DL Paper Type Plain Recycled Color 3 hole punch Bond Heavy Paper 1 Heavy Paper 2 Transparency Labels Register Irregular Size Size 1 X 5 9 16 24 3 4 140 mm 630 mm Y 3 15 16 8 1 2 99 mm 216 mm...

Page 348: ...MODE2 MODE3 Initialize After Replacing Drum Select Yes or No This function is used only when the drum unit needs to be replaced T 10 5 Report Settings 1 Indicates items that are available only when the optional Super G3 Fax Board AJ1 standard equipped for the imageRUNNER 1750iF 1740iF 1730iF is attached to the machine Item Setting Description Settings TX Report On For Error Only Report With TX Ima...

Page 349: ...rk 1 FAX TEL Gamma Value for Color Send Jobs Gamma 1 0 Gamma 1 4 Gamma 1 8 Gamma 2 2 Sharpness 2 7 levels 4 Register Favorites Button Register Edit Erase PDF Compact Image Quality Image Level in Text Photo or Photo Mode Data Size Priority Normal Image Priority Image Level in Text Mode Data Size Priority Normal Image Priority PDF OCR Orig Auto Detect Settings 3 On Off Color TX Scan Settings Speed P...

Page 350: ...t is activated Item Setting Description Paper Save OFF ON Orientation Portrait Landscape Font Number 0 to 104 Point Size 4 00 to 999 75 point 12 00 Pitch 0 44 to 99 99 cpi 10 00 T 10 9 Item Setting Description Form Lines 5 to 128 lines 60 Symbol Set PC8 PC850 PC851 PC852 PC862 PC864 PC866 PC8DN PC8GRK PC8TK PC1004 PIFONT PSMATH PSTEXT ROMAN8 VNINTL VNMATH VNUS WIN30 WINARB WINBALT WINCYR WINGRK WI...

Page 351: ...x Address Max 120 characters File Register Name Max 16 characters Destination Registration Max 16 characters Protocol FTP Windows SMB Host Name FTP Max 47 characters Windows SMB Max 120 characters File Path Max 120 characters User Max 24 characters Password FTP Max 24 characters Windows SMB Max 14 characters Group Register Name Max 16 characters Destination Registration Max 16 characters Address B...

Page 352: ...ers I Fax Address Max 120 characters File Register Name Max 16 characters Register One Touch Name Max 12 characters Protocol FTP Windows SMB Host Name FTP Max 47 characters Windows SMB Max 120 characters Folder Name Max 120 characters User Name Max 24 characters Password FTP Max 24 characters Windows SMB Max 14 characters Group Register Name Max 16 characters Register One Touch Name Max 12 charact...

Page 353: ...d user name to Send Document Name ON OFF T 10 15 T 10 16 T 10 17 T 10 18 Network Settings Item Setting Description TCP IP Settings IPv4 Settings IP Address Settings DHCP ON OFF BOOTP ON OFF RARP ON OFF IP Address IP Address 0 0 0 0 Subnet Mask IP Address 0 0 0 0 Gateway Address IP Address 0 0 0 0 PING Command Enter the IP Address using the numeric keys Then press the Start key IP Address Range Set...

Page 354: ...olling Interval 1 to 48 24 NTP Server Address IP Address or Max 47 characters NTP Server Check OK Error Use PASV Mode for FTP ON OFF FTP Extension ON OFF Item Setting Description Certificate Settings Generate Key Key Name Max 24 characters CA Certificate List Cert Details Version Serial Number Sig Algorithm Issue Dest Validity Start Validity End Issuer Public Key Cert Thmprn SHA1 Cert Verif Erase ...

Page 355: ...64 characters POP Server Max 47 characters POP Address Max 32 characters POP Password Max 32 characters POP Interval 0 to 99 Minutes 0 Startup Time Settings 0 to 300 Seconds 0 Item Setting Description IEEE802 1X Settings USE IEEE802 1X Settings OFF ON Login Name Max 24 characters TLS Settings Use TLS OFF ON Key and Certificate Set as Def key Cert Details Display Use Loc TTLS Settings Use TTLS OFF ...

Page 356: ...F ON When I Fax is selected in Forwarding Conditions Settings Divide into Pages PDF B W JPEG Color TIFF B W JPEG Color PDF Do not Divide into Pages PDF TIFF B W PDF Color Forward w o Condition Receive Tipe Fax I Fax Forwarding destination Select from the list of registered addresses File Format When Fax is selected in Receive Tipe TIFF PDF Divide into Pages OFF ON When I Fax is selected in Receive...

Page 357: ...icense Registrastion Enter a license key using the numeric keys USB Device Item Setting Description USB Device ON OFF T 10 26 T 10 27 T 10 28 T 10 29 T 10 30 Dept ID User Name Display Item Setting Description Dept ID User Name Display ON OFF PDL Selection PnP Item Setting Description PDL Selection PnP UFRII LT PCL5e PCL6 PS3 FAX Memory Media Settings Item Setting Description Use Scan to Memory Med...

Page 358: ...lear 5 No No SSL Keys 4 Clear Clear 3 4 No No CA Certificates Clear Clear 3 No No eRDS Clear Clear 2 No No Service Mode Main Controller PCB Clear 1 Clear No No Service Mode DC Controller PCB DC Controller PCB Clear No No 1 In service mode output REPORT OUTPUT SERVICE DATA LIST REPORT OUTPUT SERVICE LABEL After replacing the board input the setting value 2 It is initialized by selecting the followi...

Reviews: