background image

Model 512 Instruction Manual  

Page 15  

CAUTION! 

For continued protection against
risk of fire, replace only with
same type and rating of fuse.

FU

S

E


FU

SE  

F

U

S

FOOTSWITCH

PROBE

PRINTER

TERMINAL

SPEAKER

ENABLE

1

2

64

385

386

257

258

129

447

448

320

191

192

130

319

63

449

450

321

322

193

194

65

66

511

512

383

384

255

256

127

128

INPUT RANGE

110/220 V~

2A   50/60HZ

J7

J5

J3

J1

J8

J6

J4

J2

1.6 A/250V


 2 


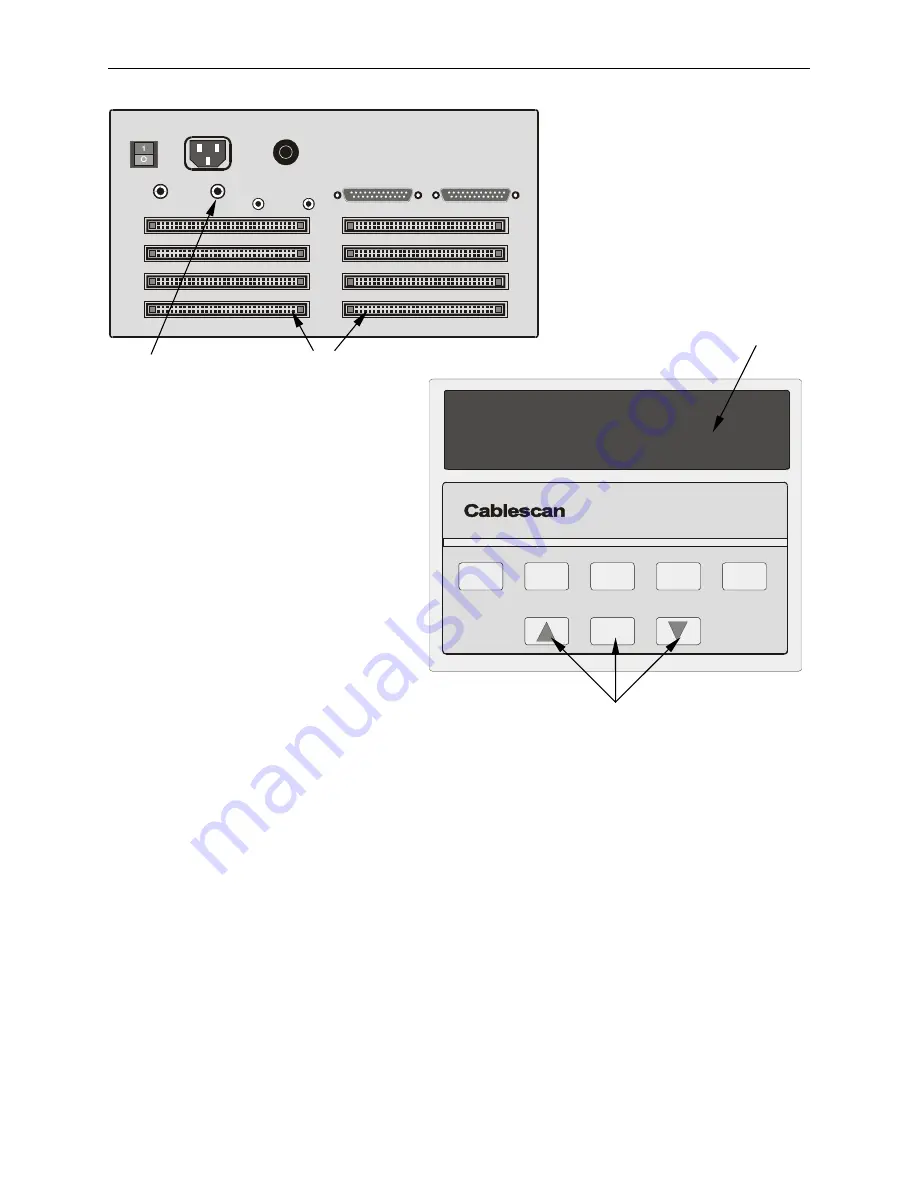
1.  Connect harness or assembly fixture. 

2.  Connect wrist strap. 

3.  Select and initiate SEARCH. 

4.  Select wires by touching them, one or more wires at a time, and the display will show the 

pin numbers of these wires.  


NOTE 

If more than one wire is touched at a time, the display will scroll 
through the numbers in succession.


Figure 11.  Simplified SEARCH (Wire Identification) Procedure  

SEQ

BUILD

RANDOM

BUILD

ERROR

LIST

TEST

RESET

MENU

RUN

MODEL 512

Summary of Contents for 512

Page 1: ...CONTINUITY TESTER MODEL 512 Cablescan ...

Page 2: ...nstruction Manual Page iii March 3 2005 MODEL 512 INSTRUCTION MANUAL Part Number 5900325 Cablescan A Eubanks Company 3022 Inland Empire Blvd Ontario California 91764 909 483 2436 Fax 909 483 2463 www cablescan com ...

Page 3: ...e service person s travel and living expenses THIS WARRANTY IS EXPRESSLY IN LIEU OF ALL OTHER WARRANTIES EXPRESSED OR IMPLIED THERE ARE NO IMPLIED WARRANTIES OF MERCHANTABILITY OR FITNESS FOR A PARTICULAR PURPOSE THIS WARRANTY STATES CABLESCAN S ENTIRE AND EXCLUSIVE LIABILITY WHETHER IN TORT OR IN CONTRACT AND BUYER S EXCLUSIVE REMEDY FOR ANY CLAIM FOR DAMAGES IN CONNECTION WITH THE SALE OR USE OF...

Page 4: ...le Assembly 5 Test Cable Assembly 5 Program Storage 6 Simplified Instructions 7 Operating Instructions Front Panel 16 Front Panel Modes 16 Seq Build Sequential Build 16 Random Build 17 Error List 18 Test 19 Reset 19 Menu Selectable Functions 20 Main Menu Functions 20 Directory of Drive 0 21 Directory of Drive 1 21 Learn Known Good 21 Save Program to Drive 0 22 Save Program to Drive 1 22 Self Test ...

Page 5: ...27 Operating Instructions Keyboard 28 Introduction 28 Entering Commands 28 Test Commands 29 Build Commands 30 Print Related Commands 31 Disk Commands 33 Setup Commands 35 Maximum Receive Board MB 35 Maximum Transmit Point MP 36 Retest Delay RD 36 Retest Flag RT 36 Scan Delay SD 36 Test Clock Speed SE 36 Learn Known Good Clock Speed SL 37 Start Point SP 37 Chaining Programs 37 Chain File CF filenam...

Page 6: ...re List without Cross References 45 Wire List with User Notation 46 Program Editor 47 Introduction 47 Wire List Table W 47 User Notation Table U 48 Edit Commands 49 Block Programming Commands 52 Introduction 52 Wire List Table 52 User Notation Table 53 Interactive User Notation Programming 54 Programming Example 55 Discussion 55 Wire Harness Schematic 55 Harness Wire List 56 Interface Wiring 57 In...

Page 7: ...tup 69 Data Format 69 Printer Cable 69 Printer Troubleshooting 69 Terminal Interface 71 Data Format 71 Terminal Cable 71 PC Interface 72 PC Cable 72 Application Notes 73 Scanner Module Adapter Cables 73 Interfacing with a PC 73 Summary of Keyboard Commands 74 Care of the Model 512 76 Maintenance 76 Repair 76 Memory Backup Battery 76 Replacement Parts 77 ...

Page 8: ...ERROR LIST Procedure 9 6 Simplified LOOP TEST Procedure 10 7 Simplified SAVE PROGRAM Procedure 11 8 Simplified LOAD PROGRAM Procedure 12 9 Simplified SEQUENTIAL BUILD Procedure 13 10 Simplified RANDOM BUILD Procedure 14 11 Simplified SEARCH Wire Identification Procedure 15 12 Sample Error List Printouts 18 13 Sample Wire List Printouts 24 14 Sample Wire Harness 44 15 Wire Harness Schematic Example...

Page 9: ...11 5 in x 13 0 in 14 0 cm x 29 2 cm x 33 0 cm WEIGHT 12 pounds 5 4 kg DISPLAY 40 Character Alphanumeric Vacuum Fluorescent PROGRAMMABLE TEST PARAMETERS Sample Rate 1 to 64 μs Start Point 1 to 512 Max Transmit Point 1 to 512 Max Receive Module 1 to 4 CONTINUITY PROGRAMMING Learn Known Good Keyboard CRT Terminal IBM PC via RS 232C Port USER NOTATIONS LENGTH FROM Point 8 Alphanumeric TO point 8 Alpha...

Page 10: ...e controlled by a Personal Computer through an RS 232C Terminal port MAJOR FEATURES Major functions of the Model 512 are as follows Self Programming for circuit testing by learning a known good circuit Programming by downloading from a PC Automatic Test of each circuit cable harness etc to be tested Assembly assistance by displaying build information Program save and load Identification or locatio...

Page 11: ...ly in random by displaying circuit information termination as each wire is touched while the wrist strap is attached Program can be created with the Learn Known Good mode or entered using the Wire List Editor ERROR LIST Initiates test and produces a printout of errors or prints Passed if no errors TEST Initiates test and displays errors RESET Terminates current mode and places Model 512 in wait st...

Page 12: ...ar panel through eight 64 pin connectors J1 through J8 A wrist strap kit provides the capability to locate wires by touch during assembly and troubleshooting utilizing body conductance A probe provided in the kit may also be used A foot switch is provided for advancing through the test and assembly modes or restarting the test mode An optional 80 column serial printer provides hard copies of error...

Page 13: ...face cables and the fixture wiring User labels cannot be learned they must be keyed in PC INTERFACE AND CONTROL Optional PC software programs TERM and TestRite are available to control the Model 512 through the serial RS 232C Terminal port TERM is a DOS based program whereas TestRite is a Windows 95 NT program TERM is a terminal emulation program that allows keyboard entry and control like an opti...

Page 14: ...row to step through menu modes until Self Test is displayed 5 Press MENU RUN to initiate Self Test Passed Self Test will display 6 Connect the test fixture or interface cable to the test point connectors on the rear panel See Figure 2 LEARN CABLE ASSEMBLY Refer to Learn mode in the Operating Instructions section for details 1 Engage ENABLE plug The ENABLE plug is required for functions that change...

Page 15: ...2 Press RESET and then arrow down through the menu until Save Program is displayed The display will show Drive 0 Program 1 3 If a different file 2 through 9 is desired use Down arrow to step to desired file 4 When desired file is located and free for use press MENU RUN to copy program from memory into that file 5 Press MENU RUN again to initiate Save Program ...

Page 16: ...on against risk of fire replace only with same type and rating of fuse F U S E FUSE F U S E FOOTSWITCH PROBE PRINTER TERMINAL SPEAKER ENABLE 1 2 64 385 386 257 258 129 447 448 320 191 192 130 319 63 449 450 321 322 193 194 65 66 511 512 383 384 255 256 127 128 INPUT RANGE 110 220 V 2A 50 60HZ J7 J5 J3 J1 J8 J6 J4 J2 1 6 A 250V 1 2 6 1 Engage ENABLE plug 3 4 5 2 Connect known good harness to connec...

Page 17: ... 50 60HZ J7 J5 J3 J1 J8 J6 J4 J2 1 6 A 250V 4 2 6 1 3 5 Verify ENABLE plug is not engaged 1 Load program Figure 8 2 Connect harness to be tested 3 Press TEST and the Model 512 will perform one test scan 4 For a successful test the display will show PASSED If an error is found test will halt and display will show OPEN or SHORT with the From To points 5 To continue test beyond failed points press TE...

Page 18: ...110 220 V 2A 50 60HZ J7 J5 J3 J1 J8 J6 J4 J2 1 6 A 250V 4 5 3 2 6 1 Verify ENABLE plug is not engaged 1 Load Program Figure 8 2 Connect harness to be tested 3 Connect printer per setup instructions in Preparation section 4 Press ERROR LIST 5 The Model 512 will perform a test of the harness all errors will be printed or Passed will be printed and displayed for a successful test 6 When test and prin...

Page 19: ...J1 J8 J6 J4 J2 1 6 A 250V 4 2 6 1 3 5 Verify ENABLE plug is not engaged 1 Load program Figure 8 2 Connect harness to be tested 3 Select and initiate LOOP TEST Test will be repeated over and over 4 For each successful test a loop count on the display will increment one If an error is found testing will stop and the display will show OPEN or SHORT with From To points 5 To restart test after error in...

Page 20: ...ANGE 110 220 V 2A 50 60HZ J7 J5 J3 J1 J8 J6 J4 J2 1 6 A 250V 3 1 2 4 6 5 1 Engage ENABLE plug on rear panel 2 Select and initiate SAVE PROGRAM 3 The display will show Drive 0 Program 1 4 If a different file 2 through 9 is desired use Down arrow to step to desired file 5 If it is decided not to save the program press RESET 6 When desired file is located and free for use press MENU RUN to copy progr...

Page 21: ...63 449 450 321 322 193 194 65 66 511 512 383 384 255 256 127 128 INPUT RANGE 110 220 V 2A 50 60HZ J7 J5 J3 J1 J8 J6 J4 J2 1 6 A 250V 2 1 3 5 4 1 Select and initiate DIRECTORY 0 2 The display will show the first file name 3 Press Down arrow to display the desired file name 4 If it is decided not to load a program press RESET 5 To load program press MENU RUN Figure 8 Simplified LOAD PROGRAM Procedur...

Page 22: ...J1 J8 J6 J4 J2 1 6 A 250V 6 4 3 1 5 2 7 1 Connect assembly fixture 2 Load Program Figure 8 3 Connect wrist strap 4 Connect foot switch 5 Press SEQ BUILD 6 Follow the display in making connections When the From To point that is displayed is touched the tone will sound as an aid in identifying points To bypass a step press foot switch or the SEQ BUILD key When the last step has been completed the di...

Page 23: ...7 J5 J3 J1 J8 J6 J4 J2 1 6 A 250V 6 7 4 8 3 1 5 8 2 9 1 Connect assembly fixture 2 Load program Figure 8 3 Connect wrist strap 4 Connect foot switch 5 Press RANDOM BUILD 6 The display will show Select Next Wire 7 Touch any wire at random and connect according to From To points displayed Repeat for all wires to be assembled 8 To bypass a displayed From To point press RANDOM BUILD or foot switch 9 W...

Page 24: ...6 127 128 INPUT RANGE 110 220 V 2A 50 60HZ J7 J5 J3 J1 J8 J6 J4 J2 1 6 A 250V 4 2 1 3 1 Connect harness or assembly fixture 2 Connect wrist strap 3 Select and initiate SEARCH 4 Select wires by touching them one or more wires at a time and the display will show the pin numbers of these wires NOTE If more than one wire is touched at a time the display will scroll through the numbers in succession Fi...

Page 25: ...ass sequence steps A complete procedure is provided below Once familiarized the user may refer to Figure 10 To select and use SEQ BUILD in building an assembly proceed as follows 1 Load program into memory refer to Loading a Program 2 Attach wrist strap to arm and plug wrist strap lead into PROBE jack on the rear panel 3 Plug footswitch lead into FOOTSWITCH jack on the rear panel 4 Press SEQ BUILD...

Page 26: ... rear panel 4 Connect the harness assembly fixture 5 Press RANDOM BUILD key the display will show Select Next Wire 6 Touch the end of a random wire to assemble and the display will show the From To points 7 When the correct termination is made the tone will sound and the display will show Select Next Wire 8 Touch each succeeding wire in any order desired and make terminations as in Steps 5 and 6 a...

Page 27: ...3 Connect harness to be tested 4 Press ERROR LIST The Model 512 will perform a single test and will print a list of all errors or it will print Passed if there are no errors 5 When test and printouts are finished disconnect harness 11 26 96 Error List USER PROGRAMMABLE CUSTOM HEADER From Pt To Pt Circuit ID OPEN 3 12 OPEN 1 10 OPEN 8 16 SHORT 3 10 SHORT 8 12 Failed 0000 0001 Without User Labels 11...

Page 28: ...er may refer to Figure 5 To select and use TEST proceed as follows 1 Load program to be used refer to Load Program 2 Install harness to be tested 3 Press TEST key Single Test will be displayed and one complete scan will be made 4 If Passed appears at the end of the scan the test is successful 5 An OPEN or SHORT with the From To points will be displayed when an error is encountered 6 To continue te...

Page 29: ...Save Program to Drive 1 Print Wire List Self Test Setup Sub menu Requires use of Enable plug These menu selectable modes and functions are accessed through the MENU RUN key and the Up and Down arrow keys To select one of the menu modes or functions use the following standard procedure 1 Press Up or Down arrow to step through the menu until the desired function or mode is displayed 2 Insert the Ena...

Page 30: ...ectory of Drive 1 This function is used to display and load programs from the external disk drive connected to the rear panel on some Model 512 testers The operation of this function is identical to the Directory of Drive 0 The external disk drive connector was available on earlier systems it is no longer available Learn Known Good Before testing it is necessary to prepare a program for the assemb...

Page 31: ...s in use thereby over writing the program currently on disk use arrow key to locate it then press MENU RUN Save Program to Drive 1 This function is used to save to an external disk drive if the Model 512 has an external disk drive connector and an external disk drive is connected The operation of this function is identical to the Save Program to Drive 0 The external disk drive connector was availa...

Page 32: ...and the error is displayed Pressing MENU RUN will restart the test A complete Loop Test procedure is provided below Once familiarized however the user may refer to Figure 7 To select and use LOOP TEST proceed as follows 1 Load program to be used in this test refer to Load Program 2 Install harness to be tested 3 Press Up or Down arrow to step through the menu until LOOP TEST is displayed 4 Press M...

Page 33: ...n the Preparation section 2 Press Up or Down arrow to step through the menu to display PRINT WIRE LIST 3 Press MENU RUN to initiate printing A sample wire list is shown below 11 26 96 Wire List USER PROGRAMMABLE CUSTOM HEADER Sequence From Pt To Pt Circuit ID 001 5 13 002 4 14 003 3 12 004 2 11 005 1 10 006 9 15 007 8 16 End of List Without User Labels 11 26 96 Wire List USER PROGRAMMABLE CUSTOM H...

Page 34: ...ter Label Return to Main Menu Display Current Time The current setting of the internal clock can be displayed to determine whether the clock needs setting The display format is as follows day date time Mon Sun MM DD YY HH MM SS The time is presented in 24 hour format To exit this function press RESET This function does not change the time Set Date This function sets the date in the internal clock ...

Page 35: ...d values The options affected and their default values are as follows MP Maximum Transmit Point 512 MB Maximum Receive Board 4 SP Start Point 1 SE Scan Clock Speed 20 SD Scan Delay Count 0800 BD Body Delay Count 1200 SL Learn Clock Speed 28 RD Retest Delay 500 RT ON OFF Retest flag ON Depends on the number of scanner boards installed typically four After the options are reset the message system de...

Page 36: ... about 30 seconds to complete and formatting complete is displayed Format Drive 1 This function is used to format a diskette if the Model 512 has an external disk drive connector and an external disk drive is connected The operation of this function is identical to the Format Drive 0 described above The external disk drive connector was available on earlier systems it is no longer available Print ...

Page 37: ...ss the ESC key on the keyboard Some commands are two letters that are executed by pressing their two keys followed by an ENTER Other commands will require that a number be entered following the two letter command Disk drive commands are single letter commands followed by either a 0 or 1 to specify the drive number If a command requires a file name a SPACE is entered after the drive number followed...

Page 38: ...er test and each error open or short is displayed After each error is displayed testing may be continued by pressing ENTER See section on Controls and Displays for more details Scan Opens Only SO Executes a scan for opens only Opens are displayed as in TEST mode After each open is displayed testing may be continued by pressing ENTER Scan Shorts Only SS Executes a scan for shorts only Shorts are di...

Page 39: ... Body Random Build RA Same as RANDOM BUILD on the Front Panel See section on Controls and Displays for more details Sequential Build SQ Same as SEQ BUILD on Front Panel See section on Controls and Displays for more details Execution of this command begins at the first sequence step programmed into the wire list table Entering a Sequence Number To start the Sequential Build at a step other than the...

Page 40: ...ted PO Print Options P Printer on off toggle FF Form Feed LF Line Feed SH Set Heading Print Wire List PW Same as PRINT WIRE LIST selected from the Front Panel menu See section on Controls and Displays for more details Print Error List PE Same as ERROR LIST key on the Front Panel See section on Controls and Displays for more details Print User Notation List PU Prints a list of user notations that h...

Page 41: ...print functions type P followed by an ENTER again Line Feed LF Entering this command will cause the printer to advance one line Form Feed FF This command causes the printer to advance to the top of the form Refer to printer owner s manual for setting the Top of Form Set Heading SH This command allows a custom heading to be printed at the top of a printout when a print command is performed The prin...

Page 42: ...ectory 1 C1 no Catalog Drive 1 not available D0 yes Delete from Drive 0 not available D1 yes Delete from Drive 1 Format Drive 0 I0 no Initialize Drive 0 Format Drive 1 I1 no Initialize Drive 1 Directory 0 L0 yes Load from Drive 0 Directory 1 L1 yes Load from Drive 1 not available R0 yes Replace to Drive 0 not available R1 yes Replace to Drive 1 Save Program S0 yes Save to Drive 0 Save Program S1 y...

Page 43: ... from the internal 3 5 drive into memory enter L0 PN943 or L PN943 Replace R d filename Replaces an existing wire list program saved on the disk drive specified by d with the program in memory This command is used when the file name already exists on the specified drive Use the Save command when writing a program to a new file name To replace the existing program PN943 that is on the internal 3 5 ...

Page 44: ...E 1 to 64 default 20 Learn Known Good Clock Speed SL 1 to 64 default 28 Retest Delay RD 1 to 9999 default 500 Retest Flag RT ON OFF default ON Start Point SP 1 to 512 default 1 Clear Chain File CC Chain File CF filename NOTE Parameter settings are also saved with the program when it is saved The values remain in memory until a program with different settings is loaded Before a new program is learn...

Page 45: ...el 512 will retest all continuities found This command is used when necessary to remove errors that otherwise could occur because of noise or interwire capacitance in the circuit under test Disabling this option allows the Model 512 to test the harness slightly faster Range ON OFF Default ON Scan Delay SD This command sets up a time delay between the time when a transmitter applies a voltage to th...

Page 46: ...these limits while testing the other harness without causing shorts This allows the system to be time shared between different test stations without disconnecting the test fixtures Only one program may be in memory at one time therefore the floppy disk option will help to increase through put for the system System setup parameters are stored along with each program and are automatically set up whe...

Page 47: ...dded to the sub menu and are discussed below PRINT LABEL STATUS Print Label Status is used to enable and disable label printing It is accessed through the sub menu LABEL PRINTING ON OFF 1 Reset the Model 512 by pressing RESET 2 Press Up arrow to display Setup Sub Menu and press MENU RUN 3 Press Up arrow a number of times to display Print Label Status and press MENU RUN Print Label ON OFF will then...

Page 48: ...L CODES The label definition file is a combination of label codes and label text Label codes are used to specify operations and are preceded by a dollar sign The label definition file can be set up two ways a single label using a status label code STATUS to print pass or fail on the label or two labels one for pass PASS and one for fail FAIL There are three types of label codes Label Definition Co...

Page 49: ...s A semicolon designates the end of the list of codes BACKLINE is used to specify the printer s reverse line feed control code Not all printers have a reverse line feed capability consult your printer manual The BACKLINE code is required when using the EJECT label code described below The EJECT code is used to advance the printer to allow the label to be removed and the BACKLINE code is used to ba...

Page 50: ...e a three column label form may have labels positioned at 0 25 and 50 and would be entered as POS 0 25 50 or POS 0 25 50 LABEL EXAMPLES Two label definition file examples are provided below Example one is a label file using the STATUS label code to create a single label file to be printed for either a passed or failed condition The second example is of a file that has separate labels for the pass ...

Page 51: ...ter thereby allowing the operator to remove the label This process is repeated for each test It is therefore necessary to set the printer with the correct number of line feeds before printing the first label and when changing forms PRINTER SETUP 1 Install the label forms into the printer and apply power 2 Press the Select button on the printer to deselect the printer Most printers are deselected w...

Page 52: ...rness connector pin numbers User Notations are also referred to as cross references user labels and point IDs Each unique user notation used in the wire list must have a tester point number assigned The user notation is determined by the wiring relationship from the back of the scanner boards through the interface cables and the test fixture wiring User notations cannot be learned they must be key...

Page 53: ...noted by the connector name and the connctor pin number separated by a dash For example pin 1 in connector PA1 would be labeled PA1 1 The harness mating connectors are backwired to the harness board connector which interfaces to J1 of the Tester through an interface cable Typically the mating connectors are wired to sequential pin numbers 1 64 on each harness board interface connector Harness Mati...

Page 54: ... CC Wire List without Cross References A typical Wire List created by learning the harness using the Learn function is shown below Since the program was generated with the Learn function the Wire List is shown with tester point numbers and not referenced with the wire harness connector pin names The user notation list does not contain labels WIRE LIST USER LABELS From To Point Label 1 5 2 6 3 9 4 ...

Page 55: ... PB2 BB PA1 4 PB1 CC PB1 C PB2 AA 1 PA1 1 2 PA1 2 3 PA1 3 4 PA1 4 5 PB1 A 6 PB1 B 7 PB1 C 8 PB2 AA 9 PB2 BB 10 PB2 CC The wire harness program now contains both the wire list and the cross reference list user labels Shown below is a display of the same short as before but with the cross reference list programmed Short PB1 6 to PB1 7 For build applications the wire list would be rearranged to optim...

Page 56: ...l continuities The User Notation Table assigns user labels to tester points User labels must be assigned in the User Notation Table before they can be used in assigning From To points in the wire list table Without the User Notation Table the From To points must be entered in the Wire List Table as the actual numeric point numbers of the tester Therefore the User Notation Table should be entered f...

Page 57: ...ay areas will be blank User Notation Table U The User Notation Table allows assignment of user notations of 8 character alphanumeric strings to point numbers When user notations are assigned to point numbers all displays and printouts will show the user notation instead of the tester point number EXAMPLE Notation Table Display U 001 J1 12345 U User Notation Table 0001 Tester point number one J1 12...

Page 58: ... Edit Command Range Description Scroll Down Scroll Up Initialize I Y to confirm Replace R Replace line mode Add A Add Insert mode No User Notation NU toggle function Delete D number of lines Find Sequence FS sequence number Find F point number Find point number in From or To point field Find F from point to point Find From To Point pair Find Wire Number FW char string Sort Tables SO Scroll Down Al...

Page 59: ...oint numbers will then be the actual system point numbers without user notation This condition will exist until the NU command is issued again Exiting the Wire List Table will cancel this command Delete D Deletes number of lines specified by and moves all remaining lines up This command starts deleting with the current line If is not specified the command will delete one line Maximum number of lin...

Page 60: ...1 followed with an ENTER Consecutive FW commands will find every occurrence of the circuit label string in the table If the string is not found between the cursor and the end of table the display will read NOT FOUND Sort Tables SO Whenever a change is made to the Wire List Table a sort operation must be done before a Test or a Record can take place This is done automatically by the system At times...

Page 61: ...nd end connected to points 65 through 128 Block Assign could be used to make a quick test program 1 Set the current line to the sequence number where you wish the block to start 2 While in the Display mode only displaying W in the left column type B and press ENTER The display shows SEQUENCE INC 3 Enter the number of sequences that you wish to increment with each continuity number between 1 and 25...

Page 62: ...rogramming time and entry errors 1 Set the current line to the point number where you wish the block to start 2 While in the Display Mode only displaying U in the left column type B and press ENTER The display then shows POINT INC 3 Enter the number of points that you wish to increment with each user notation between 1 and 256 The display then shows START 4 Enter the starting user notation A user ...

Page 63: ... the fixture 2 Enter the two letter command ID followed by an ENTER 3 Connect the wrist strap to the PROBE input on the Model 512 rear panel 4 Touch a point on the fixture with your finger or use a metal probe if the point is recessed in a connector 5 Once a point is probed the display will lock and display the point number along with the current user notation of the point if one has been assigned...

Page 64: ...begins There are many ways companies document wire harnesses including schematics wire lists bill of materials etc For the purpose of our example the documentation consists of two items Wire Harness Schematic Harness Wire List Wire Harness Schematic The wire harness schematic example shown below consists of three connectors and two loose leads The connector designated P1 represents a 10 pin circul...

Page 65: ...ires will be assembled Wire information such as Wire Number Gauge or Color also can be entered while entering the From To list in the circuit label field This additional information is displayed during build along with the From and To points for the operator WIRE FROM TO Wire No Item No Gauge Color Termination Termination WS01 8 24 WHT P3 4 P1 A WS02 6 24 WHT P3 2 P1 B WS03 7 24 WHT P3 3 P1 C WS04...

Page 66: ...ther Each point on the harness is connected to one point on the tester interface connector The dedicated interface harness example is shown below AMP CHAMP 64 pin IDC discrete wire Connector AMP CHAMP 64 pin Flat Cable Connector To J1 on Tester 64 pin Socket Connector P2 P3 P1 1 2 3 4 5 1 2 3 4 5 A B C D E F J H K L A B C D E F J H K L 1 2 3 4 5 1 2 3 4 5 NOTE In actual applications a set of inter...

Page 67: ...1 10 P1 L 11 J1 11 P2 1 12 J1 12 P2 2 13 J1 13 P2 3 14 J1 14 P2 4 15 J1 15 P2 5 16 J1 16 P3 1 17 J1 17 P3 2 18 J1 18 P3 3 19 J1 19 P3 4 20 J1 20 P3 5 21 J1 21 E1 22 J1 22 E2 NOTE Be careful when using interface cables between the fixture connectors and tester connectors If different connector types are used on opposite ends of the cables their pin numbering sequences must be considered The connect...

Page 68: ...u begin programming Also shorter labels are easier for the operator to read Editor Start up Connect the CRT Terminal or PC as described in the Preparation section Follow the procedure below 1 Press ESC to display the system prompt 2 Type ED and press ENTER The last lines should be as shown below ED EDIT W U User Notation Table 1 To edit the User Notation Table press U Do not press ENTER The monito...

Page 69: ...ch new line as it is displayed as shown below ED EDIT W U EDIT User Notation List U 0001 JA 32 I Initialize Y U 0001 R RU 0001 4 Using the test fixture wire list enter P1 A which is the label assigned to test point 1 and press ENTER 5 Enter the next nine labels P1 B through P1 L by typing each label followed by an ENTER When all 10 labels have been entered the screen will be as shown below ED EDIT...

Page 70: ...ve labels P2 1 through P2 5 type 1 and press ENTER for the USER INC prompt RU 0008 P1 J RU 0009 P1 K RU 0010 P1 L RU 0011 U B POINT INC 1 START P2 1 STOP P2 5 USER INC 1 U 0015 P2 5 8 Press Down arrow to move the cursor to point number 16 9 Press the letter B to select the block mode again and press ENTER 10 Type 1 for the POINT INC prompt and press ENTER 11 Type P3 1 for the beginning user label ...

Page 71: ... 1 ENTER RU 0020 P3 5 Press arrow down R Type R ENTER RU 0021 E1 Type E1 ENTER RU 0022 E2 Type E2 ENTER RU 0023 All 22 Cross References have been entered Each pin in the harness connectors has been interfaced and has a Cross Reference assigned even though two pins in each connector are unused Interfacing and assigning all pins in the harness connectors eliminates changes to the Cross Reference lis...

Page 72: ...the Find command The cursor can be moved to the desired location using the Up and Down arrows while only a U is displayed in the left column To move the cursor with the Find command follow the procedure below 1 If RU or AU is displayed in the left column press ESC A U will display in the left column 2 Press F followed by a SPACE Finding a Point Number 1 To find a point number type the point number...

Page 73: ... shown above The Replace mode is indicated with an RW while the Add mode Insert is indicated by an AW 4 The Wire List Table may contain previous data To initialize the list type I and press ENTER Type Y to the prompt Initialize WARNING Verify that you are in the Wire List Table before entering the Initialize command Inside the Editor the Initialize command is used to clear the Wire List or User No...

Page 74: ... For build applications the line order of the From To list determines the sequential build order The list should be entered in the proper order for the application 7 Type P1 A the To point termination of the first circuit in the wire list and press ENTER 8 The third column is for the wire or circuit label it can contain information regarding the circuit or wire up to 12 characters For this example...

Page 75: ...ror follow the procedure below 1 If the replace mode is selected with an RW in the left column press ESC once to select the Cursor Positioning mode Pressing ESC again from the Cursor Positioning mode exits the editor 2 Using the Up or Down arrow scroll to the line or sequence containing the error Refer to Moving the Cursor in the Wire List below 3 Select the Replace mode by typing R and pressing E...

Page 76: ...ing at the cursor and searching down If a point number or its user label is above the cursor or you are not sure move to the top of the table by finding sequence number one Type FS 1 followed by an ENTER 2 To find a point number user label type F followed with a SPACE and point number user label and press ENTER Both the From and To fields are searched for a match If a match is found the cursor is ...

Page 77: ... TURN ON AND SELF TEST Verify that the power cord is connected to the proper power source then proceed as follows 1 Turn power on at the unit by moving the power switch on the rear panel to 1 on the display will light up and a tone will sound 2 For a self test of the basic Model 512 verify that no circuits are connected to the interface connectors on the rear panel 3 Press the Up or Down arrow to ...

Page 78: ...8 data bits 1 stop bit and no parity Printer Cable The printer connector on the Model 512 is also used for external control signals that are not printer related Therefore a fully loaded 25 pin printer cable should not be used The pin assignments for the printer are as follows Description Symbol Tester 25 Pin D Printer 25 Pin D Receive Data RD 3 3 Signal Ground SG 7 7 Supervisory Send Data SSG 11 1...

Page 79: ... PRINTER connector and not the TERMINAL port on the Model 512 5 Turn power off and then on after making switch changes on the printer This causes the printer to read the new switch settings 6 Verify in the printer manual that pin 11 is used by the printer to control data and the polarity is correct 7 If tester stays in the printing mode the polarity of SSD could be incorrect Disconnect pin 11 and ...

Page 80: ...0 Data Format If the terminal was not supplied by Cablescan the following setup data are required Transmission to the terminal is at 9600 Baud with 8 data bits 1 stop bit no parity Terminal Cable The terminal interface cable is not wired one to one Data Out from the tester must be connected to Data In on the terminal and Data In on the tester must be wired to Data Out on the terminal Both the Mode...

Page 81: ... 5 Execute TERM from the DOS prompt on the PC 6 A greater than prompt should appear on the PC screen NOTE If the prompt does not appear press ESC Also verify that the interface cable is wired according to the pin assignments shown below and verify the correct baud rate of 9600 The software automatically sets the communications format and baud rate on the PC The serial port on the PC must also be s...

Page 82: ...d for programmed adapter cables Unused points do not require termination and multiple circuits do not require any special consideration As an aid in diagnosis of faults however it is recommended that an organized sequence be followed One suggestion is to interface connector pins or interface points using successive point numbers such as left to right This will reduce search time and confusion in l...

Page 83: ... List PS Print Sorted List PU Print User Notation List PW Print Wire List P Printer ON OFF LF Line Feed Printer FF Form Feed Printer SH Store Printout Heading PROGRAMMING COMMANDS ED Editor ID Probe ID LG Learn Known Good SYSTEM SETUP COMMANDS MB Maximum Board 1 4 MP Maximum Point 1 512 RD Retest Delay 1 9999 RT Retest Enable OFF ON SE Test Clock Rate 1 64 SD Test Delay 1 9999 SL Learn Known Good ...

Page 84: ...lename Load File R filename Replace File S filename Save File Z filename Rename File Drive Number 0 OR 1 filename Name of Wire List Program EDITOR COMMANDS A Add Insert B Block Assign D Delete Current Line D Delete Specified Number Of Lines F XXX Find Point Number Or User Notation FS Find Sequence Number FW XXX Find Wire Number I Initialize Table NU No User Notation Display R Replace at current li...

Page 85: ... Model 512 requires repair due to any defect of manufacture and it is within the warranty period contact Cablescan Inc for instructions on returning it to the factory Even if the Model 512 is beyond the warranty period and repair is necessary it is advisable to return the unit to the factory for repair If it is necessary for the user to replace parts the replacement parts must be Cablescan Inc par...

Page 86: ...canner Board Mating Connector female 64 pin flat cable 7200481 Printer 80 column serial 5210787 Printer Interface Cable 5210791 PC Interface Cable 5210866 Terminal Interface Cable 5210789 PC Software TERM 5210857 Eight foot 64 conductor flat cable scanner board interface cable 5210914 03 with scanner board mating connector 7200481 on one end second end unterminated Eight foot 64 conductor flat cab...

Page 87: ...Page 78 Figure 17 Schematic Scanner Board 1 of 3 ...

Page 88: ...Page 79 Figure 17 Schematic Scanner Board 2 of 3 ...

Page 89: ...Page 80 Figure 17 Schematic Scanner Board 3 of 3 ...

Page 90: ...Page 81 Figure 18 Schematic CPU Board 1 of 3 ...

Page 91: ...Page 82 Figure 18 Schematic CPU Board 2 of 3 ...

Page 92: ...Page 83 Figure 18 Schematic CPU Board 3 of 3 ...

Page 93: ...NOTES ...

Page 94: ...NOTES ...

Page 95: ...5900325 Rev I Cablescan ...

Reviews: