


7-48
2002 Buell P3: Electrical
HOME
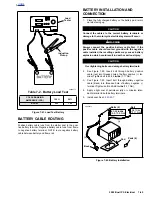
1
1
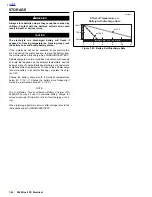
WARNING
1
WARNING
Check for proper headlamp operation before riding
motorcycle. Visibility is a major concern for motorcy-
clists. Failure to have proper headlamp operation could
result in death or serious injury.
5.
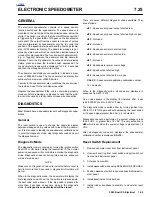
Check headlamp for proper operation.
a.
Turn ignition key switch to IGN.
b.
See
Figure 7-66.
Check headlamp LOW and HIGH
beam settings.
c. Set headlamp to LOW beam. Press passing lamp
switch. Headlamp should flash HIGH beam for as
long as the switch is pressed.
d.
Turn ignition key switch to OFF.
e.
If operation fails, reread procedure and verify that all
steps were performed.
6.
Align headlamp. See
ALIGNMENT
.
ALIGNMENT
1
1
WARNING
1
WARNING
Do not modify ignition/light switch wiring to circumvent
the automatic-on headlamp feature. Operating with head-
lamp off will reduce your visibility to other motorists and
could cause an accident resulting in death or serious
injury.
Check headlamp beam for proper height and lateral align-
ment as follows:
1.
Verify correct front and rear tire inflation pressure. See
Section 2.
2.
Place motorcycle on level floor (or pavement) in an area
with minimum light.
3.
See
Figure 7-65.
Point front of motorcycle toward a
screen or wall which is 25 ft (7.62 M) away from front tire
contact patch on floor (directly below front axle).
4.
Draw a horizontal line on the screen or wall 35 in. (88.9
cm) above the floor.
5.
Have a person whose weight is roughly the same as that
of the principal rider sit on motorcycle seat. Weight of
rider will compress vehicle suspension slightly.
6.
Stand motorcycle upright with both tires resting on floor
and with front wheel held in straight alignment (directly
forward).
7.
See
Figure 7-66.
Turn ignition switch to IGN. Set handle-
bar headlamp switch to HIGH beam position.
8.
Check light beam for proper height alignment. Main
beam of light (broad, flat pattern of light) should be cen-
tered on horizontal line on screen or wall (i.e. equal area
of light above and below line).
9.
Check light beam for proper lateral alignment. Main
beam of light should be directed straight ahead (i.e.
equal area of light to right and left of center).
10. Adjust headlamp if necessary. See
ADJUSTMENT
.
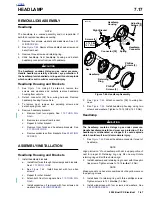
Figure 7-65. Checking Headlamp Alignment
Figure 7-66. Headlamp Switch
25 ft
(7.62 M)
a0063xSx
Horizontal
line
35 in
(88.9 cm)
a0252x7x
Headlamp
HIGH Beam
Headlamp
LOW Beam
Headlamp
Switch
Summary of Contents for 2002 P3
Page 2: ......
Page 17: ...A 15 Appendix A Tools HOME ...
Page 32: ...C 3 Appendix C Metric Conversions HOME ...
Page 41: ...1 8 2002 Buell P3 Maintenance HOME NOTES ...
Page 75: ......
Page 111: ...2 36 2002 Buell P3 Chassis HOME NOTES ...
Page 143: ...2 68 2002 Buell P3 Chassis HOME NOTES ...
Page 144: ...2002 Buell P3 Chassis 2 69 HOME ...
Page 146: ......
Page 147: ......
Page 223: ...3 76 2002 Buell P3 Engine HOME NOTES ...
Page 225: ......
Page 256: ...2002 Buell P3 Fuel System 4 31 HOME ...
Page 258: ......
Page 259: ......
Page 279: ...5 20 2002 Buell P3 Electric Starter HOME NOTES ...
Page 281: ......
Page 327: ......
Page 398: ...2002 Buell P3 Electrical 7 71 HOME ...
Page 400: ...Product 1 2 ...


