


2002 Buell P3: Chassis
2-27
HOME
FRONT BRAKE LINE
2.12
REMOVAL
1.
Drain and discard brake fluid. See Step 1 under
2.10
FRONT BRAKE MASTER CYLINDER
.
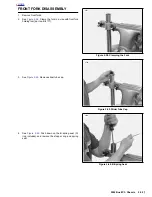
2.
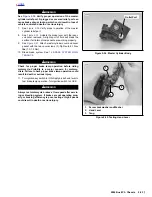
See
Figure 2-41.
Remove screw (4) to detach brake line
clamp (5) from right side of lower triple clamp. Remove
brake line from wireform.
CAUTION
Damaged banjo bolt seating surfaces will leak when
reassembled. Prevent damage to seating surfaces by
carefully removing brake line components.
3.
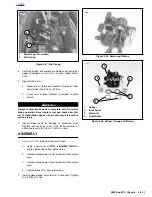
Remove master cylinder banjo bolt (1) (metric) and two
banjo washers (2) to disconnect brake line from master
cylinder. Discard banjo washers.
4.
Remove caliper banjo bolt (6) (metric) and two banjo
washers (7) to disconnect brake line from caliper. Dis-
card banjo washers.
5.
Carefully inspect the brake line for dents, cuts or other
defects. Replace the brake line if any damage is noted.
INSTALLATION
1
1
WARNING
1
WARNING
Use only new black banjo washers (See Parts Catalog for
Part No.) with D.O.T. 4 brake fluid. Earlier silver banjo
washers are not compatible with D.O.T. 4 fluid and will
not seal properly over time. Failure to comply may
adversely affect braking ability and lead to brake failure
which could result in death or serious injury
CAUTION
To avoid leakage, ensure that banjo washers, banjo bolt,
hydraulic brake line and master cylinder bore are com-
pletely clean.
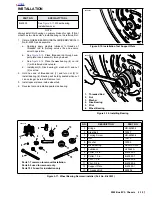
1.
See
Figure 2-41.
Connect brake line to master cylinder
using two
new
banjo washers (2) and banjo bolt (1)
(metric). Loosely install bolt into master cylinder.
2.
From the master cylinder, the brake line runs downward
in front of the right handlebar, where it turns inboard at
the upper triple clamp. Loosely install clamp (5) with
screw (4) to attach front brake line to right side of lower
triple clamp. Position brake line in wireform.
3.
Connect brake line to caliper using two
new
banjo wash-
ers (7) and banjo bolt (6) (metric). Tighten banjo bolt (6)
to 16-20 ft-lbs (22-27 Nm).
4.
Tighten clamp screw (4) on lower triple clamp to 3-5 ft-
lbs
(4-7 Nm).
5.
Tighten master cylinder banjo bolt (1) (metric) to 16-20
ft-lbs (22-27 Nm).
6.
Install bleeder valve if removed. Refill master cylinder
and bleed brakes.
1
1
WARNING
1
WARNING
Check for proper brake lamp operation before riding
motorcycle. Visibility is a major concern for motorcy-
clists. Failure to have proper brake lamp operation could
result in death or serious injury.
7.
Turn ignition key switch to IGN. Apply brake hand lever to
test brake lamp operation. Turn ignition key switch to
LOCK.
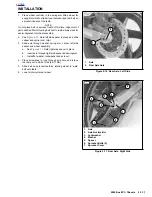
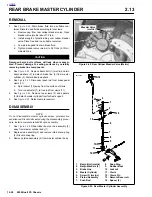
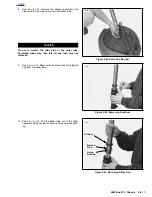
Figure 2-41. Front Brake Line
Lower right side-
brake caliper
Top right side-
master cylinder
1.
Master Cylinder Banjo Bolt (metric)
2.
Banjo Washers (2)
3.
Brake Line
4.
Screw
5.
Wire Guide
6.
Caliper Banjo Bolt (metric)
7.
Banjo Washers (2)
a0215x2x
3
2
1
4
5
6
7
Summary of Contents for 2002 P3
Page 2: ......
Page 17: ...A 15 Appendix A Tools HOME ...
Page 32: ...C 3 Appendix C Metric Conversions HOME ...
Page 41: ...1 8 2002 Buell P3 Maintenance HOME NOTES ...
Page 75: ......
Page 111: ...2 36 2002 Buell P3 Chassis HOME NOTES ...
Page 143: ...2 68 2002 Buell P3 Chassis HOME NOTES ...
Page 144: ...2002 Buell P3 Chassis 2 69 HOME ...
Page 146: ......
Page 147: ......
Page 223: ...3 76 2002 Buell P3 Engine HOME NOTES ...
Page 225: ......
Page 256: ...2002 Buell P3 Fuel System 4 31 HOME ...
Page 258: ......
Page 259: ......
Page 279: ...5 20 2002 Buell P3 Electric Starter HOME NOTES ...
Page 281: ......
Page 327: ......
Page 398: ...2002 Buell P3 Electrical 7 71 HOME ...
Page 400: ...Product 1 2 ...


