


2002 Buell P3: Chassis
2-49
HOME
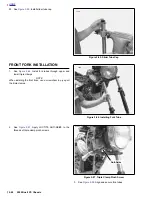
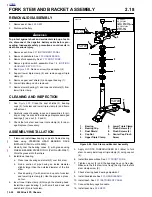
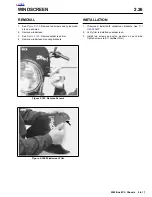
a. Position fork tubes so that top of each slider tube is
flush with the top surface of upper triple clamp. Be
sure that top surface of fork is not below top surface
of upper triple clamp.
b.
Tighten upper triple clamp pinch screws (at sliders)
to 13-16 ft-lbs (18-22 Nm).
c.
Tighten lower triple clamp pinch screws to 22-29 ft-
lbs (30-39 Nm).
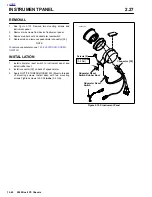
d. See
Figure 2-89.
Tighten head lamp brackets flush
against bottom of top triple clamp.
4.
Install front fender. See
2.23 FENDERS
.
5.
Install front wheel. See
2.5 FRONT WHEEL
.
6.
Install front brake caliper. See
2.11 FRONT BRAKE
CALIPER
.
7.
Align head lamp. See
7.17 HEADLAMP
.
Figure 2-88. Pinch Screws
Figure 2-89. Tighten Head lamp Bracket
3765
Upper
Triple
Clamp
Lower
Triple
Clamp
a0065aSx
Headlamp Bracket
Screws
Summary of Contents for 2002 P3
Page 2: ......
Page 17: ...A 15 Appendix A Tools HOME ...
Page 32: ...C 3 Appendix C Metric Conversions HOME ...
Page 41: ...1 8 2002 Buell P3 Maintenance HOME NOTES ...
Page 75: ......
Page 111: ...2 36 2002 Buell P3 Chassis HOME NOTES ...
Page 143: ...2 68 2002 Buell P3 Chassis HOME NOTES ...
Page 144: ...2002 Buell P3 Chassis 2 69 HOME ...
Page 146: ......
Page 147: ......
Page 223: ...3 76 2002 Buell P3 Engine HOME NOTES ...
Page 225: ......
Page 256: ...2002 Buell P3 Fuel System 4 31 HOME ...
Page 258: ......
Page 259: ......
Page 279: ...5 20 2002 Buell P3 Electric Starter HOME NOTES ...
Page 281: ......
Page 327: ......
Page 398: ...2002 Buell P3 Electrical 7 71 HOME ...
Page 400: ...Product 1 2 ...


