Synergy Software Page 4
Spray Control Settings
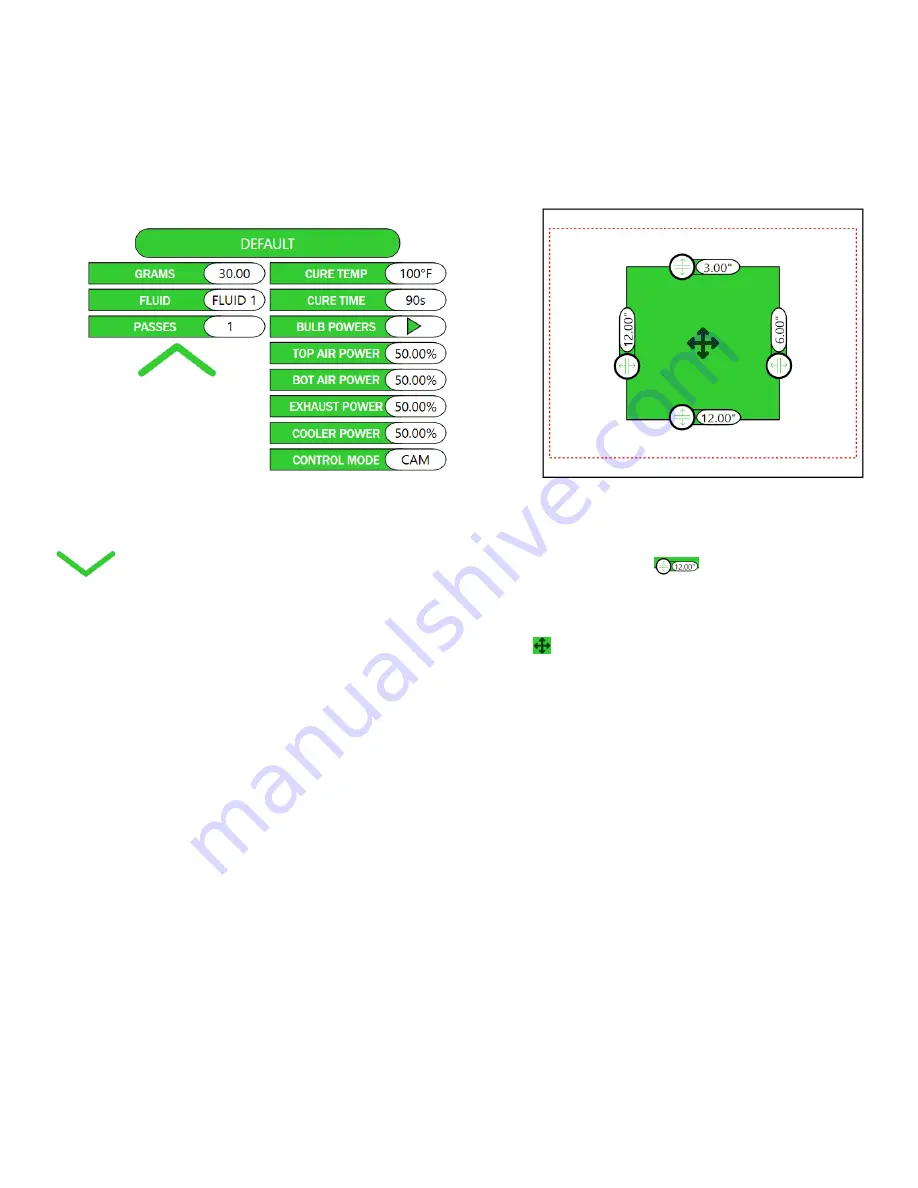
Controls are split into two portions, Spray Settings and the
Spray Area. The Spray Settings are on the left and control
how the garment is sprayed and cured.The Spray Area is on
the right and controls where the garment will be sprayed.
Image 4
Image 4: Spray Settings Control
To expand the Spray Settings press the Green Arrow
. The left side controls how the garment is
sprayed, the right side controls how the garment is cured.
• Spray Settings
▪
Grams
: The Spray Density for the garment. This
number displays g/in
2
in a friendly way using a
fixed area for the in
2
(Default Fixed Area is 18” x
13” = 234 in
2
). This controls how fast the carriage
moves when spraying a particular nozzle.
▪
Fluid
: The fluid to be sprayed on the garment. The
Synergy Pretreater is a multi-fluid system and can
alternate between spraying two fluids with ease.
▪
Passes
: The number of passes to perform when
spraying.
• Cure Settings
▪
Cure Temp
: Temperature the garment is to be
maintained at while in the dryer.
▪
Cure Time
: Amount of time the garment is to be
exposed to heat while in the dryer.
▪
Bulb Powers
: Power (as a percentage) for each
bulb while curing.
▪
Top Air Power
: Percentage power for the top
convection fan in the dryer.
▪
Bot Air Power
: Percentage power for the bottom
convection fan in the dryer.
▪
Exhaust Power
: Percentage power for the exhaust
fans on the dryer.
▪
Cooler Power
: Percentage power for the cooler
fan at the end of the dryer.
▪
Control Mode
: How the dryer is to maintain
the cure temperature on the garment. Default is
CAMera mode, which utilizes IR cameras to read
the temperature on the garment. ALGOrithm mode
uses predictive math to determine the best way to
maintain temperature on the garment.
Image 5
Image 5: Spray Area Control
The Spray Area Control controls where the garment will
be sprayed. All four sliders
can be dragged to
their position, or the number in the slider can be pressed
and manually entered via on-screen keyboard. It is also
possible to drag the spray around by pressing on the center
drag icon and moving it. Pressing on the green area will
turn the control gray, indicating that the current settings
will NOT spray the garment.
The left slider controls the length of the spray (how far the
carriage moves), and displays the distance from the right
edge of the area. The bottom slider controls the width of
the spray (which nozzle will be used to spray), displays
the distance from the top edge of the area, and will snap to
position for the 3 ideal nozzle widths (6”, 12”, 18”). The
top slider displays the distance from the top edge of the
max spray area (red dotted-line). The right slider displays
the distance from the right edge of the max spray area (red
dotted-line).


