9. STANDARD ADJUSTMENTS
RH-9820
85
9-13-2. Adjusting the contact between the knife and the hammer
The knife incision can be seen more clearly if the cutting surface of the hammer is filled over with a marker pen or similar.
1. Operate the hammer three times with the knife making a mark on it each time.
2. If the knife incision is not uniform, file the hammer. (Refer to the previous page for details on filing the hammer.)
3. Repeat steps 1 and 2 until the knife incisions are uniform.
<Contact adjustment method using thin paper>
The following method can also be used to adjust the contact.
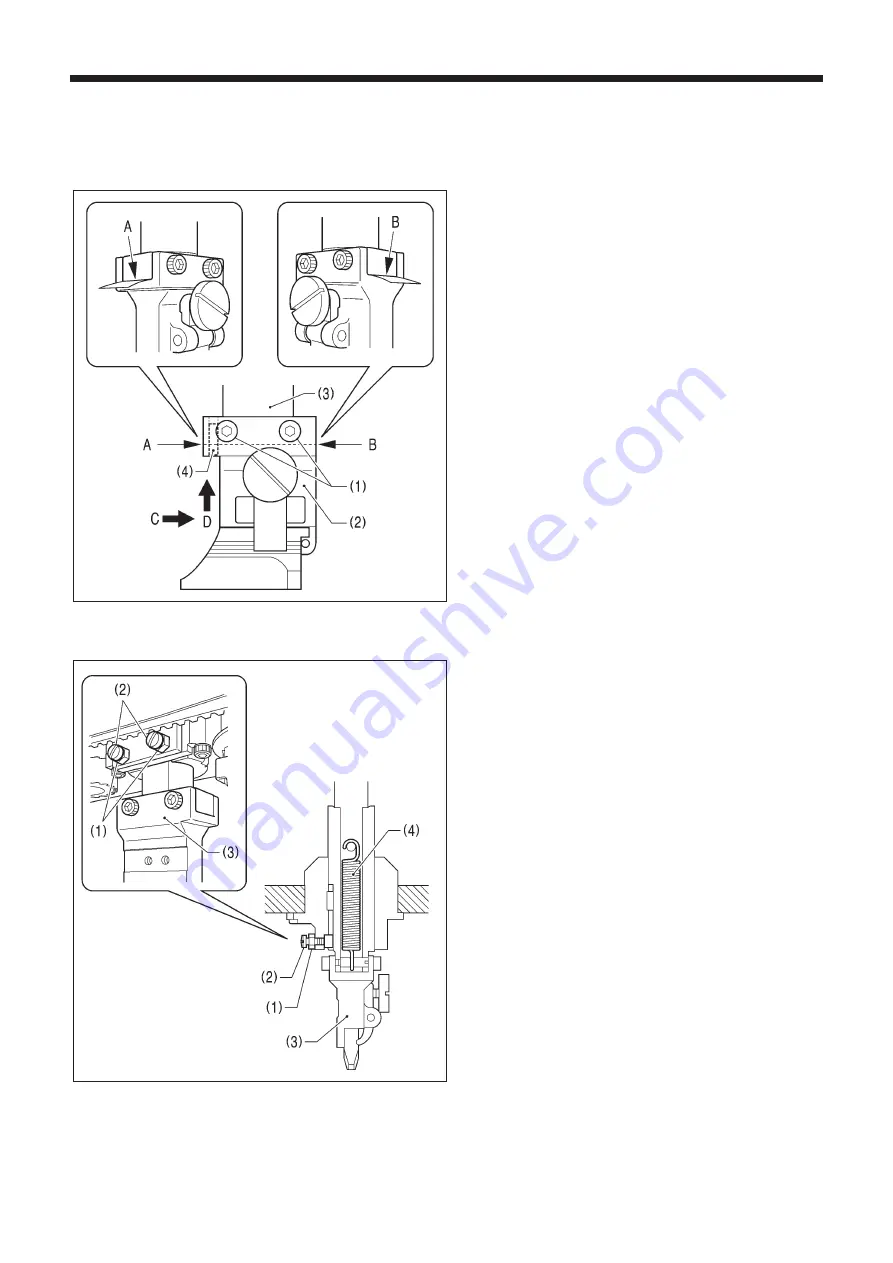
1. Loosen the four screws (1).
2. Insert some thin paper into either of the gaps A or B
between the hammer bracket (2) and the cutter driving
shaft (3).
3. Tighten the four screws (1).
* Push the hammer bracket (2) in the direction of arrow
C and firmly upward in the direction of D shown in the
illustration so that there is no gap between the hammer
bracket (2) and the cutter driving shaft (3), and then
tighten the screws.
(This operation will position the hammer bracket (2))
accurately by pushing the pin (4) of the hammer
bracket (2) against the hole side of the cutter driving
shaft (3).)
9-14. Adjusting the axial play of the hammer
If there is too much axial play in the hammer, carry out the
following adjustment.
1. Loosen the two nuts (1).
2. Tighten the two screws (2) slightly to adjust while checking
the amount of play.
3. When the hammer bracket (3) is pushed downward by
hand, check that the built-in extension spring (4) causes it
to return correctly.
* If the hammer bracket (3) does not return correctly, it
may obstruct the work clamps and damage may result.
4. Once adjustment is complete, tighten the two nuts (1).
0464B
0470B


