3. INSTALLATION
RH-9820
25
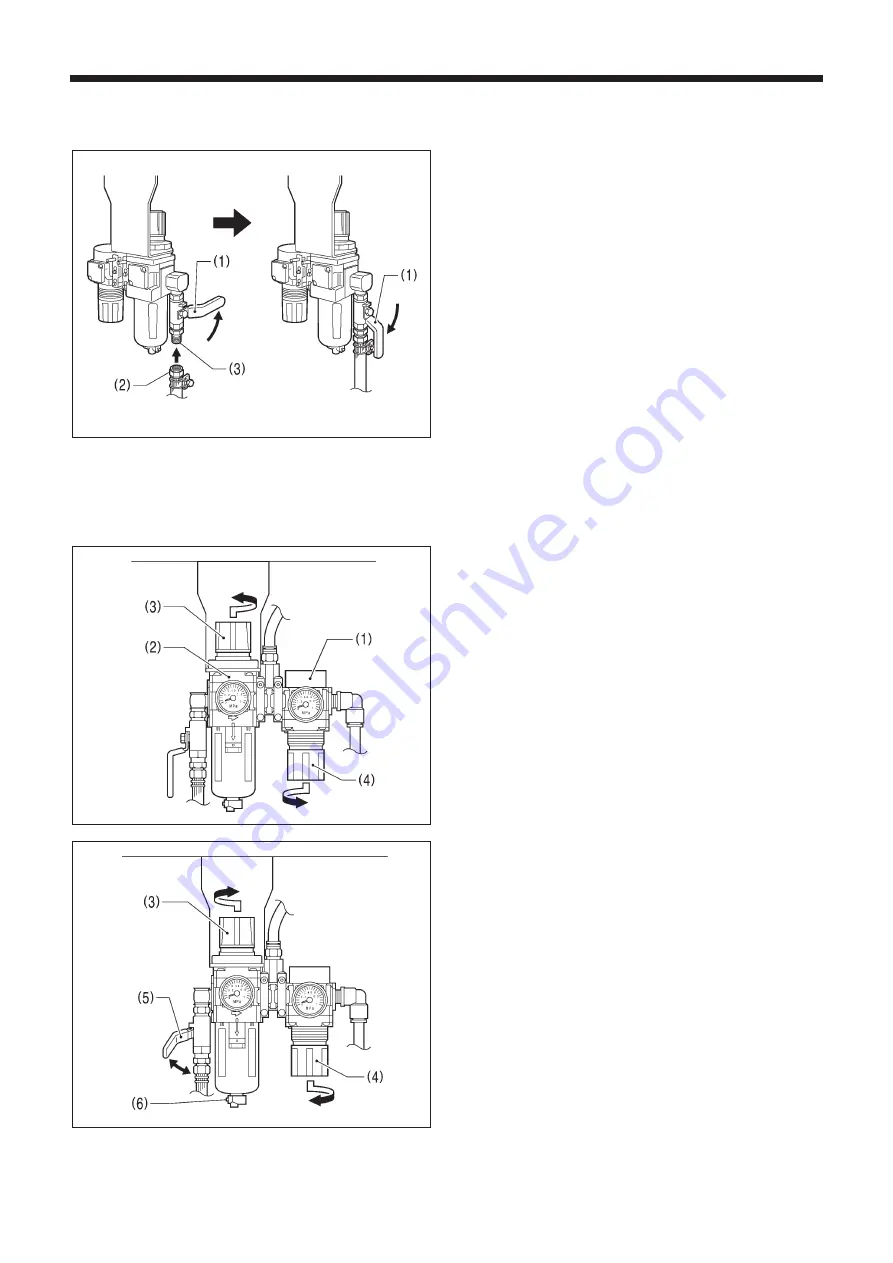
3-15. Installing the air hose
Connect the air hose coming from the compressor to the air unit which is installed underneath the table.
1. Close the cock (1).
2. Turn the nut (2) at the end of the air hose and connect it to
the valve (3).
3. Open the cock at the compressor.
* Check that no air is leaking from the valve connection.
4. Open the cock (1).
(The meter pointer will turn clockwise.)
5. Adjust the air pressure.
NOTE:
Turn the cock (1) gently to open it. If this is not done, the
air cylinder may operate too suddenly.
Close Open
3-16. Adjusting the air pressure
Adjust the hammer pressure adjustment regulator (1) to the minimum pressure setting which will allow cutting of the article
being sewn.
To set to the standard pressure, adjust the main regulator (2) to 0.5 MPa.
<Increasing the air pressure>
1. Lift up the knob (3) of the main regulator (2) and turn it
gently to adjust the pressure.
* When the knob (3) is turned in the direction of the arrow,
the air pressure will increase.
2. Pull down the knob (4) of the hammer pressure
adjustment regulator (1) and turn it gently to adjust the
pressure.
* When the knob (4) is turned in the direction of the arrow,
the air pressure will increase.
NOTE:
The hammer pressure adjustment regulator (1) is already
adjusted to a pressure of 0.4 MPa. Do not increase the
pressure if it is not necessary to do so. If the pressure is
too high, the sharpness of the knife will deteriorate and
the knife may become damaged.
<Decreasing the air pressure>
1. Close the air cock (5). (The pointer will stay at the high
position on the scale.)
2. Press the button (6).
The air pressure inside the bowl will be released and the
pointer will move down.
3. To decrease the air pressure, lift up the knob (3) or pull
down the knob (4) and turn it in the direction of the arrow.
4. Open the cock (5).
Air will enter the bowl and the pointer will move.
5. Repeat steps 1 to 4 until the desired air pressure is
obtained.
Close
Open
0374B
0375B
0376B


