EN
| 64
Bosch Security Systems | 02 April 2004
LTC 8850 |
Instruction Manual
|
VCR Server
4.3
COMMUNICATION SETUP
DIALOG BOX
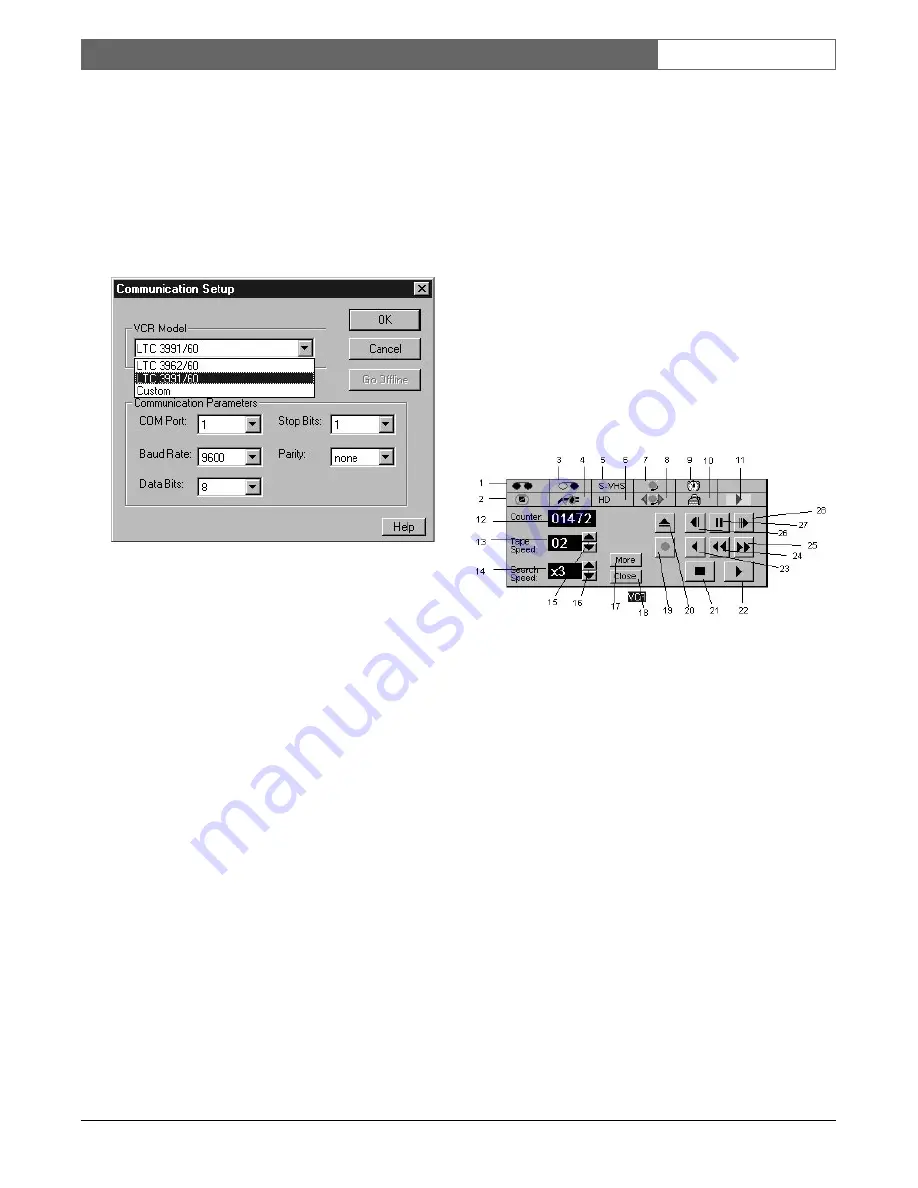
A VCR/DVR icon requires some initial setup before it
can be used to operate a VCR/DVR. A model type
must be assigned and the communication parameters
must be set. Double-clicking a VCR/DVR icon or
choosing
Communication Setup
from the VCR/DVR
icon’s right-click menu will display the Communication
Setup dialog box.
Figure 101 Communication Setup Dialog Box
In the
VCR Model
box, select the appropriate VCR
model. Select
Custom
if the VCR/DVR model you
want to assign to the icon is not listed. In the
COM
Port
box, select the computer COM port that is
attached to the VCR/DVR. Consult the VCR’s/DVRs
manual for the correct settings for the other
communication parameters.
When
OK
is clicked, the VCR icon will attempt to go
online with the VCR/DVR. The GUI status bar will
report the result of the go online attempt:
VCR is online
— indicates the icon went online
successfully; icon is no longer dimmed.
ERROR: could not open COM port
— indicates
the selected COM port could not be opened for
communication, because it is already open or does
not exist.
ERROR: the COM port opened but the icon
could not communicate with the VCR/DVR,
verify communication parameters
— indicates
that the communication parameters are incorrect.
Verify the correct COM port was selected and the
parameters (particularly the baud rate) match the
VCR/DVR.
NOTE: For Custom VCRs/DVRs, there is no way at
this point to verify the icon can communicate with the
VCR/DVR. Therefore, only the COM port is verified.
Custom VCR icon will be considered online if the
COM port was open successfully.
The VCR icon will be dimmed until it is online.
Click
Go Off-line
to take the VCR/DVR off-line. This
would only be used when the communication
parameters need adjusting.
4.4
VCR SUPPORT
4.4.1 Control Panel
The control panel appears when a VCR icon is
double-clicked or when Open Control Panel is selected
from the icon’s right-click menu.
Figure 102 VCR Control Panel
INDICATORS
1.
Tape In
– Appears when a cassette is loaded.
2.
No Safety Tab
– Appears when a cassette without
its safety tab is loaded.
3.
Tape End
– Appears when a tape reaches the end
during recording.
4.
Power Loss
– Appears when a power loss is
sensed.
5.
Super VHS
– Appears when a super VHS tape is
loaded (not used for the LTC 3962/60 model).
6.
High Density
– Appears when Record Mode is set
to High Density (not used for the LTC 3962/60
model).
7.
Alarm
– Appears when an alarm has been
detected.
8.
Alarm Index Search
– Appears when Alarm
Index Searching is turned on.
9.
Timer
– Appears when the Timer is turned on.
10.
Lock
– Appears when the recorder is in security
lock mode.


