


DSL LAN Extender 200 User’s Guide
© 2002 Black Box Corporation
Page 18
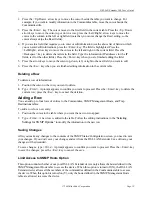
Figure 1 SNMP Status/Configuration screen
SNMP Status/Configuration screen
The SNMP Status/Configuration screen consists of one option and three tables:
•
Limit Access to SNMP Hosts option
•
Communities table
•
SNMP Management Hosts table
•
Trap Destinations table
These items are described below.
Selecting Settings for SNMP Options
You can enter and edit text in the following fields in the SNMP Status/Configuration screen:
•
Communities
•
Host Name
•
Community
•
IP
For all the other fields (including the Limit Access to SNMP Hosts field), you simply need to move the
cursor beside the desired option, and then press the <Enter> key to display the desired setting (Y = option
turned on; N = option turned off).
Follow the steps below to change a setting in one of the tables:
1. If the cursor appears inside one of the tables, press the <Esc> key. The cursor moves outside the
table.
===== SNMP Configuration =====
. Limit Access to SNMP Hosts: N
. Communities (16 bytes max.)
|---No.------Communities-----------Read--------------Write------|
| 1 |public | Y | N |
| 2 | | | |
| 3 | | | |
|-Total:1 -----------------------------------------------------|
. SNMP Management Hosts
|---No.--------Host Name---------Community------------IP--------|
| 1 | sysadmin | secured | 201.100.100. 1 |
| 2 | | | |
| 3 | | | |
|-Total:0 -----------------------------------------------------|
. Trap Destinations
|---No.--------Host Name---------Community------------IP--------|
| 1 | | | |
| 2 | | | |
| 3 | | | |
|-Total:0 -----------------------------------------------------|
Ctrl-s Save all Escape Return to the main menu