


DSL LAN Extender 200 User’s Guide
© 2002 Black Box Corporation
Page 14
NOTE:
The DHCP server feature is most commonly used when the DSL LAN Extender CP device is
configured as an Internet access gateway, although you can use it when the DSL LAN Extender
CP is configured for another mode.
DHCP Enabled
To turn the DHCP feature on and off, use the arrow keys to position the cursor beside the DHCP Enabled
field. Press the <Enter> key to toggle between the Y and N settings. Select Y to turn the DHCP feature
on; select N to turn the feature off.
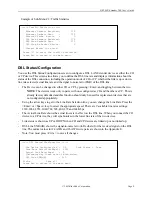
DHCP Range
Specify the range of IP addresses you want the DSL LAN Extender CP device (functioning as the DHCP
server) to assign the DHCP clients on your local LAN. Each machine you configure as a DHCP client
will be assigned an IP address in this range. The maximum number of DHCP clients supported by the
DSL LAN Extender CP is displayed in the DHCP Status/Configuration screen. Make sure the range of IP
addresses you specify are valid host IP addresses on the same subnet as the subnet connected to the DSL
LAN Extender CP device’s Ethernet side.
NOTE:
When you define the DHCP range, you should set aside a few IP addresses for your servers (such
as your Web and e-mail servers). For example, suppose the available IP addresses on your local
LAN include the addresses from 1.2.3.1 to 1.2.3.30. To reserve three IP addresses for your
servers, you could define the following DHCP range: 1.2.3.4 to 1.2.3.30.
To specify the DHCP IP address range:
1. Use the arrow keys to position the cursor beside the first DHCP Range field. Press the <Enter> key.
The field is highlighted.
2. Type the starting IP address for the range. Press the <Enter> key when you are finished typing the
first address.
3. Press the <Right> arrow key to move the cursor to the next DHCP Range field. Press the <Enter>
key. The field is highlighted.
4. Type the last IP address in the range. Press the <Enter> key when you are finished typing the last
address. Type <Ctrl-s> to save the new settings.
DNS Addresses
If your network includes DNS servers, you can configure the DSL LAN Extender CP device to
automatically pass the addresses of the DNS servers to DHCP clients. To set this up, you need to define
the IP addresses of the DNS servers (up to 3 allowed). Make sure you specify the correct host IP
addresses for each DNS server (if you do not know the IP addresses of the DNS servers on your network,
contact your system administrator or ISP for this information).
To define the DNS server information:
1. Use the <Up/Down> arrow keys to position the cursor beside the first field beside the DNS Servers
option. Press the <Enter> key. The field is highlighted.
2. Type the IP address for the first DNS server. Press the <Enter> key when you are finished typing the
address. Press the <Right> arrow key to move the cursor to the next DNS Server’s field.
3. Follow the above step to specify the IP addresses of up to two more (for a total of 3) DNS servers.
Type <Ctrl-s> to save this information.