


27
R5906852 /09
F80
2
ECO
READY
ON
1%
50%
50%
JSON
ON
OFF
JSON
ON
ECO
JSON
ON
ECO
ASCII
ON
Stby
ASCII
ON
Powr
JSON
ON
ON
Image 2–5
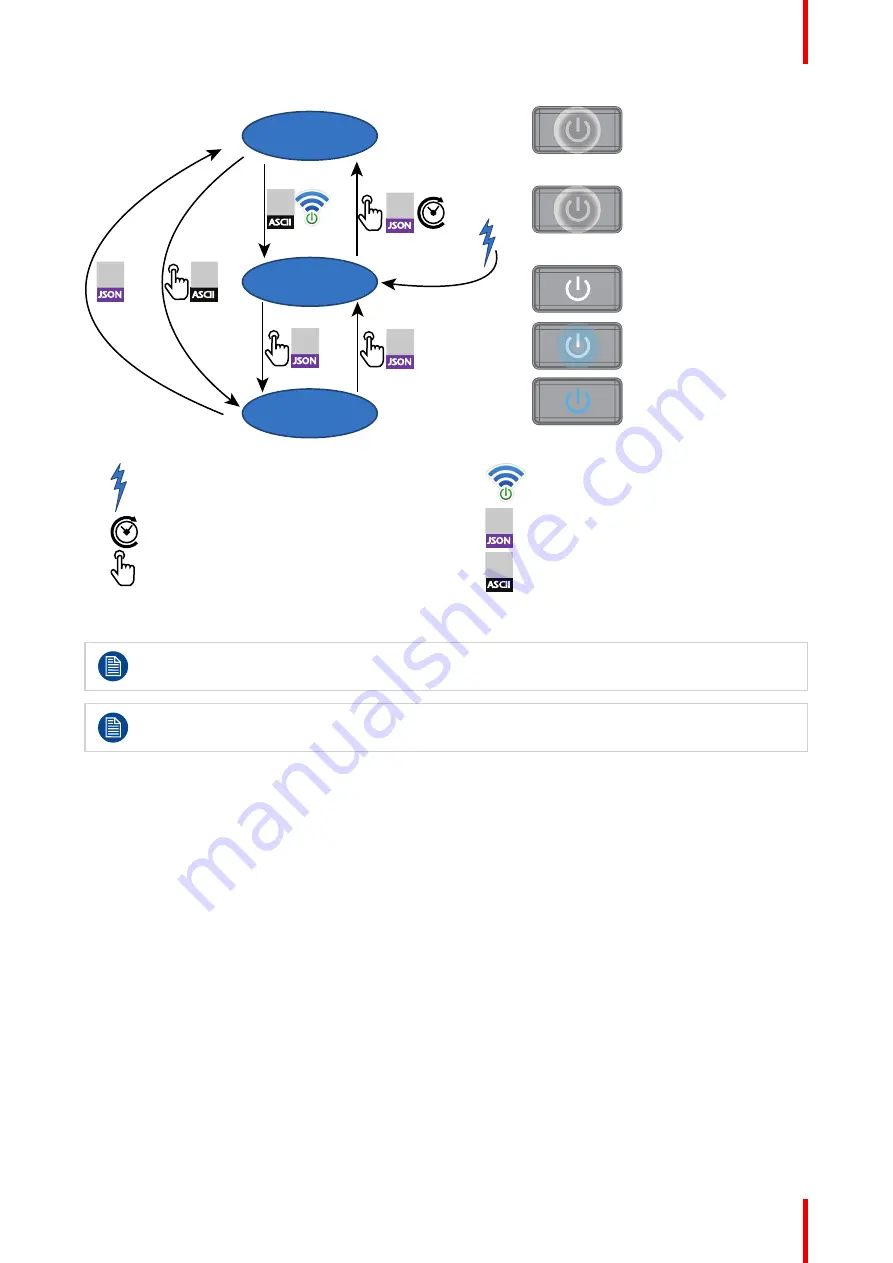
-
Projector mains powered
-
Auto transition after x minutes if ECO mode enables
-
Press power On/Off button, remote On/Off button
-
Wake on LAN (WOL)
-
JSON
ON
OFF
JSON command (Power on, Power off, Go to Eco)
-
JSON
ON
OFF
ASCII
ON
Stby
ASCII command (power, stby) received via RS-232
Power on projector
If not already connected, connect the female side of the power cord with the power input socket of
the projector. For more details see section dedicated to the power cord installation.
The background image of the startup screen and info screens can be changed with Projector
Toolset with an installed F80 plug-in.
Plug the 3-prong plug of power cord into a grounded AC outlet. The projector will go to
READY
mode. During
this stage the system boots and performs the internal check of the boards. The Power
On/Off button
will
BLINKING WHITE until
READY
mode is achieved. Once in
READY
mode, the
Power On/Off
button will be lit
WHITE.
Going from READY to ON
Press the
Power On/Off
button (short press) on the projector, or the
Power On
button on the remote control.
The projector will power
ON
. The
Power On/Off
button will BLINK BLUE during the transition from
READY
to
ON
. Once the projector is on, the
Power On/Off
button will be lit BLUE.
A JSON command (power on) could also be send to make the projector turn in to
ON
mode.
Going from ON to READY
Press and hold the
Power on/off
button on the projector for 3 seconds, or press the
Power Off
button on the
remote control. The projector will power down through a cool down phase. The
Power on/off
button will BLINK
WHITE during the transition from
ON
to
READY
. Once the projector is in
READY
, the
Power on/off
button will
be lit WHITE.
A JSON command (power off ) could also be send to make the projector turn in to
READY
mode.
Summary of Contents for F80-Q12
Page 1: ...ENABLING BRIGHT OUTCOMES User Manual F80 ...
Page 22: ...R5906852 09 F80 22 Safety ...
Page 34: ...R5906852 09 F80 34 Getting Started ...
Page 44: ...R5906852 09 F80 44 Remote Control Unit ...
Page 56: ...R5906852 09 F80 56 GUI Introduction ...
Page 62: ...R5906852 09 F80 62 GUI Source ...
Page 78: ...R5906852 09 F80 78 GUI Image ...
Page 146: ...R5906852 09 F80 146 GUI System Settings ...
Page 156: ...R5906852 09 F80 156 Advanced Settings ...
Page 160: ...R5906852 09 F80 160 GUI Status menu ...
Page 176: ...R5906852 09 F80 176 Specifications ...
Page 181: ...181 R5906852 09 F80 Image B 1 HDCP revision information Connector specifications ...
Page 182: ...R5906852 09 F80 182 Connector specifications ...
Page 186: ...R5906852 09 F80 186 Control interface specifications ...
Page 194: ...R5906852 09 F80 194 Regulatory information ...
Page 205: ...205 R5906852 09 F80 DMX chart F ...
Page 209: ......


