USING SENSOR FUNCTIONS WITH SEWING STITCH
Se
ns
or
Fu
nc
tion
s
Basic operations
B-81
B
2
g
Press
to apply the reference position
setting.
*
The setting can also be applied by long touching an
adjustment area with the sensor pen.
→
The needle moves to the specified position to start
sewing.
→
The stitch selection screen appears again, and the
stitch width changes to the setting specified with the
sensor pen.
→
The guideline marker stops flashing.
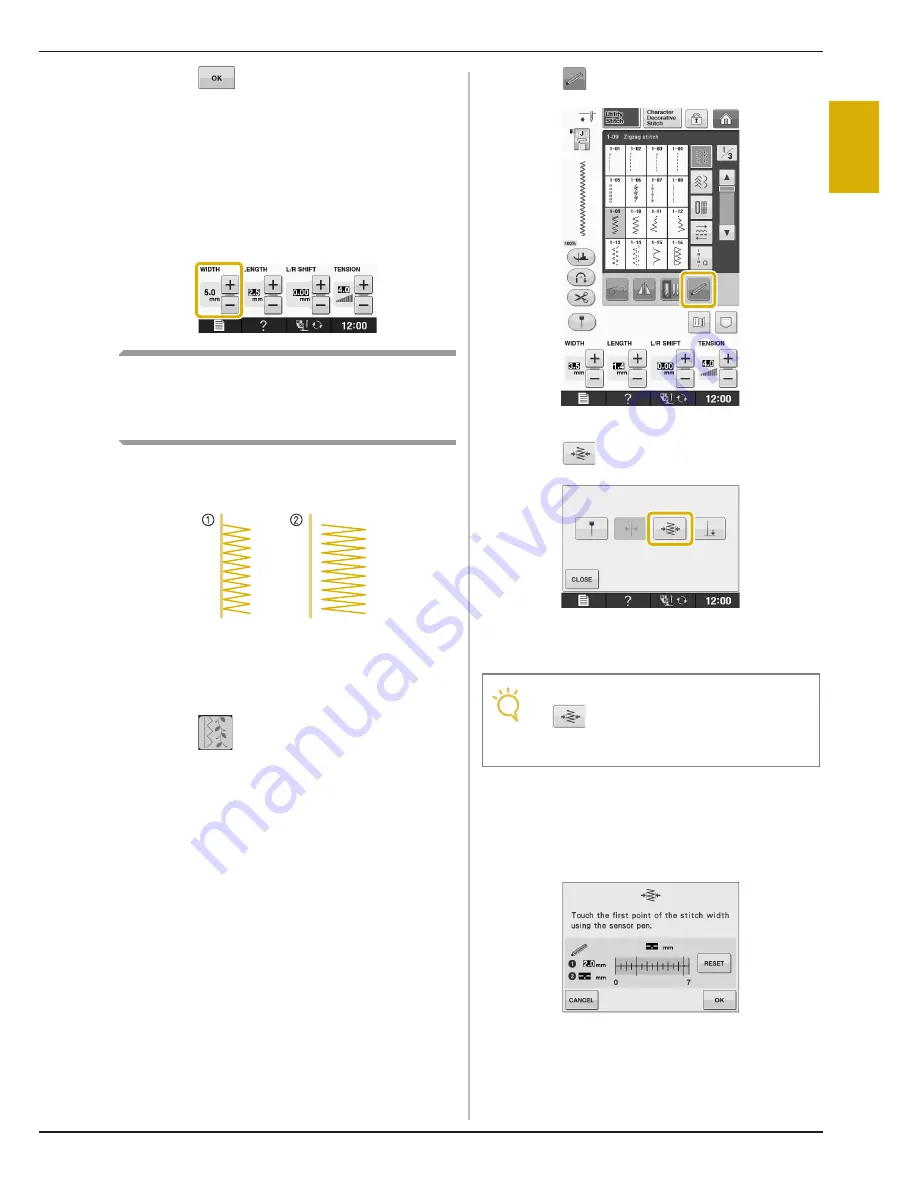
Using the Sensor Pen to Specify
the Stitching Width and Stitch
Position
The zigzag width and “L/R SHIFT” value can be
specified.
a
Original stitching width/position
b
Adjusted stitching width/position
a
Turn on the machine.
b
Press .
c
Select a stitch pattern.
d
Press .
→
The sensor functions screen appears.
e
Press .
→
The stitching width setting screen appears, and the
guideline marker flashes at the present left side of
the stitch width.
f
With the sensor pen, touch the first point
for the stitching width.
→
The distance from the left reference line to the
touched position appears in the stitching width
setting screen.
→
The guideline marker moves to the touched position
and flashes.
Note
• If
is not available, the stitching width
cannot be specified with the selected stitch
pattern. Select a different stitch pattern.
Summary of Contents for Urity BLTY
Page 1: ......
Page 109: ...USEFUL FUNCTIONS Sewing Basics Sewing S 19 S 1...
Page 193: ...USING THE MEMORY FUNCTION Character Decorative Stitches Sewing S 103 S 3...
Page 206: ...TROUBLESHOOTING S 116...
Page 224: ...ATTACHING THE EMBROIDERY FRAME E 18 b Pull the embroidery frame toward you...
Page 304: ...TROUBLESHOOTING E 98...
Page 331: ......
Page 332: ...English 882 C41 Printed in Taiwan XF3648 001...


