SELECTING UTILITY STITCHES
U
tility
S
titc
h
es
Sewing
S-21
S
2
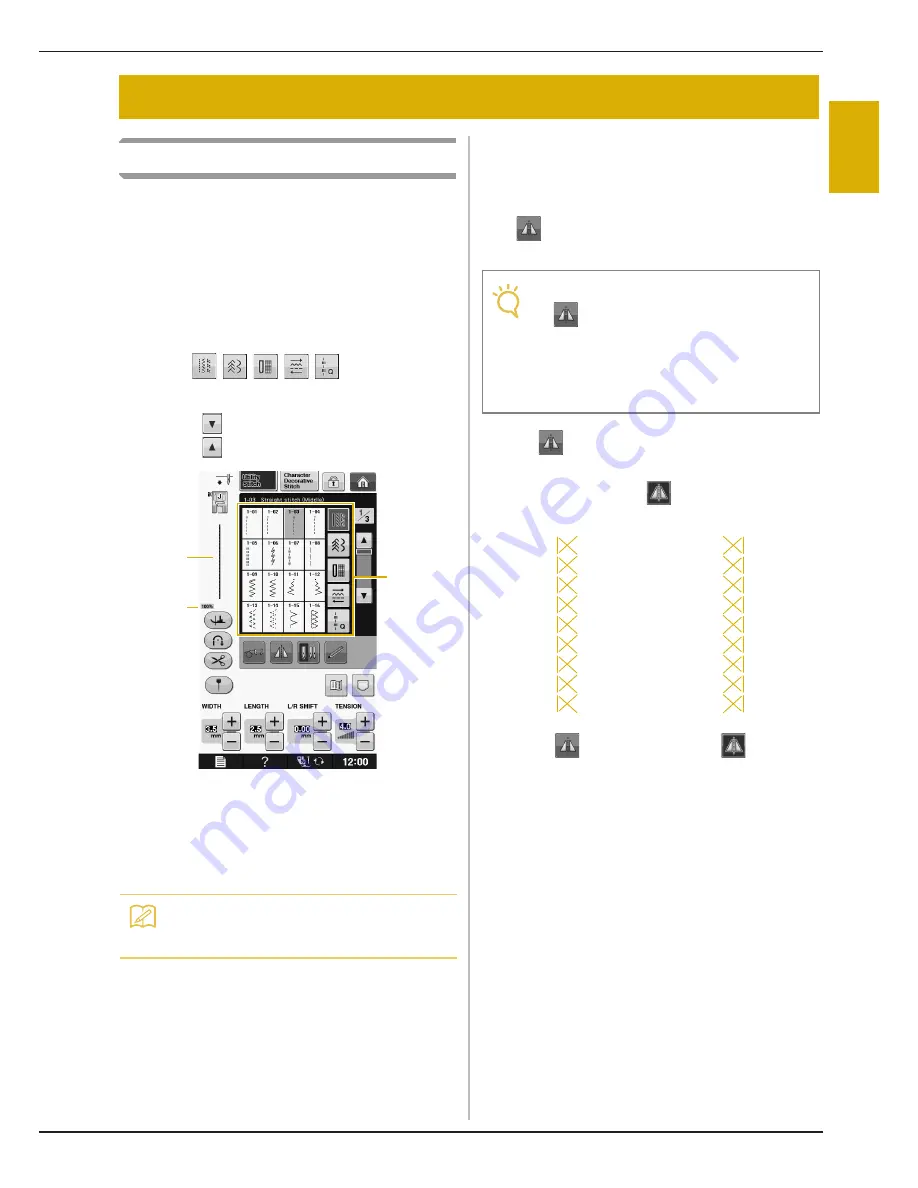
Selecting a Stitch
There are 5 categories of Utility Stitches.
a
Turn the main power to ON and display the
utility stitches.
→
Either “1-01 Straight stitch (Left)” or “1-03 Straight
stitch (Middle)” is selected, depending on the setting
selected in the settings screen.
b
Use
to select the
category you want.
*
Press
to view the next page.
*
Press
to view previous page.
a
Preview of the selected stitch
b
Stitch selection screen
c
Percentage size of view
c
Press the key of the stitch you want to sew.
■
Using the Mirror Image Key
Depending on the type of utility stitch you select,
you may be able to sew a horizontal mirror image of
the stitch.
If
is lit when you select a stitch, it will be
possible to make a mirror image of the stitch.
Press
to create a horizontal mirror image of the
selected stitch.
The key will display as
.
SELECTING UTILITY STITCHES
Memo
• For details on each stitch, refer to the
“STITCH SETTING CHART” on page S-68.
a
b
c
Note
• If
is light gray after you select a stitch,
you cannot create a horizontal mirror image
of the selected stitch due to the type of
stitch or type of presser foot recommended
(this is true of buttonholes, multi-directional
sewing, and others).
Summary of Contents for Urity BLTY
Page 1: ......
Page 109: ...USEFUL FUNCTIONS Sewing Basics Sewing S 19 S 1...
Page 193: ...USING THE MEMORY FUNCTION Character Decorative Stitches Sewing S 103 S 3...
Page 206: ...TROUBLESHOOTING S 116...
Page 224: ...ATTACHING THE EMBROIDERY FRAME E 18 b Pull the embroidery frame toward you...
Page 304: ...TROUBLESHOOTING E 98...
Page 331: ......
Page 332: ...English 882 C41 Printed in Taiwan XF3648 001...


