background image

BEFORE EMBROIDERING

B-66

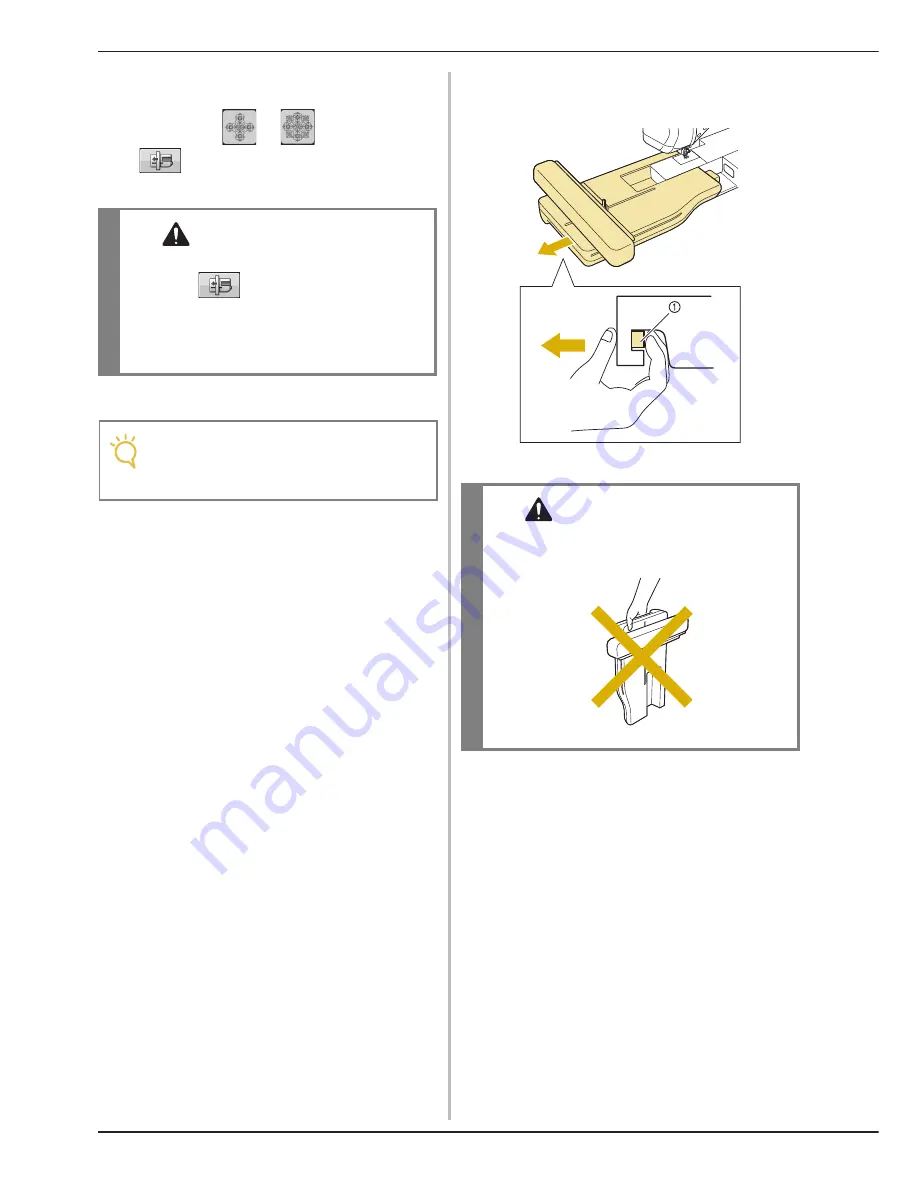
Removing the Embroidery Unit 

a

Press either 

 or 

, then press 

.

The carriage will move to the removal position. 

b

Turn the main power to OFF. 

c

Hold down the release button, and pull the 
embroidery unit away from the machine.

a

Release button

 CAUTION

• Always remove the embroidery frame before 

pressing 

. Otherwise, the frame may 

strike the embroidery foot, and possibly cause 
injury. 

• The embroidery unit will not fit in the storage 

case if this step is not done. 

Note

• Be sure to turn off the machine before 

removing the embroidery unit, otherwise 
damage to the machine may result.

 CAUTION

• Do not carry the embroidery unit by holding 

the release button compartment.

Summary of Contents for Urity BLTY

Page 1: ......

Page 2: ...ndirect incidental special exemplary or consequential damages including but not limited to procurement of substitute goods or services loss of use data or profits or business interruption however caus...

Page 3: ...the electrical outlet Do not use an extension cord Always unplug your machine if the power is cut 3Electrical Hazards This machine should be connected to an AC power source within the range indicated...

Page 4: ...se attention is necessary when the machine is used by or near children The plastic bag that this sewing machine was supplied in should be kept out of the reach of children or disposed of Never allow c...

Page 5: ...e by a person responsible for their safety Children should be supervised to ensure that they do not play with the appliance FOR USERS IN THE UK EIRE MALTA AND CYPRUS ONLY IMPORTANT In the event of rep...

Page 6: ...However there is no guarantee that interference will not occur in a particular installation If this equipment does cause harmful interference to radio or television reception which can be determined...

Page 7: ...ergence angle InGaAlP laser diodes Therefore eye damage may result from disassembling or altering this machine Safety precautions have been designed to prevent any possible laser beam exposure to the...

Page 8: ...ngth 6 12 degree at parallel divergence angle 24 34 degree at perpendicular divergence angle InGaAlP laser diodes Therefore eye damage may result from disassembling or altering this machine Safety pre...

Page 9: ...t Do you feel like trying a new material like thin fabric or nylon fabric Included dual feed foot works very effectively when sewing those difficult materials This foot also works effectively when you...

Page 10: ...er Decorative Stitches The variety of stitches widen your creativity Page S 76 Chapter 4 How to Create Bobbin Work Sewing Wind medium to heavy weight thread on a bobbin for three dimensional appearanc...

Page 11: ...the Sensor Pen Holder 74 USING THE SENSOR PEN 75 Using the Sensor Pen 75 Important Information about Sensor Pen 75 Calibrating the Sensor Pen 76 USING SENSOR FUNCTIONS WITH SEWING STITCH 78 Sensor Fu...

Page 12: ...to the Fabric 11 Hooping the Fabric in the Embroidery Frame 13 Embroidering Small Fabrics or Fabric Edges 16 ATTACHING THE EMBROIDERY FRAME 17 CONFIRMING THE PATTERN POSITION 19 Checking the Pattern...

Page 13: ...obbin Thread 88 CREATING BOBBIN WORK 92 Selecting the Pattern 92 Start Embroidering 93 ADJUSTING THE THREAD TENSION 96 TROUBLESHOOTING 97 A Appendix Chapter1 Maintenance and Troubleshooting 2 CARE AND...

Page 14: ...t page B 15 n Thread cutter Pass the threads through the thread cutter to cut them page B 50 o Thread guide plate Pass the thread around the thread guide plate when threading upper thread page B 48 Ri...

Page 15: ...g Needle plate cover Remove the needle plate cover to clean the race page S 26 E 22 h Needle plate The needle plate is marked with guides to help sew straight seams page S 26 i Needle bar thread guid...

Page 16: ...of sewing Press and hold this button and the machine sews 3 stitches in the same spot and stops automatically see page S 5 c Reinforcement Stitch button Use this button to sew a single stitch repeate...

Page 17: ...accessory compartment of the flat bed attachment a Storage space of the flat bed attachment b Presser foot storage space of the flat bed attachment c Presser foot storage tray There are also storage s...

Page 18: ...1 2 3 4 5 6 7 8 9 10 11 12 13 14 15 16 17 18 19 20 21 22 23 24 25 26 27 28 29 30 31 32 33 34 35 36 37 38 39 40 41 42 43 44 45 46 47 48 49 50 51 52 53 54 55 56 75 11 2 needles 90 14 2 needles 90 14 2...

Page 19: ...sert XA5752 121 31 Spool felt on machine X57045 051 32 Spool net 2 XA5523 050 33 Embroidery needle plate cover XE5131 001 34 Touch pen stylus XA9940 051 35 Knee lifter XA6941 052 36 USB cable XD0745 0...

Page 20: ...eet 9 Embroidery frame set medium H 100 mm W 100 mm H 4 inches W 4 inches EF74 Frame EF78 Embroidery sheet 10 Border embroidery frame set H 180 mm W 100 mm H 7 inches W 4 inches BLSO BF 11 Embroidery...

Page 21: ...section provides details on the initial setup procedures as well as descriptions of this machine s more useful functions Page number starts with B in this section Chapter1 Getting Ready B 20 Chapter2...

Page 22: ...s that Unwind Quickly 54 Using the Spool Net 54 Using the Vertical Spool Pin 54 CHANGING THE PRESSER FOOT 55 Removing the Presser Foot 55 Attaching the Presser Foot 55 Attaching the Presser Foot with...

Page 23: ...he machine always turn the main power to OFF first Always grasp the plug to remove it from the outlet Pulling on the cord may damage the cord or lead to fire or electric shock Do not allow the power c...

Page 24: ...ess and to set your local language b Press c The message screen confirming if you want to set time date appears To set the time date press to cancel the setting press The screen to set time date appea...

Page 25: ...ime on the screen b Set the year YYYY month MM and date DD c Select whether 24h or 12h setting to display d Set the current time e Press to start using your machine The clock starts from 0 second of t...

Page 26: ...damage the screen No Display Key Name Explanation Page a Utility and Decorative Stitches key Press this key to sew utility stitches or character or decorative stitch patterns See the Key Functions ta...

Page 27: ...3 c Presser foot display Shows the presser foot code Attach the presser foot indicated in this display before sewing B 55 d Stitch preview Shows a preview of the selected stitch When shown at 100 the...

Page 28: ...not be sewn in the twin needle mode B 52 f Sensor function key Press this key to use the sensor function B 78 g Image key Press this key to display an enlarged image of the selected stitch pattern S 2...

Page 29: ...machine automatically sew reinforcement stitches at the beginning and end of sewing depending on the pattern the machine may sew reverse stitches and trim the threads after sewing S 13 s Automatic rev...

Page 30: ...y stitch that is automatically selected when the machine is turned on see page S 21 g Select whether Utility Stitch or Quilt Stitch displayed first on the stitch selection screen when the Utility and...

Page 31: ...se is used see page B 32 d Turn the Upper and Bobbin Thread Sensor ON or OFF If it is turned OFF the machine can be used without thread see page S 4 E 26 e Change the speaker volume Increase the numbe...

Page 32: ...hine in for regular servicing Contact your authorized retailer for details e The No is the internal machine number for the embroidery and sewing machine f Display the program version Version 1 shows t...

Page 33: ...ct the height of the embroidery foot W during embroidering see page E 11 g Change the initial mode of the display Embroidery Embroidery Edit see page E 3 h Change the color of the background for the e...

Page 34: ...three that are available a Press The settings screen appears b Press The General settings screen appears c Display page 4 of the General settings screen d Use or to choose the pointer shape from the...

Page 35: ...lay language Select from English Deutsch German Fran ais French Italiano Italian Nederlands Dutch Espa ol Spanish Dansk Danish Norsk Norwegian Suomi Finnish Svenska Swedish Portugu s Portuguese and Ru...

Page 36: ...n Specifying the Size of Pattern Thumbnails The thumbnails for selecting an embroidery pattern can be set to be displayed at the smaller size or a larger size The larger size is 1 5 times the smaller...

Page 37: ...e image file will be saved to the USB media d Remove the USB media and then for future reference check the saved image using a computer The files for Settings screen images are saved with the name S B...

Page 38: ...ey to see explanation for upper threading winding the bobbin changing the presser foot preparing to embroider a pattern and how to use the machine see page B 37 b Press this key to select utility stit...

Page 39: ...is the first screen displayed when you press displays information about the operation buttons displays information about threading the machine changing presser feet etc Some of the functions are descr...

Page 40: ...he original screen Using the Sewing Guide Function The sewing guide function can be used to select patterns from the Utility Stitch screen Use this function when you are not sure which stitch to use f...

Page 41: ...formation about a Press b Press c Press The screen shows information d Press to return to the original screen Note With the pattern explanation function descriptions can be displayed for the patterns...

Page 42: ...ng the supplemental spool pin a Supplemental spool pin a Turn the main power to ON and open the top cover b Align the groove in the bobbin with the spring on the bobbin winder shaft and set the bobbin...

Page 43: ...the thread spool and or spool cap are set incorrectly the thread may tangle on the spool pin and cause the needle to break Use the spool cap large medium or small that is closest in size to the threa...

Page 44: ...hread through the guide slit in the bobbin winder seat and pull the thread to the right to cut the thread with the cutter a Guide slit with built in cutter b Bobbin winder seat i Set the bobbin windin...

Page 45: ...in winding The sound of winding the bobbin with stiff thread such as nylon thread for quilting may be different from the one produced when winding normal thread however this is not a sign of a malfunc...

Page 46: ...hands pull the thread up from under the thread guide plate a Thread guide plate f Pass the thread through the thread guide a Thread guide g Pass the thread around the pre tension disk making sure that...

Page 47: ...of the operation on the LCD see page B 39 Follow the steps explained below to complete the operation a Press Note Make sure that the thread passes through the pre tension disk correctly page B 42 CAUT...

Page 48: ...n pull the thread toward you to cut it with the cutter c a Slit b Cutter Cut the thread with the cutter The cutter cuts the thread Make sure that the thread is correctly passed through the flat spring...

Page 49: ...o not cut the thread with the cutter Do not replace the bobbin cover b While holding the upper thread press the Needle Position button to lower the needle a Needle Position button c Press the Needle P...

Page 50: ...ng to injury When using the walking foot the side cutter or accessories not included with this machine attach the accessory to the machine after threading the machine Memo The automatic threading func...

Page 51: ...ction indicated CAUTION If the thread spool and or spool cap are set incorrectly the thread may tangle on the spool pin and cause the needle to break Use the spool cap large medium or small that is cl...

Page 52: ...groove in the thread guide a Groove in thread guide l Pull the thread up through the thread cutter to cut the thread as shown in the illustration a Thread cutter Memo Look in the upper groove area to...

Page 53: ...ed a About 10 15 cm approx 4 6 inches Memo When the Automatic Threading button is pressed the presser foot will be automatically lowered After threading is finished the presser foot moves back to the...

Page 54: ...for this machine Contact your authorized retailer for replacement needles size 2 0 11 is recommended Be sure to set the twin needle mode when using the twin needle Using the twin needle while the mac...

Page 55: ...eft hand and then guide the thread through the groove following the arrows in the illustration h Continue threading however do not pass the thread in the needle bar thread guide 6 on the needle bar Th...

Page 56: ...ol felt and the thread spool in that order and then thread the upper thread Memo To change direction when sewing with the twin needle raise the needle from the fabric raise the presser foot lever and...

Page 57: ...ng the Presser Foot with the Included Adapter You can attach optional presser feet using the included adapter and small screw For example the walking foot the free motion echo quilting foot E the free...

Page 58: ...w c Remove the screw of the presser foot completely from the presser foot shaft d Set the adapter on the presser foot bar aligning the flat side of the adapter opening with the flat side of the presse...

Page 59: ...tton or another operation button is pressed accidentally the machine will start and injury may result Use only sewing machine needles made for home use Other needles may bend or break and may cause in...

Page 60: ...urely tighten the needle clamp screw a Needle stopper b Hole for setting the needle c Flat side of needle e Press to unlock all keys and buttons CAUTION Be sure to push in the needle until it touches...

Page 61: ...0 14 with stretch fabrics To avoid skipped stitches use ball point needle golden colored 90 14 when sewing character or decorative stitches Use needle 75 11 for embroidery Use ball point needle 75 11...

Page 62: ...0 Corduroy Synthetic thread 50 60 Tweed Silk thread Stretch fabrics Jersey Thread for knits 50 60 Ball point needle gold colored 75 11 90 14 Tricot Easily frayed fabrics Cotton thread 50 90 65 9 90 14...

Page 63: ...read and set it in place B 40 5 Fabric preparation Attach a stabilizer material to the fabric and hoop it in the embroidery frame E 11 to E 17 6 Pattern selection Turn the main power to ON and select...

Page 64: ...der e Use the included screwdriver to loosen the screw of the presser foot holder then remove the presser foot holder a Screwdriver b Presser foot holder c Presser foot holder screw Remove the presser...

Page 65: ...ED pointer indicates the needle drop point The LED pointer turns off automatically by lowering the presser foot or returning to the previous page CAUTION Use the included screwdriver to firmly tighten...

Page 66: ...point f Press twice to return to the original screen Adjusting the Brightness of the LED Pointer a Follow the steps from a to d to display the embroidery foot with LED pointer adjust screen b Use or...

Page 67: ...ign do not touch the embroidery carriage and frame when the machine is embroidering Note You can also sew utility decorative stitches with the embroidery unit attached Touch and The feed dog will auto...

Page 68: ...chine a Release button CAUTION Always remove the embroidery frame before pressing Otherwise the frame may strike the embroidery foot and possibly cause injury The embroidery unit will not fit in the s...

Page 69: ...nly an embroidery card reader designed for this machine Using an unauthorized embroidery card reader may cause your machine to operate incorrectly Embroidery patterns cannot be saved from the machine...

Page 70: ...fabric control when sewing difficult fabrics that slip easily such as quilted fabrics or fabrics that tend to stick to the bottom of a presser foot such as vinyl leather or synthetic leather Note Do n...

Page 71: ...dual feed foot into the jack on the back of your machine e Press to unlock all keys and buttons All keys and operation buttons are unlocked and the previous screen is displayed Replacing the Sole Part...

Page 72: ...se or decrease the feeding of the top fabric Select 00 for sewing in most cases If the feed amount for the top fabric is too little causing the fabric to be longer than the bottom fabric press to incr...

Page 73: ...USING FUNCTIONS BY CONNECTING THE ACCESSORY TO THE MACHINE Getting Ready Basic operations B 71 B 1...

Page 74: ...78 Sensor Function Area 78 Specifying the Guideline Marker Position With the Sensor Pen 78 Specifying the Needle Drop Position With the Sensor Pen 80 Using the Sensor Pen to Specify the Stitching Widt...

Page 75: ...ly inserted into the jack a Sensor pen jack b Sensor pen connector CONVENIENT SEWING FEATURES BY USING THE SENSOR PEN CAUTION The guideline marker is a laser therefore do not stare at the laser light...

Page 76: ...cleaning brush or the seam ripper point remove the protective cap covering the hole on the right side of the machine Insert the point of the seam ripper or cleaning brush into the hole in the protect...

Page 77: ...aved out from the sensor pen USING THE SENSOR PEN Note Once a point is touched with the sensor pen and the entered information is applied in the screen perform the next operation Repeatedly touching a...

Page 78: ...and second points a Press The settings screen appears b Press The General settings screen appears c Display page 6 of the General settings screen d Press after connecting the sensor pen to the machin...

Page 79: ...using the sensor pen Touch on the point in the illustrations a Flat bed attachment b Embroidery unit g Press to finish the calibration To repeat the calibration touch the first point again using the s...

Page 80: ...ify a position Area 7 mm when positioning the guideline marker c Adjustment area right Touch With each touch the setting increases by 0 5 mm This allows fine adjustments to be made after touching with...

Page 81: ...rker scale changes to the setting specified with the sensor pen The guideline marker stops flashing Note The following error message appears if the area outside of the sensor pen touch range is touche...

Page 82: ...reference position setting screen The stitch preview on the upper left side of the screen is updated according to the specified setting a Press to return the needle drop position to its default settin...

Page 83: ...dth and L R SHIFT value can be specified a Original stitching width position b Adjusted stitching width position a Turn on the machine b Press c Select a stitch pattern d Press The sensor functions sc...

Page 84: ...hen touch within the sensor pen touch range Memo The position can be precisely adjusted by touching the adjustment areas with the sensor pen Note If the distance between the specified first and second...

Page 85: ...end point setting screen appears g With the sensor pen touch the location to be specified as the sewing end point The distance from the current needle position to the touched location appears a Press...

Page 86: ...this setting be sure to feed the fabric straight otherwise the actual end point may be different from the point you set When using the sensor pen to specify the sewing end point the sewing end point m...

Page 87: ...de If the message The carriage of the embroidery unit will move Keep your hands etc away from the carriage appears during the operation ensure safety and then press a Turn on the machine b Press c Sel...

Page 88: ...d select the center position Selecting the Embroidering Position by the Pattern Edge a From on the screen press the edge to be the reference for positioning b Press c With the sensor pen touch the poi...

Page 89: ...view in the sewing screen is updated according to the specified embroidering position k Press the Start Stop button to start embroidering Selecting the Embroidering Position by the Pattern Center a Pr...

Page 90: ...nd position g Press to apply the setting h The preview in the sewing screen is updated according to the specified embroidering position i Press the Start Stop button to start embroidering Note When us...

Page 91: ...chine from sewing tubular pieces and buttonholes to sewing the character and decorative stitch patterns Page number starts with S in this section The screen display and machine illustration may vary s...

Page 92: ...rics 9 STITCH SETTINGS 10 Setting the Stitch Width 10 Setting the Stitch Length 10 Setting the L R SHIFT 11 Setting the Thread Tension 12 Proper Thread Tension 12 Upper Thread is Too Tight 12 Upper Th...

Page 93: ...oid injury pay special attention to the needle while the machine is in operation Keep your hands away from moving parts while the machine is in operation Do not stretch or pull the fabric during sewin...

Page 94: ...e or during machine operation The thread may tangle possibly resulting in damage Note When cutting thread thicker than 30 nylon monofilament thread or other decorative threads use the thread cutter on...

Page 95: ...einforcement Stitch button to sew reverse stitches or reinforcement stitches automatically at the end of sewing a Reverse stitch b Reinforcement stitch The operation performed when the button is press...

Page 96: ...rs as when the stitch is selected Memo If you press the Start Stop button to pause sewing press it again to continue The machine will not sew reverse reinforcement stitches again Memo To turn off the...

Page 97: ...er pull the basting thread toward the back while sewing a 5 mm approx 3 16 inch Sewing Heavyweight Fabrics The sewing machine can sew fabrics up to 6 mm approx 1 4 inch thick If the thickness of a sea...

Page 98: ...loop fastener before sewing Sew the edge of the hook and loop fastener at a slow speed If the needle does not pass through the hook and loop fastener replace the needle with the needle for thick fabri...

Page 99: ...izer after sewing a Thin paper Sewing Stretch Fabrics First baste together the pieces of fabric and then sew without stretching the fabric In addition a better result can be achieved by using thread f...

Page 100: ...steps below when you want to change the stitch pattern length STITCH SETTINGS Note Settings for some stitches cannot be changed refer to the STITCH SETTING CHART on page S 68 If you turn off the mach...

Page 101: ...he right side of the left needle position The value in the display appears with a plus sign Memo Press to check changes made to the stitch Press after pressing to return to the original setting CAUTIO...

Page 102: ...he upper thread is visible from the wrong side of the fabric the upper thread is too loose a Upper thread b Bobbin thread c Wrong side d Locks appear on wrong side of fabric Press to tighten the upper...

Page 103: ...tion The key will display as c Set the fabric in the start position and start sewing a Reverse stitches or reinforcement stitches The machine will automatically sew reverse stitches or reinforcement s...

Page 104: ...to the left of the left needle c Press again to stop using the guideline marker Adjusting the Guideline Marker Position If the guideline marker indicates the position incorrectly in the center needle...

Page 105: ...When the Start Stop button is pressed again the presser foot is automatically lowered and sewing continues This function is useful for stopping the machine to rotate the fabric CAUTION Only change po...

Page 106: ...le Position UP DOWN in the settings screen must be set in the down position for the pivot function to be used When Needle Position UP DOWN is set in the raised position appears as light gray and canno...

Page 107: ...ic Fabric Sensor System Automatic Presser Foot Pressure The thickness of the fabric is automatically detected and the presser foot pressure is automatically adjusted with an internal sensor while sewi...

Page 108: ...nt in the settings screen b Set Needle Position Stitch Placement to ON or OFF c Press to return to the original screen Locking the Screen If the screen is locked before starting to sew the various set...

Page 109: ...USEFUL FUNCTIONS Sewing Basics Sewing S 19 S 1...

Page 110: ...ng Using Presser Foot J 34 Quilting 35 Piecing 36 Piecing Using the 1 4 Quilting Foot with Guide optional with some models 37 Appliqu 38 Quilting with Satin Stitches 39 Free Motion Quilting 40 Echo Qu...

Page 111: ...ey of the stitch you want to sew Using the Mirror Image Key Depending on the type of utility stitch you select you may be able to sew a horizontal mirror image of the stitch If is lit when you select...

Page 112: ...wever if you have specific settings that you wish to reuse later for a stitch you can change the settings so that they can be saved for that stitch Five sets of settings can be saved for a single stit...

Page 113: ...e original screen automatically appears Memo When a stitch is selected the last settings retrieved are displayed The last settings retrieved are retained even if the machine was turned off or a differ...

Page 114: ...to insert the needle into the fabric a Sewing start position d Lower the presser foot and hold the Reverse Stitch or Reinforcement Stitch button to sew 3 4 stitches The machine sews reverse stitches...

Page 115: ...he needle with the stitch width then align the edge of the presser foot with the edge of the fabric during sewing for an attractive finish a Stitch width Example Left Middle needle position stitches C...

Page 116: ...only be used for straight stitches middle needle position stitches Use the straight stitch needle plate and the straight stitch foot when sewing thin fabrics or when sewing small pieces which tend to...

Page 117: ...ser foot J Note Align the two screw holes on the needle plate with the two holes on the machine Use the disc shaped screwdriver included with the machine to secure the screws in the needle plate Memo...

Page 118: ...cally be sewn at the beginning of sewing a Basting c Cut the thread at the end leaving 50 mm approx 1 15 16 inches and then tie both ends together Do not sew a reverse stitch at the end d Insert the e...

Page 119: ...1 15 16 inches d Sew two rows of straight stitches parallel to the seam line then trim excess thread leaving 50 mm approx 1 15 16 inches a Seam line b 10 mm to 15 mm approx 3 8 inch to 9 16 inch c Abo...

Page 120: ...rong side d Lay both seam allowances on the side of the shorter seam cut seam and iron them a Wrong side e Fold the longer seam allowance around the shorter one and sew the edge of the fold a Wrong si...

Page 121: ...Select a stitch and attach presser foot J See page S 5 for the detailed information of reverse stitches and reinforcement stitches See page S 68 for the detailed information of stitches a Select a st...

Page 122: ...of Basic operations b Thread the gimp thread through the hole in the cord guide bobbin cover from top to bottom Position the thread in the notch at the back of the cord guide bobbin cover a Notch b Gi...

Page 123: ...sew overcasting on the edge of stretch fabrics Sew the overcasting along the edge of the fabric while positioning the right hand side needle drop point just outside the edge of the fabric Overcasting...

Page 124: ...h presser foot J CAUTION After the stitch width is adjusted rotate the handwheel toward you counterclockwise Check that the needle does not touch the presser foot If the needle hits the presser foot t...

Page 125: ...tes that these stitches are intended for Q quilting and P piecing See page S 68 for the detailed information of stitches Note Use the L R SHIFT setting for fine tuning the placement of the stitch Be s...

Page 126: ...be set to 1 50 mm approx 1 32 inch a 6 5 mm approx 1 4 inch To change the needle position use or in the width display Rick rack stitch Decorative stitch Decorative stitch Hemstitching Hemstitching Sin...

Page 127: ...his mark with edge of fabric to begin b Beginning of stitching c End of stitching d Opposite edge of fabric to end or pivot e 1 4 inch Topstitching quilting 1 8 inch Sew with the edge of the fabric al...

Page 128: ...ric and then fold over the seam margin using an iron Clip curves when necessary c Turn the appliqu over and attach the stabilizer with basting pins or a basting stitch d Select and attach presser foot...

Page 129: ...he display will return to the original screen g Start sewing You can adjust the stitch width during sewing by moving the sewing speed controller Slide the lever to the left and the stitch width become...

Page 130: ...aster than the sewing speed the needle may break or other damage may result a Press to set the machine to free motion sewing mode The key appears as the quilting foot is raised to the necessary height...

Page 131: ...lanted CAUTION Be sure to securely tighten the screws with the included screwdriver Otherwise the needle may touch the quilting foot causing it to bend or break Memo Do not be discouraged with your in...

Page 132: ...free motion quilting foot C is indicated in the upper left corner of the screen d Attach free motion quilting foot C at the front with the presser foot holder screw aligned with the notch in the quil...

Page 133: ...sser foot as a guide sew around the motif at a fixed interval We recommend attaching the foot controller and sewing at a consistent speed Free motion echo quilting foot E measurement a 6 4 mm approx 1...

Page 134: ...lting foot is raised to the height specified in the machine settings screen Press to display Free Motion Foot Height of the settings screen see page S 15 Press or to change the height that the quiltin...

Page 135: ...blind hem stitching a Turn the skirt or pants wrong side out a Wrong side of fabric b Right side of fabric c Edge of fabric d Bottom side b Fold the fabric along the desired edge of the hem and press...

Page 136: ...with the edge of the folded hem against the guide of the presser foot and then lower the presser foot lever a Wrong side of fabric b Fold of hem c Guide a Wrong side of fabric b Right side of fabric...

Page 137: ...he fold of the hem Thick fabric Normal fabric a Wrong side of fabric b Right side of fabric If the Needle does not Catch the Hem Fold The needle is too far to the right Press to increase the stitch wi...

Page 138: ...ring sewing a Appliqu b Fabric glue b Select or Adjust the stitch length and width to correspond to the appliqu shape size and quality of material see page S 10 c Attach presser foot J Check that the...

Page 139: ...sleeves of dresses and blouses a Select b Increase the upper thread tension for an attractive scallop finish to the shelltuck stitches see page S 12 c To make rows of shell tuck stitches fold the fabr...

Page 140: ...an be sewn on top of a pressed seam allowance a Select a straight stitch and attach presser foot J b With the right sides facing each other sew two pieces of fabric together and then press open the se...

Page 141: ...approximately 2 0 see Setting the Stitch Length on page S 10 and Setting the Thread Tension on page S 12 c Pull the bobbin and upper threads out by 50 mm approx 1 15 16 inches d Sew the seams leaving...

Page 142: ...tic Attaching a Select a straight stitch and attach presser foot J b Set the stitch length to 4 0 mm approx 3 16 inch and loosen the upper thread tension to 2 0 see Setting the Stitch Length on page S...

Page 143: ...le does not strike a basting pin or any other objects during sewing The thread could tangle or the needle could break causing injury Memo Use a light to medium weight homespun fabric with a little sti...

Page 144: ...s on the opposite edge of the open area to keep the stitching symmetrical Hemstitching 3 Drawn Work 2 a Pull out several threads from both sides of the 4 mm approx 3 16 inch area which are not yet ope...

Page 145: ...the front of the presser foot to the back as shown below a Reinforcement stitching Memo A wing needle can be used for Hemstitching 3 Stitch Stitch name Presser foot Narrow rounded buttonhole Wide rou...

Page 146: ...foot a Buttonhole lever a Metal bracket f Gently hold the end of the upper thread and then start sewing Feed the fabric carefully by hand while the buttonhole is sewn Once sewing is completed the mach...

Page 147: ...both threads are automatically cut after the reinforcement stitches are sewn If the fabric does not feed for example because it is too thick increase the stitch length setting CAUTION When using the...

Page 148: ...ons See page S 68 for the detailed information of stitches Darning is performed by sewing from the front of the presser foot to the back as shown below a Reinforcement stitches a Select a stitch and a...

Page 149: ...bject to strain such as pocket corners See page S 68 for the detailed information of stitches a Select b Attach buttonhole foot A and set the scale to the length of the bar tack you wish to sew a Pres...

Page 150: ...completed the machine will sew reinforcement stitches and stop automatically Memo Bar tacks can be between 5 mm approx 3 16 inch and 28 mm approx 1 1 16 inches Bar tacks are usually between 5 mm appr...

Page 151: ...ttach the button more securely repeat the process e Gently hold the end of the upper thread and start sewing The machine stops automatically when sewing is finished f From the wrong side of the fabric...

Page 152: ...ar applications See page S 68 for the detailed information of stitches a Select b Use or in either the stitch width display or the stitch length display to choose the size of the eyelet Actual size a...

Page 153: ...e flat bed attachment to use the free arm b Select and attach monogramming foot N c Set the needle in the fabric at the sewing start point and sew seam 1 as shown a Start Point d Select and sew seam 2...

Page 154: ...ee page S 28 and sew to the top of the fabric a Basting stitches b Reverse stitches c End of zipper opening d Wrong side c Press the seam allowance open and attach the zipper with a basting stitch in...

Page 155: ...eeth of the zipper while maintaining 3 mm approx 1 8 inch of sewing space a Zipper pull tab b Wrong side of fabric c Zipper teeth d End of zipper opening e 3 mm approx 1 8 inch d Remove presser foot J...

Page 156: ...er When sewing the left side of the zipper the needle should drop on the right side of the presser foot When sewing the right side of the zipper the needle should drop on the left side of the presser...

Page 157: ...ING THE STITCHES Utility Stitches Sewing S 67 S 2 n Open the zipper and sew the rest of the seam a Basting stitches b 7 mm to 10 mm approx 1 4 inch to 3 8 inch c Reverse stitches d 50 mm approx 2 inch...

Page 158: ...orced stitching sewing and decorative applications 1 0 1 16 0 0 7 0 0 1 4 2 5 3 32 0 4 5 0 1 64 3 16 OK J Decorative stitch Decorative stitching top stitching 0 0 0 0 0 7 0 0 1 4 2 5 3 32 0 4 5 0 1 64...

Page 159: ...while cutting fabrics 0 0 0 0 0 2 5 0 3 32 2 5 3 32 0 2 5 0 1 64 3 16 NO With side cutter Zigzag stitch while cutting fabrics 3 5 1 8 3 5 5 0 1 8 3 16 1 4 1 16 0 0 5 0 0 3 16 NO With side cutter Overc...

Page 160: ...16 0 0 7 0 0 1 4 1 2 1 16 0 2 5 0 1 64 3 16 OK J Patchwork double overlock stitch Patchwork stitches decorative stitching 5 0 3 16 0 0 7 0 0 1 4 2 5 3 32 0 4 5 0 1 64 3 16 OK J Couching stitch Decora...

Page 161: ...6 NO Hemstitching Decorative hems daisy stitch 6 0 15 64 0 0 7 0 0 1 4 3 0 1 8 0 4 5 0 1 64 3 16 NO Hemstitching Heirloom decorative hems 5 0 3 16 0 0 7 0 0 1 4 3 5 1 8 0 4 5 0 1 64 3 16 NO Hemstitchi...

Page 162: ...st tapered buttonholes 5 0 3 16 3 0 5 0 1 8 3 16 0 4 1 64 0 2 1 0 1 64 1 16 NO Round ended buttonhole Buttonholes with vertical bar tack in heavyweight fabrics 5 0 3 16 3 0 5 0 1 8 3 16 0 4 1 64 0 2 1...

Page 163: ...0 5 0 1 4 15 64 3 16 7 0 1 4 7 0 6 0 5 0 1 4 15 64 3 16 NO Diagonally left up Straight For attaching appliqu on tubular pieces of fabric and mitering corners NO Reverse Straight For attaching appliqu...

Page 164: ...3 16 NO Zigzag stitch Right Start from right needle position zigzag sew at left 3 50 1 8 2 50 5 00 3 32 3 16 1 6 1 16 0 3 5 0 1 64 3 16 NO Zigzag stitch Left Start from left needle position zigzag se...

Page 165: ...ng decorative stitching 5 00 3 16 0 00 7 00 0 1 4 1 6 1 16 0 4 5 0 1 64 3 16 NO Rick rack stitch Decorative top stitching 4 00 3 16 0 00 7 00 0 1 4 2 5 3 32 0 4 5 0 1 64 3 16 NO Decorative stitch Deco...

Page 166: ...nning of the Pattern 88 Checking the Image 89 COMBINING STITCH PATTERNS 90 Before Combining 90 Combining Various Stitch Patterns 90 Combining Large and Small Stitch Patterns 91 Combining Horizontal Mi...

Page 167: ...satin stitch patterns You can set stitch length and width e Cross stitch f Utility decorative stitch patterns g Characters Gothic font Handwriting font Outline Cyrillic font Japanese font h Patterns s...

Page 168: ...ious page Touch the bar that appears between and to leap multiple pages at one time To select a different stitch pattern press When the current stitch pattern is erased select the new stitch pattern T...

Page 169: ...stitch Remove the jumping stitches after sewing h Press and then enter ky If you want to continue entering characters in a different font press and then repeat from step b Deleting Characters a Press...

Page 170: ...acter spacing and press to decrease the character spacing Example Each setting equals a specific distance between characters Value mm 0 0 1 0 18 2 0 36 3 0 54 4 0 72 5 0 9 6 1 08 7 1 26 8 1 44 9 1 62...

Page 171: ...may be shrinking or bunching of stitches so be sure to attach a stabilizer material Guide the fabric with your hand to keep the fabric feeding straight and even during sewing Fabric When sewing on str...

Page 172: ...9 24 Memo If the fabric is pulled or pushed during sewing the pattern may not turn out correctly Also depending on the pattern there may be movement to the left and right as well as front and back Gui...

Page 173: ...display The displayed value decreases each time the button is pressed and the pattern will shorten If the pattern is skewed to the left Press in the Fine Adjust Horiz display The displayed value incre...

Page 174: ...ing functions Make patterns larger or smaller make mirror images etc EDITING STITCH PATTERNS Note Some editing functions cannot be used with certain stitch patterns Only the functions for the displaye...

Page 175: ...sion setting for the selected stitch pattern The machine default settings are highlighted S 12 i Memory key Use this key to save stitch pattern combinations S 96 to S 97 j Elongation key When 7mm sati...

Page 176: ...her marker on the fabric S 14 w L R SHIFT key Press to shift the stitch pattern to the right or press to shift the pattern to the left This feature is not available on all patterns Only those applicab...

Page 177: ...h settings Creating a Vertical Mirror Image To create a vertical mirror image select a stitch pattern then press Creating a Horizontal Mirror Image To create a horizontal mirror image select a stitch...

Page 178: ...ning of the selected pattern W from the point where sewing was stopped b Press the Start Stop button to continue sewing CAUTION If the stitches bunch when thread density is changed to return the threa...

Page 179: ...he selected pattern is displayed b Press to change the thread color in the image to red blue or black The color changes every time you press the button c Press to display the enlarged image d Use to v...

Page 180: ...ombined patterns If you want to sew the pattern continuously press after finishing the stitch pattern combination When changing sizes creating mirror images or making other adjustments to a combined s...

Page 181: ...ning Large and Small Stitch Patterns Example a Press The large size stitch will be selected b Press again then press to select the small size The pattern is displayed in a smaller size c Press to sew...

Page 182: ...ess b Press again then press The pattern is flipped along a vertical axis c Press The entered pattern is repeated Combining Stitch Patterns of Different Length Example a Press then press once The leng...

Page 183: ...step effect Stitch patterns sewn so that they create a step effect are called step stitch patterns Press to move the stitch pattern a distance equal to half of the stitch pattern s size to the left P...

Page 184: ...COMBINING STITCH PATTERNS S 94 e Press The entered pattern is repeated More Examples Press Press Press Press...

Page 185: ...i Media Card MMC xD Picture Card To create file folders use a computer Computers and Operating Systems with the Following Specifications can be Used Compatible models IBM PC with a USB port as standar...

Page 186: ...ou are trying to save a pattern on the machine s memory the memory is too full to hold the currently selected stitch pattern To save the stitch pattern in the machine s memory you have to delete a pre...

Page 187: ...ing stitch patterns from the machine to USB media plug the USB media into the machine s top USB port a Press Memo USB media is commercially available but some USB media may not be usable with this mac...

Page 188: ...er The USB cable can be plugged into the USB ports on the computer and machine whether or not they are turned on a USB port for computer b USB cable connector The Removable Disk icon will appear in Co...

Page 189: ...r Retrieving Stitch Patterns from the Machine s Memory a Press The pocket selection screen appears b Choose a stitch pattern to retrieve If the entire saved stitch pattern is not displayed press the t...

Page 190: ...splayed c Press when there is a subfolder to sort two or more stitch patterns to USB media the stitch pattern in the subfolder is displayed Press to return to the original screen without recalling Sti...

Page 191: ...e S 98 b On the computer open Computer My computer then go to Removable Disk c Move copy the pattern data to Removable Disk Stitch pattern data in Removable Disk is written to the machine d Press The...

Page 192: ...The selected stitch pattern is recalled and the sewing screen will be displayed Note The pattern recalled from the computer is only temporarily written to the machine It is erased from the machine whe...

Page 193: ...USING THE MEMORY FUNCTION Character Decorative Stitches Sewing S 103 S 3...

Page 194: ...in thread 109 When tension is not applied to the bobbin thread 110 CREATING BOBBIN WORK 111 Positioning the Fabric and Sewing 111 Finishing the thread ends 113 Bobbin Work Free Motion Sewing 113 ADJUS...

Page 195: ...n the underneath side of fabric while sewing with the fabric wrong side facing up Required Materials Bobbin case and bobbin cover Bobbin case gray There is a notch at the location indicated by the let...

Page 196: ...ches or decorative stitches Monogramming foot N Free motion sewing Free motion open toe quilting foot O Fabric Be sure to sew trial stitches on a piece of scrap fabric which includes the same threads...

Page 197: ...b Race f Wipe the bobbin case gray with a soft lint free cloth to clean it g Insert the bobbin case so that the S mark on the bobbin case aligns with the mark on the machine Align the S and marks a S...

Page 198: ...ose to the bobbin as possible a Beginning of wound thread CAUTION Use a bobbin thread that has been correctly wound Otherwise the needle may break or the thread tension will be incorrect The included...

Page 199: ...o If inserting thread tail through bobbin hole is difficult bobbin can be wound by holding the tail and wrapping thread around inside base Then carefully trim thread tail so it does not extend from th...

Page 200: ...e until the mark on the handwheel aligns with the center top of machine o Gently pull the upper thread to bring the bobbin thread up through the needle plate A loop of the bobbin thread comes out thro...

Page 201: ...stitches using same fabric and threads as project in order to check the sewing results The bobbin thread may become tangled due to the type of pattern and thread that are being used Since this may ca...

Page 202: ...lever and then use tweezers to pull up the bobbin thread and bring the end of the thread to the top of the fabric m Align the upper thread and bobbin thread and then pass them under the presser foot...

Page 203: ...age S 114 Bobbin Work Free Motion Sewing If so desired use a template or draw your design on the stabilizer to allow for ease of stitching Remember your stitches with your decorative thread will be on...

Page 204: ...30 to 45 clockwise To decrease the tension of the bobbin thread turn the slotted head screw 30 to 45 counterclockwise ADJUSTING THE THREAD TENSION Note Turning the screw on the bobbin case gray may pu...

Page 205: ...the bobbin side of the fabric increase the upper tension Refer to ADJUSTING THE THREAD TENSION on page S 114 If the top thread still shows on the bobbin side of the fabric reduce the tension of the b...

Page 206: ...TROUBLESHOOTING S 116...

Page 207: ...th E in this section Before starting embroidery work refer to BEFORE EMBROIDERING of Basic operations The screen display and machine illustration may vary slightly depending on the countries or region...

Page 208: ...rrect Thread Tension 30 Upper Thread is Too Tight 30 Upper Thread is Too Loose 30 Adjusting the Bobbin Case with No Color on the Screw 31 Correct Tension 31 Bobbin Thread is Too Loose 31 Bobbin Thread...

Page 209: ...and the carriage has moved to the start position the pattern type selection screen will display If another screen is displayed press then Embroidery or to display the screen below There are 6 categori...

Page 210: ...t to embroider Press to view the next page Press to view the previous page The selected pattern is displayed c Press to create a mirror image of the pattern as needed If a mistake has been made when s...

Page 211: ...ter and then press to change the size The size changes each time you press the key from large to medium to small If you make a mistake press to erase the mistake If the pattern is too small to see cle...

Page 212: ...gain and enter F h Press and then enter ly i Press The embroidery screen is displayed j Proceed to VIEWING THE EMBROIDERING SCREEN on page E 9 to embroider the pattern To return to the previous screen...

Page 213: ...cting Patterns from Embroidery Cards About Embroidery Card Reader Sold Separately and USB Card Writer Module Use only an embroidery card Reader designed for this machine Using an unauthorized embroide...

Page 214: ...ess the key of the USB port The patterns on the embroidery card are displayed on the selection screen d Follow the steps on page E 4 to select a pattern Selecting Patterns from USB Media Computer To r...

Page 215: ...time necessary to sew the pattern and the time already spent sewing the pattern not including time for changing and automatically trimming the thread j Shows the number of colors in the selected patt...

Page 216: ...E 32 to E 33 s Forward Back key Press this key to move the needle forward or back in the pattern useful if the thread breaks while sewing or if you want to start again from the beginning E 27 to E 29...

Page 217: ...hicker than 3 mm approx 1 8 inch may cause the needle to break When using layers with thicker batting etc you can sew more attractive embroidery by adjusting the embroidery presser foot height in the...

Page 218: ...abilizer b Fabric wrong side Memo When embroidering on thin fabrics such as organdy or lawn or on napped fabrics such as towel or corduroy use water soluble stabilizer sold separately for best results...

Page 219: ...frame compatibility Select a frame that matches the pattern size Included frame options are displayed on the LCD a Highlighted Can be used b Shaded Cannot be used Extra Large Large Embroidery field 30...

Page 220: ...ot loosen the screw d Gently stretch the fabric taut and tighten the frame adjustment screw to keep the fabric from loosening after stretching After stretching the fabric make sure the fabric is taut...

Page 221: ...the fabric you want to embroider a Embroidery pattern b Mark b Place the embroidery sheet on the inner frame Align the guide lines on the embroidery sheet with the mark you made on the fabric a Inner...

Page 222: ...the small piece of fabric to the larger piece in the frame If you do not wish to use a temporary spray adhesive attach the stabilizer with a basting stitch a Fabric b Stabilizer Embroidering Edges or...

Page 223: ...re to align the embroidery frame s with the holder s a Arrow mark d Lower the frame securing lever to be level with the frame to secure the embroidery frame in the embroidery frame holder a Frame secu...

Page 224: ...ATTACHING THE EMBROIDERY FRAME E 18 b Pull the embroidery frame toward you...

Page 225: ...sition Watch the frame closely to make sure the pattern will be sewn in the right place a Press The following screen is displayed b From press the key for the position that you want to check a Selecte...

Page 226: ...wn as it appears in the following display Frame sizes displayed on screen a Press to return to the original screen Icon Name Embroidering area Extra large embroidery frame H 300 mm W 180 mm H 12 inche...

Page 227: ...bin case for prewound or other embroidery bobbin threads a Bobbin case no color on the screw The bobbin case with no color on the screw is set with tighter tension for embroidery with different weight...

Page 228: ...our fingernail in the groove and lift the plate out Sewing Embroidery Patterns Example a Embroidery color order b Cursor a Thread the machine with thread for the first color pass the thread through th...

Page 229: ...liqu There are some patterns which call for an appliqu inside the pattern Prepare the base fabric and the appliqu fabric appliqu piece When sewing an embroidery pattern with an appliqu the color sewin...

Page 230: ...qu fabric will not be caught by the appliqu stitch d Place the base material into the embroidery frame a Base material e Press the Start Stop button to sew the position of the appliqu Use the same thr...

Page 231: ...carry out the rest of the embroidering Memo Some patterns may not show all three appliqu steps Sometimes the APPLIQUE step will be shown as a color Memo Some glue may get onto the presser foot needle...

Page 232: ...frame Be careful not to apply strong force to the fabric at this time Otherwise the fabric may loosen in the frame c Insert a wound bobbin into the machine see Setting the Bobbin of Basic operations...

Page 233: ...previous section to reset the bobbin c Press d Press or to move the needle back the correct number of stitches before the spot where the thread broke If you cannot move back to the spot where the thr...

Page 234: ...embroidery is stopped The next time the machine is turned on you have the option to continue or delete the pattern a Current stitch number when embroidery was stopped a Turn the main power to ON b Fo...

Page 235: ...h the embroidery frame and press The previous embroidery screen displayed before the machine was turned off appears d Continue embroidering a Stitch number when embroidery is resumed Memo If you want...

Page 236: ...oo Loose The tension of the upper thread is too loose resulting in a loose upper thread loose thread locks or loops appearing on the right side of the fabric a Right side b Wrong side a Press MAKING E...

Page 237: ...pper thread slightly appears on the wrong side of fabric a Right side b Wrong side Bobbin Thread is Too Loose Bobbin thread appears slightly on the right side of fabric a Right side b Wrong side If th...

Page 238: ...c thread cutting function The key will display as When one color thread is sewn the machine will stop without cutting the thread Using the Thread Trimming Function JUMP STITCH TRIM The thread trimming...

Page 239: ...mm 1 inch and the machine will not trim a jump stitch of 25 mm or less before moving to the next stitching Adjusting the Embroidery Speed a Press b In the Max Embroidery Speed display use to change t...

Page 240: ...in thick or heavy fabrics The sewing speed can be changed after an embroidery has been started The maximum sewing speed setting does not change until a new setting is selected The setting specified be...

Page 241: ...hes b Center mark c Large frame embroidering area 18 cm 13 cm 7 inches 5 inches d Embroidering area for optional border embroidery frame 18 cm 10 cm 7 inches 4 inches e Embroidery area for optional qu...

Page 242: ...attern can also be dragged by selecting it directly in the screen with your finger or the touch pen Aligning the Pattern and the Needle Example Aligning the lower left side of a pattern and the needle...

Page 243: ...is positioned correctly d Press e Use to align the needle and the mark on the fabric and begin embroidering the pattern Changing the Size of the Pattern a Press b Select the direction in which to chan...

Page 244: ...the pattern 10 degrees to the right Press to rotate the pattern 1 degree to the left Press to rotate the pattern 1 degree to the right Press to return the pattern to its original position Memo Some p...

Page 245: ...image of the selected pattern Press again to return the pattern to normal Enlarging the Editing Screen Enlarge the editing screen by pressing Press to close the enlarged screen 0 Memo You can rotate...

Page 246: ...ense a Normal b Fine stitches closer together c Coarse stitches farther apart The pattern density changes each time you press a button c Press to return to the pattern selection screen Changing the Co...

Page 247: ...y frame Example Linking DEF to the characters ABC a Select the character patterns for ABC b Press c Press The needle is positioned in the lower left corner of the pattern The embroidery frame moves so...

Page 248: ...s to a generous length remove the embroidery frame and then attach the embroidery frame again so that the remaining characters DEF can be embroidered a End of the embroidering i As in step a select th...

Page 249: ...l hesitate but not stop between color steps and then continue till the pattern is completed Press for the multicolor steps to become shaded and the selected pattern will embroider in a single color in...

Page 250: ...a Multi Media Card MMC XD Picture Card USING THE MEMORY FUNCTION CAUTION When using embroidery data other than our original patterns the thread or needle may break when sewing with a stitch density th...

Page 251: ...must be within the 30 cm 18 cm approx 12 inches 7 inches design field size pes files saved with the number of stitches or the number of colors exceeding the specified limits cannot be displayed The c...

Page 252: ...displayed When the pattern is saved the display returns to the original screen automatically If the Memory is Full If the screen below displays either the maximum number of patterns have been saved or...

Page 253: ...ing screen is displayed You will lose the pattern you are saving Memo If there is enough memory available after deleting the pattern the pattern you want to save will be saved automatically If there i...

Page 254: ...s on the computer and embroidery machine whether or not they are turned on a USB port for computer b USB cable connector The Removable Disk icon will appear in Computer My computer on the computer Not...

Page 255: ...will be temporarily saved to Removable Disk under Computer My computer e Select the pattern s phc file in Removable Disk and copy the file to the computer Retrieving Patterns from the Machine s Memor...

Page 256: ...edia the embroidery pattern in the subfolder is displayed Press to return to the original screen without recalling a Folder name b Embroidery patterns in USB media c Path The path shows the current fo...

Page 257: ...attern data to Removable Disk Pattern data in Removable Disk is written to the machine d Press The patterns in the computer are displayed on the selection screen e Press the key of the pattern you wan...

Page 258: ...e of the shape b Embroider the same pattern from step a onto the base fabric c Apply a thin layer of fabric glue or a temporary spray adhesive to the rear of the appliqu created in step a Attach the a...

Page 259: ...attern embroidered in step a Be sure that the appliqu fabric completely covers the stitched line c Embroider the same pattern on the appliqu fabric d Remove the embroidery frame from the embroidery un...

Page 260: ...Palette Ver 7 or later The following procedure describes how to read the split embroidery pattern shown below from USB media and embroider it a Connect to the machine the media containing the created...

Page 261: ...he Start Stop button to embroider the pattern section f When embroidering is finished the following screen appears Press A screen appears so that a section of the split embroidery pattern can be selec...

Page 262: ...in a Pattern 66 Embroidering Linked Characters 67 Changing the Thread Color 67 Creating a Custom Thread Table 68 Adding a Color to the Custom Thread Table from the List 69 Saving the Custom Thread Ta...

Page 263: ...on on the LCD Rotate Patterns You can rotate patterns one degree ten degrees or ninety degrees at a time Enlarge or Reduce Patterns You can make patterns larger or smaller This function is not availab...

Page 264: ...page E 49 h Patterns saved in USB media see page E 50 i Patterns saved on the computer see page E 51 j Press this key to position the embroidery unit for storage SELECTING PATTERNS TO EDIT Memo See in...

Page 265: ...7 for more information on selecting patterns The pattern is displayed in the top part of the screen c Press The pattern selected for editing is outlined in red on the Embroidery Edit display d Proceed...

Page 266: ...ple When selecting an arc use and to change the degree of the arc Press to make the arc flatter Press to make the arc rounder e Press to return to the original screen f After you finish your selection...

Page 267: ...size of the pattern currently selected c Shows the distance from the center of the frame d Shows the color sequence and times of each step of the pattern currently selected e Shows the degree of rota...

Page 268: ...acter patterns E 64 h Add key Press this key to add another pattern to the editing pattern E 79 i Delete key Press this key to delete the selected pattern the pattern outlined by the red box E 63 j Em...

Page 269: ...age E 38 Changing the Size of the Pattern For details on changing the size of the pattern refer to Changing the Size of the Pattern on page E 37 Deleting the Pattern Press to delete the pattern from t...

Page 270: ...ge E 60 for more information about layout types The display will show the selected layout c Press Changing Character Spacing a Press b Use to change the spacing Press to increase the character spacing...

Page 271: ...aracter patterns can be separated to adjust the character spacing or to separately edit the patterns after all characters have been entered a Press b Press The key appears as Note It is not recommende...

Page 272: ...t a pattern and then use to adjust the character spacing e Press Changing the Color of Each Alphabet Character in a Pattern a Press so you can assign a thread color to each character b Change the thre...

Page 273: ...pattern editing screen press The thread color palette screen displays b Press or to put the color you want to change at the top of the sewing order a 64 Embroidery threads table c Press to choose a ne...

Page 274: ...oose where to add a color on the custom thread table You can choose colors from the custom thread table by directly touching the screen with the touch pen You can scroll through 100 colors at a time u...

Page 275: ...rs are specified To delete a specified color from the palette select the color to be deleted and then press To delete all the specified color from the palette press g Press to return to the original s...

Page 276: ...ave a custom thread table data file to USB media a Press and then press b Set your desired colors in the custom thread table according to the procedure in Creating a Custom Thread Table on page E 68 c...

Page 277: ...a b Press and then press c Press The Saving screen is displayed When the data is loaded to the machine the display returns to the original screen automatically d The recalled custom thread table is di...

Page 278: ...you want to change at the top of the sewing order c Press a Custom thread change key The custom thread table will appear d Press to choose a new color from the custom thread table Use and to scroll th...

Page 279: ...ct a pattern and then press b Press c Select the direction in which the pattern will be repeated a Vertical direction b Horizontal direction c Repeating and deleting vertical keys d Repeating and dele...

Page 280: ...which the repeated pattern will be cut Press to cut horizontally Press to cut vertically The pattern direction indicator will change depending on the direction selected b Use and to select the cut li...

Page 281: ...ut repeatedly changing the upper thread or changing the sewing order manually Note Once you have cut a repeated pattern into separate elements you cannot return to the original repeated pattern Each e...

Page 282: ...the final thread When sewing a series of patterns use the point of this arrow for positioning the following designs to be sewn a Press b Press c Press to select the thread mark to be sewn Memo When re...

Page 283: ...center of the end of the pattern Refer to Assigning Thread Marks on page E 76 b Press then c Press the Start Stop button to begin embroidering When embroidering is finished the thread mark is sewn wi...

Page 284: ...the starting point is aligned with the thread mark on the fabric a Positioning keys Press to check the embroidering position j Remove the thread mark k Press the Start Stop button to begin embroideri...

Page 285: ...er Editing a Press To combine the pattern with other patterns select see page E 80 See page E 21 for more information about sewing patterns Note If multiple patterns are displayed in the screen only t...

Page 286: ...OMBINING PATTERNS E 80 Editing Combined Patterns Example Combining alphabet characters with an embroidery pattern and editing a Press to select an embroidery pattern b Select c Press COMBINING PATTERN...

Page 287: ...ecting press to change the character case then enter the remaining characters The characters you enter will be displayed in the center of the display g Press h Use to move the characters With a USB mo...

Page 288: ...n combined use to select the pattern to be edited If a USB mouse is connected the pattern can be selected by clicking it Move the mouse to position the pointer over the desired pattern and then click...

Page 289: ...order they were entered In this example the embroidery order will be as follows a Embroider by following the color order on the right side of the display After the flowers are embroidered the cursor...

Page 290: ...abilizer material to the fabric shrinkage of the stitching or misaligned pattern can be minimized a Press b In the Embroidery Basting Distance display use and to specify the distance from the pattern...

Page 291: ...embroidery patterns in Chapter 1 you can save and retrieve edited embroidery patterns to and from the machine s memory a personal computer or USB media Refer to the relevant sections in Chapter 1 on...

Page 292: ...is applied to the bobbin thread 90 When tension is not applied to the bobbin thread 91 CREATING BOBBIN WORK 92 Selecting the Pattern 92 Start Embroidering 93 ADJUSTING THE THREAD TENSION 96 Adjusting...

Page 293: ...d tabs on the back of the bobbin cover as indicated by the letter B The tabs help hold the bobbin in place so it does not lift up while thick thread is being pulled through Lower thread We recommend t...

Page 294: ...ANGING THE NEEDLE of Basic operations b Attach the embroidery foot c Thread the machine with the upper thread For details on threading the machine refer to Upper Threading of Basic operations Preparin...

Page 295: ...rn Note The bobbin case gray cannot be used in any way other than bobbin work After creating bobbin work refer back to the steps in Preparing the Bobbin Thread on page E 88 for removing and cleaning t...

Page 296: ...bobbins of the same type part code X52800 150 Actual size a This model b Other models c 11 5 mm approx 7 16 inch Note Slowly and evenly wind the thread around the bobbin For best results wind the bob...

Page 297: ...oward you counterclockwise until the mark on the handwheel aligns with the center top of machine p Gently pull the upper thread to bring the bobbin thread up through the needle plate A loop of the bob...

Page 298: ...work B cannot be used in the Embroidery Edit screen or a Note The beginning and end of stitching are specified for bobbin work patterns They cannot be used for normal embroidering Recommended default...

Page 299: ...es and all keys and operation buttons are locked Note Since bobbin work is embroidered from the wrong side of the fabric the pattern shown in the screen appears as a mirror image of the final sewn emb...

Page 300: ...and then press The embroidery frame moves to the beginning of stitching j While holding both the upper thread and the bobbin thread sew a section of the pattern k Stop the machine and then tie the upp...

Page 301: ...ttern again For more details refer to ADJUSTING THE THREAD TENSION on page E 96 Memo If there is a gap between the start point and end point of the pattern leave an adequate length of thread cut the t...

Page 302: ...0 to 45 clockwise To decrease the tension of the bobbin thread turn the slotted head screw 30 to 45 counterclockwise ADJUSTING THE THREAD TENSION Note Turning the screw on the bobbin case gray may pus...

Page 303: ...op thread shows on the bobbin side of the fabric increase the upper tension Refer to ADJUSTING THE THREAD TENSION on page E 96 If the top thread still shows on the bobbin side of the fabric reduce the...

Page 304: ...TROUBLESHOOTING E 98...

Page 305: ...section to find troubleshooting tips and pointers as well as how to keep your machine in the best working order Page number starts with A in this section The screen display and machine illustration m...

Page 306: ...ouch Panel is Malfunctioning 6 TROUBLESHOOTING 7 Frequent troubleshooting topics 7 Upper thread is too tight 7 Symptom 7 Cause 7 Remedy 7 Tangled thread on wrong side of fabric 8 Symptom 8 Cause 8 Rem...

Page 307: ...he machine is dirty lightly soak a cloth in a neutral detergent squeeze it out firmly and wipe the surface Then wipe again with a dry cloth Cleaning the Race If dust or bits of dirt collect in the rac...

Page 308: ...ate and then slide the cover back on Note Do not apply oil to the bobbin case If lint or dust collects on the bobbin thread sensor the sensor may not operate correctly a b b a CAUTION Never use a bobb...

Page 309: ...utter in the bobbin case area a Cutter d Use the screwdriver included with the machine to screw and attach the needle plate e Insert the tabs on the needle plate cover into the needle plate and then s...

Page 310: ...ey the machine does not perform the operation or performs a different operation follow the steps below to make the proper adjustments a Holding your finger on the screen turn the main power switch to...

Page 311: ...abric b Lower thread visible from upper side of fabric c Upper thread d Upper side of fabric e Lower thread Cause Incorrect lower threading If the lower thread is incorrectly threaded instead of the a...

Page 312: ...attling noise is made and sewing cannot continue Looking under the fabric there is tangled thread in the bobbin case Cause Incorrect upper threading If the upper thread is incorrectly threaded the upp...

Page 313: ...under the thread guide plate a Thread guide plate g While holding the thread in your right hand pass the thread through the thread guide in the direction indicated h Guide the thread down up then dow...

Page 314: ...ric are not being used the thread tension will not be adjusted correctly causing wrinkles in the fabric or skipped stitches Refer to Fabric Thread Needle Combinations on page B 60 to check that a need...

Page 315: ...fabric and then remove the needle Refer to CHANGING THE NEEDLE on page B 57 d Remove the presser foot and presser foot holder Refer to CHANGING THE PRESSER FOOT on page B 55 e Lift up the fabric and...

Page 316: ...urn the handwheel to check that the feed dogs move smoothly and do not contact the edges of the slots in the needle plate a Correct position of feed dogs b Incorrect position of feed dogs p Insert the...

Page 317: ...needle or feed dogs contact the needle plate the machine may be malfunctioning therefore contact your nearest authorized retailer f Turn off the machine and then install the bobbin and presser foot R...

Page 318: ...ar threader etc Rethread the machine correctly B 48 Needle is turned bent or the point is dull Replace the needle B 57 There are scratches on the bobbin case Replace the bobbin case or consult your au...

Page 319: ...sult your authorized retailer A 3 Needle is defective Replace the needle B 57 Upper threading is incorrect Check the steps for threading the machine and rethread the machine B 48 Bobbin is set incorre...

Page 320: ...n to operate the machine or set the Width Control to OFF in the settings screen B 28 S 4 All keys and buttons have been locked by Press to unlock all keys and buttons B 55 B 57 Nothing happens even if...

Page 321: ...n power to ON B 21 Embroidery unit is not attached correctly Reattach the embroidery unit correctly B 65 Embroidery frame was attached before the unit was initialized Perform the initialization proces...

Page 322: ...hread the upper thread This message is displayed when the upper thread is broken or not threaded correctly and the Start Stop button or the Reverse Stitch button is pressed Data volume is too large fo...

Page 323: ...rs when you try to start sewing utility decorative stitch or character pattern with the embroidery foot with the LED pointer attached to the machine Remove the embroidery foot with the LED pointer bef...

Page 324: ...n the sensor mode This message appears when the selected function is not available with the sensor function see page B 73 This key cannot be used at this time This message is displayed when you press...

Page 325: ...15 16 inches W 21 5 8 inches H 14 13 16 inches D Weight of machine Approx 15 4 kg approx 33 9 lb Weight of box for shipping Approx 22 0 kg approx 48 5 lb Sewing speed 70 to 1050 stitches per minute N...

Page 326: ...he media device should only contain the upgrade file a USB port for media mouse b USB media d Press The upgrade file is loaded e Remove the USB media and turn the machine off and on again UPGRADING YO...

Page 327: ...nector into the corresponding USB ports for the computer and for the machine Removable Disk will appear in Computer My computer d Copy the upgrade file to Removable Disk The following message will app...

Page 328: ...ewing S 81 Cleaning LCD screen A 3 machine casing A 3 race A 3 Combining Patterns character decorative stitches S 90 embroidery edit E 80 Cord guide bobbin cover S 32 Crazy quilt S 32 Custom Thread Ta...

Page 329: ...e needle position S 25 checking the needle location B 7 fabric thread needle combinations B 60 mode B 24 twin needle B 52 Needle bar thread guides B 13 B 52 Needle clamp screw B 13 Needle mode selecti...

Page 330: ...ght stitch foot S 26 Straight stitch needle plate S 26 Straight stitches S 24 Supplemental spool pin B 12 B 40 B 52 T Tape attaching S 33 Tape or elastic attaching S 52 Thread fabric thread needle com...

Page 331: ......

Page 332: ...English 882 C41 Printed in Taiwan XF3648 001...

Reviews: