background image

3-22

AX-4030

AUTION MAX  AX-4030  OPERATING MANUAL

  2 

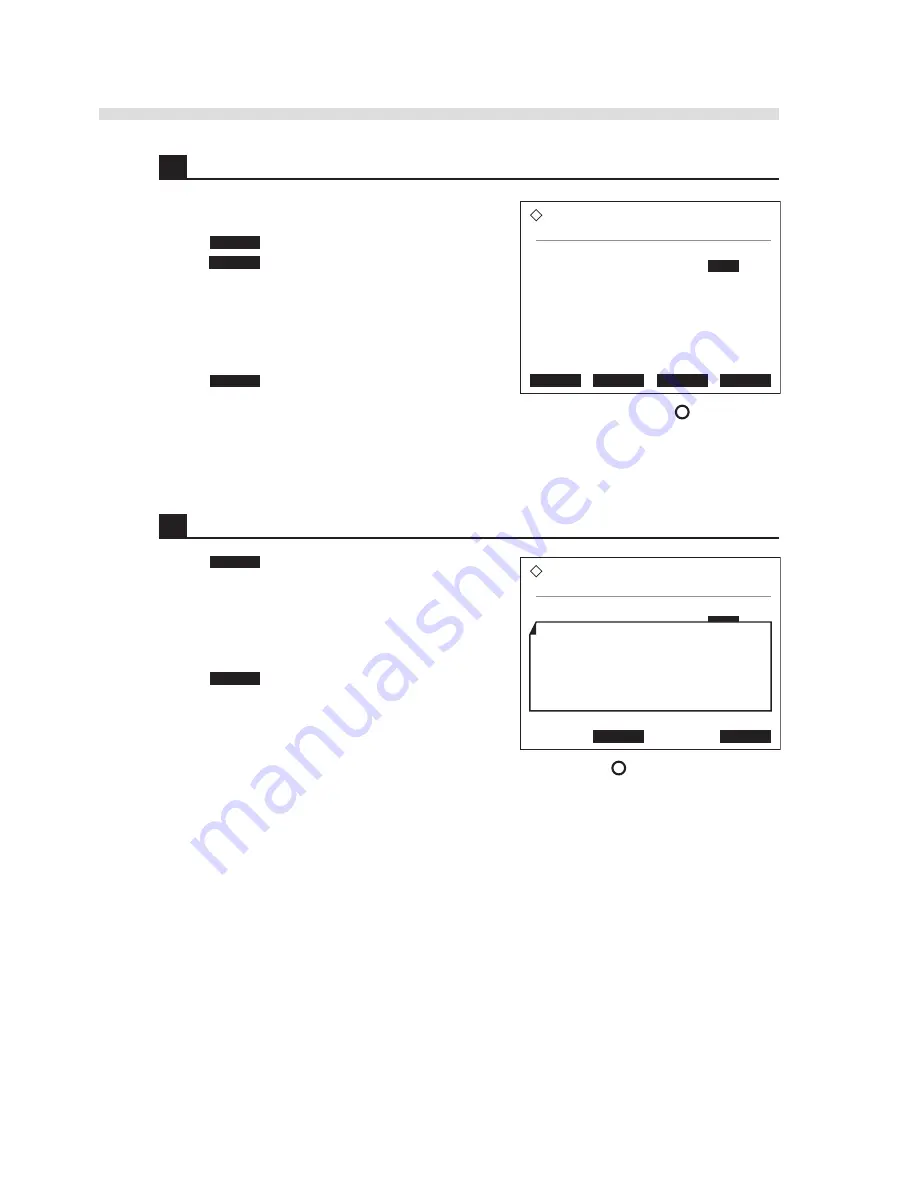
  Select the level of the beeper volume.

1

 Below 

[Beeper volume]

, select the level of the 

beeper volume from 00 to 09.

 Press 

  +     

 to increase the volume level, and 

press 

  -     

 to lower the level.

 The beeper sounds at the set level each time you 

press these function keys.

 Selecting “00” mutes the sound.

2

 Press 

   OK   

 .

 A message window will open to ask if you want to 

save your setting.

  3 

  Save your setting.

1

 Press 

   OK   

 to save your setting.

 The 

[Initial settings]

 screen will appear.

NOTE:

 Keep the power on while saving the setting.

2

 Press 

Go back 

 twice on the 

[Initial settings]

 screen to 

return to the standby screen.

  Beeper volume setting

  (3400)             2006-01-09  11:00

  Beeper volume
                        05  

>>>>>

  +         -          OK      Cancel

  Beeper volume setting

  (3400)             2006-01-09  11:00

  Beeper volume

                        07  

>>>>>

             OK                Cancel

  Save setting changes?

Summary of Contents for AUTION MAX AX-4030

Page 1: ......

Page 2: ...ng manual contains important information on the functions of the AUTION MAX AX 4030 This operating manual is issued by ARKRAY Inc Read carefully prior to starting up the unit This instrument is IVD medical device This product conforms to European Directive 98 79 EC ...

Page 3: ... persons only A qualified person is one having adequate knowledge of clinical testing and the disposal of infectious waste Thoroughly read this operating manual before use Never touch the aspirating nozzle waste box waste box tray trap bottle drain bottle drain tubes transport tray introduction tray or other parts where the sample may adhere with unprotected hands During cleaning or maintenance of...

Page 4: ...o pathogenic microbes Follow the instructions given here to prevent injury and property damage For Optimal Performance IMPORTANT Follow the instructions given here to obtain accurate measurement results NOTE Information useful for preventing damage to the instrument or parts and other important information you should keep in mind REFERENCE Additional explanations that help you make the best use of...

Page 5: ...ntaminated by urine samples Do not touch these parts with unprotected hands Wear protective gloves to prevent exposure to pathogenic microbes while cleaning these parts 3 Trap bottle and tube Do not touch liquid waste with unprotected hands to prevent exposure to pathogenic microbes 4 Maintenance section The introduction tray tubes and other components inside this section can be contaminated by ur...

Page 6: ...s 2 Washing solution joint The washing solution in the washing solution bottle goes through this joint Use the specified washing solution 3 Power input terminal The supplied power cord is plugged in here Use of other cords may cause electric shock or fire The fuse holders are also located here Prepare fuses of the specified capacity for replacement 4 Waste box and waste box tray Used test strips a...

Page 7: ...ic microbes while cleaning these parts 2 Introduction tray The introduction tray can be contaminated by urine samples Do not touch this tray with unprotected hands Wear protective gloves to prevent exposure to pathogenic microbes while cleaning these parts 3 Test strip storage section Contact with the electrical circuits can damage the instrument Do not touch the electrical circuits 1 2 1 Transpor...

Page 8: ...in Bottle Liquid waste is collected in this bottle When discarding liquid waste wear protective gloves to prevent exposure to pathogenic microbes Washing solution bottle 1 Washing solution bottle Fill this bottle with the washing solution prepared as specified 1 1 ...

Page 9: ...sconnecting the Tubes Sensor Code and Cables 1 37 1 6 6 Detaching the Sampler 1 38 1 6 7 Relocating the Instrument 1 39 1 7 Basic Operations 1 40 1 7 1 Components on the Operator Panel 1 40 1 7 2 Screen Configuration 1 41 1 7 3 Menu Operations and Examples 1 42 Chapter 2 Measurement 2 1 Before Making Measurements 2 2 2 1 1 Flowchart of Operational Procedure 2 2 2 1 2 Measurement and Calibration 2 ...

Page 10: ...enance 4 3 4 2 1 Cleaning the Waste Box 4 3 4 2 2 Discarding Liquid Waste from the Drain Bottle 4 5 4 2 3 Cleaning the Feeders 4 6 4 2 4 Cleaning the Test Strip Stopper 4 8 4 2 5 Washing the Introduction Tray 4 12 4 3 Replacement of Consumables 4 15 4 3 1 Replacing the Washing Solution 4 15 4 3 2 Replacing the Thermal Printer Paper 4 17 4 4 Regular Maintenance 4 18 4 4 1 Washing the Air Filter 4 1...

Page 11: ... 18 5 4 2 S G Measurement Related Errors Printed Results Report S G 5 19 UNDER 5 19 OVER 5 19 5 19 CAL ERR 5 19 5 4 3 Turbidity Measurement Related Errors Printed Results Report TURB 5 20 CAL ERR 5 20 ERROR 5 20 5 4 4 Messages on the Abnormal Results List 5 20 Barcode misread 5 20 No sample 5 20 Measurement error 5 21 Abnormal data 5 21 Positive sample 5 21 S G measurement error 5 21 Turbidity mea...

Page 12: ...tion Bottle 1 26 1 4 5 Installing the Drain Bottle 1 28 1 4 6 Installing the Waste Box 1 29 1 4 7 Connecting the Power Cord and External Devices 1 30 1 5 Starting Up 1 31 1 5 1 Turning On the Power for the First Time 1 31 1 5 2 Setting up the Printer and System Clock 1 33 1 5 3 Turning Off the Power 1 34 1 6 Relocation 1 35 1 6 1 Precautions in Instrument Relocation 1 35 1 6 2 Checking for Leftove...

Page 13: ...e sampler for one way transportation and up to 10 sample racks 100 samples for loop transportation The instrument is factory set to the one way transportation mode If you prefer loop transportation to measure more samples at a time contact your distributor STAT measurement STAT measurement is used to interrupt ongoing normal measurements and measure one or more urgent samples There are two types o...

Page 14: ... makes measurement work more efficient Large color LCD A large color LCD makes measurement conditions and menu settings easy to read and identify which facilitates operation If a warning occurs such as test strips or solution running out remedial action is displayed in English so that the situation can be quickly corrected Thermal compensation function The best temperature range for measurements i...

Page 15: ...ta is recorded above 2 500 samples the old data is sequentially deleted Up to 200 control measurements 50 check measurements and 100 troubles can be logged Management by barcode Measurement results can be managed by ID using a barcode reader If a barcode label is affixed to the sample tube the barcode is read during measurement and assigned to the measurement results as an ID A built in barcode re...

Page 16: ...andards illustrated in Sample Containers in 2 1 4 Sample Containers and Sample Racks on page 2 7 Applicable racks ARKRAY racks Sample loading capacity One way transportation default Max 50 samples Loop transportation Max 100 samples Warm up time Max 2 minutes Display Large color liquid crystal display 320 240 dots Built in printer 58 mm width thermal printer paper 24 digits Memory capacity Normal ...

Page 17: ...is discarded in the waste box The measurement unit irradiates the reagent pad with light of 2 wavelengths from a 5 wavelength LED the reflected light of which is picked up by a single detector Moreover by measuring the reflectivity of the color correction pad of the test strip destabilizing factors such as the amount of reflected light and colored samples are corrected The irradiated wavelength co...

Page 18: ...vity therefore the position of the incident light from the slit will change The refractive index is obtained by detecting the position of the incident light and after correcting it for temperature effects it is converted into a Brix value The specific gravity of the sample is then obtained using this Brix value and a conversion formula The Brix value is the sugar content of an aqueous solution mea...

Page 19: ...lucose and protein obtained from test strip measurement SG SGx CGLU CPRO SG Specific gravity after GLU and PRO correction SGx Specific gravity obtained from formula 3 CGLU Corrected GLU value CPRO Corrected PRO value Correction values Unit of concentration mg dL GLU concentration 0 10 30 50 70 100 Correction value 0 0000 0 0000 0 0001 0 0002 0 0003 0 0004 150 200 300 500 1000 OVER 0 0006 0 0008 0 ...

Page 20: ...te system at right Coordinates are calculated as follows 1 XYZ stimulus is obtained X a R b G c B 1000 Y d R e G f B 1000 Z g G h B 1000 R Transmission intensity of 635 nm light G Transmission intensity of 525 nm light B Transmission intensity of 470 nm light a to h Correction coefficients 2 The x and y color coordinates are obtained from formula 1 x X X Y Z y Y X Y Z 3 The density is obtained fro...

Page 21: ...urbidity Ss Scattered light of sample Ts Transmitted light of sample Sw Scattered light of washing solution Tw Transmitted light of washing solution K Factory set instrument coefficient Turbidity is determined by the obtained T value T range Turbidity Output T Level 1 Clear Level 1 T Level 2 Turbid 1 Level 2 T Densely turbid 2 Level 1 and Level 2 are constants 470 nm 525 nm 635 nm multiple wavelen...

Page 22: ... Rank 1 2 3 4 5 6 7 8 9 10 11 Qualitative 1 2 3 4 Semiquantitative mg dL 10 20 30 50 70 100 200 300 600 OVER BIL bilirubin Rank 1 2 3 4 5 6 7 8 9 10 Qualitative 1 2 3 4 Semiquantitative mg dL 0 5 1 0 2 0 3 0 4 0 6 0 8 0 10 0 OVER URO urobilinogen Rank 1 2 3 4 5 6 7 8 Qualitative NORMAL 1 2 3 4 Semiquantitative mg dL 2 3 4 6 8 12 OVER PH pH Rank 1 2 3 4 5 6 7 8 9 Value 5 0 5 5 6 0 6 5 7 0 7 5 8 0 8...

Page 23: ...1 12 AX 4030 AUTION MAX AX 4030 OPERATING MANUAL NIT nitrite Rank 1 2 3 Qualitative 1 2 LEU leukocytes Rank 1 2 3 4 5 Qualitative Semiquantitative Leu μL 25 75 250 500 ...

Page 24: ...nd make sure you have all items listed in this section If anything is missing or damaged contact your distributor 1 2 1 Instrument No Item Description Qty 1 Instrument AUTION MAX AX 4030 1 2 Waste box 1 1 2 2 Sampler No Item Description Qty 1 Sampler Rack type 1 1 Instrument 2 Waste box Sampler Unpacking 1 2 ...

Page 25: ... 1 6 Start rack With rubber cushions and light blue adapters 1 7 STAT and control rack With rubber cushions and orange and blue adapters 1 8 Adapters Gray colored 100 9 Accessory case See page 1 15 1 10 Operating manual This manual 1 11 Error and trouble list 1 5 Rack set 9 Accessory case 10 Operating manual 11 Error and trouble list 6 Start rack 7 STAT and control rack 8 Adapter gray Light blue a...

Page 26: ...ing 5 pieces for each 1 4 Fuses T5AE250V 2 1 5 Tygon tube For washing solution bottle 1 16 i d 3 16 o d 2 m 1 1 6 Silicon tube For drain bottle 3 mm i d 6 mm o d 4 m 1 1 7 Silicon tubes For drain pinch valves 2 mm i d 4 mm o d 100 mm 2 1 8 Blower brush 1 9 White plate 1 10 Tweezers L125 1 1 Check strip set 5 Tygon tube 6 Silicon tube 7 Silicon tubes 8 Blower brush 10 Tweezers 9 White plate 3 Filte...

Page 27: ... and close feeder 1 8 Feeder cover 2 This cover has a locking lever to open and close feeder 2 9 Side cover The pumps for aspirating samples for staining samples on test strips and for flushing the washing solution are located inside The trap bottle is also attached here 10 Maintenance cover Open this cover to clean inside the instrument 11 Loading side Place sample racks with samples loaded here ...

Page 28: ...vice here 7 START terminal 1 Use these terminals to attach the extended sampler or joining unit A 8 STOCK terminal 2 9 Cooling fan The fan exhausts heated air to keep the inside of the instrument cool 10 Cooling fan The fan draws in air from outside to cool the inside of the instrument 11 Main power switch Press this switch to turn on or off the main power supply Keep this switch on for daily use ...

Page 29: ...te box and dispose of the used test strips Insufficient distances may block the waste box Also users will have trouble trying to turn off the main power switch and disconnect connectors in the event of errors or trouble Install the instrument where temperature and humidity can be maintained in the following ranges Temperature 10 C 30 C Humidity 20 80 Installation in the measurement environment out...

Page 30: ...rmation contact your distributor Use the specified Ethernet cable to connect an external device to the Ethernet terminal that is provided when the optional Ethernet board is installed in the instrument Use of other cables may cause electric shock or fire For more information contact your distributor The START 1 and STOCK 2 terminals are used to connect optional joining unit A or an expansion sampl...

Page 31: ...ill be needed the next time the instrument is moved 1 Remove the anchoring tape 1 Remove the anchoring tape at the locations shown in the right figure Also remove the tape from the waste box tray on the left panel 2 Unlock the nozzle drive section 1 Open the front cover 2 Loosen the screw that locks the nozzle drive using a Phillips screwdriver and remove it 3 Loosen the two screws on the retainer...

Page 32: ...eeder unit is locked with the latch shown with the circles in the figure So first you need to pull the whole feeder unit to the right with a little force to open the latch NOTE Do not apply excessive pressure to the feeder unit when in the tilted position as this may cause damage to the instrument 6 Remove the anchoring tape 7 Stand the feeder unit straight up Once the feeder is standing up straig...

Page 33: ...AUTION MAX AX 4030 OPERATING MANUAL 4 Close the covers 1 Close the covers in the order of the side cover a feeder protective cover b and maintenance cover c Feeder protective cover a b c Side cover Maintenance cover ...

Page 34: ...from dropping 2 Connect the sampler cables to the instrument 1 Place the sampler in front of the instrument 2 Connect the two cables from the sampler to the connectors on the lower part of the front panel 3 Lock the connectors to avoid disconnection 4 Loosen the earth anchoring screw from the instrument with the Phillips screwdriver and remove it 5 Fit the earth anchoring screw through the eye of ...

Page 35: ...tach the sampler to the instrument 1 Fit the hooks on both sides of the sampler into the holes on the instrument Be careful not to pinch the cables and earth line 2 Loosen the locking nut on the instrument legs close to the sampler 3 Turn the adjuster feet until the sampler rises an even 5 mm off the countertop Check that the instrument has a clearance of about 20 mm from the countertop 4 Tighten ...

Page 36: ...move the two rubber caps from the sampler You can see the screw heads of the auxiliary legs 2 Turn the auxiliary leg screws clockwise with a Phillips screwdriver until the auxiliary legs contact the countertop NOTE Excessively turning the auxiliary legs will cause the sampler to rise Lower the auxiliary legs until they just contact the countertop 3 Reattach the rubber caps 4 Open the front cover 5...

Page 37: ... concentrated washing solution 3 2 Uncap the washing solution bottle 3 Pour the diluted washing solution into the washing solution bottle 4 Seal the bottle with a piece of sealing film 5 While holding the film in your hand gently invert the bottle so as not to froth the solution NOTE Keep foreign matter out of the bottle and solution as this may cause the filter in the flow line to clog 2 Install ...

Page 38: ... a longer tube may interfere with solution filling Keep the remaining tube in the accessory case for replacement 3 Fit one end of the Tygon tube over the washing solution joint W on the rear panel 4 Fit the other end of the tube over the washing solution nozzle of the bottle cap NOTE Care should be taken not to tear the tube by forcing it W D H S Liquid sensor cord Washing solution joint Washing s...

Page 39: ...the drain bottle 1 Cut the silicon tube to an appropriate length 2 Remove the joint from the drain bottle Insert one end of the silicon tube into the joint until the tube extends about 5 cm from the joint 3 Reattach the joint to the bottle cap and tighten it securely 2 Connect the tube to the instrument Do not bend or pinch the silicon tube of the drain bottle Also keep objects off of the tube If ...

Page 40: ...ox on the waste box tray Ensure the waste box guides fit the concaves inside the tray 2 Store the waste box tray in the instrument If the waste box is correctly set in the tray it is held steadily by the magnets If the waste box gets caught halfway it is set incorrectly NOTE Ensure the waste box correctly fits into the tray before pushing it in Incorrect installation may cause used test strips to ...

Page 41: ... power cord into the power input terminal on the rear panel 3 Insert the male connector of the power cord into a receptacle REFERENCE The type of power cord supplied varies depending on the country 2 Connect an external device if necessary NOTE Use the specified RS 232C cross cable or Ethernet cable to connect an external device to the instrument 1 Connect one end of the communication cable to a d...

Page 42: ...m up 1 Turn on the main power switch 1 Press the I on side of the main power switch on the rear panel 2 Turn on the standby switch 1 Press the standby switch on the left side of the front panel The standby switch will light green The message Please wait will appear for a maximum of 20 seconds followed by the product name and program version for about 2 seconds NOTE If the initial memory check dete...

Page 43: ...minutes and the standby screen shown at right will appear You will see the current date and time the factory set measurement start number and test strip settings Startup Initializing Please wait Ready for measurement 2006 01 09 10 00 Measurement start No 0001 Test strips in feeder 1 1 9EB Test strips in feeder 2 2 9EB Menu Meas No Strip S G Cal Standby screen ...

Page 44: ...re Thermal printer paper 1 Load the thermal printer paper 1 Load a roll of paper into the built in printer For more information see steps 2 in 4 3 2 Replacing the Thermal Printer Paper on page 4 17 2 Set the system clock 1 Set the clock to the current date and time For detailed instructions see 3 4 1 Setting the System Clock on page 3 17 System clock setup 3100 2006 01 09 10 00 Date 05 12 22 YY MM...

Page 45: ...tandby screen 2 Press the standby switch The light of the standby switch will turn off indicating the instrument has powered off REFERENCE When you are to use the instrument almost every day keep the main power switch on and use the standby switch to turn on or off the instrument Ready for measurement 2006 01 09 10 00 Measurement start No 0001 Test strips in feeder 1 1 9EB Test strips in feeder 2 ...

Page 46: ...h any of the covers open may expose you to pathogenic microbes or damage the instrument Make sure there are no test strips left inside the instrument before relocating the instrument Moving the instrument with used test strips inside may expose you to pathogenic microbes or damage the instrument For safety reasons always move the instrument with the help of at least one other person Hold the botto...

Page 47: ...ous waste 1 Discharge the washing solution from the flow lines 1 Make sure the standby screen is displayed then press the standby switch to turn off the power 2 Uncap the washing solution bottle Place the cap on tissue paper to protect it against dust 3 Press the standby switch to turn on the power During warm up washing solution will be discharged from the flow lines 1 6 4 Unplugging the Power Co...

Page 48: ...loves Wear protective gloves to prevent exposure to pathogenic microbes Discard used protective gloves and liquid waste in accordance with local regulations for biohazardous waste 1 Disconnect the tube of the drain bottle 1 Disconnect the tube of the drain bottle from the drain joint D on the rear panel To drain bottle W D ...

Page 49: ...on joint W on the rear panel 3 Disconnect cables to the optional part and external devices 1 If an optional hand held barcode reader or external device is connected to the instrument disconnect their cables from the instrument 1 6 6 Detaching the Sampler Prepare Phillips screwdriver 1 Detach the sampler 1 Carefully lift the sampler straight upward with both hands and pull to the front This unhooks...

Page 50: ... using the screwdriver to prevent the splash guard from dropping 5 Disconnect the two sampler cables from the connectors on the lower part of the front panel The sampler is now detached completely from the instrument 1 6 7 Relocating the Instrument 1 Move the instrument to its new location IMPORTANT For safety reasons always move the instrument with the help of at least one other person Hold the b...

Page 51: ... cursor down 7 Hyphen key Press this key to select an option for a setup item move the cursor between entry fields or enter a hyphen for IDs 8 0 to 9 Alphanumeric keys Use these keys to enter numeric values On the menu screens these keys can work as cursor keys see the REFERENCE below For ID entries use these keys to enter alphabetical characters 9 Function keys Press the function key just below t...

Page 52: ...reens When an option is selected on a menu screen the appropriate setup screen appears Setup screens contain one or more setup items Below each setup item is a selection field for selecting an option or an entry field for inputting numbers or characters Ready for measurement 2006 01 09 10 00 Measurement start No 0001 Test strips in feeder 1 1 9EB Test strips in feeder 2 2 9EB Menu Meas No Strip S ...

Page 53: ...o works in the same way Stop This function label appears while measurement is in progress Press Stop to suspend the measurement process The instrument then shifts to the end process before going on standby The key on the operator panel works in the same way Until the end process begins you can press Start to resume the suspended measurement Cancel This function label appears on the setup screens P...

Page 54: ...ions or to type in numeric values or text Selecting an option Below the setup item e g Measurement in the right figure the currently selected option is displayed at first The setting changes each time you press the hyphen key For example if the setup item has 4 selectable options pressing the hyphen key four times allows the first option to appear again REFERENCE The numeric keys double as cursor ...

Page 55: ...ate display format is YY MM DD year month day If you are using a different format month date year or date month year set the date accordingly For example to enter April 15th 2006 1 To enter the year 06 press 0 and 6 in that order and press the hyphen key to move to the month entry position 2 To enter the month 04 April press 0 and 4 in that order and press the hyphen key to move to the day entry p...

Page 56: ...or example to enter AA enter A press the hyphen key and enter A Use the same method to enter different characters assigned to the same keys For example to enter NO enter N press the hyphen key and enter O REFERENCE To enter a special character Use the 0 key Number 0 and special characters rotate in the following order each time 0 is pressed 0 zero asterisk hyphen question mark exclamation mark per...

Page 57: ...1 46 AX 4030 AUTION MAX AX 4030 OPERATING MANUAL ...

Page 58: ...trips to the Item Racks 2 19 2 3 5 Preparing Samples 2 21 2 4 Measurement Operations 2 23 2 4 1 Normal Measurement Measuring Samples Continuously 2 23 2 4 2 Port STAT Measurement Measuring a Higher Priority Sample 2 27 2 4 3 Rack STAT Measurement Measuring Higher Priority Samples 2 31 2 5 S G Calibration 2 34 2 5 1 Preparing S G Standard Solutions 2 34 2 5 2 Starting S G Calibration 2 36 2 6 Contr...

Page 59: ...n the same way 8 Print the second result 9 Interpret the results Prepare samples 1 Label sample tubes with barcodes if needed 2 Pour samples into tubes 3 Load samples into sample racks 4 Load sample racks into sampler Normal measurement 1 Check the type of test strips and main feeder 2 Set the measurement start No 3 Press START 4 After completion take out samples Daily maintenance 1 Return test st...

Page 60: ...tion to measure more samples at a time contact your distributor For more information about measurement numbers and rack port numbers see the next page STAT measurement STAT measurement is used to interrupt ongoing normal measurements and measure one or more urgent samples There are two types of STAT measurements Port STAT measurement Measures a single sample loaded into the STAT port If you have a...

Page 61: ...ower on Rack port number A rack port number identifies the location of a sample by the sample rack port where the sample has been loaded and consists of a 3 digit rack number and a 2 digit port number Rack numbers are assigned to sample racks in the order in which they are loaded into the sampler and start with 001 Port numbers are assigned to the ports of the sample rack and start with 01 for por...

Page 62: ...ported by each barcode reader Barcode readers Normal measurement Port STAT measurement Rack STAT measurement Built in type N A Hand held type N A N A Sample rack transportation The instrument supports two methods for transporting sample racks in the sampler one way and loop The instrument is configured for one way transportation when shipped from the factory and can be changed to loop transportati...

Page 63: ...em racks or normal racks in remaining locations numbered 2 to 10 in the figure below These racks are circulated in the sampler as the samples are aspirated and the instrument automatically stops aspiration the next time it detects the start rack To employ loop transportation contact your distributor and ask to have parameter settings changed Start measurement Start rack 10 9 8 7 6 Start rack Unloa...

Page 64: ...essful use of the item racks assign one of the two feeders to each rack ID before testing samples For example you may assign feeder 1 to item racks 01 to 05 and feeder 2 to 06 to 10 For detailed instructions see 2 3 4 Assigning the Type of Test Strips to the Item Racks on page 2 19 For sample preparation load samples into the item rack assigned to the feeder that contains the test strips to apply ...

Page 65: ...ions The start rack has a black label that informs the instrument of the beginning and end of the batch to avoid measuring the same sample twice In other words when the racks are completely circulated in the sampler and the start rack returns to the initial position the instrument detects the black label and automatically stops measurement Normal rack The separately sold normal racks can also be u...

Page 66: ... that contain liquid on the instrument Spilling inside the instrument may cause damage to the components Never fail to clean or wash the specified components of the instrument to maintain measurement quality For more information see chapter 4 Maintenance If you detect abnormal odors or noise immediately turn off the standby switch and then main power switch and unplug the power cord Continuous ope...

Page 67: ...th tissue paper etc The liquid level of the sample cannot be correctly detected if covered in bubbles and a film If it is the instrument cannot aspirate the volume of sample required for measurement thus producing incorrect results Use samples as collected Do not add preservative disinfectant or detergent Do not place samples where exposed to direct sunlight Direct sunlight can alter the quality o...

Page 68: ... Take as many test strips as you need out of the bottles and load them into the feeders just before testing Each feeder can contain up to 200 test strips equivalent to 2 bottles but the quality of the strips is assured only for 3 days Test strips absorb moisture in the air which may alter their quality and produce incorrect results The test strip bottles should be securely capped immediately after...

Page 69: ... out the waste tray to check if there are any used test strips in it Discard the used strips if there are any See 4 2 1 Cleaning the Waste Box on page 4 3 NOTE Before pushing in the waste box ensure the box is correctly sitting on the waste box tray Incorrect installation of the waste box may cause test strips to be scattered inside the instrument or clog the test strip path NOTE If test strips ar...

Page 70: ... the remaining solution and transfer newly prepared solution to the bottle See 4 3 1 Replacing the Washing Solution on page 4 15 4 Check the thermal printer paper 1 Check for two red lines appearing on both edges of the thermal printer paper If red lines are found replace the paper roll with a new one See 4 3 2 Replacing the Thermal Printer Paper on page 4 17 Washing solution bottle Thermal printe...

Page 71: ...error E or trouble T code before displaying the program version For more information see Chapter 5 Troubleshooting The instrument will read the parameter settings and then initialize the hardware Warm up will complete in 2 minutes and the standby screen shown at right will appear You will see the current date and time the initial measurement start number 0001 and the current test strip settings St...

Page 72: ...isables the built in printer Use 3 18 Use of external output Enables or disables the external output Not use 3 20 Result format Selects the result format for normal STAT and control measurements between semiquantitative and reflectivity respectively Semiquantitative 3 4 Measurement start number assignment Determines whether sequential measurement numbers are assigned through batches or the measure...

Page 73: ...y capped immediately after taking out the strips 1 Setting the test strips and main feeder by key operation Set the types of test strips to be loaded into the feeders and select the main feeder between feeder 1 or 2 REFERENCE When to select the main feeder You can select either feeder 1 or 2 as the main feeder usually However you should explicitly specify the main feeder to use the sample racks li...

Page 74: ...you want to save your settings 6 Press OK to save your changes The standby screen will appear with the new settings displayed REFERENCE Press Cancel to abort your changes and return to the standby screen IMPORTANT Keep the instrument on while saving the settings 2 Attach a desiccant bag to the feeder cover 1 Turn the locking lever a to unlock the feeder cover and open the cover b Test strip setup ...

Page 75: ...ed 3 Load the test strips into the feeders 1 Take out as many test strips as you need from the bottle and load them into the feeder Level test strips into even piles IMPORTANT Do not touch the pad area on the test strips Contact can cause sebum to adhere to the surface whereby producing incorrect results NOTE Place the test strips with the black marker to the back side of the feeder see the figure...

Page 76: ...ers and Sample Racks on page 2 7 NOTE In the following procedure what you actually assign to the item racks are feeders 1 2 or main not the type of test strips If you want to change the type of test strips to load into the feeder see the instructions in step 1 in 2 3 3 Loading Test Strips into the Feeders on page 2 16 1 Access the setup screen 1 On the standby screen press Menu to go to the Main m...

Page 77: ... test strips and main feeder settings cannot be changed here 3 Press OK You will be asked to save the changes 3 Save the changes 1 Press OK to save the changes and return to the Parameter settings screen NOTE Keep the power on while saving the settings 2 Press Go back twice to go back to the standby screen Rack assignment for test strip 1100 2006 01 09 10 12 01 02 03 1 9EB 04 1 9EB 05 1 9EB 06 1 9...

Page 78: ...tective gloves to prevent exposure to pathogenic microbes 1 Prepare sample tubes 1 Prepare the sample tubes that comply with the standards shown at right REFERENCE To have the built in barcode reader read barcodes successfully label the tubes as shown at right 2 Pour samples into sample tubes 1 Fill a sample tube with at least 2 mL of sample Ensure the sample level is at least 40 mm above the bott...

Page 79: ...FERENCE To have the built in barcode reader read barcodes successfully labels on the tubes must be facing to the rear side of the sample rack 4 Load the sample racks into the sampler 1 Hold the sample rack with the marker facing you and place it on the loading side of the sampler First place the rack at the frontward of the loading side fit the recesses at the lower right of the rack into the guid...

Page 80: ... aspirated samples may not be measured successfully Check the printed results reports thoroughly and test the samples again if necessary 1 Perform S G calibration Calibrate the instrument using low and high specific gravity standard solutions once a month For instructions see 2 5 S G Calibration on page 2 34 2 Load test strips into the feeders 1 Load the test strips into the feeders See 2 3 3 Load...

Page 81: ...d 0 in that order To correct the number press BS to delete the digits one by one and enter a new number REFERENCE If the cursor is placed below Control measurement press to move up to the Normal measurement entry field 4 Press OK to save your changes The standby screen will appear again with a new measurement start number Ready for measurement 2006 01 09 11 00 Measurement start No 0001 Test strips...

Page 82: ...bbed at the rear of the sampler The rack can move suddenly which is very dangerous When adding sample racks to the sampler during measurement keep hands away from the rack at the rear and place new racks at the front The test strip storage section may be driving while measurement is in progress Do not touch inside the storage section directly with hands when adding test strips in the feeder Contac...

Page 83: ...ples are completed The message Measurement operations ending will appear after the entire batch of samples has been measured The instrument will proceed with flow line flushing and other end processes When the end processes are completed the standby screen will appear again 1 Take out the sample racks from the sampler 8 At the end of the day 1 Take the test strips out of the feeder and put them ba...

Page 84: ...ent see 2 4 3 Rack STAT Measurement Measuring Higher Priority Samples on page 2 31 Prepare Sample tube and protective gloves Wear protective gloves to prevent exposure to pathogenic microbes Discard used samples test strips and protective gloves in accordance with local regulations for biohazardous waste 1 Prepare a sample for STAT measurement 1 Pour the sample for STAT measurement in a sample tub...

Page 85: ...er At the right of the feeder number the type of test strips currently set for the feeder is shown Measurement No Enter the measurement number for the sample For example to enter 0200 press 0 2 0 0 in that order ID Enter the ID for the sample An ID can be up to 18 digits long and can contain numbers alphabet and special characters For more information see ID in 1 7 3 Menu Operations and Examples o...

Page 86: ... nozzle may descend into the STAT port Port STAT measurement will automatically start when aspiration of the normal measurement sample in process is completed REFERENCE The following keys are operational during STAT measurement Press Stop to stop STAT measurement Normal measurement also stops if it was running Press results to view the latest result Pressing or can view the previous or next result...

Page 87: ...erforming STAT measurement If the instrument was on standby The display will show Measurement operations ending the flow lines will be flushed and then the instrument will put itself on standby If measurement was underway The suspended normal measurement will resume 1 Press the PUSH mark on the STAT port backward to unlock the stopper and then slide the port toward you 2 Take the sample tube out o...

Page 88: ...t during standby Prepare STAT and control rack sample tubes and protective gloves Wear protective gloves to prevent exposure to pathogenic microbes Discard used samples test strips and protective gloves in accordance with local regulations for biohazardous waste 1 Prepare samples for STAT measurement 1 Pour samples for STAT measurement in sample tubes See 2 3 5 Preparing Samples on page 2 21 2 Pla...

Page 89: ...rack into the sampler 1 Place the STAT and control rack on the loading side of the sampler If there are some racks waiting for normal measurement on the loading side keep the rack at the aspirating position furthest from you as it is and slide the other racks toward you to make room for the STAT and control rack If the loading side is full with racks remove one of them and insert the STAT and cont...

Page 90: ...ement will start when the STAT and control rack reaches the sample aspirating position Samples are processed in the same way as those for normal measurement 5 When rack STAT measurement is completed When the sample aspiration of the STAT and control rack is completed the rack will be discharged to the unloading side of the sampler 1 When aspiration of the remaining normal measurement samples is co...

Page 91: ...are the S G standard solutions just before carrying out calibration Use of solutions stored for a long period of time may produce incorrect calibration results 1 Prepare a low solution Use purified water as a low solution 1 Transfer at least 2 mL of purified water into a sample tube Ensure the water level is at least 40 mm above the bottom of the tube IMPORTANT An insufficient amount of low soluti...

Page 92: ... into the correct ports respectively Loading them into the wrong ports may cause an error 5 Load the sample rack into the sampler 1 Hold the sample rack with the marker facing you and place it on the loading side of the sampler First place the rack at the frontward of the loading side fit the recesses at the lower right of the rack into the guides inside the sampler and slide the rack backward NOT...

Page 93: ...der A decimal point is automatically added To correct the entry press BS to delete the digits one by one and enter a new value 2 Press to proceed to the Standard solution High entry field 3 Below Standard solution High enter the S G value of the high solution Use the numeric keys 0 to 9 The S G value acceptable here is between 1 000 to 1 050 4 Press OK to save your entries The next S G Calibration...

Page 94: ...lf back on standby Note that breaking calibration aborts all of the calibration results 4 When S G calibration is completed The message Measurement completed will appear 1 Press Go back to return to the standby screen 2 Remove the sample rack of the standard solutions from the sampler REFERENCE If the error E120 occurs See E120 in 5 2 2 Causes and Remedies on page 5 8 to determine the cause of the...

Page 95: ...rse of normal measurement by inserting the STAT and control rack at the beginning of or between the racks containing patient samples REFERENCE For the controls labeled with barcodes control IDs read from the barcodes are automatically assigned to the corresponding control measurement results 1 Check the main feeder The test strips in the main feeder are always used for control measurement 1 On the...

Page 96: ...oad the controls into the STAT and control rack 1 Insert the sample tubes into ports 8 9 and 10 with dark blue adapters in that order Port 8 Low density control L Port 9 Middle density control M Port 10 High density control H REFERENCE Do not place the controls in ports 1 to 7 with the orange adapters as they are dedicated to rack STAT measurement REFERENCE To have the built in barcode reader read...

Page 97: ...number 1 On the standby screen press Meas No to go to the Measurement start No screen 2 Press to move down to Control measurement 3 Enter a number between 0000 to 9999 to be assigned to the first control Use the numeric keys 0 to 9 REFERENCE For example to enter 0150 press 0 1 5 and 0 in that order To correct the number press BS to delete digits one by one and enter a new number 4 Press OK to save...

Page 98: ...Results to view the latest result Pressing or can display the previous or next result To return to the Measuring screen press Go back REFERENCE To stop control measurement in progress press Stop The instrument will perform the breaking process and put itself on standby Ready for measurement 2006 01 09 13 15 Port No 0001 Measurement No 0150 ID Test strip type 1 9EB Stop Waiting for rack Ready for m...

Page 99: ...AT and control rack will be discharged to the unloading side of the sampler REFERENCE In the case that control measurement was carried out at the beginning or in course of normal measurement normal measurement will start or resume at this point 1 Remove the STAT and control rack from the sampler ...

Page 100: ...ouch the pad area on the check strips Use of strips contaminated by sebum can produce incorrect results NOTE Ensure you have the check strips that came with the instrument Measuring other test strips in the check measurement mode can cause trouble or damage to the instrument 1 Clean the test strip transportation path 1 If the instrument is powered on make sure the standby screen is displayed Then ...

Page 101: ...ect the feeder to load the first white check strip Press the hyphen key to switch between feeders 1 and 2 2 Press OK You will be asked to load the check strip Ready for measurement 2006 01 09 14 00 Measurement start No 0250 Test strips in feeder 1 1 9EB Test strips in feeder 2 2 9EB Menu Meas No Strip S G Cal Main menu 0000 2006 01 09 14 00 1 Parameter settings 2 Results 3 Initial settings 4 Print...

Page 102: ...ite strip in the loading slot NOTE Hold the test strip with the black marker to the rear of the feeder and facing down Put the whole strip down on the loading slot Incorrect loading may cause trouble to occur 4 Press Start Check measurement will start REFERENCE To stop check measurement in progress press Stop The instrument will proceed to the breaking process before putting itself back on standby...

Page 103: ...p 3 3 Take a gray test strip out of the container 4 Load the gray test strip into the feeder selected in step 2 For detailed instructions see step 5 Check measurement 5300 2006 01 09 14 11 Measurement completed 2006 01 09 14 10 430 nm 89 3 500 nm 93 1 565 nm 88 5 635 nm 9 7 760 nm 100 0 Print Go back Reflectivity Wavelengths Maintenance 5000 2006 01 09 14 15 1 S G cell washout 2 Clean washing bath...

Page 104: ...ent or the test strips are abnormal Perform a check measurement again Press Go back to return to the Maintenance screen Take the remaining two check strips out of the container and repeat from step 2 4 on page 2 44 Go to step 8 when completed NOTE If the printed results report includes an error message clear the error as follows Reflection light intensity drift Internal measurement operation is in...

Page 105: ...here is something wrong with the instrument Go to step 9 and then contact your distributor 9 Take the check strips out of the waste box 1 Press Go back three times to put the instrument on standby 2 Pull out the waste box tray and take the check strips out of the box 3 Store the check strips in the container 4 Load the test strips removed from the feeder in step 1 into the feeder as they were View...

Page 106: ...g Results displays the result on the screen in the format shown below The obtained results are stored in memory and can be retrieved on the screen later by key operation For more information about the components from 1 to 8 in the figure see the appropriate sections in 2 8 2 Printed Results Report on the next page Example View Date 2006 01 09 11 16 Kind NORMAL No 0150 Po 001 05 Strip 1 9EB ID 0000...

Page 107: ...question mark has a higher priority than the black circle The sample is positive or abnormally colored The instrument is operating abnormally Example Measure No 0001 ID 1234567890 ABCDEFG 2006 01 10 13 41 25 Po 001 01 Strip 9EB 1 GLU 50 mg dl PRO BIL URO NORMAL PH 7 0 BLD KET NIT LEU TURB 1 S G 1 000 Color Colorless No sample 1 Abnormal mark type of measurement measurement No 2 ID 3 Measurement da...

Page 108: ...d Ambient Temperature The date and time when the measurement is carried out and the ambient temperature in centigrade appear here The default date format is year 4 digits month 2 digits day 2 digits REFERENCE The date format can be changed to day 2 digits month 2 digits year 4 digits or month 2 digits day 2 digits year 4 digits To have the parameter settings changed contact your distributor 4 Rack...

Page 109: ...replaced with qualitative value and reflectivities For instructions see 3 2 2 Using a Different Results Format on page 3 4 6 Turbidity REFERENCE The turbidity measurement value is added if the result format is set to Reflectivity see 3 2 2 Using a Different Results Format on page 3 4 Abnormal turbidity mark The result is flagged with an asterisk if it is abnormal Normal results are printed with no...

Page 110: ...9 UNDER The result is lower than the specified range OVER The result is higher than the specified range Specific gravity was not measured for some reason CAL ERR S G calibration has not been performed yet 8 Color tone The color tone of samples is determined from 23 colors which includes 21 combinations of 7 colors yellow orange brown red violet blue and green and 3 intensity levels light normal da...

Page 111: ...at are obtained after powering on For instructions see 3 5 2 Printing the Abnormal Results List on page 3 24 For information on the error messages that can appear in this list see 5 4 4 Messages on the Abnormal Results List on page 5 20 Example 2 8 4 Error and Trouble List Automatic Report If an error or trouble occurs the appropriate code is automatically reported on a printout An error code cons...

Page 112: ...rror and trouble codes see 5 2 When an Error Occurs on page 5 6 and 5 3 When Trouble Occurs on page 5 10 Example 2005 01 11 10 45 E110 001 002 003 2005 01 11 10 48 T210 001 002 395 2005 01 11 10 58 T214 143 234 512 2005 01 11 11 14 T220 015 024 035 2005 01 11 11 21 E122 011 302 400 Measurement date and time Error code E and 3 digit number or trouble code T and 3 digit number and its detailed infor...

Page 113: ...with lights from outside of the instrument When the check strip was placed out of position and could not be measured CHECK Serial No 12345678 2006 01 10 14 10 430 nm 89 3 500 nm 93 1 565 nm 88 5 635 nm 9 7 760 nm 100 0 Type of measurement Measurement date and time Reflectivities Wavelengths CHECK 2006 01 10 14 10 Reflection light intensity drift Error message CHECK 2006 01 10 14 10 Test strip out ...

Page 114: ...ignment for test strip 01 1 9EB 02 1 9EB 03 1 9EB 04 1 9EB 05 1 9EB 06 1 9EB 07 1 9EB 08 1 9EB 09 1 9EB 10 2 9EB Result display format Sample Semi quantitative values Control Semi quantitative values Measurement No setup Measurement start No Initialize for every batch Measurement No Assign to samples Product name and software version Print date and time Printer use no use External output use no us...

Page 115: ...2 58 AX 4030 AUTION MAX AX 4030 OPERATING MANUAL ...

Page 116: ...s 3 8 3 3 2 Reviewing Results Editing IDs 3 12 3 3 3 Deleting Results and Trouble Logs from Memory 3 15 3 4 Initial settings Menu 3 17 3 4 1 Setting the System Clock 3 17 3 4 2 Enabling Disabling the Built in Printer 3 18 3 4 3 Enabling Disabling the External Output 3 20 3 4 4 Controlling the Beeper Volume 3 21 3 5 Print Menu 3 23 3 5 1 Printing a Trouble List 3 23 3 5 2 Printing the Abnormal Resu...

Page 117: ...the measurement numbering system 3 6 Measurement start No Continue from previous batch Initialize for every batch Measurement No Assign to samples Assign to ports Results screen No 2000 No Options Description default bolded See page s 2100 Print Reprints the results stored in memory 3 8 Date Specify a range of days today Measurement Normal STAT measurements Normal measurement STAT measurement Cont...

Page 118: ...tput setup Enables or disables the external output 3 20 Use No use Use No use 3400 Beeper volume setting Controls the volume of the beeper that alerts you to an error or trouble 3 21 Beeper volume 00 to 09 The default is 05 Print screen No 4000 No Options Description default bolded See page s 4100 Trouble list Prints a list of errors and troubles that have arisen so far 3 23 Date A range of days 4...

Page 119: ...effect on the displayed and printed reports and the data transmitted to external devices as listed below Options Semiquantitative Reflectivity Displayed report Qualitative or semiquantitative values Reflectivity only Printed report Qualitative or semiquantitative values Qualitative values and reflectivity External output data Qualitative and semiquantitative values Qualitative values and reflectiv...

Page 120: ...gs The Parameter settings screen will appear again NOTE Keep the power on while saving the settings 2 Press Go back twice on the Parameter settings screen to return to the standby screen Parameter settings 1000 2006 01 09 11 00 1 Rack assignment for test strip 2 Results display format 3 Measurement No setup Results display format 1200 2006 01 09 11 00 Sample Semiquantitative Control measurement Se...

Page 121: ...ne or more samples from the beginning of a batch depending on the set measurement start number This takes place because measurement numbering is made so that the ones place of the port number matches that of the measurement number For example when the measurement start number is set to 5 the instrument skips ports 1 to 4 and measures samples from port 5 1 Access the setup screen 1 On the standby s...

Page 122: ... OK to save your changes The Parameter settings screen will appear again NOTE Keep the power on while saving the settings 2 Press Go back twice on the Parameter settings screen to return to the standby screen Parameter settings 1000 2006 01 09 11 00 1 Rack assignment for test strip 2 Results display format 3 Measurement No setup Measurement No setup 1300 2006 01 09 11 00 Measurement start No Conti...

Page 123: ...ling Disabling the External Output on page 3 20 REFERENCE Lists of errors abnormal results and parameter settings can also be printed out For instructions see 3 5 Print Menu on page 3 23 3 3 1 Printing Transmitting Results The results stored in memory can be manually printed out or transferred to a connected external device You can specify what results you want by date type of measurement type of ...

Page 124: ...of results from All Normal and abnormal results and barcode misread results Normal results only Normal results only Include abnormal results Normal and abnormal results Barcode misread Barcode misread results only Range of results Select how you want to specify a range of results from All Include all results Measurement No Specify a range of results by measurement number Port No Specify a range of...

Page 125: ...ent Terminology on page 2 4 For ID Enter the ID of the result you want using the alphanumeric keys An ID can contain up to 18 digits and can include numbers alphabet and special characters see page 1 45 Go to step 2 The ID can also be input by having the optional hand held barcode reader read a barcode from the labeled sample REFERENCE For detailed instructions see ID in Entering Alphanumerics in ...

Page 126: ...s will be sent to the printer or external device REFERENCE If Not found is displayed there is no matching data in memory Press OK to return to the previous screen Print 2100 2006 01 09 11 02 ID 060108 001 00248 BS OK Cancel Print 2100 2006 01 09 11 02 Printing Please wait ...

Page 127: ...press Menu to go to the Main menu screen 2 Press 2 to go to the Results screen 3 Press 3 to go to the View screen 2 Select the results you want 1 Select the results you want to view REFERENCE For detailed instructions see step 2 on page 3 9 2 Press OK Go to the appropriate step according to the selection below Results All Go to step 4 Measurement No Port No or ID Go to step 3 Menu Meas No Strip S ...

Page 128: ...ID of the result you want using the alphanumeric keys An ID can contain up to 18 digits and can include numbers alphabet and special characters see page 1 45 Go to step 2 The ID can also be input by having the optional hand held barcode reader read a barcode from the labeled sample REFERENCE For detailed instructions see ID in Entering Alphanumerics in 1 7 3 Menu Operations and Examples on page 1 ...

Page 129: ... ID edit window 3 Enter a correct ID number An ID can contain up to 18 digits and can include numbers alphabet and special characters see page 1 45 The ID can also be input by having the optional hand held barcode reader read a barcode from a labeled sample REFERENCE For detailed instructions see ID in Entering Alphanumerics in 1 7 3 Menu Operations and Examples on page 1 45 To correct the entry p...

Page 130: ... press Menu to go to the Main menu screen 2 Press 2 to go to the Results screen 3 Press 4 to go to the Delete screen 2 Select the type of data you want to delete 1 Select the type of data you want to delete using the hyphen key The available options include All Normal STAT measurements Control measurement Check measurement and Trouble list 2 Press OK You will be asked if you want to delete the dat...

Page 131: ...ete the data 1 Press OK to delete the data from memory The Results screen will appear again 2 Press Go back twice on the Results screen to return to the standby screen Delete 2400 2006 01 09 11 00 Measurement Normal STAT measurements OK Cancel Delete data ...

Page 132: ...contact your distributor 1 Access the setup screen 1 On the standby screen press Menu to go to the Main menu screen 2 Press 3 to go to the Initial settings screen 3 Press 1 to go to the System clock setup screen 2 Adjust the date and time 1 Below Date enter the date of today To move through the year month and day entry fields press the hyphen key To move down to the Time entry field press 2 Below ...

Page 133: ...rinter has been disabled it does not print any information 1 Access the setup screen 1 On the standby screen press Menu to go to the Main menu screen 2 Press 3 to go to the Initial settings screen 3 Press 2 to go to the Printer setup screen System clock setup 3100 2006 01 09 11 07 Date 05 10 11 YY MM DD Time 19 25 BS OK Cancel Menu Meas No Strip S G Cal Main menu 0000 2006 01 09 11 00 1 Parameter ...

Page 134: ...to save the new setting 3 Save your setting 1 Press OK to save your setting The Initial settings screen will appear again NOTE Keep the power on while saving the setting 2 Press Go back twice on the Initial settings screen to return to the standby screen Printer setup 3200 2006 01 09 11 00 Use No use Use OK Cancel Printer setup 3200 2006 01 09 11 00 Use No use No use OK Cancel Save setting changes...

Page 135: ...to go to the Initial settings screen 3 Press 3 to go to the External output setup screen 2 Enable or disable the external output 1 Below Use No use select Use or No use using the hyphen key 2 Press OK A message window will open to ask if you want to save the new setting Menu Meas No Strip S G Cal Main menu 0000 2006 01 09 11 00 1 Parameter settings 2 Results 3 Initial settings 4 Print 5 Maintenanc...

Page 136: ...controlled in 10 levels from 00 muted to 09 max 1 Access the setup screen 1 On the standby screen press Menu to go to the Main menu screen 2 Press 3 to go to the Initial settings screen 3 Press 4 to go to the Beeper volume setting screen External output setup 3300 2006 01 09 11 00 Use No use No use OK Cancel Save setting changes Menu Meas No Strip S G Cal Main menu 0000 2006 01 09 11 00 1 Paramete...

Page 137: ...keys Selecting 00 mutes the sound 2 Press OK A message window will open to ask if you want to save your setting 3 Save your setting 1 Press OK to save your setting The Initial settings screen will appear NOTE Keep the power on while saving the setting 2 Press Go back twice on the Initial settings screen to return to the standby screen Beeper volume setting 3400 2006 01 09 11 00 Beeper volume 05 OK...

Page 138: ... screen 2 Press 4 to go to the Print screen 3 Press 1 to go to the Trouble list screen 2 Specify a range of history 1 Specify the range of history to print To move through the year month and day entry fields press the hyphen key To move from the start date field left field to the end date field right field press For detailed information on setting dates see Date in 1 7 3 Menu Operations and Exampl...

Page 139: ...esults List If you obtain abnormal results try to print the abnormal results list to determine the causes by the error messages The abnormal results list includes error information related to measurement results that have recorded after powering on 1 Access the setup screen 1 On the standby screen press Menu to go to the Main menu screen 2 Press 4 to go to the Print screen System clock setup 3100 ...

Page 140: ...inting the Current Parameter Settings You can obtain a list of parameter settings that includes printer and external output use beeper volume and the type of test strips for each feeder 1 Access the setup screen 1 On the standby screen press Menu to go to the Main menu screen 2 Press 4 to go to the Print screen Print 4000 2006 01 09 11 00 1 Trouble list 2 Abnormal results list 3 Parameter settings...

Page 141: ...arameter settings will be printed out After the completion of printing the Print screen will appear again 2 Press Go back twice on the Print screen to return to the standby screen Print 4000 2006 01 09 11 00 1 Trouble list 2 Abnormal results list 3 Parameter settings Parameter settings 4300 2006 01 09 11 00 1 Initial settings Go back Parameter settings 4310 2006 01 09 11 00 Printing Please wait St...

Page 142: ...aintenance tasks were last performed S G calibration S G cell washout washing bath tray cleaning and check measurement This page 3 6 1 Viewing Maintenance Information You can view a list of dates when maintenance tasks were last performed These tasks include S G calibration S G cell washout washing bath and transport tray cleaning and check measurement 1 Access the setup screen 1 On the standby sc...

Page 143: ...ntenance tasks were performed 2 Press Go back three times on the Maintenance information screen to return to the standby screen Maintenance information 5400 2006 01 09 11 00 S G calibration 2006 01 08 12 00 S G cell washout 2006 01 05 10 25 Clean washing bath and tray 2006 01 05 13 55 Check measurement 2006 01 05 15 20 Go back ...

Page 144: ...ing the Washing Solution 4 15 4 3 2 Replacing the Thermal Printer Paper 4 17 4 4 Regular Maintenance 4 18 4 4 1 Washing the Air Filter 4 18 4 4 2 Washing the Transport Tray 4 19 4 4 3 Cleaning the S G Cell 4 24 4 4 4 Cleaning the Washing Bath 4 26 4 4 5 Replacing the Washing Solution Filter 4 29 4 4 6 Replacing the Drain Pinch Valve Tubes 4 30 4 4 7 Replacing the White Plate 4 32 4 5 Before After ...

Page 145: ...Maintenance task Cycle See page s Waste box cleaning Every day or before reaching 400 measurements 4 3 Liquid waste disposal drain bottle Every day or before reaching 600 measurements 4 5 Feeder cleaning Every three days 4 6 Test strip stopper cleaning Every three days 4 8 Introduction tray washout Every three days 4 12 Washing solution replacement Every 600 measurements 4 15 Thermal printer paper...

Page 146: ...out If warning W004 occurs due to the waste box reaching capacity dispose of the test strips immediately Prepare Alcohol cloth and protective gloves Wear protective gloves to prevent exposure to pathogenic microbes Discard used test strips and protective gloves in accordance with local regulations for biohazardous waste 1 Discard used test strips from the waste box 1 Make sure the standby screen i...

Page 147: ...ox tray Ensure the waste box guides fit the concaves inside the tray 2 Store the waste box tray in the instrument If the waste box is correctly set in the tray it is held steadily by the magnets If the waste box gets caught halfway it is set incorrectly NOTE Ensure the waste box correctly fits into the tray before pushing it in Incorrect installation may cause used test strips to be scattered arou...

Page 148: ...ive gloves to prevent exposure to pathogenic microbes Discard liquid waste and protective gloves in accordance with local regulations for biohazardous waste 1 Discard liquid waste 1 Make sure the standby screen is displayed Do not try to discard liquid waste while the instrument is mechanically working e g measuring samples Uncapping the drain bottle in operation may splash the liquid from the tub...

Page 149: ...d blower brush tissue paper and protective gloves IMPORTANT Wear protective gloves when taking the test strips out of the feeders Do not touch the pad area on the test strips with unprotected hands Test strips contaminated with sebum may produce incorrect results 1 Turn off the power 1 Make sure the standby screen is displayed then press the standby switch to turn off the power 2 Take the test str...

Page 150: ...r 1 Blow dust off the roller using the blower brush Carefully remove dust as much as possible from the loading slot shown in the right figure Rotating the roller by hand clean the internal surfaces entirely 2 Load the test strips that were taken out in step 2 2 back into the feeder 3 Close the feeder cover a Turn the locking lever to lock the cover b 4 Clean the other feeder using the same procedu...

Page 151: ... tissue paper and protective gloves IMPORTANT Wear protective gloves when taking the test strips out of the feeders Do not touch the pad area on the test strips with unprotected hands Test strips contaminated with sebum may produce incorrect results 1 Turn off the power 1 Make sure the standby screen is displayed then press the standby switch to turn off the power 2 Take the test strips out of the...

Page 152: ...he right The feeder unit is locked with the latch shown with the circles in the figure So first you need to pull the whole feeder unit to the right with a little force to open the latch NOTE Do not apply excessive pressure to the feeder unit when in the tilted position as this may cause damage to the instrument 5 Clean the test strip stopper and roller 1 Loosen the knurled screw on the test strip ...

Page 153: ...topper and roller 4 Blow dust off the stopper using the blower brush 5 Blow dust off the roller using the blower brush NOTE The shaded area in the right figure attracts particles from the test strips Blow the dust off using the blower brush 6 Insert the test strip stopper in the direction of the arrow to attach it to the feeder unit a 7 Close the stopper b Test strip stopper Roller Test strip stop...

Page 154: ...the feeder unit straight up Once the feeder is standing up straight press the feeder downward until the latch clicks and the unit locks in place 2 Close the side cover a feeder protective cover b and maintenance cover c in that order Knurled screw Test strip stopper Feeder unit Feeder protective cover a b c Side cover Maintenance cover ...

Page 155: ... to prevent exposure to pathogenic microbes Discard used cleaning tools and protective gloves in accordance with local regulations for biohazardous waste NOTE Do not use thinner or other organic solvents to wash the introduction trays Do not subject the tray to ultrasonic cleaning Inappropriate cleaning may deform or discolor the tray possibly making it unusable 1 Turn off the power 1 Make sure th...

Page 156: ...rms lift the introduction tray up at an angle and remove the tray NOTE Avoid strong impact to the introduction arms while removing the introduction tray These arms are made of fragile materials NOTE Be careful not to touch the nozzle while removing the introduction tray 5 Wash and sterilize the introduction tray 1 Sterilize the introduction tray with alcohol 2 Rinse the tray using a sponge to thor...

Page 157: ... you feel some resistance and hear a click NOTE Be careful not to hit the introduction arms while installing the tray 7 Close the covers 1 Stand the feeder unit straight up Once the feeder is standing up straight press the feeder downward until the latch clicks and the unit locks in place 2 Close the side cover a feeder protective cover b and maintenance cover c in that order Introduction arms Arr...

Page 158: ...orrect measurement results or even cause trouble 1 Remove the washing solution bottle 1 Make sure the standby screen is displayed 2 Uncap the washing solution bottle and discard the remaining solution 3 Rinse the bottle with purified water to wash out old solution 2 Prepare new washing solution 1 Dilute concentrated washing solution 3 with purified water NOTE Check the correct dilution rate on the...

Page 159: ...4 16 AX 4030 AUTION MAX AX 4030 OPERATING MANUAL 3 Install the washing solution bottle 1 Remove the sealing film from the washing solution bottle 2 Cap the bottle and place it where it was ...

Page 160: ... 1 Take the old paper roll out of the printer 1 Make sure the standby screen is displayed 2 Press the printer cover button to open the cover 3 Take the old paper roll from the printer 2 Load a new paper roll 1 Orient a new paper roll so the paper can unroll from the bottom and place it in the paper compartment 2 Pull out about 1 cm of paper from the printer cover when it closes 3 Gently press the ...

Page 161: ...ntil the cooling fan comes to a complete stop Make sure the cooling fan stops completely before proceeding to the next step Failure to do so may result in injury 2 Remove the air filter 1 Pull the cooling fan cover toward you and remove it 2 Remove the air filter 3 Wash the air filter 1 Wash the filter thoroughly under running tap water to remove accumulated dust 2 Gently wring out the filter to r...

Page 162: ... tray Improper procedures may misalign the tray from the designated position This may hinder smooth transportation of the test strips consequently producing incorrect results NOTE Do not use thinner or other organic solvents to wash the transport and introduction trays Do not subject the trays to ultrasonic cleaning Inappropriate cleaning may deform or discolor the trays possibly making it unusabl...

Page 163: ... of the instrument and sterilize it See steps 2 to 5 in 4 2 5 Washing the Introduction Tray on page 4 12 NOTE The introduction and transport trays are similar in shape It is recommended to wash the introduction tray first and keep it in another place When washing the two trays at the same time handle the trays with care not to confuse them Clean washing bath and tray 5200 2006 01 09 11 02 Preparin...

Page 164: ...strument NOTE Be careful not to touch the nozzle when removing the transport tray 6 Wash and sterilize the transport tray 1 Sterilize the introduction tray with alcohol 2 Rinse the tray using running water to thoroughly remove dirt NOTE Do not use hot water to rinse the tray so as to avoid deformation NOTE Protect the tray from scratches which may prevent smooth transportation of test strips NOTE ...

Page 165: ...uides and a click is heard NOTE Keep the tray horizontally while installing it Do not insert the tray at a slant 8 Install the introduction tray 1 Insert the introduction tray along the introduction arms in the grooves until the tray is sitting flat 2 Slide the tray backward until the arrow marks are completely visible Push the tray until you feel some resistance and hear a click NOTE Take care no...

Page 166: ...straight press the feeder downward until the latch clicks and the unit locks in place 2 Close the front cover a the side cover b feeder protective cover c and maintenance cover d in that order 3 If necessary press the standby switch to turn on the power Feeder unit Feeder protective cover Front cover b c d a Side cover Maintenance cover ...

Page 167: ...detergent 1 Transfer 2 mL or more detergent into a sample tube 2 Make sure the standby screen is displayed and load the sample tube into the STAT port 3 While pressing the PUSH mark slide the STAT port backward and push it in place Then gently pull the port out to make sure the port is locked with the stopper 2 Flush the S G cell 1 On the standby screen press Menu to go to the Main menu screen 2 P...

Page 168: ...ment will flush the flow lines and displays the Maintenance screen again 3 When washout is completed The end process will automatically start and then the Maintenance screen will appear again Press Go back twice on the Maintenance screen to return to the standby screen Maintenance 5000 2006 01 09 11 00 1 S G cell washout 2 Clean washing bath and tray 3 Check measurement 4 Maintenance information S...

Page 169: ...taminated Prepare Purified water cotton swabs and protective gloves Wear protective gloves to prevent exposure to pathogenic microbes Discard used cleaning tools and protective gloves in accordance with local regulations for biohazardous waste 1 Move the nozzle Move the nozzle to make enough room for you to access the washing bath 1 On the standby screen press Menu to go to the Main menu screen 2 ...

Page 170: ...ted REFERENCE Trouble T290 will occur if the cover is opened with the power on 3 Open the front cover 1 Open the front cover Maintenance 5000 2006 01 09 11 00 1 S G cell washout 2 Clean washing bath and tray 3 Check measurement 4 Maintenance information Clean washing bath and tray 5200 2006 01 09 11 02 Preparing for cleaning Please wait Clean washing bath and tray 5200 2006 01 09 11 03 Power off f...

Page 171: ...ch the nozzle while cleaning the washing bath and port NOTE After cleaning check inside the washing bath and port for lint or other dust which may cause the flow line filter to clog 5 Close the cover and turn on the power 1 Close the front cover 2 Press the standby switch to turn on the power Allow the instrument to warm up The nozzle will automatically return to its home position Washing port Lev...

Page 172: ...dby switch to turn off the power 2 Replace the washing solution filter 1 Turn the filter holder by hand to disassemble it and remove the filter with tweezers 2 Fit a new filter into the recess of the filter holder NOTE The washing solution filter is easily deformed Handle the filter with care 3 Screw the filter holder in to assemble it 3 Check for leaks 1 Press the standby switch to turn on the po...

Page 173: ...ves Wear protective gloves to prevent exposure to pathogenic microbes Discard used cleaning tools and protective gloves in accordance with local regulations for biohazardous waste 1 Turn off the power 1 Make sure the standby screen is displayed then press the standby switch to turn off the power 2 Open the covers 1 Open the maintenance cover 2 Open the feeder protective cover The cover stops at a ...

Page 174: ...pinch valve has two hooks The tube must pass through the backward hook 4 Close the covers 1 Close the side cover a feeder protective cover b and maintenance cover c in that order NOTE After replacing the tubes check trouble T280 does not occur at the next startup If it occurs check the bottom of the instrument and drain tube connections for leaks If there is a leak secure the connections Replaceab...

Page 175: ...ke sure the standby screen is displayed then press the standby switch to turn off the power 2 Remove the white plate cover 1 Open the front cover 2 Remove the white plate cover Use the Phillips screwdriver to loosen the two screws on the cover and slide the cover up to remove it 3 Move the optical block 1 Slide the optical block backward by hand to make enough room for you to access the white plat...

Page 176: ...th sebum whereby producing incorrect results 2 Attach the black sticker to cover the opening 3 Attach the white plate cover Ensure the cover is inserted in the slit between the two plates Use a Phillips screwdriver to tighten the screws 6 Close the cover and turn on the power 1 Close the front cover 2 Press the standby switch to turn on the power Allow the instrument to warm up The optical block w...

Page 177: ...s purified water alcohol blower brush tissue paper and protective gloves Wear protective gloves to prevent exposure to pathogenic microbes Discard used cleaning tools and protective gloves in accordance with local regulations for biohazardous waste 1 Wash the S G cell 1 Wash the S G cell See 4 4 3 Cleaning the S G Cell on page 4 24 Keep the power on after the completion of the washout 2 Clean the ...

Page 178: ... 3 Cleaning the Feeders on page 4 6 2 Clean the waste box See 4 2 1 Cleaning the Waste Box on page 4 3 3 Wash the introduction and transport trays See 4 4 2 Washing the Transport Tray on page 4 19 5 Discharge the purified water from the flow lines 1 Make sure the standby screen is displayed then press the standby switch to turn off the power 2 Uncap the washing solution bottle Place the cap on tis...

Page 179: ...tle 1 Uncap the washing solution bottle and discard the water 2 Cap the washing solution bottle 8 Discard liquid waste 1 Discard the liquid waste in the drain bottle Wash and sterilize the bottle and place it where it was See 4 2 2 Discarding Liquid Waste from the Drain Bottle on page 4 5 9 Unplug the power cord 1 Pull out the power cord from the receptacle REFERENCE The type of power cord supplie...

Page 180: ... cord into an AC receptacle 2 Press the ON side of the main power switch 3 Press the standby switch to turn on the power During warm up the instrument will fill the flow lines with washing solution 3 Load the test strips 1 Make sure the standby screen is displayed 2 Load the test strips into the feeders See 2 3 3 Loading Test Strips into the Feeders on page 2 16 IMPORTANT The quality of the test s...

Page 181: ...4 38 AX 4030 AUTION MAX AX 4030 OPERATING MANUAL ...

Page 182: ...ement Related Messages 5 17 5 4 1 Results Related Errors Printed Results Reports on the lowest line 5 17 No sample 5 17 Skipped 5 17 Reflection light intensity drift 5 17 Excess reflectivity 5 18 Test strip out of position 5 18 Abnormal sampling 5 18 5 4 2 S G Measurement Related Errors Printed Results Report S G 5 19 UNDER 5 19 OVER 5 19 5 19 CAL ERR 5 19 5 4 3 Turbidity Measurement Related Error...

Page 183: ...strument will wait for the ongoing measurement to complete if there are test strips reacting with samples inside 2 Consecutive short beeps sound for about 10 seconds and a warning code appears along with a message If a warning occurs while on standby the instrument will be brought to this status immediately 3 Check the warning code and message and take the necessary action to remove the cause See ...

Page 184: ...explained in the operating manual and try again Cause There is no sample in the STAT port or the sample is incorrectly placed in the STAT port Remedy Place the sample in the STAT port correctly see page 2 27 Press OK to clear the warning W003 The washing solution has run out Add fresh washing solution to continue Cause 1 The washing solution bottle is empty 2 The liquid sensor of the washing solut...

Page 185: ...e the feeder cover Press OK to clear the warning W007 Replace the white plate to adjust LED intensity and then cancel this warning Cause The white plate in the optical unit is dirty or has deteriorated Remedy Replace the white plate with a new one see page 4 32 Press OK to clear the warning W008 The test strip type for the selected feeder is not specified Press Continue to use test strips in the m...

Page 186: ...lapsed since the last calibration Remedy Press OK to clear the warning Perform S G calibration to update the result see page 2 34 and retry the tests W011 The test strips are not sent out of the feeder correctly To continue measurement mix the test strips in the feeder Cause Several test strips are trapped inside the feeder or sticking together Remedy Mix the test strips in the feeder Press OK to ...

Page 187: ...rips reacting with samples 2 Consecutive short beeps sound for about 10 seconds and an error code appears on the screen If an error occurs while on standby the instrument will be brought to in this status immediately 3 Check the error code and press OK to stop the beeping 4 Take the necessary action to clear the error See 5 2 2 Causes and Remedies on page 5 7 5 Run the tests on the samples that co...

Page 188: ...ntally turned off during measurement Remedy Press OK to clear the error Allow the instrument to warm up When the instrument puts itself on standby retry testing the remaining samples E103 Battery voltage error Cause The backup battery naturally discharged while the instrument was not in use for several days Remedy Press OK to clear the error Keep the instrument powered on for at least 25 hours to ...

Page 189: ...ration failure Cause 1 No sample rack was placed in the sampler 2 The low and high solutions are not loaded in the appropriate ports of the sample rack 3 The volume of S G standard solution in the sample tubes is insufficient 4 The S G standard solutions are inadequate in specific gravity value Remedy 1 Press OK to clear the error Correctly place the sample rack containing the S G standard solutio...

Page 190: ...unication cable to both the instrument and host E140 Test strip marker error Cause The test strip type detected from the strip marker and the test strip type setting do not match Remedy Press OK to clear the error Make the correct setting for the type of test strips loaded into the feeder see page 2 16 Check the feeder contains the correct type of test strips and remove the wrong types of test str...

Page 191: ...ion describes the procedure from trouble notification to remedy 1 While measurement is in progress the message Error trouble occurred appears to notify you that trouble or an error has occurred The instrument will cease operations For some troubles the instrument will wait for the ongoing measurement to complete if one or more test strips inside are still under reaction 2 Two different long tones ...

Page 192: ... used samples test strips and protective gloves in accordance with local regulations for biohazardous waste T999 Unknown trouble Cause A system failure occurred Remedy Take notes of what appears on the screen and contact your distributor T201 Data ROM trouble Cause 1 The main ROM version has been upgraded 2 Trouble occurred in the flash ROM that stores the parameter settings Remedy 1 and 2 Press O...

Page 193: ...le Check the test strip transport section If the section is damaged turn off the power and contact your distributor T212 Test strip identification section drive trouble Cause The test strip flip section of the feeder is clogged with test strips Remedy Press OK to clear the trouble Remove the clogged test strips from the feeder T220 Optical unit drive trouble Cause 1 The transport tray is not insta...

Page 194: ...bstacles that are blocking the measurement light and the optical unit movement 3 Press OK to clear the trouble Install the transport tray correctly Remove the obstacles that are blocking the measurement light and the optical unit movement Remove the test strips scattered on the analysis section 4 Press OK to clear the trouble Replace the white plate with a new one see page 4 32 and perform a check...

Page 195: ... the trouble Pull out the waste box and discard the used test strips see page 4 3 T230 Feeder drive trouble Cause 1 Damaged or wrong type of test strips are loaded in the feeder Or test strip waste has accumulated in the feeder 2 The feeder did not work correctly Remedy 1 Press OK to clear the trouble Remove the clogged test strips from the feeder and clean the feeder see page 4 6 Load the specifi...

Page 196: ... the tube and retry cleaning operation T250 S G hydrometer trouble Cause The S G hydrometer is not connected correctly Remedy Press OK to clear the trouble Turn off the power and contact your distributor T251 Turbidimeter trouble Cause The turbid Hb color cell is dirty or the tubing is clogged Remedy Press OK to clear the trouble Wash the S G cell see page 4 24 T252 Tintometer trouble Cause The tu...

Page 197: ...lear the trouble Take the sample racks out of the sampler 2 Press OK to clear the trouble Check the sampler If the sampler is damaged turn off the power and contact your distributor T272 Loading side full Cause Another rack was added to the loading side when the sampler was fully loaded with 5 racks Remedy Press OK to clear the trouble Take the sample racks out of the loading side of the sampler T...

Page 198: ...ve gloves in accordance with local regulations for biohazardous waste No sample Description No sample was detected Cause The sample tube is empty Remedy Ensure the sample tube contains at least 2 mL of sample and the sample level is 40 mm above the bottom of the tube Retry measurement Skipped Description The sample was not measured Cause 1 The host instructs the instrument not to measure the sampl...

Page 199: ...e the instrument is not in operation then press the standby switch to turn off the power Pull out the transport tray Remove test strips scattered around Attach the transport tray and close the covers Press the standby switch to turn on the power and retry measurement Abnormal sampling Description The nozzle could not drop the sample on the test strip Cause 1 The sample is unacceptable to the instr...

Page 200: ...mples Discard used samples test strips and protective gloves in accordance with local regulations for biohazardous waste UNDER The S G cell is dirty Cause The result obtained from S G measurement is lower than the allowable range Remedy Wash the S G cell see page 4 24 Retry measuring the sample OVER The S G cell is dirty Cause The result obtained from S G measurement is higher than the allowable r...

Page 201: ...elow The abnormal results list includes only the errors that occurred after power on If an error persists turn off the power and contact your distributor Wear protective gloves to prevent exposure to pathogenic microbes before any operation that may expose you to samples Discard used samples test strips and protective gloves in accordance with local regulations for biohazardous waste Barcode misre...

Page 202: ... Abnormal colored urine was measured or the obtained result includes abnormal data Remedy Check the sample Positive sample Description The obtained result includes positive values for one or more measurement items Cause The instrument measured a positive sample Remedy Check the sample S G measurement error Description The instrument could not obtain a correct S G calibration result Cause 1 No S G ...

Page 203: ... specified capacity Over or under rated fuses can lead to equipment damage and fire Make sure you have fuses of correct capacity before replacement NOTE If the fuses blow soon after the replacement there is something wrong with the instrument In such case contact your distributor 1 Turn off the power 1 Press the standby switch to turn off the power The green light turns off 2 Turn off the main swi...

Page 204: ...om the fuse holder 3 Insert a new fuse 1 Insert a new fuse into the fuse holder making sure it stands up straight 2 Store the fuse holder as before Lift the holder from the bottom and rotate it backward until it clicks in place Push the holder in until it stops 4 Turn on the power 1 Plug in the power cord 2 Press the main power switch Press the I on side of the switch on the rear panel 3 Press the...

Page 205: ......

Page 206: ......

Reviews: