background image

19 Appendix C: FCC Compliance Information 

(con’t)

Re

co

m

m

en

de

d s

ep

ar

at

io

n d

ist

an

ce b

et

we

en p

or

ta

bl

e a

nd m

ob

ile RF C

om

m

un

ic

at

io

ns e

qu

ip

m

en

an

d t

he F

re

eS

ty

le N

av

ig

at

or sy

st

em.

Tab

le 3.

 Th

e F

re

eS

ty

le N

av

ig

at

or s

ys

te

m i

s in

te

nd

ed f

or u

se in a

n e

lec

tro

m

ag

net

ic e

nv

iro

nm

en

t in 

wh

ich r

adi

at

ed RF di

stur

ba

nc

es a

re c

on

tro

lle

d. Th

e c

us

to

m

er o

r t

he u

se

r o

f t

he F

re

eS

ty

le N

av

ig

at

or 

sy

ste

m c

an h

elp p

re

ve

nt e

lec

tro

m

ag

net

ic in

te

rfe

re

nc

e b

y m

ain

ta

in

in

g a m

in

im

um di

sta

nc

e b

et

we

en 

po

rt

ab

le a

nd m

ob

ile RF c

om

m

un

ica

tio

ns e

qui

pm

en

t (t

ra

ns

m

itt

er

s) a

nd t

he F

re

eS

ty

le N

av

ig

at

or s

ys

te

as r

ec

om

m

en

de

d b

elo

w, a

cc

or

din

g t

o t

he m

axim

um o

ut

pu

t p

ow

er o

f t

he c

om

m

un

ica

tio

ns e

qui

pm

en

t. 

Ra

di

at

ed m

axi

m

um p

ow

er o

Tr

an

sm

itt

er W

Se

pa

ra

tio

n d

ist

an

ce a

cc

or

di

ng t

o f

re

qu

en

cy o

f t

ra

ns

m

itt

er (m)

80 – 800MH

z

d = 1.2 


800MH

z - 3GH

z

d = 2.3 


0.01

0.12

0.23

0.1

0.38

0.73

1

1.20

2.30

10

3.79

7.27

100

12.00

23.00

Fo

r T

ra

ns

m

itt

er

s r

at

ed a m

axim

um o

ut

pu

t p

ow

er n

ot li

ste

d a

bo

ve

, t

he r

ec

om

m

en

de

d s

ep

ar

at

io

di

sta

nc

e d in m

et

er

s (m) c

an b

e e

stim

at

ed u

sin

g t

he e

qu

at

io

n a

pp

lic

ab

le t

o t

he f

re

qu

en

cy o

f t

he 

tra

ns

m

itt

er w

he

re P i

s t

he m

axim

um o

ut

pu

t p

ow

er r

at

in

g o

f t

he t

ra

ns

m

itt

er in w

at

ts (W

) a

cc

or

din

g t

th

e t

ra

ns

m

itt

er m

an

uf

ac

tur

er

.

No

te 1:

 A

t 8

0 MH

z a

nd 800MH

z t

he s

ep

ar

at

io

n di

sta

nc

e f

or t

he h

ig

he

r f

re

qu

en

cy r

an

ge a

pp

lie

s.

No

te 2:

 Th

es

e gui

de

lin

es m

ay n

ot a

pp

ly in a

ll s

itu

at

io

ns. E

lec

tro

m

ag

net

ic p

ro

pa

ga

tio

n i

s a

ffe

ct

ed b

ab

so

rp

tio

n a

nd r

efl

ec

tio

n f

ro

m s

tr

uc

tur

es, o

bj

ec

ts a

nd p

eo

pl

e.

No

te 3:

 1 m

et

er = 3.28 f

eet

.

Cu

st

om

er C

ar

e: 1-866-597-5520

 168 

Section 19


Appendix C: Classification/Compliance/Declaration

Summary of Contents for FREESTYLE NAVIGATOR

Page 1: ...6 162 611 6 175 752 6 284 478 6 299 757 6 329 161 6 338 790 6 461 496 6 484 046 6 503 381 6 514 718 6 560 471 6 565 509 6 591 125 6 592 745 6 605 200 6 605 201 6 616 819 6 618 934 6 676 816 6 749 740 6 893 545 6 932 894 6 942 518 6 973 706 6 990 366 7 003 340 7 003 341 7 074 308 7 090 756 7 299 082 Abbott Diabetes Care Inc 1360 South Loop Road Alameda CA 94502 2008 Abbott ART16072 Rev A 05 08 User...

Page 2: ......

Page 3: ...erformed The FreeStyle Navigator Continuous Glucose Monitoring System provides a built in blood glucose meter to confirm the continuous glucose result The FreeStyle Navigator Continuous Glucose Monitoring System provides real time readings graphs trends and glucose alarms directly to the user The FreeStyle Navigator Continuous Glucose Monitoring System is intended to be used in home settings to ai...

Page 4: ......

Page 5: ... reached the end of the Section If you find it difficult to use the guide or if you seem lost or confused use the table of contents index glossary and appendices to help you The table of contents provides a list of Sections you will find in this guide and what each Section contains The appendices have useful information that you may want to refer to The glossary provides a list of terms and what t...

Page 6: ... Your Sensor Sensor Insertion Sites Prepare the Insertion Site How Long Can You Wear the Sensor Reconnect the Transmitter and Receiver n Section 6 Attach your Transmitter 47 50 Attach the Transmitter Sensor Code n Section 7 Calibrate your System Test Blood Glucose Manually 53 63 System Calibration Time to Perform Calibration Sample Calibration Schedules Perform Blood Glucose Tests Interpret Your B...

Page 7: ...smitter Clean Your Receiver Clean Your Receiver Skin n Section 14 Link and Unlink your Transmitter and Receiver 131 133 Link and Unlink your System What is the Difference Between Linking and Reconnecting n Section 15 Reset User Settings 137 138 Reset Settings n Section 16 Change Country Settings 141 144 Change Language Date and Time Formats Decimal Point format n Section 17 Appendix A Site Mainten...

Page 8: ......

Page 9: ...1 Getting Acquainted ...

Page 10: ... n in vitro n Interstitial Fluid n Left Right Option Buttons n Receiver n Receiver Display Screen n Receiver Test Strip Port n Reports n Sensor n Sensor Delivery Unit n Sensor Inserter n Sensor Insertion Button n Sensor Locking Pin n Sensor Release Tabs n Sensor Support Mount n Transmitter n Transmitter Tabs n Up Down Arrow Buttons Customer Care 1 866 597 5520 ...

Page 11: ...lin exercise and diabetes medication affect your glucose levels and to adjust your treatment plan accordingly Your FreeStyle Navigator system has a number of helpful features Wireless communication between the transmitter and receiver Disposable sensor that can be worn up to 5 days Alarms to alert you to low or high glucose levels hypoglycemia or hyperglycemia before reaching those low and high gl...

Page 12: ...Solution and Insert 1 Vial of 50 FreeStyle Strips and Strip Insert 1 Warranty Registration Card The Sensor Kit 6 Sterile Sensor Delivery Units each containing a sensor and Product Insert 1 Silver Oxide 357 HC Replacement Battery for the transmitter In addition the FreeStyle Navigator system can transfer data to a computer wirelessly using Bluetooth technology Important Notes The F reeStyle Navigat...

Page 13: ...e level Sensor Tip Part of sensor inserted into your skin Locking Pin Prevents accidental discharge must be removed before insertion Insertion Button Pushes a tiny needle into the skin to place the sensor tip just under the surface of the skin Sensor Inserter Inserts the sensor into the skin Must be disposed after inserting the sensor Sensor Support Mount Stays on your skin after sensor is inserte...

Page 14: ...n For more details on the different symbols and icons on the screen see Section 9 on Daily Use Key features of the System Statistics Alarms Event Log Line Graph Customer Care 1 866 597 5520 4 Section 1 Getting Acquainted Stats 21 day 08 30A Highest CM 298 mg dL Lowest CM 61 mg dL Ave CM 160 mg dL Std Dev 20 mg dL Above Target 19 Next Back Select Event 08 30A Insulin Meals Exercise State of Health ...

Page 15: ... a commercial aircraft Follow the guidelines below when traveling Always check with local authorities prior to departure as rules and regulations may change without notice At the airport Notify the security personnel of the presence of the device when going through the security systems On the plane Check with your airline before departure whether the device will be permitted aboard the aircraft Th...

Page 16: ...irst and then in the receiver see Section 2 o Set the time and date see Section 3 o Perform a control solution test see Section 4 o Insert your sensor see Section 5 o Attach your transmitter see Section 6 o Calibrate your receiver when prompted see Section 7 o Set the alarms in the receiver see Section 8 Note This can be done while waiting to perform the first calibration Result Your system is ope...

Page 17: ...e If the problem continues discard the old sensor and insert a new sensor You should never reset your user settings when you are wearing a sensor This will reset parameters that may affect your system performance If you accept an incorrect transmitter ID when linking your Transmitter and Receiver your glucose readings will be incorrect Do NOT use the sensor delivery unit if the sterile package is ...

Page 18: ...ensor insertion If you get a request for a calibration or expect additional calibration requests during a time when you do not want to be disturbed e g sleep time you can choose to wait to perform additional BG tests at a later point in time If you choose to wait and the allotted time window for calibration has expired please note that you will not get glucose results until you have performed a su...

Page 19: ...in environments that are oxygen rich or that contain a combustible gas The radio receiver and transmitter of your FreeStyle Navigator system operate on the frequency of 433 6 MHz Primary users of this frequency band include amateur HAM radio transmitters Because of the coexistence of the FreeStyle Navigator radio connection and HAM transmitters there may be instances where the connection between y...

Page 20: ...ting your glucose levels in the Blood Glucose mode differences in the blood circulation in your finger or palm at the base of your thumb and other test sites forearm upper arm hand thigh or calf may result in different glucose readings Differences in blood glucose readings between your finger or palm at the base of your thumb and other test sites forearm upper arm hand thigh or calf may be observe...

Page 21: ... hypoglycemia the only signs or symptoms you may have would be due to the effects of low blood glucose on the brain Irritability Tiredness Confusion Forgetfulness Pale skin Slurred speech Loss of consciousness This condition is potentially dangerous because hypoglycemia confusion can occur without warning If you were driving a car or operating heavy machinery confusion or delayed reaction could ca...

Page 22: ...ose BG You will perform traditional blood glucose testing BG testing in the Blood Glucose mode using a FreeStyle Test Strip and a drop of blood You can use the Blood Glucose mode whenever you wish to perform a traditional blood glucose test It is also used for calibrating the system Blood Glucose mode tests used for calibrating the system can also be relied on like traditional blood glucose tests ...

Page 23: ...2 Install or Replace Transmitter and Receiver Batteries ...

Page 24: ...Section 2 Key Terms n Alarm n Icon n Receiver n Transmitter n Battery Life n Alkaline Batteries n 357 HC Silver Oxide Battery n Reconnect Customer Care 1 866 597 5520 ...

Page 25: ...nsert a new sensor after each battery replacement you should replace the batteries just before you insert a new sensor For example if you drop your receiver and the batteries fall out you will have to insert a new sensor After installing the transmitter or receiver batteries allow a couple of minutes for the system to recognize new batteries You may then access the status of the battery life from ...

Page 26: ... Note The receiver skin must be removed in order to access the receiver s battery door Locate the battery door on the back of the receiver a Press down on the ridged part of the battery door to b slide the battery door completely out Remove old batteries if any and discard them properly c Note Be sure to finish within 5 minutes to prevent losing the date and time settings Insert the new batteries ...

Page 27: ...y Go to Check your work You may not see the icon if you have connection between the transmitter and receiver Reconnect the transmitter and receiver if you see the icon The time and date need to be set Go to Step 4 of Section 3 Set the Time and Date After setting the time and date reconnect the transmitter and receiver Then Check your work Select the mode that you want the system to operate in Go t...

Page 28: ...e battery in the transmitter is new and ensure that the receiver and transmitter are linked see Section 14 Note If the transmitter and receiver are connected properly the disconnect icon will not appear on the screen END OF Section 2 Check your work Result An operational system You have done this procedure correctly when o The batteries have been installed and the battery doors have been closed se...

Page 29: ...3 Set the Time and Date ...

Page 30: ...Section 3 Key Terms n Left Right Option Buttons n Main Menu n Receiver n System Menu n Transmitter n Up Down Arrow Buttons Customer Care 1 866 597 5520 ...

Page 31: ... time If you make a mi stake or want to exit from the Set Date Time screen simply leave the receiver alone for 12 seconds It will automatically turn off and any changes you made will be cancelled or cleared If you change the time and or d ate in the receiver the line graphs and statistical reports will be affected For example if you travel from one time zone to another and change the time to match...

Page 32: ...Time screen 4 Set the time a Use the UP DOWN Arrow buttons to set the current hour b Press the left Option button Next to move to the minutes digits c Use the UP DOWN Arrow buttons to set the current minutes d Press the left Option button Next to move to the AM or PM field e Use the UP DOWN Arrow buttons to select A AM or P PM f To set the date go to Step 5 Customer Care 1 866 597 5520 22 Section ...

Page 33: ... to set the current year g Confirm that your selections are correct If NO press the left Option button Next and repeat this procedure from Step 5a If YES press the right Option button Set to accept your changes Result The screen displays the System menu h Press the left Option button Main to return to the Main screen 6 Check your work Result Your FreeStyle Navigator Receiver is operating with the ...

Page 34: ...Customer Care 1 866 597 5520 ...

Page 35: ...4 Perform a Control Solution Test ...

Page 36: ...Section 4 Key Terms n Control Solution Test n FreeStyle Control Solution n FreeStyle Test Strips n Left Right Option Buttons n Receiver n Up Down Arrow Buttons Customer Care 1 866 597 5520 ...

Page 37: ...tion Caution Do NOT use FreeStyle Control Solution for calibration Do NOT perform the control solution test when the system asks you to Do BG Test for calibration Results from Control Solution tests do NOT reflect your blood glucose level Important The control solution range is a target range for the control solution only It is NOT a target range for your blood glucose levels Important If your con...

Page 38: ...de of the control solution bottle Example You open the control solution on January 15th Count forward three months to April 15th This is the discard date that you record on the bottle 2 Prepare test strip a Locate the expiration date on the vial of FreeStyle Test Strips If strips are expired obtain a new vial of strips b Locate the code number you ll need it in a minute c Remove a single test stri...

Page 39: ... Section 10 on troubleshooting 4 Compare code numbers Compare the code number on the display with the code number on the vial of test strips The numbers match a Press the right Option button Set b Go to Step 5 The numbers do NOT match a Use the UP DOWN Arrow buttons to change the code to match b Press the right Option button Set c Go to Step 5 The screen changes to the Apply Sample screen If the n...

Page 40: ...eceiver measures the control solution The receiver will beep twice when the test results appear 6 Confirm that you used a control solution Press the left Option button Yes to alert the receiver that you used a control solution for this test Note If you do NOT select yes the system will record the result as a blood glucose result instead of a control solution result which can result in an incorrect...

Page 41: ...ution range o The used test strips have been discarded properly o The control solution tests are marked as control solution tests END OF Section 4 If the result And Then Falls WITHIN the range Go to Step 8 Falls OUTSIDE of the range You ve repeated the test Call Customer Care You ve NOT repeated the test Repeat the test from Step 1 with a NEW test strip Is an error message Go to Section 10 on trou...

Page 42: ...Customer Care 1 866 597 5520 ...

Page 43: ...5 Insert or Remove Your Sensor ...

Page 44: ... calibrate if your blood glucose is higher than 300 mg dL 16 7 mmol L or lower than 60 mg dL 3 3 mmol L If you have just exercised eaten or taken insulin your glucose levels may be changing rapidly Allow about an hour for the glucose levels to reach a relatively steady state before calibrating The system automatically detects conditions that may not be suitable for calibration It may delay calibra...

Page 45: ...meal or exercise activities Note You should keep your sensor inserted for 5 days See the exceptions listed above under Start The system will ask you to perform 4 calibrations at approximately 10 12 24 and 72 hours after inserting a new sensor See Section 7 You MUST change your sensor every 5 days to reduce the chance of infection The system automatically terminates a sensor session after 5 days Do...

Page 46: ...rning in such circumstances Choose the proper sensor insertion site when inserting the sensor and prepare the site by following the instructions for site preparation Caution If your results from the Continuous Monitoring mode seem erroneous check and make sure that the sensor has not dislodged If you notice the sensor is dislodged from the skin or if you see that the adhesive on your overbandage o...

Page 47: ...the sensor support mount and sensor e Gently wash the transmitter with soap and water f Dry the transmitter thoroughly with a clean soft lint free cloth Be sure that you blot the sensor connector on the end of the transmitter g If necessary use an alcohol wipe prep pad baby oil or a wet soapy washcloth to remove any adhesive left on your arm h Dry your arm with a clean dry towel before continuing ...

Page 48: ...receiver and transmitter are linked see Section 14 Note If the transmitter and receiver are connected properly the disconnect icon will not appear on the screen 5 Select an insertion site Notes Select a site ONLY on the back of the upper right arm on the back of the upper left arm or on your abdomen Do NOT insert the sensor where another sensor was just removed See Site Selection in Appendix A Rot...

Page 49: ... delivery unit from its sterile package by peeling off the foil on the back of the package b Save the package Note You will need the sensor code number on the back of the package later Important We recommend that you save the sensor kit carton or the sensor sterile package until the last sensor from your sensor kit has been used and discarded Saving the package will help you to have sensor lot inf...

Page 50: ...hesive pad is adhered to your skin a Hold the sensor delivery unit firmly in place b Smooth the adhesive pad against your skin Inserting the sensor on the back of your arm Place the sensor support mount lengthwise on your arm with the top of the sensor support mount facing your shoulder Inserting the sensor on your abdomen Place the sensor support mount horizontally on your abdomen If you are Then...

Page 51: ... of the button at the same time Important Do NOT press on the blue release tabs while pressing the button on the top of the inserter Note You will feel a slight pinch as the sensor is placed just under your skin a Hold the sensor inserter and firmly squeeze the two blue release tabs at the inserter s base as you lift the inserter away from the sensor support mount Note Do NOT lift the inserter wit...

Page 52: ...n a few minutes even after blotting with a clean cloth or swab repeat the procedure from Step 2 to remove the sensor support mount select a new site and insert a NEW sensor c Use a mirror to check that sensor is correctly placed Sensor is correctly placed You will see the tip of the sensor is inserted under the skin and the sensor is flush against the top edge of the sensor support mount Sensor is...

Page 53: ... removed a sensor o The site was selected and prepared according to the guidelines given in this procedure o The receiver and transmitter were reconnected successfully o The sensor support mount is tightly adhered to either your abdomen or the back of your upper arm o The sensor is inserted in a site that is different from the site that was used for the last sensor o The sensor is visible with the...

Page 54: ...Customer Care 1 866 597 5520 ...

Page 55: ...6 Attach Your Transmitter ...

Page 56: ...Section 6 Key Terms n Left Right Option Buttons n Receiver n Sensor Code n Sensor Support Mount n System n Transmitter n Up Down Arrow Buttons Customer Care 1 866 597 5520 ...

Page 57: ...e receiver and transmitter by reconnecting them if necessary After you attach your transmitter you must keep your receiver within 10 feet of the transmitter to maintain a consistent connection If the connection between the transmitter and receiver is broken you will not receive continuous glucose readings The connection can also be affected by objects getting between the transmitter and receiver b...

Page 58: ... and slide the transmitter until it clicks into place Apply firm pressure as you slide the transmitter into place Fig 2 Fig 1 Fig 2 2 Confirm the transmitter is correctly attached to the sensor support mount a Look at the side of the transmitter where the bottom sits on the guide rails b Is there a space between the bottom edge of the transmitter and the top edge of the guide rails No The transmit...

Page 59: ...nge the number on the receiver screen to the number on the packaging Fig 2 Important Once the code has been entered and you have hit the Set button as instructed below you will not be able to change the sensor code number If you have entered the code incorrectly you will have to replace the sensor and enter the right sensor code If you choose the wrong sensor code you may get erroneous results fro...

Page 60: ...ly attached to the sensor support mount o You have applied an over bandage as necessary to hold down the transmitter and the sensor support mount o The sensor code has been correctly entered into the receiver o You see an icon on the top right hand corner of the screen END OF Section 6 Customer Care 1 866 597 5520 50 Section 6 Attach Your Transmitter ...

Page 61: ...7 Calibrate Your System Test Blood Glucose Manually ...

Page 62: ...ps n Icon n Lancet n Lancing Device n Lancing Device Cocking Handle n Lancing Device Depth Indicator Window n Lancing Device Depth Setting n Lancing Device Lancet Cup Holder n Left Right Option Buttons n Receiver Test Strip Port n Sharps Container n Up Down Arrow Buttons Customer Care 1 866 597 5520 ...

Page 63: ... be between 60 and 300 mg dL 3 3 and 16 7 mmol L to be able to perform calibration tests If your blood glucose level is changing rapidly you may not be able to calibrate the system For example during a meal or exercise your glucose levels may vary rapidly Try to time your sensor insertion so that your calibration times do not coincide with your regular meal or exercise activities Caution Always ca...

Page 64: ...mately 10 12 24 and 72 hours after sensor insertion For example Insertion at night If you insert the sensor at 9 00 pm on Day 1 the first calibration would be at 7 00 am on Day 2 the second calibration would be at 9 00 am on Day 2 the third calibration would be at 9 00 pm on Day 2 the fourth calibration would be at 9 00 pm on Day 4 Sensor removal would be at 9 00 pm on Day 6 Although a typical cal...

Page 65: ...skin temperature may be out of range the skin temperature has to be between 77 F 25 C and 104 F 40 C The sensor signal may be out of range or has changed relative to the last successful calibration Improper Blood Glucose mode testing Carefully follow the instructions in this Section to perform a BG test keep your hands clean enter the right strip code and choose finger for calibration tests to avo...

Page 66: ...rips Result The receiver will prompt you to Apply Sample The numbers match a Press the RIGHT Option button Set b Go to Step 3 The numbers do NOT match a Use the UP DOWN Arrow buttons to change the code to match b Press the RIGHT Option button Set c Go to Step 3 The screen changes to the Apply Sample screen If the numbers do NOT match a Press the LEFT Option button Back b Repeat Step 2 If the numbe...

Page 67: ...rating Select from among the sites shown including the circled areas If Then Calibration sites n BG Test Site Caution Always calibrate the system using only a finger stick blood sample Do NOT use alternate site blood glucose measurements to calibrate the system The receiver contains a built in FreeStyle Blood Glucose Meter for performing calibration tests Caution If you have hypoglycemia or hypogl...

Page 68: ...than one person d Insert a new FreeStyle Lancet firmly into the white lancet cup holder Important Do not touch the exposed needle on the lancet e Hold the lancet firmly in place with one hand and use your other hand to twist off the rounded top f Replace the cap until it snaps or clicks into place A finger Use the grey cap Your forearm or a test site other than the finger Use the clear cap If your...

Page 69: ...setting to its shallowest depth 1 and use the grey cap h Pull the dark grey cocking handle out until it clicks Note You may have already cocked the device in Step 4d i Prepare the site A finger Set the depth setting to its shallowest depth 1 Your forearm Start at Level 2 or higher if your experience with setting 2 does not produce a usable sample If you are lancing Then A finger Warm your hand low...

Page 70: ...To lance your forearm clear cap a Hold the lancing device against the test site b Press the release button c Continue to hold the lancing device against the test site as you i Inspect the test site through the clear cap ii Gradually increase pressure until the sample is the size of this dot Important Do NOT smear the sample as you do the next step d Lift the lancing device straight up Customer Car...

Page 71: ...cose level is changing rapidly you may not be able to calibrate the system b Observe the receiver The stopwatch icon does NOT appear within 5 seconds Continue adding blood sample to the SAME half circle for up to 60 seconds The receiver BEEPS ONCE only if Progress Tones are turned on Enough blood has been used The stopwatch icon appears The receiver is measuring your blood glucose level The receiv...

Page 72: ...inger A new test strip You have any of these symptoms Weakness Headache Sweating Confusion Nervousness Follow your healthcare team s recommendations for treating hypoglycemia This is your second test Hi appears in the display Hi appears when the measured glucose result is more than 500 mg dL 27 8 mmol L You do NOT have high blood glucose symptoms Repeat the test from Step 3 with a new test strip Y...

Page 73: ...owel o The code number in the receiver matches the code number for the test strips o The test site for calibration was a finger o The test site for manual blood glucose testing was selected from any of the other test sites shown in Step 3 of this Section o You used your finger if you have hypoglycemia unawareness o You used the grey cap on the lancing device for a finger site Or you used the clear...

Page 74: ...Customer Care 1 866 597 5520 ...

Page 75: ...8 Set Review or Change the Alarm Settings ...

Page 76: ...n High Glucose Alarm n High Glucose Threshold n Left Right Option Buttons n Low Glucose Alarm n Low Glucose Threshold n Main Menu n Progress Tones n Projected High Alarm n Projected Low Alarm n Receiver n System n System Alarms n Up Down Arrow Buttons Customer Care 1 866 597 5520 ...

Page 77: ... of notice required whether you should be notified approximately 10 minutes 20 minutes or 30 minutes in advance of reaching your threshold value based on the input from your healthcare team A data loss alarm warns you when glucose results are no longer available They occur when the sensor has expired when the transmitter receiver connection is broken when a calibration has expired or when the sens...

Page 78: ...high and projected low glucose alarms see alarm performance under performance characteristics for more information Therefore do NOT turn off the low and high glucose threshold alarms to rely just on the projected high and projected low glucose alarms In order to get maximum notification of low and high glucose conditions use both the low and high glucose threshold alarms AND the projected low and ...

Page 79: ...OT rely solely on the projected glucose alarms for detection of low or high glucose conditions Always use both the low glucose and high glucose threshold alarms AND the projected low and projected high glucose alarms for maximum notification of low or high glucose conditions Threshold Projected Detection Alarm Alarm Rate ON ON Maximum High Sensitivity 30 min ON ON Intermediate Low Sensitivity 10 m...

Page 80: ...u want for the field For example choose ON or OFF for the alarm choose a number for the threshold like 70 mg dL or choose medium beep or long beep for the alarm setting Review the alarm performance data in Section 18 for a detailed analysis of the effectiveness of the glucose alarms Set review or change the Low glucose alarm Go to Step 3 Set review or change the High glucose alarm Go to Step 4 Set...

Page 81: ...he alarm you selected c Decide what to do next You are setting reviewing or changing all alarms Continue to the next step You are finished setting reviewing and changing alarms Go to Step 11 If Then Decide what settings you want Alarm on or off Your threshold value Note The alarm can only be set between 60 and 139 mg dL 3 3 mmol L and 7 7 mmol L Alarm type Setting Low medium or high beep Short med...

Page 82: ...ted c Decide what to do next Decide what settings you want Alarm on or off Your threshold value Note The alarm can only be set between 140 and 300 mg dL 7 8 mmol L and 16 7 mmol L Alarm type Setting Low medium or high beep Short medium or long vibration You are setting reviewing or changing all alarms Continue to the next step You are finished setting reviewing and changing alarms Go to Step 11 If...

Page 83: ...tinue to the next step You are finished setting reviewing and changing alarms Go to Step 11 If Then Decide what settings you want Alarm on or off Sensitivity Alarm type Setting Low medium or high beep Short medium or long vibration If you want this much notice before reaching your Low glucose level Then set the Sensitivity to Maximum detection most alarms approximately 30 minutes in advance of eve...

Page 84: ... Setting Low medium or high beep Short medium or long vibration You are setting reviewing or changing all alarms Continue to the next step You are finished setting reviewing and changing alarms Go to Step 11 If Then If you want this much notice before reaching your High glucose level Then set the Sensitivity to Maximum detection most alarms approximately 30 minutes in advance of events Intermediat...

Page 85: ...w buttons to change the setting in any field Press the right Option button Set to accept the settings and return to the Alarms menu Note The receiver will respond with a brief sample of the alarm you selected c Decide what to do next Decide what settings you want Alarm on or off Alarm type Setting Low medium or high beep Short medium or long vibration You are setting reviewing or changing all alar...

Page 86: ... accept the settings and return to the Alarms menu Note The receiver will respond with a brief sample of the alarm you selected c Decide what to do next Decide what settings you want Alarm on or off Alarm type Setting Low medium or high beep Short medium or long vibration You are setting reviewing or changing all alarms Continue to the next step You are finished setting reviewing and changing alar...

Page 87: ...uttons to change the setting in either field Press the right Option button Set to accept the settings and return to the Alarms menu Note The receiver will respond with a brief sample of the alarm you selected c Decide what to do next You want to mute alarms Go to Step 10 You are finished setting reviewing and changing alarms Go to Step 11 If Then Section 8 77 Set Review or Change the Alarm Setting...

Page 88: ...ng the alarms is not recommended during times when you are unable to interact with your receiver for instance when you are asleep Interacting with your receiver includes activities such as pressing the buttons viewing the screen or inserting a strip to do a BG test If no buttons are pressed during the 1 hour muting period during which an alarm is active the alarm response period will elapse during...

Page 89: ...9 Daily Use ...

Page 90: ...Section 9 Key Terms n BG Mode n CM Mode n Directional Glucose Trend Arrows n Icon n Receiver n Transmitter n Transmitter Receiver Connection Customer Care 1 866 597 5520 ...

Page 91: ...If the connection between the transmitter and receiver is broken you will not receive continuous glucose readings The connection can also be affected by objects getting between the transmitter and receiver like nearby large metal objects and by some electronic devices that produce radio frequencies As a periodic check turn your receiver on a few times everyday to make sure that it is still produci...

Page 92: ...ck to Step 1 of Section 9 For 30 minutes or more 1 Press the right Option button twice to display the Main Menu screen 2 Use the UP DOWN Arrow button to highlight System 3 Press the right Option button Select to display the System menu with Reconnect highlighted 4 Press the right Option button Select 5 Wait for the receiver to beep If it beeps Twice the system is connected Go back to Step 1 of Sec...

Page 93: ...onally the arrow may not be displayed temporarily Refer to the Line Graph for recent glucose history Tells you what pressing the RIGHT Option button will do in this case it takes you to the Main screen Your current glucose level Follow the recommendations of your healthcare team to treat low glucose hypoglycemic and high glucose hyperglycemic episodes Caution Before adjusting treatment for diabete...

Page 94: ...at a rate of greater than 120 mg dL hr 6 7 mmol L hr The system is processing a control solution or blood glucose sample in the Blood Glucose mode It is time to do a calibration See Section 7 The system is waiting until it is time to do something for example waiting to do the 1st calibration after inserting a sensor You don t need to do anything There is a problem with the transmitter receiver con...

Page 95: ...turn on with a backlight 6 Check your work Result You are aware of your glucose levels and trends You have done this procedure correctly when o You correctly interpret the directional glucose trend arrows o You can tell your current glucose level at a glance o You maintain the connection between your transmitter and receiver or can reconnect the transmitter and receiver when the connection is lost...

Page 96: ...Customer Care 1 866 597 5520 ...

Page 97: ...10 Respond to Alarms Errors and Problems ...

Page 98: ...ibration n High Glucose Alarm n Icon n Low Glucose Alarm n Projected High Alarm n Projected Low Alarm n Receiver Status n Sensor n Sensor Support Mount n Status Information n Transmitter n Transmitter Receiver Connection n Transmitter Status Customer Care 1 866 597 5520 ...

Page 99: ...en activated Press the RIGHT Option button to respond to a vibration or audio alarm Press the LEFT Option button to turn off a text display message See Section 8 Step 10 to mute all audible alarms for 1 hour Alarms are given a level of urgency based on how soon you must respond Alarms act differently depending upon the level of urgency High H Must never be ignored Cannot be muted Is the same as a ...

Page 100: ...r including serial number and software version may be useful when calling Customer Care as well as battery life remaining Transmitter Status Shows the transmitter s serial number You may need to verify the serial number after linking to a new transmitter This unique value is used by the receiver to accept data from only the transmitter the receiver is linked to It also shows battery life remaining...

Page 101: ...ose results based on this calibration When using the Calibration BG feature always perform an additional Blood Glucose mode test to confirm the first test This feature cannot be used in the first ten hours after sensor insertion Using this feature does not change the regular scheduled times for calibration Status Information Description Fig 1 Fig 2 Display Description The system will notify you of...

Page 102: ...m message has just been triggered By using the RIGHT and LEFT option and up down buttons on the receiver go to the Glucose screen and read your alarm Flashing light at the test strip port N A Receiver has reset Call Customer Care Alarms Inactive Insert New Sensor I Alarms are not operating because the 5 day life of the sensor has ended Remove the sensor and insert a new one see Section 5 Alarms In...

Page 103: ...cose level between 60 and 300 mg dL 3 3 and 16 7 mmol L for proper calibration If your glucose level is low follow your healthcare professional s advice for a low glucose level hypoglycemic episode Perform another Blood Glucose mode test for calibration Cal Failed Receiver Temp Redo BG Later I Calibration failed because the receiver was too warm or too cold Bring the receiver to room temperature a...

Page 104: ... environment If you are wearing warm clothing like a sweater or jacket try taking them off Cool Down Skin Redo BG Later I Calibration failed because your skin temperature is too warm Cool the skin at the insertion site Wait for half an hour and perform another Blood Glucose mode test for calibration You can cool down your skin temperature by moving to a cooler environment If you are wearing warm c...

Page 105: ...efore readings will not be displayed and the alarms are not working Perform a Blood Glucose mode test for calibration High Glucose M Your glucose has reached your preset high glucose threshold Follow the recommendations of your healthcare team for treating a high glucose level hyperglycemic episode Link L The receiver is not linked to the transmitter The link is necessary for the system to operate...

Page 106: ...ve failed Remove the sensor and insert a new one see Section 5 This message can appear during or after cleaning the transmitter Ensure that the transmitter is thoroughly dry before inserting a new sensor see Section 13 Preferences Lost Reconfigure L An error occurred with the receiver configuration The receiver has reset Your stored preferences may be lost Review your alarm settings and other user...

Page 107: ...Inactive I Receiver error The problem could go away in 50 minutes or less If problem persists call Customer Care Reconnect L The receiver has not been receiving signals sent by the transmitter for 5 minutes The receiver is either too far from the transmitter or there are materials or signals causing interference Be sure the receiver and transmitter are within 10 feet of one another If the alarm pe...

Page 108: ...sensor Sensor Error Alarms Inactive I Unstable sensor signal Unable to calculate glucose Alarms are not working Wait for 50 minutes for the problem to go away Ensure that the sensor is firmly attached and that the transmitter and the sensor support mount are not loose If the problem persists remove sensor and insert new one Sensor Error Replace Sensor I Sensor failure No more BG alarms will occur ...

Page 109: ... Skin L Unable to calibrate the System because the skin temperature is too cold Warm the skin at the insertion site and wait for the Do BG Test prompt and perform another Blood Glucose mode test for calibration You can warm up the skin temperature by moving to a warmer environment or by putting on some warm clothing Warm Up Skin Redo BG Later I Calibration failed because your skin temperature is t...

Page 110: ...e test strip vial retest your blood using a new test strip If the test does not work or if the error persists call Customer Care Er3 Be sure you see Apply Sample on the receiver screen before you apply blood or control solution Perform a control solution test using a new test strip If results are within the range printed on the test strip vial retest your blood using a new test strip If the test d...

Page 111: ...lue on the screen Sensor Insertion There is skin irritation at the sensor insertion site The sensor support mount is not sticking to your skin Discomfort when inserting the sensor The system does not recognize a new sensor after attaching the transmitter to the sensor support mount Note Also see Appendix A on Site Maintenance Receiver and Transmitter Connection You are not sure whether your receiv...

Page 112: ...ead replace existing batteries and reset time and date e Repeat the test with a new test strip If this did not resolve your problem call Customer Care Note Whenever batteries are removed and replaced or re installed in the receiver you will have to reconnect the transmitter and receiver and insert a new sensor The receiver will not turn on Note Ensure that you apply your sample when the Apply Samp...

Page 113: ...omagnetic interference see Appendix C for further details move away from the interfering source and see if the problem goes away If there is consistent interference from a source contact the manufacturer of the source or a certified electrician for help The batteries may have to be replaced Replace batteries with fresh ones and reset date and time The batteries are installed incorrectly Install ba...

Page 114: ...cknowledge the alarm take appropriate action for example bring the skin temperature within range or establish connection between the transmitter and receiver and allow the system up to 2 hours to prompt you to do a BG test for calibration The time window for calibration for example you have 2 hours to perform the second calibration see Section 7 has expired You have not performed a BG Test for cal...

Page 115: ... b Dry the site thoroughly with a clean towel c Wipe the area with an alcohol prep pad d If your skin type requires more adhesive than provided on the sensor support mount or if you anticipate an activity level that may require more adhesive place an over bandage over the transmitter AFTER connecting the transmitter to the sensor support mount Around the edges of the adhesive or tape Lift the edge...

Page 116: ...support mount and wait for 3 minutes to allow the system to recognize the sensor b If the system still does not recognize the sensor remove the sensor Section 5 establish connection between the transmitter and receiver Section 9 insert a new sensor and attach the transmitter to the sensor support mount Section 6 Make sure that the contact points on the transmitter are dry clean and not excessively...

Page 117: ...hange the battery c Establish connection between transmitter and receiver d Insert a new sensor You continue to see the icon even after replacing the battery in the transmitter Wait for a couple of minutes after inserting the new battery to allow the system to recognize the new battery If after two minutes the system still does not recognize the new battery there is probably something wrong with y...

Page 118: ...nsor support mount Follow the troubleshooting guidelines on sensor recognition It has been less than 10 hours after insertion of the sensor Wait for the 10 hour time period to end and allow the system to prompt you to do a BG Test for calibration It has been more than 10 hours after the insertion of the sensor There is a icon on the screen Reconnect the transmitter and receiver Section 9 and allow...

Page 119: ...11 Add Events ...

Page 120: ...Section 11 Key Terms n Events n Exercise Event n Generic Event n Insulin Event n Left Right Option Buttons n Meal Event n State Of Health Event n Up Down Arrow Buttons Customer Care 1 866 597 5520 ...

Page 121: ... time are automatically recorded when you enter an event If you enter the event at a later time you must change the date and time of the event to when it actually occurred before you press the right Option button Set to save the event If you change your mind about saving the event use the UP DOWN Arrow button to change SAVE to CANCEL before you press the right Option button Set Steps Do This 1 Acc...

Page 122: ...n you are done press the right Option button Set to save or cancel the event Meals or snacks 1 Highlight Meals 2 Press the right Option button Select 3 Go to Step 3 Details of an insulin dose injection or pump 1 Highlight Insulin 2 Press the RIGHT Option button Select 3 Go to Step 4 Exercise 1 Highlight Exercise 2 Press the RIGHT Option button Select 3 Go to Step 5 Your state of health 1 Highlight...

Page 123: ... button Set to save or cancel the event 6 Record state of health events a Use the left Option button Next to select which item to enter or change State of health SAVE CANCEL Date Time b Use the up Arrow button or the down Arrow button to change the selected item Note Your state of health choices are Normal Cold Sore Throat Infection Tired Stress Fever Flu Allergy Period Dizzy Alcohol Low Symptoms ...

Page 124: ...e Day 4 to Party etc Note 2 Write down the meanings for each number as you assign them so you don t forget what they represent you don t have to assign meanings to all the numbers c When you are done press the right Option button Set to save or cancel the event 8 Check your work Result An electronic record of all events that may affect your glucose levels You have done this procedure correctly whe...

Page 125: ...12 Review Reports and Edit Events ...

Page 126: ... n Generic Event n Glucose Targets n Insulin Event n Left Right Option Buttons n Line Graph n Main Menu n Meal Event n Multi Day Statistics n Reports n Single Day Statistics n State Of Health Event n Statistical Reports n Up Down Arrow Buttons Customer Care 1 866 597 5520 ...

Page 127: ...mation Your healthcare team will usually give you glucose targets Compare your actual glucose levels with these targets to see how you are doing Ask your healthcare team to tell you how your levels should compare to each target Glucose targets are DIFFERENT from the thresholds for low and high glucose alarms Low and high glucose alarms alert you when you ve reached the low or high threshold value ...

Page 128: ... High Glucose target setting d Enter your high glucose target using the up or down arrows e Press the right Option button Set to save the settings Result The settings are saved and the Select Report screen appears f Return to Step 2 to decide what to do next Set glucose targets Go to Step 3 See a line graph showing a history of your glucose levels Go to Step 4 See a statistical summary of your glu...

Page 129: ...oth your continuous readings plotted every 10 minutes and your blood glucose readings the symbols on the line graph When viewing the line graph you can scroll forward on the time axis by pressing the up Arrow button and you can scroll backward on the time axis by pressing the down Arrow button You will not be able to see the date on the time axis d Decide what to do next Note The line graph displa...

Page 130: ...ote The Stats screen shows you a summary of glucose results relative to your glucose targets b Press the left Option button Next to advance to the desired period Note You can view statistical reports for 1 3 7 14 21 or 28 day periods in that order Continue to Step 6 Customer Care 1 866 597 5520 120 Section 12 Review Reports and Edit Events Stats 3 day 08 30A Highest CM 298 mg dL Lowest CM 61 mg dL...

Page 131: ... are maintaining your levels near the average value Std Dev Note A small number indicates that most of your glucose readings are close to your average value A large number indicates that many of your glucose levels vary considerably from your average value The percentage of readings that are above your high glucose target Above Target The percentage of readings that are within your glucose targets...

Page 132: ... Meal events Meals Exercise events Exercise State of health State of Health Miscellaneous events Generic Alarms history Alarm history All events User Events Edit the event Go to Step 9 Interpret the event Go to Step 8 Review other events 1 Select the left Option button Back to go to the Select Filter screen 2 Go to Step 7b Stop reviewing events 1 Select the left Option button Back to go to the Sel...

Page 133: ...k mark 3 indicates that the measure was marked as a control Use the right Option button Next to move to the next recorded BG screen Insulin Each recorded insulin event is displayed with type dosage in units date and time Meals Each recorded meal event is displayed with its carbohydrate value in grams date and time Exercise Each recorded exercise event is displayed with its description duration in ...

Page 134: ...or cancel your edits 10 Check your work Result The result will be an increased awareness of your glucose level history glucose level patterns and events that could affect your treatment plan You will have done this procedure correctly when o Your glucose targets are set correctly o You view and correctly interpret line graphs for any available period o You correctly select and view any desired sta...

Page 135: ...13 Clean Your System ...

Page 136: ...Section 13 Key Terms n Receiver n Transmitter n Contact Points Customer Care 1 866 597 5520 ...

Page 137: ...Keep your receiver in its protective carrying case when you are not using it Note Your transmitter and receiver cannot be repaired when broken The transmitter should be removed from the sensor support mount and cleaned each time you remove a used sensor every 5 days Contact your healthcare team or Customer Care when you need to replace your transmitter or receiver They will suggest a proper way to...

Page 138: ...e receiver skin in mild soap and water 3 Clean your receiver Wipe the outside of your receiver with a clean soft lint free towel dampened with either a mild soapy solution or 70 isopropyl alcohol 4 Check your work Result A clean transmitter receiver and receiver skin You have done this procedure correctly when o All visible dust dirt grime and other foreign substances have been removed o The trans...

Page 139: ...14 Link and Unlink Your Transmitter and Receiver ...

Page 140: ...Section 14 Key Terms n BG Mode n CM Mode n Link Unlink n Receiver n Transmitter Customer Care 1 866 597 5520 ...

Page 141: ...er are linked they don t have to be re linked or unlinked unless you want to link the receiver to a new transmitter If you attempt to link your receiver to a new transmitter you must replace the current sensor with a new sensor You can still perform blood glucose measurements in the blood glucose mode while the transmitter and receiver are unlinked Link is NOT the same as Reconnect Typically when ...

Page 142: ...eed you will need to insert a new sensor after linking to your new transmitter A warning screen is displayed if you have a sensor in progress Press the button labeled Yes to continue unlinking g Press the left Option key BG to operate your system in the Blood Glucose mode By choosing this option you have shut off the Continuous Monitoring mode Note You can now use your receiver to perform blood gl...

Page 143: ...ed Customer Care after your 2nd attempt to link failed o The ID number of the transmitter displayed by the receiver under the Transmitter Status menu item matches the ID on the transmitter label END OF Section 14 Are the same 1 Press the right Option button Yes Result The Main menu is displayed 2 Go to Step 4 Are NOT the same 1st attempt Press the Left Option button No The receiver will continue t...

Page 144: ...Customer Care 1 866 597 5520 ...

Page 145: ...15 Reset User Settings ...

Page 146: ...Customer Care 1 866 597 5520 ...

Page 147: ... Do This 1 Access the System menu from the Main menu a Press the up or down Arrow button to highlight System b Press the right Option button Select to go to the System Menu screen High Glucose Target 180 mg dL 10 mmol L Low Glucose Target 80 mg dL 4 4 mmol L Alarm Settings Med Beep On Off Low beep Medium beep High beep Short vibe Medium vibe Long vibe Alarm Thresholds Country Settings Local settin...

Page 148: ...nal settings if you changed your mind END OF Section 15 Return your system to its default settings Press the right Option button Yes Note You will lose your personal settings Change your mind Press the left Option button No Note Your personal settings will be retained If you want to Then Caution You should never reset your user settings when you are wearing a sensor This will reset parameters that...

Page 149: ...16 Change Country Settings ...

Page 150: ...Section 16 Key Terms n Left Right Option Buttons n Receiver n System Menu n Up Down Arrow Buttons Customer Care 1 866 597 5520 ...

Page 151: ...r FreeStyle Navigator Receiver Helpful Information Check with your healthcare team if you have any questions about your requirements If you don t press any button within 12 seconds the receiver screen will go blank and the last change will be lost if you haven t pressed the RIGHT Option button Select Steps Do This 1 Access the System menu from the Main menu a Press the up or down Arrow button to h...

Page 152: ...uage screen c Use the up or down Arrow button to highlight the language that you want to use d Press the right Option button Set to accept your selection Result The Country Settings screen is displayed e Go to Step 2c to decide what to do next Language 3 Date 4 Time 5 Decimals 6 None of the above you are done changing the country settings 2d If you want to change how Then go this is displayed to S...

Page 153: ...Time Format a Use the up or down Arrow button to highlight Time Format b Press the right Option button Select to go to the Select Time Format screen c Use the up or down Arrow button to select either the 12h or the 24h format d Press the right Option button Set to accept your choice Result The Country Settings screen is displayed e Go to Step 2c to decide what to do next Section 16 143 Change Coun...

Page 154: ...pt your choice Result The Country Settings screen is displayed e Go to Step 2c to decide what to do next 7 Check your work Result A display that presents information in the format that you prefer You have done this procedure correctly when you are satisfied with the format the system uses to display information END OF Section 16 Customer Care 1 866 597 5520 144 Section 16 Change Country Settings C...

Page 155: ...17 Appendix A Site Maintenance ...

Page 156: ...Section 17 Appendix A n Adhesive Enhancers n Antiseptics n Dressings n Site Rotation n Skin Barriers Customer Care 1 866 597 5520 ...

Page 157: ...iseptic Ask your healthcare team to recommend which antiseptic is best for you Dressings If you are having trouble with the sensor support mount sticking to your skin consider applying a bandage over the transmitter A variety of such bandages are available at your local pharmacy Ask your healthcare team to recommend which type of bandage is best for you Adhesive enhancers If you re having trouble ...

Page 158: ...Customer Care 1 866 597 5520 ...

Page 159: ...18 Appendix B Specifications ...

Page 160: ...Section 18 Appendix B n Calibration n Hematocrit n Interstitial Fluid n Receiver n Transmitter Customer Care 1 866 597 5520 ...

Page 161: ...ric electrochemical sensor using WIRED ENZYME technology Continuous subcutaneous measurement of glucose in interstitial fluid by a sensor inserted approximately 5mm under the skin Power Source Transmitter One silver oxide 357 HC battery small coin cell battery replaceable battery life is 30 days Receiver Two AAA alkaline batteries replaceable battery life is 60 days We recommend Energizer MAX Ener...

Page 162: ... 1st calibration or continuous glucose will not be reported The 2nd calibration can be performed after 4 hours continuous glucose reporting will resume after completing the 2nd calibration successfully 3rd calibration Must be performed between 12 and 20 hours after the 2nd calibration or continuous glucose will not be reported The 3rd calibration can be performed after 20 hours continuous glucose ...

Page 163: ...sult in above average glucose control This in turn may result in the appearance that the FreeStyle Navigator Continuous Glucose Monitoring System agrees with blood glucose levels better than it does under typical conditions Monitors that measure glucose in interstitial fluid often show better agreement to blood glucose levels when glucose levels are not changing rapidly or when glucose levels are ...

Page 164: ...is no difference in the performance of the system when worn on the abdomen or on the back of the upper arm Table 1 Clarke Error Grid Analysis Continuous glucose results from FreeStyle Navigator System mg dL vs the YSI mg dL Zone in the Clarke Error Grid N pairs of data Percentage in the different zones Sensor Insertion Site Abdomen Arm A 16627 81 7 81 5 81 8 B 3398 16 7 16 8 16 6 C 19 0 1 0 1 0 1 ...

Page 165: ...5 30 4 0 1 N A N A 121 240 11430 99 9 85 4 14 4 0 1 N A 0 0 241 3795 99 5 91 7 7 8 0 0 0 4 0 1 Overall 20362 98 3 81 7 16 7 0 1 1 6 0 0 N A means that the Clarke Error Grid does not consider the possibility of these zones in that concentration range Table 3b displays the same data as in table 3a on the Continuous Glucose Error Grid This is a modified error grid that is designed to evaluate the cli...

Page 166: ...overall median absolute relative difference for all the data pairs is 9 3 Table 4a Performance relative to YSI at different glucose levels Glucose mg dL Performance 20 40 Mean Absolute Difference 32 3 mg dL 41 80 Mean Absolute Difference 18 1 mg dL 81 120 Mean Absolute Difference 16 3 mg dL 121 240 Mean Absolute Relative Difference 11 0 240 Mean Absolute Relative Difference 9 5 Table 4b Performanc...

Page 167: ...18 3 14 2 16 9 C 0 2 0 1 0 0 0 0 0 0 D 0 9 0 9 2 2 1 8 2 1 E 0 0 0 1 0 0 0 0 0 0 Overall Mean Absolute Relative Difference MARD0 12 6 12 3 14 1 11 9 13 0 Table 6b Continuous Error Grid Analysis by day of wear Zone Day 1 Day 2 Day 3 Day 4 Day 5 Accurate Readings 97 9 97 8 97 1 97 4 97 3 Benign Errors 1 0 1 2 0 7 0 8 0 8 Erroneous Readings 1 1 1 0 2 2 1 8 1 9 Table 6c groups the difference between g...

Page 168: ...tion Period 84 94 98 Second Third of Third Calibration Period 80 92 97 Final Third of Third Calibration Period 80 91 95 Cal 4 typically occurs 72 hours after sensor insertion First Quarter of Final Calibration Period 86 93 96 Second Quarter of Final Calibration Period 84 92 96 Third Quarter of Final Calibration Period 80 93 98 Final Quarter of Final Calibration Period 82 93 97 The absolute differe...

Page 169: ...18 22 26 30 34 38 42 46 50 54 58 62 66 70 74 78 82 86 90 94 98 102 106 110 114 118 122 500 400 300 200 100 0 x x x x x SensorTime hours Glucose mg dL FreeStyle Navigator YSI Reference FreeStyle Calibration x Night Time 11pm to 6am 10 14 18 22 26 30 34 38 42 46 50 54 58 62 66 70 74 78 82 86 90 94 98 102 106 110 114 118 122 500 400 300 200 100 0 x x x x SensorTime hours Glucose mg dL FreeStyle Navig...

Page 170: ...e successive YSI measurements below the alarm threshold or one YSI measurement 6 mg dL below the alarm threshold Hyperglycemic event two or more successive YSI measurements above the alarm threshold or one YSI measurement 6 above the alarm threshold True Threshold Alarm a threshold alarm that occurred 30 minutes from the start of a hypoglycemic or hyperglycemic event True Alarm Rate the percentage...

Page 171: ... was not below the threshold setting n N is the n umber of observations divided by the total N umber Detection of High Glucose See Table 8 for detection of high glucose As an example when the threshold alarm was set at 240 mg dL during the day 78 of the high glucose events were detected by FreeStyle Navigator Table 8 High Glucose Detection DAY NIGHT High Alarm Setting mg dL Day True Alarms Day Mis...

Page 172: ...and sensor wear were evaluated in a Home Use Study where 137 participants used the product on their own in a home environment The participants wore 8 sensors during the study period of 40 days They wore the sensors either on the arm or abdomen During the first 20 days of the study continuous glucose results were not visible to the participants During the following 20 days participants had access t...

Page 173: ...19 Appendix C FCC Compliance Information ...

Page 174: ...Customer Care 1 866 597 5520 164 Section 18 Appendix B Specifications ...

Page 175: ...ate or visual icons unrecognizable characters on the screen or lack of glucose results means If you observe a significant change in your continuous glucose readings that you think is erroneous or if you feel the blood glucose measurement in the Blood Glucose mode is erroneous and you are close to an electromagnetic interference source move away from the source of interference and check to see if t...

Page 176: ...vigator system is intended for use in the electromagnetic environment specified below The customer or user of the FreeStyle Navigator system should assure that it is used in such an environment Immunity test Test Level FreeStyle Navigator System Compliance Level Electromagnetic Environment Guidance Tx Rx Electrostatic Discharge ESD IEC60601 1 2 8 kV Contact Discharge 15 kV Air Discharge 8 kV Conta...

Page 177: ...lation 2 874 msec dwell time Within 433 05 434 79MHz operating range and 100ppm Frequency Error Electrical Fast Transient Burst IEC 61000 4 4 2 kV for power supply lines 1 kV for input output lines Not Applicable Battery Operated Mains power quality should be that of a typical commercial or hospital environment Surge IEC 61000 4 5 1 kV for Differential mode 2 kV for common mode Not Applicable Batt...

Page 178: ...ower of Transmitter W Separation distance according to frequency of transmitter m 80 800MHz d 1 2 800MHz 3GHz d 2 3 0 01 0 12 0 23 0 1 0 38 0 73 1 1 20 2 30 10 3 79 7 27 100 12 00 23 00 For Transmitters rated a maximum output power not listed above the recommended separation distance d in meters m can be estimated using the equation applicable to the frequency of the transmitter where P is the max...

Page 179: ...rom RF transmitters as determined by an electromagnetic site survey a should be less than the compliance level in each frequency range b Interference may occur in the vicinity of equipment marked with the following symbol Note 1 At 80 MHz and 800 MHz the higher frequency range applies Note 2 These guidelines may not apply in all situations Electromagnetic propagation is affected by absorption and ...

Page 180: ... Remote control Transmitter This device complies with Part 15 of the FCC Rules Operation is subject to the following two conditions 1 This device may not cause harmful interference 2 This device must accept any interference received including interference that may cause undesired operation Note This equipment has been tested and found to comply with the limits for a Class B digital device pursuant...

Page 181: ...vide reasonable protection against harmful interference in a residential installation This equipment generates uses and can radiate radio frequency energy and if not installed and used in accordance with the instructions may cause harmful interference to radio communications However there is no guarantee that interference will not occur in a particular installation If this equipment does cause har...

Page 182: ...Customer Care 1 866 597 5520 ...

Page 183: ...20 Glossary ...

Page 184: ...Customer Care 1 866 597 5520 174 Section 19 Appendix C Classification Compliance Declaration ...

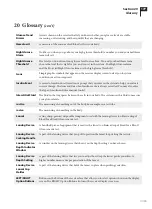
Page 185: ...s main use is for calibrating the system Calibration The system must be calibrated at approximately 10 12 24 and 72 hours after sensor insertion The system is calibrated using a blood glucose measurement performed in the Blood Glucose mode using the built in FreeStyle Blood Glucose Meter The receiver compares the reading it gets from the blood to the reading the sensor takes from the interstitial ...

Page 186: ... several ways including Event History reports or Line Graph reports Event History Reports A type of report that incorporates the event information you enter For example histories of recent glucose results insulin doses carbohydrate content of meals exercise state of health etc Exercise Event A record of many popular forms of exercise You may also specify the intensity and duration of each exercise...

Page 187: ...between the cells in your body The system uses this fluid to measure your glucose levels in vitro The measuring of something out of the body For example in a test tube in vivo The measuring of something in the body Lancet A tiny sharp pointed disposable component used with the lancing device to obtain a drop of blood for a Blood Glucose mode test Lancing Device A handheld piece of equipment that i...

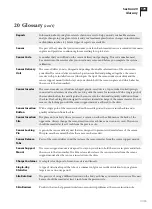
Page 188: ...n choose 3 7 14 21 or 28 day periods Progress Tones Communicate progress errors and successful completion of system activities such as Blood Glucose mode testing Projected High Alarm Provides an early warning when you are approaching your high glucose threshold Projected Low Alarm Provides an early warning when you are approaching your low glucose threshold Receiver Rx Also called Rx A wireless co...

Page 189: ...cidental discharge of the sensor inserter Do not remove the locking pin until the sensor support mount is adhered to the skin Sensor Insertion Button With a single push of the insertion button the needle guides the sensor into the skin and is quickly withdrawn from the skin Sensor Insertion Site The place on your body where you insert a sensor on either the abdomen or the back of the upper arm Alw...

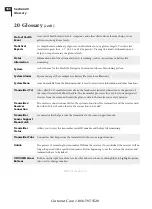
Page 190: ...ove the skin The transmitter processes the very low current signals it receives from the sensor and sends the glucose data to the receiver once every minute Transmitter Receiver Connection The wireless connection needed for the system to function The transmitter and the receiver must be within 10 feet of each other for the connection to be valid Transmitter Sensor Support Mount Latch A connector t...

Page 191: ...21 Index ...

Page 192: ...Customer Care 1 866 597 5520 ...

Page 193: ...28 Clean The Insertion Site 39 Control Solution Perform Control Solution Test 27 Control Solution Expiration 28 Mark A Control Solution Test 30 Country Settings 141 143 Daily Use 81 Data Data Loss Alarm 67 75 Data Upload 5 Glucose Data And Reports 118 Date Change The Date 23 Change The Date Format 143 Edit Events 117 124 Error Respond To Error Messages 92 Error Codes In BG Mode 100 Events Add Even...

Page 194: ...An Insertion Site 38 Blood Glucose Test Site 57 Maintain Your Site 147 Site Rotation 147 Prepare Insertion Site 38 39 Specifications 151 Standard Deviation 121 State Of Health 113 122 Statistics 121 Status 90 91 Symbols 83 84 System Parts Of The System 3 Clean The System 127 Specifications 151 Calibrate Your System 53 Time Change The Time 22 Change The Time Format 143 Time For Calibration 54 Trans...

Page 195: ......

Reviews: