


Firmware Pages and Descriptions
67
NXP-TPI/4 NetLinx Touch Panel Interface
Although these same options are available within the main RGB Adjustments page, these
RGB image controls provide you with UP/DN arrows for accurate value entry adjustments.
These controls allow you to set the RGB properties for the incoming
image/video on the selected TP4-RGB card within the selected Slot ID.
3.
Use the UP/DN
Phase
buttons to alter the RGB tracking/signal level of the incoming
image/video.
These values cycle back thru 0 and on after reaching 31.
4.
Use the UP/DN
H Position
buttons to adjust the horizontal location and move the image
(left-right) on the screen.
These values cycle back thru 0 and on after reaching 255.
5.
Use the UP/DN
H Size
buttons to adjust the horizontal height and stretch the image on the screen.
These values cycle back thru 0 and on after reaching 255.
6.
Use the UP/DN
V Position
buttons to adjust the vertical location and move the image
(up-down) on the screen.
These values cycle back thru 0 and on after reaching 255.
7.
Use the UP/DN
Brightness
buttons to adjust either the overall or individual Red, Green, and Blue
brightness of the incoming image/video.
The All Brightness bargraph gives a visual representation
of the overall brightness level and cycles through an entire turn.
8.
Use the UP/DN
Contrast
buttons to adjust the overall or individual Red, Green, and Blue contrast
of the incoming image/video.
Increasing the value can increase sharpness. This All Contrast
bargraph gives a visual representation of the overall contrast level and cycles through an entire
turn
.
9.
Once done making these adjustments, press the
Done
button to temporarily save these modifications
and place the grey
RGB Adjustments
bar back onto the bottom of the screen. Pressing the
Cancel
button returns you to the RGB Adjustments page without temporarily saving your changes.
10.
Press anywhere on the background image to exit from the Full Screen Edit mode and return to the
RGB Adjustment page.
11.
In the RGB Adjustment Page, press the
Save Settings
button to save your changes to the
TP4-RGB card.
Cycling power to the panel before saving your settings can cause your pages to
shift back to their original locations.
12.
Press the
Back
button to return to the Setup page.
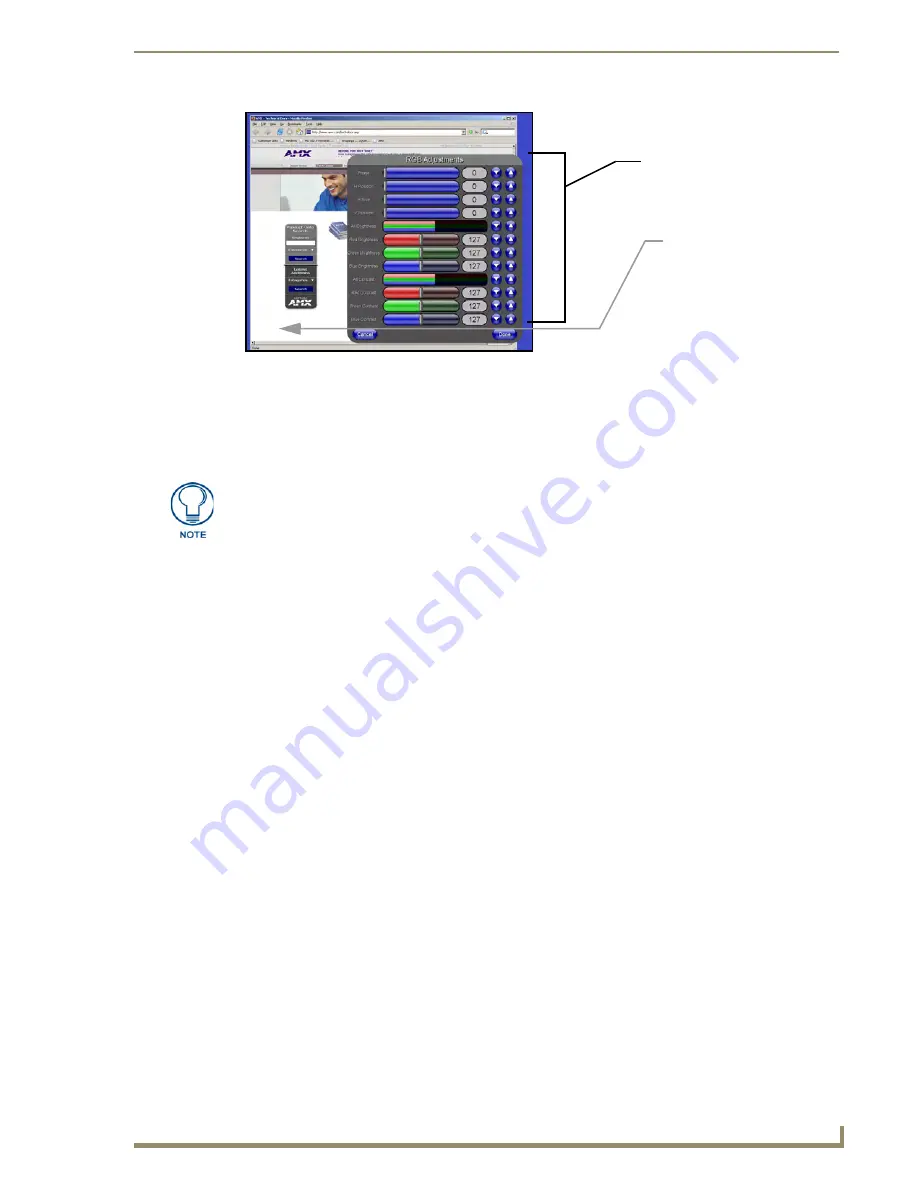
FIG. 48
RGB Setup page-showing the Full Edit option with controls
Incoming RGB signal
On-screen image controls
(activated by pressing
the RGB Adjustments bar)
Once done making your screen
adjustments, SAVE SETTINGS.
The incoming TPI/4 image must be first be adjusted (especially if using a CRT
monitor) to fit into the visible screen area. Refer to the TPI/4 and Panel Interface
Setup
section on page 27
for more detailed information on adjusting the position and
size on a CRT monitor. When using a touch panel, the TOUCH DRIVER selected
should compensate for the visible area, if not, continue with these steps.
Summary of Contents for NetLinx NXP-TPI/4
Page 38: ...TPI 4 and Panel Interface Setup 32 NXP TPI 4 NetLinx Touch Panel Interface...
Page 60: ...Upgrading TPI 4 Firmware 54 NXP TPI 4 NetLinx Touch Panel Interface...
Page 138: ...Troubleshooting 132 NXP TPI 4 NetLinx Touch Panel Interface...
Page 147: ...Appendix 141 NXP TPI 4 NetLinx Touch Panel Interface...


