31
Chapter 2: Recording on the DPS16
Overdub operation
1. Connect the bass guitar to INPUT jack 8. Play the bass guitar and use [INPUT TRIM] knob 8 to adjust
the signal level while checking the level meter, so that the OVER indicator will not light up even when
the volume level reaches maximum. If the bass guitar is high-impedance, turn the [GUITAR/NOR-
MAL] switch to GUITAR.
NORMAL
INPUT
GUITAR
✐
TIP :
“High-impedance” instrument here means an electric guitar or bass that has passive-type pick-
ups (a guitar or bass (without an internal pre-amp) that produces sound without using batteries).
INPUT jack 8 accepts high-impedance instruments. You can connect an electric guitar or bass directly to this
input.
2. Press the [PATCH] key
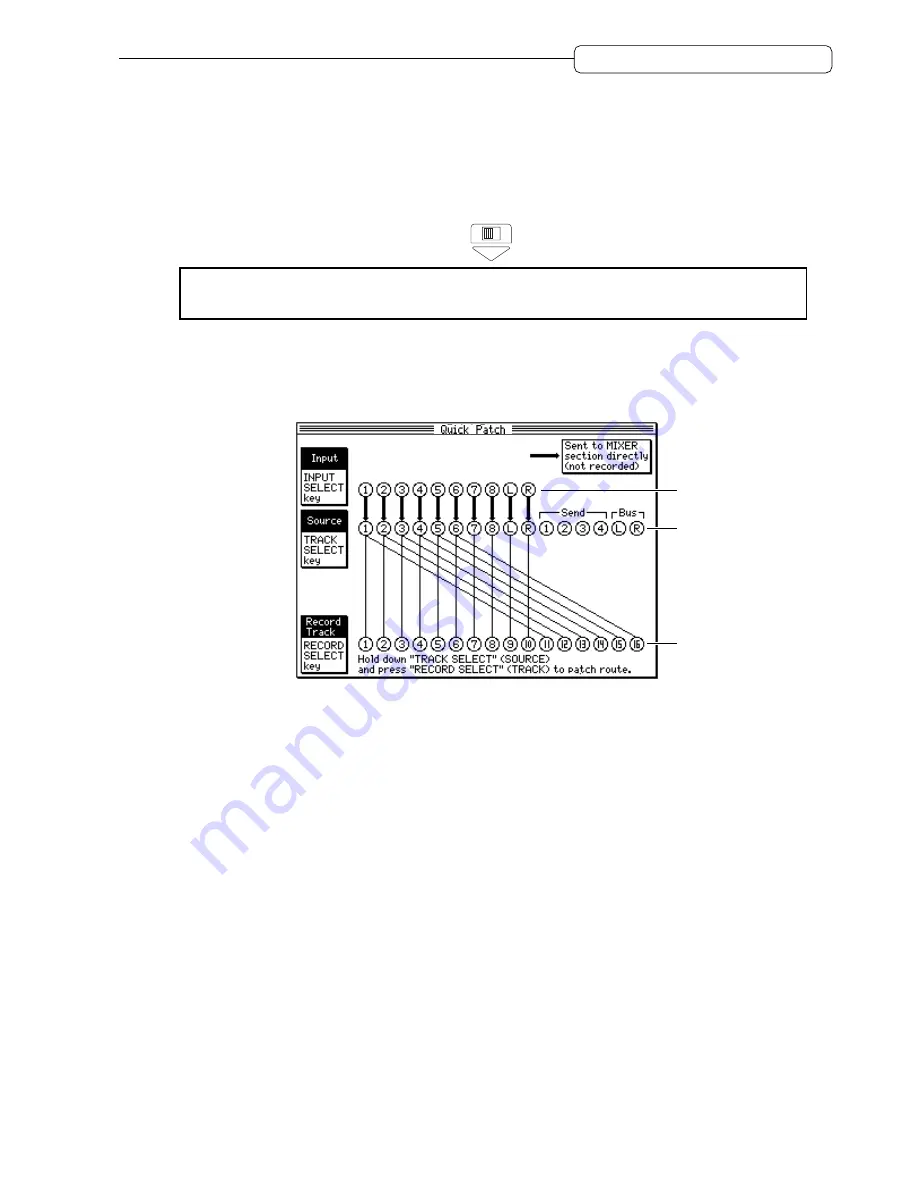
The DPS16 enters Quick Patch mode in which you can change the internal routing, and displays the following
Quick Patch screen.
1
2
3
1
Input
This field indicates the destinations of the signals input from the INPUT jacks (1–8) and DIGITAL IN jack.
A thick ascending line indicates a signal routed directly to the INPUT MIX channels in the mixer section. A
thick descending line indicates a signal routed to the
Source
section (
2
) where you can select a recording
source for the physical tracks. To record the input signal, a thick descending line should appear. Press the
[INPUT SELECT]
key repeatedly to toggle between ascending and descending lines.
2
Source
This section displays the recording source for physical tracks 1-16. You can select a recording source using
the
[TRACK SELECT]
keys.
[TRACK SELECT]
keys 1-8 correspond to input channels 1-8,
[TRACK SE-
LECT]
keys 9 and 10 to digital input L and R,
[TRACK SELECT]
keys 11-14 to AUX SEND 1-4, and
[TRACK SELECT]
keys 15 and 16 to Ping-pong bus L and R.
3
Record Track
This field indicates physical tracks 1–16. You can select a recording source by connecting (patching) track
numbers (1–16) with the recording sources in the
Source
section using patch cable (thin lines on the
screen).
As you see in this figure, with the default setting, the input signal from INPUT jack 8 is sent to track 8. In
this example, we change this to track 3.
3. If a thick ascending line from Input 8 appears, press [INPUT SELECT] key 8 to change to a thick
descending line.
4. Press [RECORD SELECT] key 3 while pressing and holding down [INPUT SELECT] key 8.
This causes the patch cable between Source 3 and physical track 3 to be disconnected. Instead, the input signal
from Source 8 is routed to physical track 3.


