BIO-01 I/O extension module 183
Mechanical installation
Refer to
on page
Before you install the BIO-01 option module, make sure that the chassis screw slider
is in the top position. After the option module is installed, tighten the chassis screw
and move the slider to the bottom position.
The BIO-01 option module kit comes with a higher cable clamp plate. Use this cable
clamp plate to ground the wires that connect to the BIO-01 option module.
Electrical installation
Refer to
on page
. If you configure the inputs, set up the
wiring accordingly. The BIO-01 module has removable spring clamp terminals. Use
ferrules on the multistranded cables before assembly.
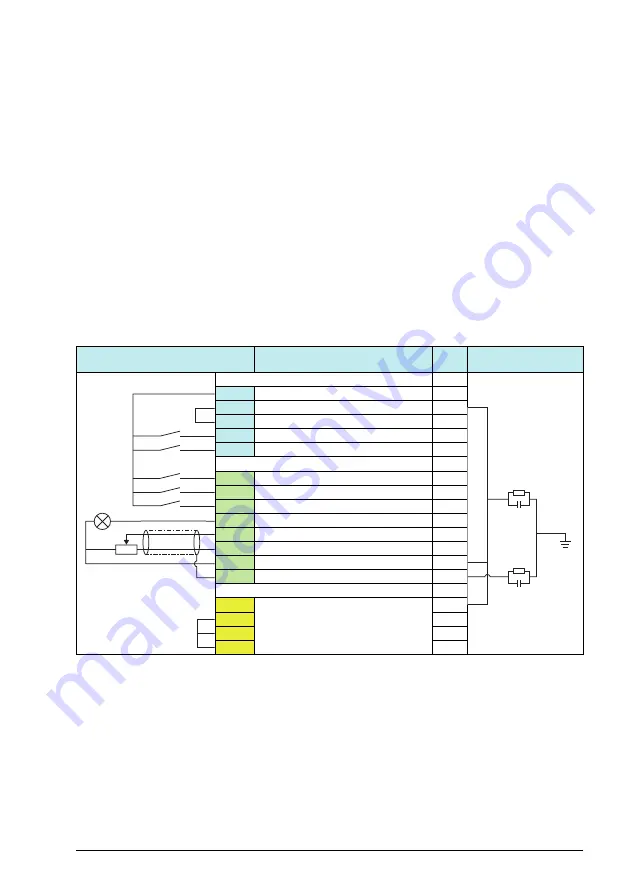
Sample wiring with the ABB standard macro:
Start-up
The BIO-01 module is automatically identified by the drive firmware. To configure the
inputs refer to the
ACS380 firmware manual
(3AXD50000029275 [English])
.
Terminals
External sample connection
Description
Base
unit
Internal connection
Aux. voltage output and prog. digital input
+24V
Aux. 24 V DC, max. 200 mA
X
DGND
Aux. voltage output common
X
DCOM
Digital input common for all
X
DI1
Stop (0)/Start (1)
X
DI2
Forward (0)/Reverse (1)
X
Digital and analog I/O extension BIO-01
DI3
Constant frequency/speed selection
DI4
Constant frequency/speed selection
DI5
Ramp set 1 (0)/Ramp set 2 (1)
DO1
Not configured
AI1
Output frequency/speed ref: 0...10 V
+10V
Ref. v10 V DC (max. 10 mA)
GND
Analog circuit common / DO common
SCR
Signal cable shield / DO screen
Safe torque off (STO)
SGND
Safe torque off. Factory connection.
Both circuits must be closed for the
drive to start.
X
IN1
X
IN2
X
OUT1
X
Summary of Contents for ACS380 Series
Page 1: ...ABB MACHINERY DRIVES ACS380 drives Hardware manual...
Page 4: ......
Page 12: ...12 Table of contents...
Page 20: ...20 Safety instructions...
Page 46: ...46 Mechanical installation...
Page 60: ...60 Planning the electrical installation...
Page 86: ...86 Maintenance...
Page 120: ...120 Technical data...
Page 122: ...122 Dimension drawings Frame R0 1 phase 230 V...
Page 123: ...Dimension drawings 123 Frame R0 400 V...
Page 124: ...124 Dimension drawings Frame R1 230 V...
Page 125: ...Dimension drawings 125 Frame R1 3 phase 230 V and 3 phase 400 V...
Page 126: ...126 Dimension drawings Frame R2 230 V...
Page 127: ...Dimension drawings 127 Frame R2 400 V...
Page 128: ...128 Dimension drawings Frame R3 400 V...
Page 129: ...Dimension drawings 129 Frame R4 400 V...
Page 130: ...130 Dimension drawings...
Page 138: ...138 Resistor braking...
Page 169: ...BTAC 02 pulse encoder interface module 169 Dimensions 3AXD50000031154 rev A...


