


Chapter 9 The VPN Transport Screens
User’s Guide
117
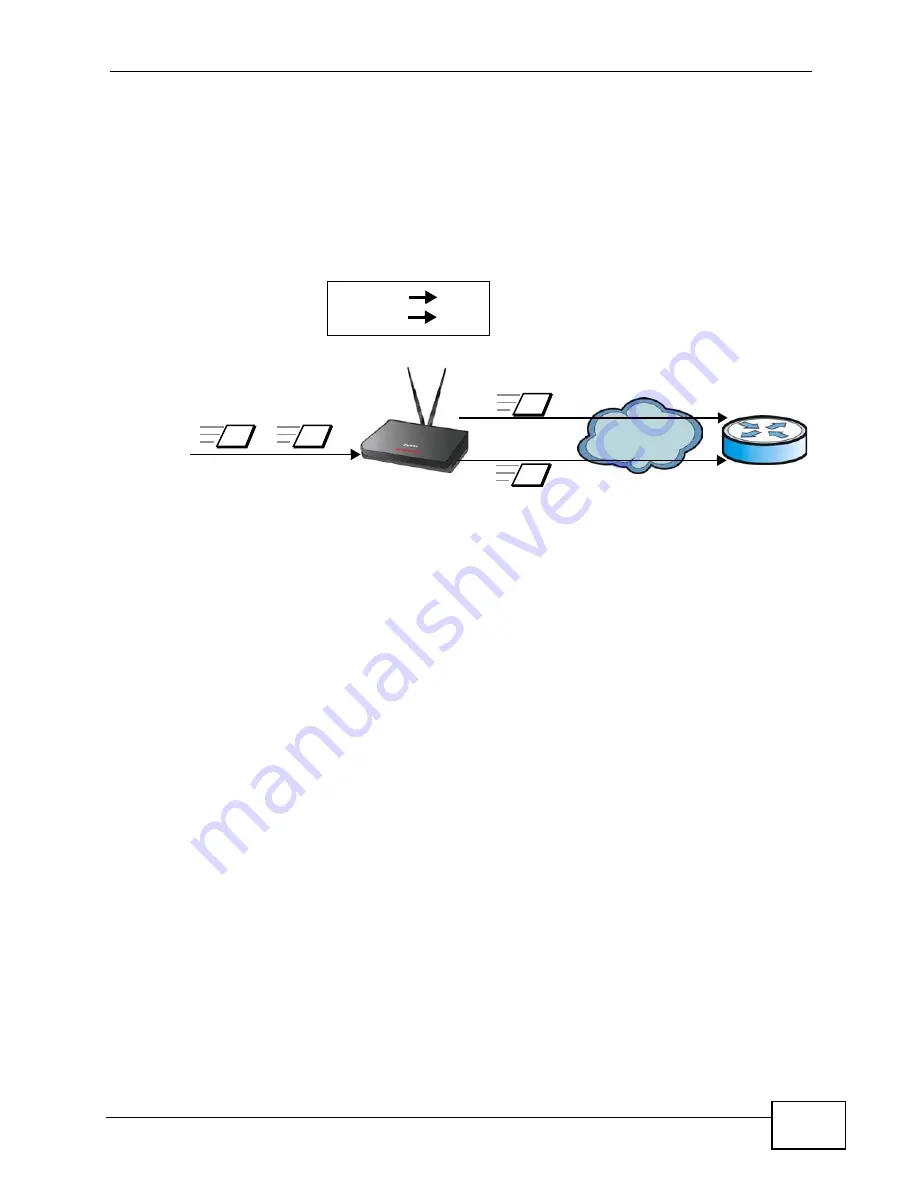
interface is simply a set of information that takes frames from a VLAN and put
them on an Ethernet pseudowire, and vice versa.
In this example, the WiMAX Device takes frames tagged with two different VLAN
IDs (10 and 20) and using the customer interfaces, assigns them to specific
pseudowires (PW1 and PW2).
Figure 49
Pseudowire Mapping
The WiMAX Device has a default customer interface configured for frames that
arrive at the WiMAX Device without VLAN tags.
9.3.1 Multi-Protocol Label Switching
The WiMAX Device uses MPLS VPNs to create virtual private LANs. MPLS stands for
Multi-Protocol Label Switching, and is a packet-switching technology that allows
packets with different VLAN tags to be transported on different paths (known as
LSPs, or Label Switched Paths). Each packet is identified by its VLAN tag and sent
to a specific LSP for transport over the WiMAX network.
Each LSP has a defined start-point and end-point. Since MPLS creates mono-
directional paths (traffic flows in only one direction), each Ethernet pseudowire
uses two LSPs so that traffic can flow both ways. One LSP carries upstream traffic,
and the other carries downstream traffic.
9.3.2 Generic Routing Encapsulation
In order to transport the VPLS traffic over the WiMAX network, the WiMAX Device
uses the Generic Routing Encapsulation (GRE) protocol. Like MPLS, GRE is a
tunneling protocol that has specified endpoints. The GRE tunnel is bi-directional,
and transports both LSPs. The GRE tunnel runs across the WiMAX network
between the WiMAX Device and your service provider’s router.
VLAN 10
PW1
VLAN 20
PW2
10
20
PW1
PW2
1
2
WiMAX
R
Содержание MAX-306
Страница 2: ......
Страница 8: ...Safety Warnings User s Guide 8...
Страница 10: ...Contents Overview User s Guide 10...
Страница 30: ...30...
Страница 36: ...Chapter 1 Getting Started User s Guide 36...
Страница 46: ...Chapter 2 Introducing the Web Configurator User s Guide 46...
Страница 64: ...Chapter 4 VoIP Connection Wizard User s Guide 64...
Страница 65: ...65 PART II Basic Screens The Main Screen 40 The Setup Screens 67...
Страница 66: ...66...
Страница 74: ...74...
Страница 88: ...Chapter 6 The LAN Configuration Screens User s Guide 88...
Страница 112: ...Chapter 8 The Wi Fi Configuration Screens User s Guide 112...
Страница 134: ...Chapter 10 The NAT Configuration Screens User s Guide 134...
Страница 145: ...145 PART IV Voice Screens The Service Configuration Screens 147 The Phone Screens 165 The Phone Book Screens 175...
Страница 146: ...146...
Страница 164: ...Chapter 12 The Service Configuration Screens User s Guide 164...
Страница 180: ...Chapter 14 The Phone Book Screens User s Guide 180...
Страница 182: ...182...
Страница 202: ...Chapter 15 The Certificates Screens User s Guide 202...
Страница 212: ...Chapter 16 The Firewall Screens User s Guide 212...
Страница 226: ...Chapter 18 The Remote Management Screens User s Guide 226...
Страница 242: ...Chapter 19 The Logs Screens User s Guide 242...
Страница 252: ...Chapter 20 The UPnP Screen User s Guide 252...
Страница 265: ...265 PART VI Troubleshooting and Specifications Troubleshooting 267 Product Specifications 275...
Страница 266: ...266...
Страница 274: ...Chapter 22 Troubleshooting User s Guide 274...
Страница 278: ...278...
Страница 310: ...Appendix B Setting Up Your Computer s IP Address User s Guide 310...
Страница 336: ...Appendix D Pop up Windows JavaScripts and Java Permissions User s Guide 336...
Страница 380: ...Appendix F Importing Certificates User s Guide 380...
Страница 382: ...Appendix G SIP Passthrough User s Guide 382...
Страница 398: ...Appendix J Customer Support User s Guide 398...
Страница 405: ...Index User s Guide 405...