


Chapter 2
______________________________________________________
Zaxcom Fusion User’s Manual
80
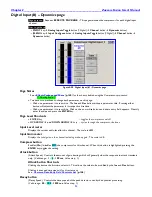
Input Configure page (Analog Inputs selected)
Page purpose:
It sets the parameters of the analog inputs. This includes Mic/Line Level, Highpass Filtering, Mic
Powering, Gain Trim and Digital Delay.
How to get here:
(
INPUT
key
)
(
MENU
key
Input Configure
button
)
Figure 2-43 Input Configure page (Analog Inputs selected)
Page Notes
See
– Effects Package and More
{
p.142
} for the theory behind using the High Pass Filter.
** Coming Soon **
Page Level Shortcuts
1
–
8
keys
– equivalent to pressing the appropriate
Channel
button
, changes to the
Analog Input (#) page
{
p.82
} for the selected channel.
Analog Channel buttons
Pressing it takes you to the
Analog Input (#) page
{
p.82
}.
Default settings: Line level, HPF Off, 48V Off, Limiter Off
Analog/Digital/Line Lvl Inputs Toggle button
Toggles this page between the
Input Configure page (Analog Inputs selected)
{
p.80
}, Input
Configure page
(Digital Inputs selected)
{
p.90
} and
Input Configure page (Line Lvl Inputs selected)
{
p.100
}.
High Pass Filter button
Each analog input can have a highpass filter applied to it. You can enable a highpass filter for both line- and mic-
level inputs.
Enabling the Highpass Filter
1.
Press the
High Pass Filter
button
The button‟s LED indicator flashes green while it is active.
2.
Set the Highpass Frequency.
Setting and changing the Highpass Frequency is outlined in the
High Pass Hz button
{
p.81
}.
3.
Press the
Channel
button
to apply the highpass filter settings.
The HPF indicator changes to purple with the highpass frequency indicated.
4.
Repeat Step 3 for each channel you want to change.
5.
Once the last channel has been changed, press the
High Pass Filter
button
again or the
ENTER
key
.
The LED stops flashing.
NOTE:
You can set different frequencies for each channel, simply repeat steps 2 and 3 for each frequency.