


YORK INTERNATIONAL
14
Ty-wrap the cable to the support as needed. Additionally,
the J19 jumper on both Microprocessor Boards MUST
be in the RS-485 position (Top 2 pins). See page 37.
Procedure #2
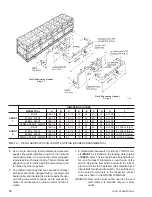
If a transient protection circuit board is installed in the
SLAVE PANEL (Fig. 7A), continue, otherwise, perform
Procedure #1.
Included in the Splice Kit is a second LTP Board which
is to be installed on the Master Micro Board. Install the
board as shown in Fig. 7B by carefully loosening the
terminals on TB7. Orient the board as shown with the
component side up and insert all 6 pins into TB7 as
shown. Carefully tighten each terminal.
Carefully, loosen the terminals of J1 on the LTP boards
in the Master and Slave control panels and install the
cable as shown in Fig. 8. Do not connect the shield in
the Master Panel. Assure that the shield, jumper, and
180 ohm resistor are installed in the Slave Panel LTP
board as shown in Fig. 8.
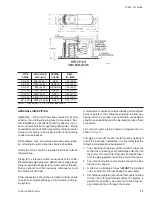
MIXED WATER TEMP. SENSOR INSTALLATION
A Mixed Leaving Water Temperature Sensor MUST be
installed in the common leaving water line coming from
the two evaporators. The sensor must be installed a
minimum of 5 pipe diameters from the intersection of
the leaving water lines. Assure that the sensor is totally
immersed in heat conductive compound. (Minnesota
Paints type #11149 or equiv.) inside the sensor well.
Connect the sensor plug to the plug which is factory
mounted on the cable. The cable should then be routed
back to the Master Control Panel. Before placing the
connector on the unterminated end of the cable, route
the cable through the hole in the bottom of the Control
Panel as shown in Fig. 9.
FIG. 7A
TRANSIENT PROTECTION CIRCUIT
BOARD (LTP) INSTALLED IN SLAVE
PANEL
FIG. 7B
TRANSIENT PROTECTION CIRCUIT
BOARD (LTP) INSTALLED IN MASTER
PANEL
LD01915
LD01916
FIG. 8
COMMUNICATIONS CABLE CONNECTION
LD01917
Содержание YDAJ87HU7
Страница 4: ...YORK INTERNATIONAL 4 FIG 1 UNIT COMPONENTS Typical on each of the two modules 00023TG 00024TG...
Страница 5: ...FORM 150 75 NM2 5 YORK INTERNATIONAL FIG 1 UNIT COMPONENTS Cont d LD01910 00025TG...
Страница 24: ...YORK INTERNATIONAL 24 MASTER MODULE WIRING DIAGRAM LD01933 FIG 17 MASTER MODULE CONNECTION DIAGRAM...
Страница 30: ...YORK INTERNATIONAL 30 SLAVE MODULE WIRING DIAGRAM FIG 20 SLAVE MODULE CONNECTION DIAGRAM LD01941...
Страница 99: ...FORM 150 75 NM2 99 YORK INTERNATIONAL...