background image

Содержание OxiTop Control OC 100

Страница 1: ...OPERATING MANUAL ba31114e07 08 2014 ON OFF GLP RUN ENTER OC 1x0 OxiTop Control OC 100 OxiTop C or OxiTop C B BOD OXYGEN CONSUMPTION BOD RESPIRATION BIOGAS DETERMINATION...

Страница 2: ...Copyright 2016 Xylem Analytics Germany GmbH Printed in Germany...

Страница 3: ...tic switch off 12 3 3 Initial commissioning 12 3 3 1 Inserting the supply battery holder controller 12 4 Operation 15 4 1 General operating principles 15 4 1 1 Keys controller 15 4 1 2 Socket field co...

Страница 4: ...ibration interval Calinterval 46 7 4 6 Data storage 47 7 4 7 AutoTemp 47 7 4 8 Switch off interval 49 7 4 9 Language 50 7 5 Check 51 7 5 1 Showing the measuring heads 51 7 5 2 Measuring head informati...

Страница 5: ...messages 69 10 2 Display messages on the charging status of the batteries 74 10 2 1 Batteries in the controller 74 10 2 2 Battery in the measuring head 74 10 3 General information 75 11 Technical dat...

Страница 6: ...Contents OxiTop Control OC 100 6 ba31114e07 08 2014...

Страница 7: ...s determina tion with the measuring head OxiTop C B Accessories see WTW catalog and price list 1 2 The measurement principle The respirometric measurement is a pressure measurement If oxygen is consum...

Страница 8: ...ead and stored in the sample management Starting at the OxiTop sample management it is possible to make the graphical and statis tical evaluation of the sample data The data can be transferred from th...

Страница 9: ...damaged if the actions mentioned are not taken 2 1 2 Safety signs on the meter Note all labels information signs and safety symbols on the instrument A warning symbol triangle without text refers to s...

Страница 10: ...ronmental conditions mentioned in this operating manual The instrument may only be opened if this is explicitly described in this operating manual example Changing the batteries 2 2 3 Unauthorized use...

Страница 11: ...measuring heads are pow ered by batteries A low battery status of the controller or measuring head is automatically indicated by a display message and a signal tone after the instru ment is switched o...

Страница 12: ...er controller Loosen the 4 screws underneath the housing using a Phillips screwdriver Place the controller on the lower case Remove the upper case and put it down to the right next to the lower case w...

Страница 13: ...wer case turn the controller and tighten the housing screws using the screwdriver Switch on the controller The battery insertion was successful if no error message appears concerning the supply batter...

Страница 14: ...Commissioning OxiTop Control OC 100 14 ba31114e07 08 2014...

Страница 15: ...a IR interface 3 RUN ENTER Confirmation of entries 4 Select and change settings Function keys 5 ORG Sample management List of samples reading calling up deleting the data of indi vidual measuring head...

Страница 16: ...ommunication with the PC Usage of the RS232 interface is exclusively intended with the WTW software Achat OC see section 8 1 ACHAT OC SOFTWARE page 62 The current date and time appear for approx 2 sec...

Страница 17: ...even per manent ranges and the corresponding filling volumes The function is permanently switched on BOD Standard Measurement of up to 12 parallel sample processes per overall sample for a BODx x 0 5h...

Страница 18: ...this by a short flashing signal The OxiTop measuring head is indicated by the symbol Action Press button The instrument displays Description of what the action caused and possible further request SEL...

Страница 19: ...tarting the mea surement Measuring Select operating mode Select settings Operating mode and settings cannot be changed for a measure ment once it is started GLP Time End of measurement Start of measur...

Страница 20: ...Operation OxiTop Control OC 100 20 ba31114e07 08 2014...

Страница 21: ...essels and close them tightly NOTE Never use joint grease or other lubricants for your OxiTop measuring heads Some of these products contain solvents that can cause severe damage to the plastic housin...

Страница 22: ...Confirm with RUN ENTER Set the required Id number setting range 001 255 with Confirm with RUN ENTER Use PRINT to print out the entire sample information in BOD Routine mode only see section 6 PRINTIN...

Страница 23: ...asuring head is started e g because the controller was not held to or not close enough to a measuring head The start was stopped Use RUN ENTER Continue start to confirm Continue start and hold the con...

Страница 24: ...ta of all active measuring heads in the scanner mode The controller stores the data obtained and updates the SAMPLE STATUS TYPE list sample management Duration of a pass approx 3 seconds for 12 measur...

Страница 25: ...e Message that all the data of all the measuring heads has been called up The instrument then returns to the entry menu 40 cm to 1 m RUN ENTER Immediately after the complete measurement data records o...

Страница 26: ...led plus checkmark The sample is ready The complete data set is given in the con troller for evaluation 3 BOD type and run duration B20h BOD with 20 hours run duration BOD5 BOD with 5 days run duratio...

Страница 27: ...nt sample The header line contains the following data of the selected sample Sample number ID number e g I001 BOD type and run duration SAMPLE STATUS TYPE list sample management Use to select a sam pl...

Страница 28: ...ntroller You can only erase a sample if it is finished in non finished samples the menu item Erase sample does not appear SAMPLE STATUS TYPE list sample management Use to select a fin ished sample Sel...

Страница 29: ...samples see section 5 3 CALLING UP ALL DATA page 24 Select the list menu item with The list of measuring heads of the selected sample is displayed together with the serial numbers of the measuring he...

Страница 30: ...u of the selected sample Preselected Call up data Point the controller at the measuring heads Sequential call up of the mea suring heads allocated to the sample in this example 7 in the scanner mode T...

Страница 31: ...ff and the following dis play appears Use RUN ENTER to restart the data transfer see above Return to the SAMPLE STATUS TYPE list sample management Transferred and completed samples appear with a check...

Страница 32: ...suring heads from the data stock The completed sample is given the finished status Back Jumps back to the previous menu Abort using a function key The stopped sample is not declared as finished Case 3...

Страница 33: ...m ple Use PRINT to print out the results with curves 1 End of measuring range 2 Mean value Evaluation of the sample Display of all the curves together with mean value data Check the display for outlie...

Страница 34: ...ressing of RUN ENTER changes directly to the cursor interrogation RUN ENTER When jumping to the selection menu from Show all curves the menu item Exclude curve is not displayed Results of the finished...

Страница 35: ...NT page 26 is used to find leaky or defective single samples The curve is only excluded temporarily The data stock of the SAMPLE STATUS TYPE list sample management does not change The excluded curve i...

Страница 36: ...the Y axis is automatically adapted to the measured value 2 Measuring time at the cursor position 3 Measured value at the cursor position Use to run through the curve values Use PRINT to print out the...

Страница 37: ...A measured curve undercutting the measuring range at its end point Sample displays Display of a single curve Display of all curves When samples are inserted that are too cold the maximum AutoTemp tim...

Страница 38: ...trol OC 100 38 ba31114e07 08 2014 After the exclusion of the defective curve see section 5 5 2 EXCLUDING A CURVE BOD STANDARD OPERATING MODE page 35 the controller displays the mean value again A meas...

Страница 39: ...erface Print date and print time Sample number Measured value mean value SD n with parallel samples or end value with single samples Type and run duration measurement range Start date and start time e...

Страница 40: ...1114e07 08 2014 Printing from the evaluation If the controller is in the display of all curves with cursor display in the display of the single curves with or with out cursor interrogation the printou...

Страница 41: ...les Show Settings The current settings are displayed here Settings Here you can undertake or change the following settings Operation mode Measuring time date time GLP calibration interval not in the B...

Страница 42: ...NTER Point the controller at the measuring heads All free measuring heads flash for approx 5 seconds GLP 40 cm to 1 m GLP TOOLS menu Select the Show Settings menu item with The following example illus...

Страница 43: ...P Setting Default setting bold and setting range Operating mode BOD Routine BOD Standard Operational life 5 days 0 5 h to 99 days 5 days 0 5 h to 99 days Date current current Time current current GLP...

Страница 44: ...urement Confirm with RUN ENTER Select the required operating mode Confirm with RUN ENTER Back Return to the main menu SETTINGS RUN ENTER SETTINGS menu Use to select the Measuring time menu item Set th...

Страница 45: ...l To make the documentation of the test resource monitoring easier and simpler the OxiTop Control system has a GLP mode When this mode is switched on the following data are documented the calibration...

Страница 46: ...libration is performed or the Off setting is selected SETTINGS menu Use to select the GLP menu item GLP menu Preselected GLP Confirm with RUN ENTER Use to select either GLP On or Off Confirm with RUN...

Страница 47: ...rements from 15 C up to 20 C You can tightly close the sample bottle with the measuring head imme diately and start the measurement The AutoTemp function then auto matically triggers the start of the...

Страница 48: ...With a further drop in pressure consumption or constant pressure after the adaptation phase the pressure value at the end of the adap tation phase is the starting point of the measurement On a further...

Страница 49: ...23 hours Since the measurement times are very short the sys tem always suppresses the AutoTemp phase here even if the AutoTemp function is switched on in the set tings 1 2 3 4 5 days 14 28 42 56 70 mi...

Страница 50: ...Interval 5 minutes To change it Confirm with RUN ENTER Set the required number of min utes with Confirm with RUN ENTER Back to the SETTINGS menu RUN ENTER SETTINGS menu Use to select the Language menu...

Страница 51: ...menu GLP TOOLS Use to select the Check menu item CHECK menu Preselected Show SHOW menu Preselected Show free Use to select either Free or All Point the controller at the measuring heads All the measu...

Страница 52: ...measuring head free used defective If the measuring head is used Use to scroll through the display of further information Start date Final date Sample number Type and Measuring range of the measuremen...

Страница 53: ...MODE BOD STANDARD page 45 To perform the test you need the WTW test resource OxiTop PM order number 209 333 Sample preparation see operating manual of the OxiTop PM test resource CHECK menu Use to se...

Страница 54: ...ether with the other samples in the SAMPLE STATUS TYPE list sample management The BOD type is CAL SAMPLE STATUS TYPE list sample management RUN ENTER Use to select the test sample Entry into the evalu...

Страница 55: ...switched on and the test is finished Stop Return to the curve display The Cal test is considered as not performed The controller sets a new test date in the measuring head The controller calculates th...

Страница 56: ...n the OxiTop PT test resource to 5 scale parts Tightly screw the measuring head to be tested onto the Oxi Top PT test resource Exceeding the time causes a return to the CHECK menu Exceeding the time c...

Страница 57: ...list of the finished samples The oldest finished sample is marked With you can mark further samples With you can remove the marking again The controller asks if you really want to erase the marked sa...

Страница 58: ...GLP TOOLS OxiTop Control OC 100 58 ba31114e07 08 2014 If no finished samples are available in the memory the follow ing display appears...

Страница 59: ...elect the Reset release menu item The serial number of the mea suring head and the sample number appear on the display Reset release Confirm with RUN ENTER The release for the measuring head has been...

Страница 60: ...are restored one after the other in a sequence It is not possible to leave this function and to continue it afterwards because then the memory would no longer be empty Select the Restore data menu ite...

Страница 61: ...suring head If the memory of the controller is not empty the following is displayed for approx 3 seconds After this the RESTORE DATA menu is displayed again It is not possible to restore the data with...

Страница 62: ...ware With the Achat OC software you can Execute the sample management of the controller on the PC back up the data regularly Comfortably display the sample management together with addi tional informa...

Страница 63: ...e Remove the upper case and put it down to the right next to the lower case with the display downwards 1 Screws 1 Supply batteries in the battery holder lower case 2 Data backup battery upper case LIS...

Страница 64: ...turn the controller and tighten the housing screws using the screwdriver Switch on the controller The battery change was successful if no error message appears concerning the supply batteries It is r...

Страница 65: ...Loosen the 4 screws underneath the housing using a Phillips screw driver Place the controller on the lower case Remove the upper case and put it down to the right next to the lower case with the disp...

Страница 66: ...s message is a reminder and should be acknowledged by press ing RUN ENTER The battery change was successful if no error message appears concerning the data backup battery Enter the current date time a...

Страница 67: ...locking pin lower case Caution Do not crush the cable connection Close the upper case let the hook snap into place Check if the battery change was successful In the GLP TOOLS Check info menu Batteries...

Страница 68: ...e outside of the measuring instrument with a damp lint free cloth NOTEThe housing is made of synthetic material ABS Thus avoid contact with acetone or similar detergents that contain solvents Remove a...

Страница 69: ...kup battery was changed Set the clock see section 7 4 3 DATE TIME page 45 defective The selected measuring head is defective Please return it to WTW Select a new and free measuring head or Stop start...

Страница 70: ...for the selected measuring head Date time is not correctly set in the controller Use another free measuring head that has been checked Start the due measuring head with the Cal test see section 7 5 4...

Страница 71: ...he finished samples must be performed If the measurement data of the measuring heads are not yet fin ished no instant remedy is possi ble The memory capacity limit of the instrument has been reached M...

Страница 72: ...Are the sealing surfaces of the bot tle and measuring head clean and fault free Are there cracks in the sleeve bottle or measuring head Perform a cal test see section 7 5 4 CAL TEST page 53 Check the...

Страница 73: ...er incuba tors further storage locations The measuring heads have no optical contact with the controller Distance too great angular position imprecise IR window of the measuring head averted from the...

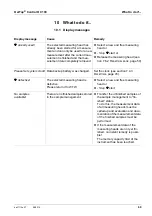
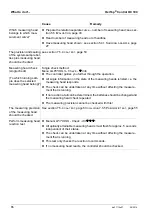
Страница 74: ...ve available Please obtain new batteries and replace the old ones The message appears for approx 3 seconds The instrument then switches itself off The instrument can no longer be used The supply batte...

Страница 75: ...tion 7 GLP TOOLS page 41 The controller causes the free measuring positions to flash for 5 seconds Measuring head uninten tionally started for mea surement Measuring head started with incorrect settin...

Страница 76: ...ingle information on the state of the measuring heads is listed i e the measuring head responds The check can be undertaken at any time without affecting the measure ment that is running If no reactio...

Страница 77: ...l tone should show the required reaction Check the function of the clock prerequisite Clock is set Switch off the instrument and switch it on again Time and date each appear showing the current values...

Страница 78: ...atteries are empty No paper or the wrong paper is loaded Printing is not possible in the oper ating state of the controller selected The printer or the controller is defective Switch on the printer Es...

Страница 79: ...CD graphic display 64 x 128 pixels Memory capacity Data of 120 measuring heads Power supply Supply batteries 3 pieces alkaline alkali manganese size Mignon AA AM3 LR6 Data backup battery 1 piece lithi...

Страница 80: ...res sure 2000 hPa mbar Accuracy 1 of the measured value 1 hPa Resolution 1 hPa Display LED pilot lamp Power supply 2 x lithium battery CR2430 Battery runtime Typically 2 years in case of normal use Pr...

Страница 81: ...P calibration interval 46 GLP TOOLS 41 I Initial commissioning 12 K Keys controller 15 L Language 50 M Menus and dialogs 18 O Operating modes 17 BOD Routine 21 BOD Standard 21 P Pneumatic test 55 Powe...

Страница 82: ...OxiTop Control OC 100 82 ba31114d07 08 2014...

Страница 83: ......

Страница 84: ...buildings factories and farms In more than 150 countries we have strong long standing relationships with customers who know us for our powerful combination of leading product brands and applications...

Отзывы: