background image

2-27

This chapter includes:


Main Components and Their Functions 

on page 2-28

Printer Configurations 

on page 2-31

Control Panel 

on page 2-32

Power Saver Modes 

on page 2-36

Checking Status of Print Data 

on page 2-37

Displaying Optional Accessory Configuration and Paper Tray Settings 

on page 2-38

More Information 

on page 2-38

Printer Features

2

Содержание DocuPrint C3290 FS

Страница 1: ...DocuPrint C3290 FS User Guide...

Страница 2: ...of whether they will be used The data saved in the hard disk of the machine may be lost if there is any problem in the hard disk Fuji Xerox is not responsible for any direct and indirect damages arisi...

Страница 3: ...he necessary operating information about the printer copier scanner and facsimile functions Please read this guide carefully before use to obtain the best performance of your printer This guide assume...

Страница 4: ...l Specifications 1 24 Electrical Specifications 1 25 Performance Specifications 1 26 Controller Specifications 1 26 2 Printer Features Main Components and Their Functions 2 28 Front View 2 28 Rear Vie...

Страница 5: ...ia USB 4 45 Connecting via Parallel 4 46 Configuring the Network Address 4 47 TCP IP and IP Addresses 4 47 Automatically Setting the Printer s IP Address 4 47 Dynamic Methods of Setting the Printer s...

Страница 6: ...Envelopes 5 81 Printing Labels 5 84 Printing Glossy Paper 5 89 Printing Custom Size or Long Paper 5 94 Defining Custom Paper Sizes 5 94 Printing on Custom Size Paper 5 95 Printing Confidential Documen...

Страница 7: ...lt Scan Settings 7 130 Changing the Scan Settings for an Individual Job 7 133 8 Faxing Fax Setup 8 135 Basic Faxing 8 137 Sending a Fax from the Printer 8 137 Sending a Fax from Your Computer 8 138 Us...

Страница 8: ...ams 10 177 Paper Jams in Tray 1 MPT 10 178 Paper Jams in the Paper Tray 10 181 Paper Jams at the Automatic Document Feeder 10 184 Paper Jams at the Fuser 10 186 Paper Jams at the Duplex Unit 10 188 Pa...

Страница 9: ...1 217 Consumables 11 217 Routine Maintenance Items 11 217 When to Order Supplies 11 218 Recycling Supplies 11 218 Managing the Printer 11 219 Checking or Managing the Printer with CentreWare IS 11 219...

Страница 10: ...uide PDF this guide Describes how to get ready to print and set various features It also covers the control panel menus troubleshooting tips and maintenance information This guide is on the Software a...

Страница 11: ...a network 5 Printing Basics Describes the supported paper how to load paper and how to print data using various print features including Secure Print and Proof Print 6 Copying Describes how to copy d...

Страница 12: ...uters and workstations are collectively called computers 2 The following terms are used throughout this guide Important Important information that must be read and followed Note Additional information...

Страница 13: ...1 10 This chapter includes Safety Notes on page 1 11 Environment on page 1 21 Regulation on page 1 22 Printer Specifications on page 1 24 Printer Information 1...

Страница 14: ...should be followed Used for item that if not followed strictly can lead death or severe or fatal injuries and the possibility to do it is comparatively high Used for items that if not followed strictl...

Страница 15: ...sult a qualified electrician This equipment is to be used on a branch circuit or outlet that has larger capacity than rated ampere and voltage of this machine See data plate on the rear panel for the...

Страница 16: ...age the cord and cause fire or electric shocks Always switch off and unplug the machine when it is not used over weekends or long holidays Always switch off the machine and the switchboard branch circ...

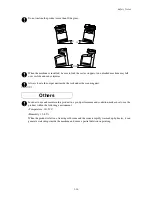
Страница 17: ...r that emits oily fumes or steam The machine only the main unit including consumables weighs 41kg Make sure to carry the equipment by three or more persons When lifting the machine face the front pane...

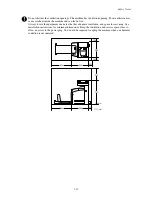
Страница 18: ...Always locate the equipment in an area that has adequate ventilation and space for servicing See installation instructions for minimum dimensions Keep the ventilation and service space clear to allow...

Страница 19: ...unit inside the rack under the scanning unit Others In order to use and maintain this product in a good performance and condition make sure to use the product within the following environment Temperat...

Страница 20: ...been tripped Liquid has spilled into the equipment The equipment is exposed to water Any part of the equipment is damaged Never push objects of any kind into slots or openings on the equipment Do not...

Страница 21: ...injury or burn Switch off the machine immediately and contact your Fuji Xerox Customer Support Center Do not apply excessive force to press a thick document against the platen glass when you make a c...

Страница 22: ...Consult a physician immediately When replacing the drum and toner cartridges be careful not to spill the toner In case of any toner spills avoid contact with skin and clothing as well as inhalation a...

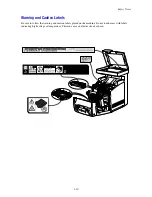
Страница 23: ...1 20 Warning and Caution Labels Be sure to follow the warning and caution labels placed on the machine Do not touch areas with labels indicating high voltage or temperature This can cause an electric...

Страница 24: ...ime In this mode the machine lowers the fuser temperature and saves the power consumption The default low power mode start time is set at 5 minutes The recovery time from low power mode is about 30 se...

Страница 25: ...io or television reception which can be determined by turning the equipment off and on the user is encouraged to try to correct the interference by one or more of the following measures Reorient or re...

Страница 26: ...ples of items that may be illegal to copy or print in your country Currency Banknotes and checks Bank and government bonds and securities Passports and identification cards Copyright material or trade...

Страница 27: ...h 460 mm Depth 520 mm Height 730 mm Weight 41 kg including consumable Environmental Specifications 10 C to 32 C and a relative humidity range of 15 percent to 85 percent Humidity should be 85 percent...

Страница 28: ...ess Power Saver Mode 2 System 17 W or less Standby less than 90 W fuser on Continuous color or monochrome printing average 500 W or less This printer does not consume electric power when the power swi...

Страница 29: ...or Speed 400 MHz processor Memory Printer 256 MB Copy Scan Fax 128 MB Expandable to combined memory of 1408 MB Resident Fonts PCL 5 PCL 6 PostScript 3 Interfaces Ethernet 10 100 Base Tx Universal Seri...

Страница 30: ...2 28 Printer Configurations on page 2 31 Control Panel on page 2 32 Power Saver Modes on page 2 36 Checking Status of Print Data on page 2 37 Displaying Optional Accessory Configuration and Paper Tray...

Страница 31: ...tion includes Front View on page 2 28 Rear View on page 2 29 Internal View on page 2 30 Scanner on page 2 30 Front View 1 Front door A 2 Control panel 3 Output tray 4 Power switch 5 Button A for openi...

Страница 32: ...d Their Functions 2 29 Rear View 1 Power cord connector 2 USB port 3 Parallel port 4 Telephone line out 5 Fax line in 6 Optional memory slot 7 Multi protocol network card 8 Network connector 6180mfp 0...

Страница 33: ...1 Fuser 2 Print cartridge 3 Transfer unit 4 Button A for opening the front door 1 Duplex unit 1 Automatic document feed cover 2 Document guides 3 Document feed tray 4 Document glass 5 Scan bar lock s...

Страница 34: ...y features including IPP SMB WINS DDNS SSL HTTPS and IPv6 Additional Trays 550 Sheet Feeder with Cabinet Tray 3 Features Printer Configuration DocuPrint C3290 FS Memory Configuration 384 MB Resolution...

Страница 35: ...book For example you can press the Fax button and then press the upper left button to access the first entry in your address book 6180mfp 007 Clear All Error Wake Up Stop Start 001 002 003 004 005 006...

Страница 36: ...tton to recall the last fax number used or to insert pauses in fax numbers 8 Clear button Deletes a single character each time the button is pressed For use when entering email addresses and telephone...

Страница 37: ...de 2 Clear All button Press once to return to the default main menu All job settings are reset to default 3 Stop button Cancels the current print job 4 Start button Press to start a copy scan or fax j...

Страница 38: ...he Menu Map to see other information pages available for printing Configuration Page To print the Configuration page to view current information about your printer do the following 1 On the control pa...

Страница 39: ...9 157 Exiting the Power Saver Mode The printer automatically cancels Power Saver Mode 1 if the scanner lid is raised any control panel buttons are pressed or if it receives data from the computer Powe...

Страница 40: ...ow Status Setting button Displays the Status Setting screen and allows you to check the printer name printer connection port and printer status For more information about SimpleMonitor see the Help 1...

Страница 41: ...he OK button 2 Select Configuration and then press the OK button to print More Information Obtain information regarding your printer and its capabilities from the following sources Resources Informati...

Страница 42: ...ncludes Print and Scan Drivers on page 3 40 CentreWare Internet Services on page 3 40 Address Book Editor on page 3 41 Express Scan Manager on page 3 41 SimpleMonitor Software on page 3 41 Printer Man...

Страница 43: ...n administrative mode you can change the configuration of the printer set up your fax directories and manage your printer settings without leaving your computer Note Users who are not given passwords...

Страница 44: ...om the printer to your computer via USB When the scan is sent from the printer to the computer Express Scan Manager automatically manages the scan job Before scanning to your computer you should start...

Страница 45: ...figuration on page 4 43 Choosing a Connection Method on page 4 44 Configuring the Network Address on page 4 47 Installing the Printer Drivers on page 4 51 This chapter provides basic information about...

Страница 46: ...stallation see the section in this chapter for the specific operating system you are using 5 Configure the printer s TCP IP address which is required to identify the printer on the network Windows ope...

Страница 47: ...or each connection type are shown in the following table For information on each connection type see Connecting via Ethernet on page 4 44 and Connecting via USB on page 4 45 Connecting via Ethernet Et...

Страница 48: ...on page 4 51 Scanning to a Computer on a Network on page 7 118 Scanning to Email on page 7 123 Connecting via USB If you are connecting to one computer a USB connection offers fast data speeds A USB c...

Страница 49: ...to high density parallel printer cable 36 pin high density 1284 C male to 36 pin low density 1284 B male cable with a maximum length of three meters 10 feet Connect the parallel cable to the printer...

Страница 50: ...the address 192 168 1 4 Generally Macintosh computers use either TCP IP or the Bonjour protocol to talk to a networked printer For Mac OS X systems TCP IP is preferred Unlike TCP IP however Bonjour d...

Страница 51: ...either the DHCP or AutoIP protocol 1 On the control panel press the System button 2 Select the Admin menu and then press the OK button 3 Select the Network Settings menu and then press the OK button 4...

Страница 52: ...On the control panel press the System button 2 Select the Admin menu and then press the OK button 3 Select the Network Setup menu and then press the OK button 4 Select the TCP IP menu and then press...

Страница 53: ...formation about CentreWare IS click the Help button in CentreWare IS to go to the CentreWare IS Online Help After setting the printer s IP address you can modify TCP IP settings using CentreWare IS 1...

Страница 54: ...latest printer drivers Printer Driver Source Description Windows PostScript Driver also used for Windows Vista CD ROM and Web The PostScript driver is recommended to take full advantage of your print...

Страница 55: ...create a desktop USB connection or use an LPD LPR connection for Macintosh OS X version 10 2 and higher Macintosh OS X Version 10 2 and 10 3 To install the printer driver from the Software and Docume...

Страница 56: ...ing options Open the Print Center utility for Mac OS X version 10 2 x Open the Printer Setup Utility for Mac OS X version 10 3 x Note To locate utilities on the Macintosh hard drive open the Applicati...

Страница 57: ...folder 3 Click the Add button 4 Select the Default Browser in the upper left corner of the Printer Browser 5 Select the USB connected printer in the printers window The Printer Browser selects the app...

Страница 58: ...Installing the Printer Drivers 4 55 6 Enter the printer s IP address in the Address field 7 Click the Add button The printer is added to the list...

Страница 59: ...ing Paper on page 5 64 Selecting Printing Options on page 5 70 Printing on Both Sides of the Paper on page 5 76 Printing on Specialty Media on page 5 78 Printing Custom Size or Long Paper on page 5 94...

Страница 60: ...Your Printer on page 5 60 Paper Storage Guidelines on page 5 60 Using paper that is not appropriate for the printer can cause paper jams image quality problems or printer failure To use the printer a...

Страница 61: ...se envelopes with windows metal clasps or adhesives with release strips All envelopes should be printed single sided only Some wrinkling and embossing may occur when printing envelopes Do not overload...

Страница 62: ...only loose sheets of paper in the document feeder Adjust the paper guides so that they fit against the originals Insert paper in the document feeder only when the ink on the paper is completely dry D...

Страница 63: ...h is emitted by the sun and fluorescent bulbs is particularly damaging to paper items The intensity and length of exposure to visible light on paper items should be reduced as much as possible Maintai...

Страница 64: ...s follows Tray 1 MPT Paper Size Letter 8 5 x 11 Legal 8 5 x 14 Executive 7 25 x 10 5 Folio 8 5 x 13 10 Commercial 4 1 x 9 5 Monarch 3 8 x 7 5 A4 210 x 297 mm A5 148 x 210 mm B5 JIS 182 x 257 mm DL 110...

Страница 65: ...ows Trays 2 and 3 Paper Size Letter 8 5 x 11 Legal 8 5 x 14 Executive 7 25 x 10 5 Folio 8 5 x 13 A4 210 x 297 mm A5 148 x 210 mm B5 JIS 182 x 257 mm Custom 148 215 9 mm 210 355 6 mm Paper Type Weight...

Страница 66: ...ch follow the instructions displayed on the control panel You can also display the message to set the paper size and type on the control panel every time you load paper into each tray See also Descrip...

Страница 67: ...paper paper already printed on one side Custom size paper See also About Paper on page 5 61 Loading Paper in Tray 1 MPT In addition to plain paper Tray 1 MPT can use various other sizes and types of...

Страница 68: ...inting or if there is any paper still in the tray Doing so may cause a paper jam Do not put any objects other than paper on Tray 1 MPT Also do not push or force down Tray 1 MPT Always load paper short...

Страница 69: ...of the paper stack Note Be careful not to bend the paper If Tray 1 MPT is configured for DriverSpecified configure the paper size and type in the print driver When MPT Mode is set to Panel Specified...

Страница 70: ...ng on Specialty Media on page 5 78 Loading Paper in Trays 2 and 3 This section describes how to load paper in the standard and optional paper trays All trays are loaded the same way Important Do not r...

Страница 71: ...to the A4 position 3 Squeeze the green tab on the length guide and then slide the tray until the arrow lines up with the appropriate paper size The guide clicks into place The length guide extends bey...

Страница 72: ...erfilling the tray may cause paper jams 6 Slide the width guides and length guide until they rest lightly against the edge of the print media stack 7 Insert the tray into the printer and push until it...

Страница 73: ...in printer settings To select printer preferences 1 Select one of the following options Windows 2000 Windows Server 2003 and Windows Vista Click Start select Settings and then click Printers Windows...

Страница 74: ...ur application access the Print dialog box 2 Select the DocuPrint C3290 FS and click its Properties button to open the printer driver 3 Make selections from the driver tabs See the following table for...

Страница 75: ...Job Type Document size paper type and tray selection 2 sided printing Feed orientation Saved Settings Covers Separators Transparency Separators Address Book Printer Status Image Options tab Output Co...

Страница 76: ...reen to save the current printer settings You can create multiple presets and save each with its own distinctive name and printer settings To print jobs using specific printer settings click the appli...

Страница 77: ...age order Print all odd even Destination paper size ColorSync Color conversion Quartz filter Cover Page Print cover page none before document after document Cover page type Billing information Error H...

Страница 78: ...der Print all odd even ColorSync Color matching Cover Page Cover pages Paper Feed Paper source Job Types Secure prints personal prints proof prints and saved prints Image Quality Print quality RGB col...

Страница 79: ...vailable as an option Before printing a 2 sided document verify that the paper is a supported size for the tray For a list of supported paper sizes see Supported Paper and Media on page 5 57 The follo...

Страница 80: ...d then press the OK button To select automatic 2 sided printing Note If your driver does not display the options listed in the table above see Enabling Options on page 10 204 for more information See...

Страница 81: ...side only For best results use only recommended Xerox transparencies To order paper transparencies or other specialty media contact our Customer Support Center or your dealers Guidelines Remove all p...

Страница 82: ...parencies When MPT Mode is set to Panel Specified you need to set the paper type and size settings for the tray on the control panel in advance See Setting Paper Types and Sizes on page 5 63 The way t...

Страница 83: ...Paper Tray select Tray 1 MPT 6 From Paper Size select the size of the original document 7 Click OK Using the PCL Driver To print on transparencies using the PCL print driver display the Paper Output t...

Страница 84: ...d relative humidity Store unused envelopes in their packaging to avoid the effects of moisture and dryness which can affect print quality and cause wrinkling Excessive moisture can cause the envelopes...

Страница 85: ...he following explains how to load envelopes in Tray 1 MPT using Monarch as an example Note The reverse side of the envelope cannot be printed on Envelopes can get wrinkled or the print quality is redu...

Страница 86: ...as the printer to be used and click Preferences to display the Properties dialog box 3 Select the Paper Output tab 4 From Paper Tray select Tray 1 MPT 5 From Paper Type select Envelope 6 From Paper Si...

Страница 87: ...ed labels flat in their original packaging Leave the sheets of labels inside the original packaging until ready to use Return any unused sheets of labels to the original packaging and reseal it Do not...

Страница 88: ...e paper guides to fit the sheets Place the side to be printed facedown with the top of the sheets entering first Do not load more than 25 sheets 5 In the printer driver select either Labels as the pap...

Страница 89: ...ut of the printer 2 If necessary open the paper guides Squeeze the tab on the length guide and then slide it back The guide clicks into place Slide the side guides outward 3 Fan the label sheets to re...

Страница 90: ...e paper above the fill line indicated on the tray Overloading the tray may cause jams The following illustration indicates the maximum fill line for transparencies labels and glossy paper 5 If necessa...

Страница 91: ...per type a Press the System button b Select Tray Settings and then press the OK button c Select Tray 2 or Tray 3 and then press the OK button d Select Paper Type and then press the OK button e Select...

Страница 92: ...ve all other paper from the tray before loading glossy paper Load only the amount of glossy paper you are planning to use Do not leave glossy paper in the tray when you are finished printing Reinsert...

Страница 93: ...e paper type or Tray 1 MPT as the paper tray 5 If the printer is set to Panel Specified the control panel asks for media type and size Printing Glossy Paper from Trays 2 and 3 1 Pull the tray out of t...

Страница 94: ...Printing on Specialty Media 5 91 Slide the side guides outward 3 Fan the paper to release sheets that are stuck together 6180mfp 010 6180mfp 009 6180mfp 011...

Страница 95: ...Overloading the tray may cause jams The following illustration indicates the maximum fill line for transparencies labels and glossy paper 5 If necessary press the paper guides inward to fit the paper...

Страница 96: ...type a Press the System button b Select Tray Settings and then press the OK button c Select Tray 2 or Tray 3 and then press the OK button d Select Paper Type and then press the OK button e Select Glo...

Страница 97: ...000 or later an administrator s password only allows users with administrator rights to change the settings Users without the rights of administrator can only check the contents When configuring the C...

Страница 98: ...PostScript drivers Using the PCL Driver To print on custom size paper using the PCL print driver Note The way to display the printer Properties dialog box differs according to the application softwar...

Страница 99: ...using the Up Arrow and Down Arrow buttons The length of the short edge cannot be longer than the long edge even if it is within the specified range The length of the long edge cannot be shorter than...

Страница 100: ...he printer for printing Then follow the steps for the output procedure at the printer to output the printed pages Printing from the Computer This section explains the procedure using WordPad on Window...

Страница 101: ...your user name and then press the OK button 4 Using the alphanumeric keypad enter the numeric password and then press the OK button 5 Repeat Step 4 for each digit of the password and then press the OK...

Страница 102: ...ata to the printer for printing Then carry out the output procedure at the printer to output the printed pages Printing from the Computer This section explains the procedure using WordPad on Windows X...

Страница 103: ...he OK button 4 Select your user name and then press the OK button 5 Select Print and Delete or Print and Save and then press the OK button to print the job 6 Scroll to the desired number of copies and...

Страница 104: ...6 101 This chapter includes Basic Copying on page 6 102 Adjusting Copying Options on page 6 103 Copying 6...

Страница 105: ...ons on page 6 103 4 Press the Start button If you placed originals in the document feeder copying continues until the document feeder is empty Note Print jobs are interrupted when users make copies Pr...

Страница 106: ...Use for Copies on page 6 104 Selecting the Default Copy Settings on page 6 105 Specifying 2 Sided Copies on page 6 105 Selecting the Default Copy Settings on page 6 105 Selecting Color or Black and Wh...

Страница 107: ...en press the OK button Tray 1 MPT Tray 2 Tray 3 if available on your printer Note For best results specify the size and type of paper if using Tray 1 Specify the paper type if using Tray 2 or 3 Select...

Страница 108: ...ault is 1 1 Sided Copies do not begin printing until the printer has scanned all the originals for the first page When making two sided copies printing does not begin until enough pages have been scan...

Страница 109: ...size To reduce or enlarge the image 1 On the control panel press the Copy button 2 Select Reduce Enlarge and then press the OK button 3 Select one of the following options Use the Up Arrow or Down Ar...

Страница 110: ...your copies 1 On the control panel press the Copy button 2 Select Color Saturation and then press the OK button 3 Press the Up Arrow or Down Arrow button to select the level of color saturation Note...

Страница 111: ...press the OK button 5 Press the Up Arrow or Down Arrow button to select the Auto Exposure level and then press the OK button Adjusting Color Balance The Color Balance control allows you to adjust the...

Страница 112: ...riginal onto several pages that can be assembled into a poster The current reduce enlarge setting is applied To select the poster option 1 On the control panel press the Copy button 2 Select Poster an...

Страница 113: ...epeat Image feature does not work properly clean the Document Glass and then try again Centering the Image You can automatically center the copy image on the page The printer automatically reduces or...

Страница 114: ...rgins and then press the Exit button 8 You can now use the margin settings for a single copy job or you can enable the margin settings for all jobs To use the margin settings for a single job see Copy...

Страница 115: ...n 1 On the control panel press the Copy button 2 Select Collated and then press the OK button 3 Select Uncollated or Collated and then press the OK button Note The factory default is Uncollated Output...

Страница 116: ...ing to a USB Connected Computer on page 7 117 Scanning to a Computer on a Network on page 7 118 Scanning to Email on page 7 123 Scanning to a FTP Server on page 7 125 Scanning Images into an Applicati...

Страница 117: ...ection type are shown in the following table See also Printer Management Software on page 3 39 Connection Type Available Scanning Features USB When connected via USB you can Scan an image into an appl...

Страница 118: ...ntation CD ROM 1 Insert the CD ROM into your computer s CD ROM drive Note For Windows operating systems if the installer does not launch click Start click Run and then type CD drive INSTALL EXE in the...

Страница 119: ...nals faceup with the top of the page entering the feeder first Adjust the paper guides so they fit against the originals Note Do not load originals above the MAX fill line Document Glass Lift the docu...

Страница 120: ...r USB and then press the OK button 3 Select the file format a Press the OK button b Press the Up Arrow or Down Arrow button to select the format c Press the OK button 4 Press the Start button A DocuPr...

Страница 121: ...ter to send scanned images to You can either create a new folder to scan to or navigate to an existing folder that you want the scan to go to Creating a Shared Folder on Windows To share a folder 1 Op...

Страница 122: ...an to Creating an Address Before scanning you must create an address for your printer to scan to There are two ways to create the address Create the address with CentreWare IS requires Ethernet connec...

Страница 123: ...290 FS Address Book Editor 2 In the left pane of the Address Book Editor right click the Server icon and then select New The Server Address dialog box appears 3 Click the Computer SMB option button 4...

Страница 124: ...right click the Server icon and then select New The Server Address dialog box appears 6 Click the Computer SMB option button 7 Type your IP address in the Server Name IP Address field 8 Type your sho...

Страница 125: ...select Computer Network and then press the OK button 3 Select Scan to and then press the OK button 4 Press the Up Arrow or Down Arrow button to select the address that points to your computer and then...

Страница 126: ...ick the Properties tab and select SNMP from the Protocols list 4 Select the Enable SNMP check box and then click Save Changes 5 Select Email Server from the Protocols list 6 Enter your email settings...

Страница 127: ...Text on the Control Panel on page 9 175 To select an email address in the Address Book select Address Book and then press OK To select a group email address in the Address Book select E mail Group an...

Страница 128: ...ddress in the browser s Address field 3 Click the Address Book button 4 Under Server Address Book click Individual Directory 5 In the Directory Listing click the Add button of any blank address 6 Fill...

Страница 129: ...P address for the FTP Server b In the Path field enter the path to the folder you want the images placed in c If the FTP server requires you to log in enter the name and password that you log in with...

Страница 130: ...file in which you want to place the image 2 Select the application s menu item to acquire the image For example if you are using Word to place an image in a document a Select Insert b Select Picture c...

Страница 131: ...le in which you want to place the image 2 Select the application s menu item to acquire the image For example if you are using Microsoft Word to place an image in a document a Select Insert b Select P...

Страница 132: ...For example if you are using Word to place an image in a document a Select Insert b Select Picture c Select From Scanner or Camera d Select the scanner and then click the Acquire button 3 Specify the...

Страница 133: ...e 9 158 Setting the Color Mode You can scan an image in color or in black and white Selecting black and white significantly reduces the file size of the scanned images An image scanned in color will h...

Страница 134: ...fault Produces the lowest resolution and smallest file size 300x300 Produces medium resolution and a medium file size 400x400 Produces high resolution and a large file size 600x600 Produces the highes...

Страница 135: ...n 5 Select the type and then press the OK button Available types PDF factory default MultiPageTIFF TIFF JPEG Automatically Suppressing Background Variations When you are using originals printed on thi...

Страница 136: ...f settings 3 Change the selected setting and then press the OK button 4 Press the Start button to begin the scan To temporarily change a scan setting when scanning to a computer 1 Press the Scan butto...

Страница 137: ...e 8 137 Using the Address Book When Faxing on page 8 139 Selecting Fax Options for Single Jobs on page 8 144 Fax Configuration on page 8 147 Managing Fax Functions on page 8 148 Solving Fax Problems o...

Страница 138: ...in and set a country code and telephone number for the printer To prepare the printer for faxing 1 If necessary plug the telephone line from the wall into the FAX connector on the rear panel of the pr...

Страница 139: ...asked to restart the printer 5 On the printer s control panel press the System button and then select Admin Menu Fax Settings Your Fax Number and then press the OK button 6 Use the alphanumeric keypa...

Страница 140: ...ee Automatic Document Feeder Guidelines on page 5 59 2 On the control panel press the Fax button 3 Using the alphanumeric keypad enter the fax telephone number and then press the Start button 4 If you...

Страница 141: ...list select a quality setting 4 On the Transmission Report drop down list select when you d like the printer to produce a fax report The choices are Output Regularly A transmission report is generate...

Страница 142: ...ividual Address Book Entry There are two ways to create address book entries Create the address with CentreWare IS requires Ethernet connection Create the address with Xerox Address Book Editor requir...

Страница 143: ...er a value from 1 to 200 for the speed dial number Note The first ten entries in the Address Book correspond to the ten one touch buttons found on the left side of the control panel 4 Type in a value...

Страница 144: ...ion Using the Address Book Editor requires USB connection Using CentreWare IS to Create a Group To create a fax group using CentreWare IS 1 Launch your web browser 2 Enter your printer s IP address in...

Страница 145: ...mbers from the list on the left side of the screen and then click the Add button to add them to the group Note To select multiple group members press and hold the Ctrl keyboard key while making select...

Страница 146: ...ft pane click the Fax icon 3 On the upper right pane right click the group you want to edit and then select Edit 4 Click the Group Membership button 5 Use the Add and Delete buttons to edit the group...

Страница 147: ...resolution 1 On the control panel press the Fax button 2 Select Resolution and then press the OK button 3 Select an option from the list displayed and then press the OK button Note The factory defaul...

Страница 148: ...s scanned and saved to be sent at the time you specified Note If the printer is turned Off with a Delayed Start job stored the job will be processed immediately after the printer is turned back On Ena...

Страница 149: ...s the OK button Note Changing the Color Fax setting requires that the printer be turned off and then on again When faxing press the Color Mode button to switch between Black and White mode and Color m...

Страница 150: ...Up Arrow or Down Arrow button to select the setting you want to change 5 Change the settings and when finished press the Exit button Fax Configuration To access settings for configuring the printer f...

Страница 151: ...transmission report is only printed when an error occurs with the fax transmission Do Not Print A transmission report is never printed Note The factory default is Print at Error Printing a Transmissio...

Страница 152: ...n if it is on Enable This option turns on the Secure Receive Lock option if it is off 9 If you want to change your password select Change Password and then press the OK button 10 Enter a new four digi...

Страница 153: ...off the Scan Fax Lock option if it is on Enable This option turns on the Scan Fax Lock option if it is off 9 If you want to change your password select Change Password and then press the OK button 10...

Страница 154: ...dmin Reports and then press the OK button 4 Select one of the following reports and then press the OK button to print the report Speed Dial Address Book Fax Activity Fax Pending Inserting Pauses in Fa...

Страница 155: ...r to the following table and then perform the indicated operation If the fax still cannot be sent correctly even after performing the described operations contact your service representative This sect...

Страница 156: ...There may be a problem with the recipient s fax machine Make a copy to check that this machine is operating correctly and then if the copy was printed correctly have the recipient check the condition...

Страница 157: ...to receive faxes manually Set the machine to automatic reception The memory is full Load paper if it is empty and then print the faxes stored in the memory The telephone line is incorrectly connected...

Страница 158: ...is chapter includes Control Panel Menus on page 9 156 Description of Menu Items on page 9 158 Menu Map on page 9 174 Entering Text on the Control Panel on page 9 175 Using the Control Panel Menus and...

Страница 159: ...uage Use this menu to set the print language to either PCL or PostScript Network Use this menu to configure the network settings for the printer Parallel Settings Use this menu to configure the parall...

Страница 160: ...ress the Up Arrow or Down Arrow button until System Settings appears and then press the Forward Arrow or OK button 4 Press the Up Arrow or Down Arrow button until Power Saver Timer appears and then pr...

Страница 161: ...installed Lighten Darken Lightens or darkens copies Sharpness Specifies the sharpness of the copies Color Saturation Deepens or lightens the overall color levels of your copies Auto Exposure Turns Aut...

Страница 162: ...document background of off white colored paper It also helps suppress show through when copying double sided thin paper Auto Expo Level Adjusts the level of the auto exposure functionality TIFF File...

Страница 163: ...er size and type every time you load paper in Tray 1 MPT When you select On the message that prompts you to set the paper size and type is displayed The default is Off MPT Mode Specifies the way to se...

Страница 164: ...panel to set whether to print the Job History Report automatically for every 22 jobs completed For details refer to System Settings on page 9 169 Error History Prints information of up to the latest 4...

Страница 165: ...min Menu This menu contains eight submenus Phone Book Print Language Network Parallel Settings USB Settings Fax Settings System Settings Maintenance Secure Settings Admin Reports Scan to E Mail Phone...

Страница 166: ...default is 10 00 You can specify a value between 6 00 and 24 00 in increments of 0 01 Form Line Specifies the form line the number of lines per form The default is 64 You can specify a value between 5...

Страница 167: ...n the Network Settings menu cannot be set when entering this menu during printing You need to restart the printer to activate the new settings After making the settings turn off the printer and then t...

Страница 168: ...g are also available IPP default Enable SMB TCP IP SMB NetBEUI NetWare default Enable IP Filter Specifies blocking the reception of data from certain IP addresses You can block up to five IP addresses...

Страница 169: ...Restart the printer after making changes in the menu Auto Used when auto detecting the PostScript communication protocol Standard Used when the communication protocol is in ASCII interface BCP Used w...

Страница 170: ...ering an incoming call Values range from 0 to 255 seconds Line Monitor Specifies the volume of the external phone line monitor Ring Tone Volume Specifies the volume for the incoming faxes Line Type Sp...

Страница 171: ...g faxes should be printed when they are forwarded When set to On all of the forwarded faxes are printed Prefix Dial Specifies whether or not to add the prefix number when you send a fax Prefix Dial Nu...

Страница 172: ...enabled When disabled only Mode 1 is enabled PowerSaver Timer Specifies the transitional time of Power Saver Modes 1 and 2 in increments of 1 minute Mode 1 Printer 1 min to 60 min default is 30 minute...

Страница 173: ...in the printer Job History Report Off default Select this if you do not want to print the Job History Report automatically even if the number of print jobs exceeds 22 On Automatically prints a report...

Страница 174: ...t only when an error occurs during a group job Do Not print Transmission reports are not printed Protocol Monitor Specifies the protocol monitor report to detect the cause of the communication trouble...

Страница 175: ...er executing this function and restarting the printer all the menu parameters are reset to their default values You cannot initialize the NVM during printing You need to restart the printer to activat...

Страница 176: ...dress Book Prints a report of the address book email addresses Server Address Prints a report of the address book server addresses Fax Activity Prints a report summarizing sent and received faxes Fax...

Страница 177: ...o Description of Menu Items on page 9 158 Main operation and buttons on the control panel Displays the Setup screen System button Switch between the menu levels Forward Arrow button moves one level do...

Страница 178: ...button to move the cursor to the character you want to delete and then press the Cancel button If the same key is to be used to enter two or more characters in a row press the Forward Arrow button aft...

Страница 179: ...his chapter includes Paper Jams on page 10 177 Print Quality on page 10 193 Problems With the Printer on page 10 201 Control Panel Error Messages on page 10 205 Getting Help on page 10 213 Troubleshoo...

Страница 180: ...ing Paper Jams To reduce the occurrence of paper jams follow the guidelines and instructions in Printing Basics on page 5 56 It includes information about supported paper and media guides for usage an...

Страница 181: ...l the jammed paper out of Tray 1 MPT and remove any remaining paper from the tray 2 Close Tray 1 MPT 3 Push up the button and open the front cover Important Fuser is hot Do not touch areas with labels...

Страница 182: ...mmed paper in the printer Confirm that there are no scraps of paper left inside Important Prolonged exposure to light may damage the print cartridge 5 Close the front cover 6 Remove the tray from the...

Страница 183: ...any jammed paper remaining inside the printer 8 Insert the tray into the printer and push until it stops Important Do not use excessive force on the tray Doing so could damage the tray or the inside...

Страница 184: ...to remove paper jammed in the paper tray 1 Gently remove the tray from the printer 2 Remove all the jammed and or creased paper from the tray 3 If there is jammed paper remaining inside the printer pu...

Страница 185: ...r remaining inside the printer Important Prolonged exposure to light may damage the print cartridge Important Fuser is hot Do not touch areas with labels indicating high temperature and the surroundin...

Страница 186: ...Paper Jams 10 183 6 Insert the tray into the printer and push until it stops Important Do not use excessive force on the tray Doing so could damage the tray or the inside of the printer 6180mfp 013...

Страница 187: ...ADF can happen if the document feed tray is overfilled Fill the document feed tray only up to the MAX line indicated on the tray Use the following procedure to remove paper jammed at the ADF 1 Remove...

Страница 188: ...in the paper feed area remove the paper by carefully pulling it up 4 If the paper jam is at the paper exit area turn the dial to remove the paper 5 Open the document cover gently remove any jammed pa...

Страница 189: ...d remove the jammed paper 2 If the paper is torn remove any scraps of paper remaining inside the printer Important Fuser is hot Do not touch areas with labels indicating high temperature and the surro...

Страница 190: ...Paper Jams 10 187 3 Open the cover of the fuser and remove the jammed paper 4 Close the fuser cover and press down both levers 5 Close the front cover 6180mfp 044 6180mfp 033 6180mfp 050...

Страница 191: ...o not touch areas with labels indicating high temperature and the surrounding areas Otherwise you can get burnt 2 Carefully pull out the jammed paper from the duplex unit If jammed paper cannot be fou...

Страница 192: ...the transfer unit as shown in the following illustration and open the unit fully 4 Remove the jammed paper Confirm that there are no scraps of paper left inside the transfer belt unit 5 Close the tran...

Страница 193: ...ptional Sheet Feeder 1 Open the trays until you find the jammed paper Note Paper jammed in the lower tray can block the trays above it preventing you from opening them Look for the jammed paper sequen...

Страница 194: ...s of paper remaining inside the printer 4 Push the button and open the front cover Confirm that there are no scraps of paper remaining inside the printer Important Prolonged exposure to light may dama...

Страница 195: ...inside of the printer When Long Paper Jams When long paper longer than 356 mm jams inside the printer cut the paper as needed then remove it in the proper way depending on the place that the paper jam...

Страница 196: ...s Multiple colors faded The print cartridges are not genuine print cartridges Verify that the print cartridges C M Y K are genuine cartridges and replace if necessary The paper is outside the recommen...

Страница 197: ...y Streak in only one color Check the condition of the print cartridge and replace as necessary Verify that the print cartridges C M Y K are genuine cartridges and replace if necessary Recurring smudge...

Страница 198: ...5 61 The transfer unit is old or damaged Replace the transfer unit Color around the edge of printing is incorrect The color registration is incorrect Adjust the color registration See Color Registrati...

Страница 199: ...K are genuine cartridges and replace if necessary Slanted printing The paper guides in Tray 2 Tray 3 or Tray 1 MPT are not set correctly Reset the paper guides in Tray 2 Tray 3 or Tray 1 MPT See Load...

Страница 200: ...Auto Exposure For information on turning Auto Exposure on and off see Setting Auto Exposure on page 6 108 Light colors are washed out or white on the copy Auto Exposure is enabled On the Copy menu ena...

Страница 201: ...utton until Adjust Color Regi appears and then press the OK button 5 Press the Up Arrow or Down Arrow button until Auto Correct appears and then press the OK button 6 Select Yes and then press the OK...

Страница 202: ...ears and then press the OK button 4 Press the Up Arrow or Down Arrow button until Adjust Color Regi appears and then press the OK button 5 Press the Up Arrow or Down Arrow button until Color Regi appe...

Страница 203: ...Setup screen 2 Press the Up Arrow or Down Arrow button until Admin Menu appears and then press the OK button 3 Press the Up Arrow or Down Arrow button until Maintenance appears and then press the OK b...

Страница 204: ...itable voltage and current rating Is the printer connected to an uninterruptable power supply Turn off the power to the printer and connect the power cord to a suitable power outlet Is the printer con...

Страница 205: ...d the displayed error message or error code turn off the power pull out the power plug from the outlet Contact our Customer Support Center or your dealers Light of the Ready indicator is on and blinki...

Страница 206: ...the printer placed on a flat location Place the printer on a stable flat surface Are the paper tray guides set in the correct positions Set the guides to the correct positions See Loading Paper in Tra...

Страница 207: ...and select Properties 3 Click the Device Settings tab 4 Under Installable Options select Available for the option that you want to enable 5 Click the OK button Using the PCL Driver 1 Select Start sel...

Страница 208: ...ly due to damage or malfunction Reinstall the print cartridge See Checking or Managing the Printer with CentreWare IS on page 11 219 094 320 Transfer Unit Error The transfer unit is not installed corr...

Страница 209: ...ter NNN NNN The fuser is not installed correctly or is not working correctly due to damage or malfunction Reinstall the fuser Remove Tape XXX Cartridge The print cartridge is installed with the sealin...

Страница 210: ...Restart the printer If the problem persists contact Xerox Technical Support Fuser Error Error 010 397 Error Code xx Restart Printer A fuser error has occurred Restart the printer If the problem persis...

Страница 211: ...d paper Open and close the front cover See Paper Jams on page 10 177 Open Tray 3 Remove Paper Open Close Door A Paper is jammed inside Tray 3 Remove the jammed paper Open and close the front cover See...

Страница 212: ...to printer problems Turn the printer off and then on If the error continues contact our Customer Support Center or your dealers Reboot Printer 116 NNN Error 116 NNN relates to printer problems Turn t...

Страница 213: ...in the tray Fill the tray with the indicated size direction and type of paper xxx indicates the number of the tray or Tray 1 MPT See Loading Paper in Trays 2 and 3 on page 5 67 SysError NNN NNN Press...

Страница 214: ...in Error SMTP Login Failed Error 016 507 Press OK Failed to login to the SMTP server Use CWIS to verify that the user name and password settings are correct Email Size Limit Error 016 985 Press OK The...

Страница 215: ...Press OK The location you are scanning to has a file with the same name Specify a different name and then resend Network Scan Error SMTP Connection Failed Press OK Can not connect to the SMTP server...

Страница 216: ...ing help When an error or warning condition occurs the control panel displays a message informing you of the problem For more information see Control Panel Error Messages on page 10 205 SimpleMonitor...

Страница 217: ...Documentation CD ROM included with the printer To access the web site click Fuji Xerox Web Site on the startup window of the CD ROM The URL of the driver download service page is as follows http www f...

Страница 218: ...is chapter includes Cleaning the Printer on page 11 216 Ordering Supplies on page 11 217 Managing the Printer on page 11 219 Checking Page Counts on page 11 223 Moving the Printer on page 11 224 Maint...

Страница 219: ...rinter about once a month Wipe the parts with a wet but well wrung soft cloth Then wipe with another dry soft cloth For stubborn stains apply a small amount of neutral detergent and gently wipe the st...

Страница 220: ...cludes installation instructions Consumables Print Cartridges Cyan Magenta Yellow and Black Standard capacity High capacity Note Each print cartridge includes installation instructions on the box Rout...

Страница 221: ...that of the genuine consumable the performance of the printer may not be at its optimum And if the printer breaks due to the use of non genuine consumable you may incur the repair charges To receive...

Страница 222: ...u can also use CentreWare IS to check the remaining volume of consumables and the paper loaded in this printer Note When using the printer as a local printer you cannot use CentreWare IS For details a...

Страница 223: ...SimpleMonitor refer to the Online Help Checking Printer Status Through E mail When connected in a network environment where sending and receiving of e mail is possible the printer can send an e mail...

Страница 224: ...Password SMTP Server Connection Status POP3 Server Address POP3 Server Port Number Login Name Password POP3 Server Check Interval APOP Settings POP3 Server Connection Status Select appropriate settin...

Страница 225: ...to set the recipient e mail address to service xerox com then confirm the setting result on the network settings list Password admin SetMsgAddr service xerox com NetworkInfo Note Describe the SetMsgA...

Страница 226: ...nting color data that has been converted by using ICC profile on an application with the Color Auto setting the data is printed by color even if it seems to be black and white data on the monitor In t...

Страница 227: ...ont panel and firmly grip the recessed areas provided on both sides of the machine Never try to lift the machine by gripping any other areas Lifting the machine by gripping any other areas can cause t...

Страница 228: ...the power cord interface cable and any other cables WARNING Never touch a power coad with wet hands Danger of electric shock exist It can cause electric shocks 3 Set the scan bar lock switch to the l...

Страница 229: ...5 Remove any paper in the Tray 1 MPT and then close the front cover Keep the paper wrapped and away from humidity and dirt 6 Pull out the paper tray from the printer and remove any paper in the tray a...

Страница 230: ...over a long distance the print cartridges should be removed to prevent toner from spilling and the printer should be packed inside a box 8 After transporting the printer Unlock the scan bar lock switc...

Страница 231: ...address dynamically 4 7 automatic 2 sided printing 5 21 automatically setting the printer s IP address Windows only 4 6 available printer drivers 4 10 B background color see images through thin paper...

Страница 232: ...es 2 9 layout 2 6 Menu Map 2 9 menus 9 2 messages 10 38 control panel menus changing settings 9 3 description of 9 4 information pages 9 7 parallel settings 9 13 system settings 9 17 tray settings 9 6...

Страница 233: ...g 5 22 UNIX Linux 4 10 Windows 2000 or later 4 11 duplex unit 2 5 dynamically setting the printer s IP address 4 7 E electrical safety 1 2 e mail commands for 11 9 enabling options 10 29 enabling Auto...

Страница 234: ...he paper 5 21 printing safety 1 5 H help resources 2 12 how to check the meter 11 10 I images adjusting 6 6 adjusting placement 6 9 centering 6 10 importing into an application 7 14 lightening or dark...

Страница 235: ...IP address 4 8 overrides AutoIP 4 8 overrides DHCP 4 8 media supported 5 2 unacceptable types 5 4 memory 2 5 Menu Map 2 9 menu map 9 22 menu settings changing 9 3 Tray 1 MPT 9 7 menus 9 2 admin menu 9...

Страница 236: ...ls 7 19 transparencies 5 23 types 5 2 unacceptable media types 5 4 usage guidelines 5 3 paper jams automatic document feeder 10 9 duplex unit 10 13 fuser 10 11 long paper 10 18 optional sheet feeder 1...

Страница 237: ...16 multiple images on a page 6 9 N Up images 6 9 on both sides of the paper 5 21 options Macintosh 5 18 selecting 5 16 5 18 Windows 5 16 Output Options tab 5 16 Paper Quality tab 5 16 posters 6 9 safe...

Страница 238: ...19 specifying the document type 7 18 suppress background color 7 19 to FTP server 7 12 using the WIA manager 7 15 via USB 7 5 secure print 5 42 security enabling secure faxes 8 15 printing secure fax...

Страница 239: ...faxes 8 19 technical support 2 12 turning off the printer 1 6 TWAIN driver Macintosh importing scanned images into applications 7 16 Windows scanning images into applications 7 14 two sided printing 5...

Страница 240: ...DocuPrint C3290 FS User Guide ME4051E2 1 Edition 1 June 2007 Fuji Xerox Co Ltd Copyright 2007 by Fuji Xerox Co Ltd...

Отзывы: