background image

Page 51

Component Removal

Integrated Modules

Integrated Modules

3-19

#826498 - Revision B - December, 2016

Component Removal - SM15TF/S

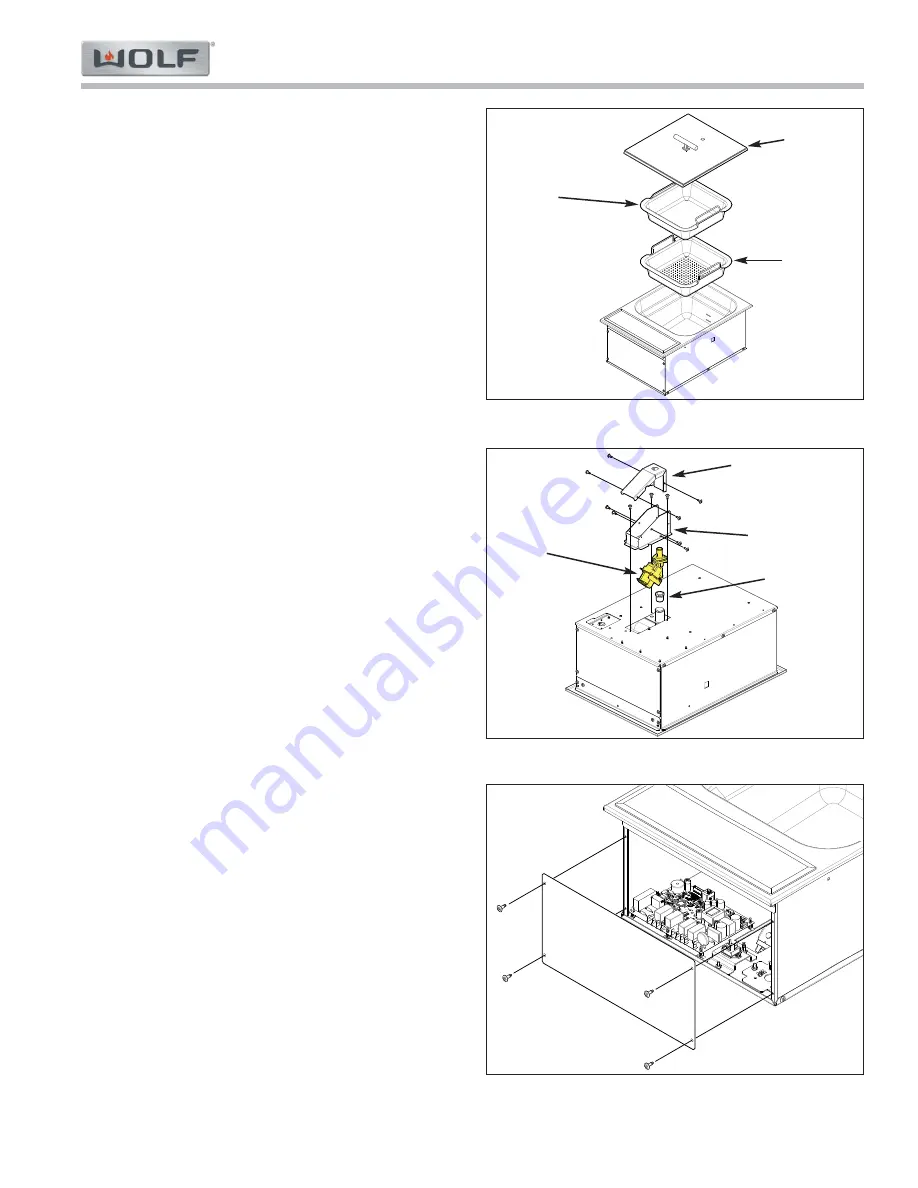
Figure 3-35.  SM15 Lid and Baskets

Figure 3-36.  SM15 Water Drain

Figure 3-37.  SM15 Access Panel

Steamer Cover, Solid Pan, and Perforated Pan

To remove the steamer cover, solid pan or perforated
pan (See Figure 3-35):

Lift the steamer cover from the unit.

1.

To remove the solid pan, lift the steamer cover, then

2.

lift the solid pan.
To remove the perforated pan, lift the solid pan,

3.

then lift the perforated pan.

Steamer Valve

To remove the steamer valve, first disconnect the water
drain line from the valve, then (See Figure 3-36):

1.

Extract the screws from the steamer drain valve 
cover, and remove the steamer drain valve cover.

2.

Extract the screws from the steamer drain valve 
shroud, and remove the steamer drain valve 
shroud.

3.

Disconnect the electrical wires from the drain valve.

4.

Pull the drain valve straight down disconnecting it 
from the steamer drain.

5.

A grommet is located around the steamer valve on 
the unit side of the valve.  Remove the grommet.

Access Panel

To remove the access panel, extract the screws from
the panel, and remove the panel (See Figure 3-37).

Steamer Drain
Valve Cover

Steamer Drain
Valve Shroud

Steamer Drain
Valve 

Steamer
Cover

Solid
Pan

Perforated
Pan

Grommet

Содержание CE152TF/S

Страница 1: ...General Information 2 Controls Operation 12 Component Access Removal 34 Troubleshooting Guide 63 Technical Data 78 Wiring Diagrams 87 subzero com 800 222 7820 Integrated Module New 2015 Service Manual ...

Страница 2: ... personal safety and product safety should be taken and lists the precautions to be taken when the signal word is observed This manual is designed to be used by Certified Service Personnel only Wolf Appliance Inc assumes no responsibility for any repairs made to Wolf appliances by anyone other than Certified Service Technicians INDICATES THAT HAZARDOUS OR UNSAFE PRACTICES COULD RESULT IN SEVERE PE...

Страница 3: ...r customer s name Wolf Appliance Inc requests that you have model and serial number available whenever contacting factory or parts distributor 3 5 Year Limited Parts Only Warranty applies to the control board power board display board elements induc tion and electric and gas burners except appearance Special Warranty Summary 2 Year Total Product Warranty parts and labor Details This Warranty appli...

Страница 4: ...er Ne pas plonger dans l eau Figure 1 1 CE152TF S Rating Plate Figure 1 2 CE152TF S Rating Plate Beneath the unit 3 2 3 7 824473 INDUCTION COOKTOP CI152T S 176XXXXX Wolf Appliance Inc Fitchburg WI FOR HOUSEHOLD USE ONLY MODEL SERIAL VOLTS 208 Hz 50 60 240 2 WIRE kW Do Not Immerse In Water Ne pas plonger dans l eau Figure 1 3 CI152TF S Rating Plate Rating Label Figure 1 4 CI152TF S Rating Plate Ben...

Страница 5: ...HOLD GAS COOKING APPLIANCES CANI I I M81 CGA IR58 1995 1XXXXXXX MM15T S 9003628 NAT 5 WC 120 V AC 1 60 22000 ANSI Z21 lb 2012 HOUSEHOLD GAS COOKING APPLIANCES CANI I I M81 CGA IR58 1995 1XXXXXXX Rating Label Rating Label Figure 1 5 CG152TF S Rating Plate Figure 1 7 MM15TF S Rating Plate Figure 1 6 CG152TF S Rating Plate Beneath the unit Figure 1 8 MM15TF S Rating Plate Beneath the unit ...

Страница 6: ...TZ ELECTRICAL RATING 208 9 7 50 60 SM15T S 9008605 1XXXXXXX 11 3 240 AMP VOLTS Wolf Appliance Inc Fitchburg WI DO NOT IMMERSE IN WATER NE PAS PLONGER DANS L EAU MODEL SERIAL NO MINIMUM HORIZONTAL CLEARANCE BETWEEN THE APPLIANCE AND COMBUSTIBLE CONSTRUCTION EXTENDING FROM THE COOKING SURFACE TO 18 ABOVE THE LEVEL OF THE COOKING SURFACE IS 6 FROM SIDE WALLS MAXIMUM DEPTH FOR OVERHEAD CABINETS IS 13 ...

Страница 7: ...AN THE NOMINAL WIDTH OF THE APPLIANCE MINIMUM HORIZONTAL DISTANCE FROM SIDE AND BACK OF APPLIANCE TO ADJACENT VERTICAL COMBUSTIBLE WALLS EXTENDING ABOVE THE TOP PANEL 6 INCHES FROM SIDE WALLS 1 3 4 INCHES FROM REAR WALL MINIMUM HORIZONTAL DISTANCE FROM FRONT EDGE OF COUNTER TO FRONT SIDE OF APPLIANCE 1 1 2 INCHES FOR HOUSEHOLD USE ONLY VOLTS AMP HERTZ ELECTRICAL RATING 208 10 1 50 60 GM15T S 90086...

Страница 8: ...soups and sauces and for confident preparation of more delicate dishes Melt settings allow you to melt even fine chocolate and other delicate foods without scorching Sliding touch controls with white LED lighting are easy to read and easy to use Hot surface indicator illuminate as a convenient safety reminder and can remain on even after the cooktop controls are turned off Black ceramic glass is r...

Страница 9: ...ps of liquid Stackable stainless steel pans Advanced lid seal holds in steam for consistent tem perature Electronic drain releases full capacity of water in just 2 minutes FM15TF S Crisper lighter fried food without unnecessary grease Melt feature for shortening or lard Three wire baskets dishwasher safe Illuminated touch controls and convenient lock feature Manual locking drain GM15TF S Two indep...

Страница 10: ... Two Coil Assemblies Induction 15 One Burner Assembly Gas Model Number MM15TF S Description Multifunction Module 15 One Burner Assembly Transitional Stainless steel Model Number CE152TF S Description Cooktop Electric 15 Two Element Assemblies Transitional Stainless steel 15 Two Element Assemblies Electric 15 Two Burner Assemblies Gas Model Number CG152TF S Description Cooktop Gas 15 Two Burner Ass...

Страница 11: ... Stainless steel 15 One Heting Element Electric Model Number SM15TF S Description Steamer Module 15 One Burner Assembly Transitional Stainless steel 15 One Heating Element Electric Model Number FM15TF S Description Fryer Module 15 One Burner Assembly Transitional Stainless steel 15 Two Coil Assembly Induction Model Number TM15TF S Description Teppanyaki Module 15 Two Coil Assembly Transitional Sta...

Страница 12: ...acknowledge touch Control Zone Pads ON OFF Enables or disables individual control zone SIM sets power to level 1 MLT sets power to level 1 LO sets power to level 1 HI sets power to level 10 ZONE 2 CE152TF S Activates Zone 2 on hobs with two or more zones BOOST CI152TF S sets power to Boost and adjusts adjacent power levels as required by the induction power sharing scheme Toggles Boost off if alre...

Страница 13: ...Steamer Fill Sensor is greater than 140 F LED turns off when RTD Steamer Fill Sensor is below 122 F Independent of any control zone activation or the unit being in lock or showroom mode HOT Surface Display GM15TF S LED is on after the GM15TF S has been on for more than five minutes LED turns off when the GM15TF S has been OFF for more than 30 minutes Name Duration Type Occurrence Valid Selection 2...

Страница 14: ...ncreases and decreases with a touch of the or pad If the or pad is held continuously for 3 intervals the count rate increases If the or pad is held continuously for additional 3 intervals the count rate increases again A continuously held or increases in this manner 00 01 02 03 04 05 10 15 20 30 40 50 60 70 80 90 99 Ending the Timer All Models Touch of the TIMER or pad stops Timer Complete beep an...

Страница 15: ...heat sink A very high power request such as both elements on 100 switches the fan on independently of the heatsink temperature After generator is off fan continues to run until heat sink temperature is below 113 F or up to 600 seconds Fan is limited to low speed when the generator is off Temperature thresholds 113 F start low speed 131 F start high speed Modes Power Up Mode All Models All LED indi...

Страница 16: ...an 7 seconds unit relocks Annunciator sounds Acceptance beep to indicate Lock Mode has been exited LOCK LED turns off and control zones enter Idle Mode Valid key presses in Lock Mode LOCK pad for exiting Lock Mode CE152TF S CI152TF S and TM15TF S touch and hold and pads for 5 seconds to enter Diagnostic Mode SM15TF S FM15TF S and GM15TF S touch and hold ALL OFF pad for 5 seconds to enter Diagnosti...

Страница 17: ...e control zone returns to Idle Mode During the 30 second wait the LEDs for that control zone flash the power level selected If a bridge is activated and a pan is detected on one control zone but not all control zones being bridged the LEDs for the unsensed control zones flash the power level that has been selected If after 2 minutes one or more of the control zones in the bridge still does not sen...

Страница 18: ...level is set to the lower of the two active zones Display States in Operational Mode ALL OFF is turned on SIM MLT LO HI ZONE 2 BRIDGE and BOOST are on if they have been activated All other displays for the active control zone are off All other displays in Idle Mode are off Power level indicators SIM MLT LO and less than the power level selected are on Power levels greater than selected power level...

Страница 19: ... has been active for more than 100 seconds When Operational Mode is first entered the unit will engage Preheat for the first 120 seconds For the first 30 seconds the unit calls for 100 power output For the next 90 seconds the unit calls for 0 power output At the end of 120 seconds If RTD Steamer Fill Sensor is equal to or greater than 30 F warmer than the Main RTD the control will enter an error m...

Страница 20: ...tion which caused the error still exists These errors are displayed as a stationary lock display and an error code in the TIMER display indicating a permanent error and does not allow the control to be unlocked to Idle mode The TIMER display alternates between E and the error code Priority 2 Error Errors are defined as errors which could cause some possible or conditionally impaired functionality ...

Страница 21: ... system sensors and to enter exit Showroom mode Entering Diagnostic Mode CE152TF S CI152TF S and TM15TF S Enter Lock Mode 1 Touch and hold the pad and pad for 5 seconds 2 After 5 seconds enters LED test alerting the user to remove their fingers 3 If another key pad sensor detects a signal Diagnostic Mode does not engage If either the or pad is not released after 7 seconds Diagnostic Mode does not ...

Страница 22: ... the requisite press and hold and the cooktop resets 6 pad engages LED Test 7 pad engages Control Temperature Readout 8 Fully Rated to Derate and Unit Reconfiguration CI152TF S and TM15TF S software version above version V 10 Touch pad during the LED test 1 Two are displayed on rear control zone 2 CF is displayed in the 2 digit display 3 Front control zone SIM MLT LO or HI pads cycles between full...

Страница 23: ...t and pad advances to Heat Sink Temperature 2 d Heat Sink Temperature Test CE152TF S Touch pad during the Control Temperature Readout 1 Four are displayed on the left rear control zone 2 digit display shows 00 There is no state on the CE152TF S pad returns to Control Temperature Readout and pad advances to Coil Temperature test 2 d Heat Sink Temperature Test CI152TF S Touch pad during Control Temp...

Страница 24: ...to error code indicator 2 e Coil Temperature Test CI152TF S and TM15TF S CE152TF S This mode is present but shows 00 as it is not active Touch pad during the Heat Sink Temperature test 1 Five are displayed on rear control zone 2 digit display shows the coil temperature in C Over 99 C 210 F the decimal point of the 2 digit display turns on to indicate the temperature is 100 C 210 F or higher CI152T...

Страница 25: ...the 2 digit display If only a single error has been logged only a single fully lit LED is displayed If no errors logged LO and HI and are not displayed and is displayed in the 2 digit display 2 digit display shows the corresponding error code stored in memory A touch of the front control zone LO or HI pads cycles through the stored error codes 2 Touch and hold TIMER pad for 5 seconds to clear erro...

Страница 26: ... all heating assemblies is disabled in User Option Mode If after 60 seconds no inputs are detected while in User Option Mode the control returns to Idle Mode If the ALL OFF pad is touched at any time while in User Option Mode the control returns to Idle Mode Use the and pads to step through the settings 3 Rear display advances one LED for each setting The number of on identifies which setting is b...

Страница 27: ...r displayed on the rear control zone OF is displayed in the 2 digit display when Temperature Offset is engaged Temperature offset is displayed in the 3 digit display and set to zero by default Touch of the temperature pad or pad adjusts the temperature offset up or down The left digit of the 3 digit display shows a for a negative offset and is blank for a positive offset Maximum offset is 10 F pad...

Страница 28: ...sound and the unit would disengage Sabbath Mode and enter an Error Mode During Sabbath Mode the hot surface indicator will be visible at all times During Sabbath Mode there will be no operational time limit All element assemblies and power levels will otherwise function normally in Sabbath mode including the ON OFF pad Temperature or power level adjustments can be made using the power level settin...

Страница 29: ...Revision B December 2016 1200 Watts 700 Watts 2200 Watts Figure 2 1 CE152TF S OFF ON ALL OFF LOCK BOOST TIMER OFF ON _ SIM HI HI MLT Generator Board 1 B O O S T 2300 Watts 1400 Watts Figure 2 2 CI152TF S 22k Burner Figure 2 3 CG152TF S 12k Burner 9 2k Burner Figure 2 4 MM15TF S ...

Страница 30: ...grated Modules Electronics and Gas Theory 2 20 826498 Revision B December 2016 Figure 2 7 GM15TF S Figure 2 8 TM15TF S 1400 Watts Figure 2 5 SM15TF S Figure 2 6 FM15TF S 2700 Watts 2700 Watts 1400 Watts 1400 Watts 1400 Watts ...

Страница 31: ... ous other substances found in natural gases The more ethane propane or butane in the gas raises the heating value Propane or LP gas has a heating value of about 2500 2800 BTU per cubic foot and butane about 3200 BTU per cubic foot Specific Gravity of Gas The specific gravity of a gas is the weight of one cubic foot of the gas compared to one cubic foot of dry air When stating the specific gravity...

Страница 32: ...additional air is required to assure complete burning of the gas The total air primary secondary and excess are expressed as percentages of the amount needed About ten cubic feet of air is required to com pletely burn one cubic foot of gas For this reason an appliance should not be operated in an air tight home Limits of Flammability Not all air to gas mixtures will burn Mixtures with 0 4 natural ...

Страница 33: ... the main support for the burner components Simmer Orifice and Main Orifice An opening or hole which regulates or limits the amount of gas flowing to a burner Gas flow rate volume depends on the size of the orifice and the gas pressure at the inlet of the orifice Burner Components MM15TF S Burner Head The component containing the burner ports where the gas air mixture ignites The burner ports are ...

Страница 34: ... 7 8 open ended wrench 12 mm open ended wrench 18 mm open ended wrench Phillips screw driver Small Phillips screw driver Small flat blade screw driver Needle nose pliers 208 240 VAC APPLIANCE MUST BE PROPERLY GROUNDED AT ALL TIMES WHEN ELECTRICAL POWER IS APPLIED DO NOT GROUND 208 240 VAC APPLIANCE WITH NEUTRAL WHITE HOUSE SUPPLY WIRE A SEPA RATE GROUND WIRE MUST BE UTILIZED IF ALUMINUM HOUSE SUPP...

Страница 35: ... Low Voltage LV wire harness from power board 5 Disconnect element wire harness from power board Element Assembly To remove the element assembly first remove the glass top then See Figure 3 2 1 Disconnect spade terminals from the element assembly NOTE Make note of wire locations prior to removing the spade terminals 2 Use a T 15 Torx driver to extract the screws that hold the element springs 2 Rem...

Страница 36: ...e harness from power board NOTE LV Wire Harness has a grommet on it It is important to install the grommet to prevent moisture from entering the control board enclosure Cable Cover Terminal Block and Power Conduit To remove the terminal block or power conduit first remove the glass top then See Figure 3 4 1 Use a 1 4 nut driver or phillips screw driver to extract screws from the cable cover 2 Use ...

Страница 37: ...ew driver to extract screws from the power board cover 5 Use a 11 32 nut driver or socket to extract nuts from the power board cover 6 Remove power board cover 7 Remove the power board Fan Assembly To remove the fan assembly first remove the power board cover then See Figure 3 6 1 Press connector tab in and disconnect fan assem bly connector from power board 2 Use a small flat blade screw driver t...

Страница 38: ...frame and back frame 2 Remove glass top Control Board To remove the control board first remove the glass top then See Figure 3 8 1 Use a needle nose pliers to compress top of control board support and lift control board off of control board support 2 Proceed to the remaining control board supports until the control board is removed 3 Disconnect comm cable from control board 4 Remove control board ...

Страница 39: ...gative Temperature Coefficient NTC sensor cable from below generator plate 5 Remove coil assembly Note Coil assembly wires are covered by insulation The black insulation is on the solid black wire and should be connected to the coil assembly terminal nearest the front Generator Plate To remove the generator plate first disconnect the com munication comm harness and remove the coil assemblies then ...

Страница 40: ...move comm harness NOTE New comm harness has a key in the connector for control board side Fan Assembly To remove the fan assembly first remove the generator plate then See Figure 3 12 1 Press connector tab in and disconnect fan assem bly connector 2 Use a small flat blade screw driver to spread the fan assembly retainer tabs slightly to release fan assembly 3 Remove the fan assembly Figure 3 11 Co...

Страница 41: ...e 3 Remove generator assembly Intake Gasket To remove the intake gasket first remove the generator then See Figure 3 14 1 Turn generator over and remove any remaining pieces of old intake gasket 2 Attach new intake gasket Support Spring Mounting Pin and Washer To remove the support spring mounting pin or washer first remove the generator then See Figure 3 15 1 Remove support spring from mounting p...

Страница 42: ...rom burner assembly 4 extract screw from underside of burner assembly and separate Torque burner assembly screws to 24 inch pounds 5 Orifice Removal The main and simmer orifice are removeable without removing the burner pan To remove an orifice first remove the burner assembly then See Figure 3 17 Use a 9 32 socket with extension to extract orifice 1 from the orifice holder Confirm the new orifice...

Страница 43: ...irst remove the burner pan then See Figure 3 19 Use a 3 8 open end wrench to remove the simmer 1 gas line Use a 1 2 open end wrench to remove the main 2 gas line main gas line not shown Extract two screws securing orifice holder to sealed 3 burner bracket Remove orifice holder 4 NOTES Support burner tube while removing or installing tubes Do not over torque brass fittings If burner tube was kinked...

Страница 44: ...m Green paint on the valve body screw denotes natu ral gas valve Pink paint on valve body screw denotes liquid propane LP valve Valve comes with the microswitch attached Red paint on microswitch screw denotes 9 2k valve Yellow paint on microswitch screw denotes 12k valve Valve Switch To remove the valve switch first remove the display light board then See Figure 3 21 Use a small Phillips screw dri...

Страница 45: ... 1 2 NPT nipple Use a 5 8 open end wrench to remove regulator 2 outlet line from brass fitting Use a 7 16 open end wrench to remove ground 3 retaining nut from regulator bracket Remove regulator and regulator bracket together 4 Use a 7 8 box wrench to remove brass fitting 5 from the regulator outlet Manifold Removal To remove the manifold first remove the display light board then See Figure 3 23 R...

Страница 46: ...re 3 25 Use a Phillips screw driver or 1 4 nut driver to 1 extract the screw holding the bottom module brack et to the burner box Lower screw side of bottom module bracket 2 Disconnect the electrode wires from the spark mod 3 ule Disconnect the electrical connections from the 4 spark module Extract the Phillips screws holding the spark mod 5 ule to the bottom module bracket Figure 3 25 Bottom Modu...

Страница 47: ...ess requires the removal of the unit from the installation Bottom Base Enclosure To access all other unit components except the spark module remove the unit from the installation To remove the bottom base enclosure first remove the unit from the installation then See Figure 3 27 Use a Phillips screw driver to extract the six screws 1 from the side of the bottom base enclosure Use a Phillips screw ...

Страница 48: ... can be ordered separately Venturi Tube Setting Figure 3 29 shows the position of the venturi tube for LP and Natural gas Verify the venturi tube setting when converting the unit to a differnt gas or reassem bling the venturi elbow assembly Side Bracket and Elbow Assembly Gasket To remove the side bracket and access the elbow assembly gasket first remove the venturi elbow assem bly then See Figure...

Страница 49: ...isplay bracket 3 and display board from unit Remove the connector from the display board 4 Use a Phillips screw driver to extract the two 5 screws from the display bracket Remove the display bracket 6 Use a Phillips screw driver or a 1 4 nut driver to 7 extract the two screws from the display board Remove the display board 8 Multifunction Gas Valve To remove the gas valve first remove the display ...

Страница 50: ...cent wrench 2 to remove the hex nut from the electrode mount Pull the electrode mount and electrode up through 3 the pan Pan To replace the pan first remove the bottom base 1 enclosure then Remove the venturi elbow assembly 2 Remove the regulator 3 Remove the gas valve display board assembly and 4 the electrode Extract the top two screws from the front panel and 5 remove the entire frame assembly ...

Страница 51: ...e steamer valve first disconnect the water drain line from the valve then See Figure 3 36 1 Extract the screws from the steamer drain valve cover and remove the steamer drain valve cover 2 Extract the screws from the steamer drain valve shroud and remove the steamer drain valve shroud 3 Disconnect the electrical wires from the drain valve 4 Pull the drain valve straight down disconnecting it from ...

Страница 52: ...er board 2 Depress the PCB standoff and lift the module power board off the PCB standoff Repeat for the remaining PCB standoffs 3 Remove the module power board Thermodisc Fryer 350 Deg To remove the fryer thermodisc first remove the access panel then See Figure 3 39 1 Disconnect the electrical wires from the fryer thermodisc 2 Extract the nuts that hold the fryer thermodisc to the steamer pan 3 Re...

Страница 53: ...d the main RTD from the pan assembly 2 Remove the rear access panel and disconnect the steamer fill sensor RTD from the pan stud 3 Disconnect the wire harness from the user interface 4 Turn the unit over and remove the steamer drain valve 5 Extract the two inner screws from the front enclosure 6 Extract the two screws from the rear panel 7 Lift the pan assembly straight up and remove the pan assem...

Страница 54: ...ision B December 2016 Figure 3 43 SM15 User Interface User Interface To remove the user interface first remove the pan assembly steamer fryer then See Figure 3 43 Use a putty knife or small screw driver to peel the 1 user interface from the glass User Interface Connection ...

Страница 55: ...e small baskets from the unit 2 Lift the large basket from the unit 3 Manual Shut Off Valve To remove the manual shut off valve first drain the oil from the unit then unscrew the manual shut off valve from the unit See Figure 3 45 Access Panel To remove the access panel extract the screws from the panel and remove the panel See Figure 3 46 Figure 3 44 FM15 Lid and Baskets Fryer Cover Small Baskets...

Страница 56: ...wer board 2 Depress the PCB standoff and lift the module power board off the PCB standoff Repeat for the remaining PCB standoffs 3 Remove the module power board Thermodisc Fryer 350 Deg To remove the fryer thermodisc first remove the access panel then See Figure 3 48 1 Disconnect the electrical wires from the fryer thermodisc 2 Extract the nuts that hold the fryer thermodisc to the fryer pan 3 Rem...

Страница 57: ... the main RTD from the pan assembly 2 Remove the rear access panel and disconnect the steamer fill sensor RTD from the pan stud 3 Disconnect the wire harness from the user interface 4 Turn the unit over and remove the manual shut off valve 5 Extract the two inner screws from the front enclosure 6 Extract the two screws from the rear panel 7 Lift the pan assembly straight up and remove the pan asse...

Страница 58: ...26 826498 Revision B December 2016 Figure 3 52 FM15 User Interface User Interface To remove the user interface first remove the pan assembly steamer fryer then See Figure 3 52 Use a putty knife or small screw driver to peel the 1 user interface from the glass ...

Страница 59: ... and remove the panel See Figure 3 54 Steamer Fryer Grill Triac To remove the steamer fryer and grill triac first remove the access panel then See Figure 3 55 Disconnect the electric wires from the triac 1 Use a T 20 Torx bit to extract the screws from the 2 triac Remove the triac from the unit 3 Module Power Board To remove the module power board first remove the access panel then See Figure 3 55...

Страница 60: ...anel 2 Disconnect the wire harness from the user interface 3 Extract the two screws from the rear of the unit 4 Lift the pan assembly straight up and remove the pan assembly from the unit User Interface To remove the user interface first remove the pan assembly grill then See Figure 3 57 Use a putty knife or small screw driver to peel the 1 user interface from the glass Figure 3 56 GM15 Pan Remova...

Страница 61: ...assembly then See Figure 3 59 Remove the insulation from the unit 1 Use a T 25 Torx bit to disconnect the induction coil 2 wires from the generator 2 Disconnect the NTC connector from the generator 3 Use a T 25 Torx bit to extract the screw from the ground plate 4 Remove the induction coil from the unit Generator Plate To remove the generator plate first remove the induc tion plate assembly then S...

Страница 62: ... 1 Use a T 20 Torx bit to extract the screws from the generator plate 2 Remove the generator from the generator plate Generator Pan To remove the generator pan first remove the genera tor plate then See Figure 3 62 Use a T 20 Torx bit to extract the screws from both 1 sides front and back Lift the generator pan from the burner box 2 Figure 3 61 Generator Figure 3 62 Generator Pan ...

Страница 63: ...ode Entering Diagnostic Mode CE152TF S CI152TF S and TM15TF S Enter Lock Mode 1 Touch and hold the pad and pad for 5 seconds 2 After 5 seconds enters LED test alerting the user to remove their fingers 3 If another key pad sensor detects a signal Diagnostic Mode does not engage If either the or pad is not released after 7 seconds Diagnostic Mode does not engage Power to all element assemblies is di...

Страница 64: ...equisite press and hold and the cooktop resets 6 pad engages LED Test 7 pad engages Control Temperature Readout 8 Fully Rated to Derate and Unit Reconfiguration CI152TF S and TM15TF S software version above version V 10 Touch pad during the LED test 1 Two are displayed on rear control zone 2 CF is displayed in the 2 digit display 3 Front control zone SIM MLT LO or HI pads cycles between fully rate...

Страница 65: ...pad advances to Heat Sink Temperature 2 d Heat Sink Temperature Test CE152TF S Touch pad during the Control Temperature Readout 1 Four are displayed on the left rear control zone 2 digit display shows 00 There is no state on the CE152TF S pad returns to Control Temperature Readout and pad advances to Coil Temperature test 2 d Heat Sink Temperature Test CI152TF S Touch pad during Control Temperatur...

Страница 66: ...or code indicator 2 e Coil Temperature Test CI152TF S and TM15TF S CE152TF S This mode is present but shows 00 as it is not active Touch pad during the Heat Sink Temperature test 1 Five are displayed on rear control zone 2 digit display shows the coil temperature in C Over 99 C 210 F the decimal point of the 2 digit display turns on to indicate the temperature is 100 C 210 F or higher CI152TF S fr...

Страница 67: ... the RTD Temperature test 1 Five are displayed on rear control zone Front control zone shows 0 8 dimmed based on how many error codes are logged Fully lit LED indicates which error is being displayed in the 2 digit display If only a single error has been logged only a single fully lit LED is displayed If no errors logged LO and HI and are not displayed and is displayed in the 2 digit display 2 dig...

Страница 68: ...present when the log is cleared it immediately regenerates an error code pad engages the Element Temperature Coil Temperature test pad engages Showroom Mode menu h Software Version Indicator CE152TF S CI152TF S and TM15TF S Touch pad during Showroom Mode 1 CE152TF S and CI152TF S eight displayed on rear control zone TM15TF S eight displayed on front control zone 2 digit display cycles to show the ...

Страница 69: ...valid on CE152TF S CI152TF S and TM15TF S 1 Test fan operation 2 Ensure fan vent is not blocked 3 No large pot or pan overlapping the control area 4 Direct sunlight or heat lamps not shinning on controls 5 Replace control board 1 Cycle unit power 2 Inspect and reseat LV wire harness CE 3 Inspect and reseat comm cable CI and TM 4 Perform unit reconfiguration 5 Replace control board 1 Inspect contro...

Страница 70: ...ceptacle None Test fan See page 4 8 None None 1 Test fan operation 2 Ensure fan vent is not blocked 3 Replace coil assembly 1 Cycle unit power 2 Perform unit reconfiguration 3 Replace control board 1 Cycle unit power 2 Replace power board 1 L1 to Ground and L2 to Ground between 90 VAC and 132 VAC 2 L1 to L2 between 180 VAC and 265 VAC 3 Neutral to Ground Trace voltage only 4 Resistance to ground s...

Страница 71: ...176 F to 221 F Default is 217 F Dry Start at startup SM15TF S RTD Steam Fill is 18 F more than Main RTD during the first 90 seconds FM15TF S RTD Steam Fill is 30 F more than Main RTD during the first 120 seconds No action required 1 Unit will try to reset and if appli ance type can t be determined unit will default to steamer 2 Replace module power board 1 Check resistance of Main RTD 2 Replace Ma...

Страница 72: ...more than 5 sec onds Comm link with display is compromised Comm link with cap touch is compromised Power Board internal clock or supply frequency out of spec All Off LED not lit during cook ing or lit during Idle 10 sec Front LO LED not lit during cooking or lit during Idle Rear LO LED not lit during cooking or lit during Idle 1 Clean debris build up from bot tom interior of pan 2 Add liquid to th...

Страница 73: ...conds Config data in EEPROM cor rupted defaults used after micro reset User option data in EEPROM corrupted defaults used after micro reset Cap touch keypad micro internal error Cap touch error reported 3 times in 40 sec onds Output Driver watchdog has detected an error Zero cross input signal is not present 1 Cycle unit power 2 Check resistance RTD Steam Fill sensor 3 Replace user interface 1 Cyc...

Страница 74: ...hat power level was selected 3 LED stays on a maximum of 60 minutes after all element assemblies are off 4 Cycle unit power 5 Ensure fan is operating and fan vent is not blocked 6 If LED does not shut off after 60 minutes replace the control board HOT Indicator Stays On CI152TF S and TM15TF S Once HOT indicator is on it stays on until a coil assembly NTC reads below 50 C 122 F 1 Check coil assembl...

Страница 75: ... in burner head Improper gas orifice Gas pressure Improper gas type Defective Microswitch Defective dirty electrode Defective or loose wiring Defective spark module May have to call an electrician Check internal connections may have to wire correctly May have to call an electrician Check internal connections may have to wire correctly Rewire spark module s or replace Reposition electrode Electrode...

Страница 76: ...5 WC Connecting Manometer to CG152TF S To check pressure on a CG152TF S the unit must be uninstalled and the burner pan removed Once the burner pan is removed loosely reassemble burners Disconnect the Main gas tube from the 9 2k orifice holder and connect manometer to Main gas tube Set the burner on High PROBLEM POSSIBLE CAUSE TEST ACTION D NO SPARK AT BURNER ASSEMBLY S E POPPING NOISE AT BURNER A...

Страница 77: ...ow pressure is good It falls in the range of 5 WC 0 5 WC 0 0 WC Example Low Flow manifold pressure reading taken with 12k burner on low simmer on Liquid Propane LP was 9 7 WC Low Flow pressure is bad Outside the range of 10 WC 0 5 WC 0 0 WC Maximum Flow Pressure Maximum Flow pressure is the manifold pressure when all burners are turned to high It is normal for the pressure to drop slightly The dif...

Страница 78: ...tifunction Module 120 VAC Breaker 15 Amp dedicated circuit Gas Supply Requirements Natural Gas Minimum Supply Line Pressure 7 WC Maximum Supply Line Pressure 14 WC Regulated Manifold Pressure 5 WC LP Gas Minimum Supply Line Pressure 11 WC Maximum Supply Line Pressure 14 WC Regulated Manifold Pressure 10 WC SM15TF S FM15TF S and GM15TF S Power Rating and Electrical Service 180 VAC to 265 VAC single...

Страница 79: ... Watts 770 Watts 6 Hours 7 7 50 600 Watts 350 Watts 1100 Watts 6 Hours 8 8 60 720 Watts 420 Watts 1320 Watts 2 Hours 9 9 75 900 Watts 525 Watts 1650 Watts 2 Hours 10 HI 100 1200 Watts 700 Watts 2200 Watts 2 Hours CE152TF S Electric Power Level Level LEDs Displayed of Power 1400 W Coil 2300 W Coil Operation Limit 0 0 0 00 0 0 0 0 1 MLT SIM 2 00 28 Watts 46 Watts 8 Hours 2 2 5 50 77 Watts 126 5 Watt...

Страница 80: ...150 F None 5 4 160 F None 6 5 170 F None 7 6 180 F None 8 7 190 F 12 Hours 9 8 200 F 12 Hours 10 HI 210 F 12 Hours SM152TF S Power Level Level LEDs Displayed Temperature Operation Limit 0 0 0 0 1 LO 190 F 4 Hours 2 1 250 F 4 Hours 3 2 300 F 4 Hours 4 3 325 F 4 Hours 5 4 350 F 4 Hours 6 5 360 F 4 Hours 7 6 370 F 4 Hours 8 7 380 F 4 Hours 9 8 390 F 4 Hours 10 HI 400 F 4 Hours FM152TF S Power Level ...

Страница 81: ...93 F 275 F 100 60 minutes 6 320 F 329 F 311 F 100 60 minutes 7 347 F 356 F 338 F 100 60 minutes 8 374 F 383 F 365 F 100 60 minutes 9 401 F 410 F 392 F 100 60 minutes HI 428 F 437 F 419 F 100 60 minutes TM15TF S Teppanyaki Power Level Level LEDs Displayed Watts Operation Limit 0 0 0 0 1 LO 150 Watts None 2 1 300 Watts None 3 2 450 Watts None 4 3 600 Watts None 5 4 750 Watts None 6 5 900 Watts None ...

Страница 82: ... Limiter Each element has a built in thermal limiter to protect the glass top Thermal limiter will open between 1040 F and 1076 F Thermal limiter will close at approximately 950 F SM15TF S Temperature Control Maintain between 80 ounces and 256 ounces of liquid within 1 8 F 1 C of the set point between the tem peratures of 131 F 55 C and 185 F 85 C Temperature must remain within 1 8 F 1 C of set te...

Страница 83: ...00 Watts 240 VAC Total Wattage 5 2000 Amps 9 6 Resistance 5 Ohms 21 7 2000 Watts 208 VAC SM and FM Element Assembly Wattage and Resistance Total Wattage 5 1400 each Amps 5 8 Resistance 5 Ohms 41 4 2800 Watts 240 VAC Total Wattage 5 1050 each Amps 5 0 Resistance 5 Ohms 41 6 2100 Watts 208 VAC GM Element Assembly Wattage and Resistance Two Elements ...

Страница 84: ...3 46 1 31 26 79 1101 22 1 32 28 82 1108 98 1 33 30 86 1116 73 1 34 32 90 1124 47 1 35 34 93 1132 22 1 36 36 97 1139 95 1 37 38 100 1147 69 1 38 40 104 1155 41 1 39 42 108 1163 14 1 4 44 111 1170 85 1 41 46 115 1178 57 1 41 48 118 1186 28 1 42 50 122 1193 98 1 43 52 126 1201 68 1 44 54 129 1209 38 1 45 56 133 1217 07 1 46 58 136 1224 76 1 47 60 140 1232 44 1 48 62 144 1240 12 1 49 64 147 1247 79 1 ...

Страница 85: ...e Ohms Tolerance Ohms 82 180 1316 62 1 58 84 183 1324 24 1 59 86 187 1331 86 1 60 88 190 1339 47 1 61 90 194 1347 08 1 62 92 198 1354 68 1 63 94 201 1362 27 1 63 96 205 1369 87 1 64 98 208 1377 45 1 65 100 212 1385 03 1 66 102 216 1392 60 1 67 104 219 1400 17 1 68 106 223 1407 73 1 69 108 226 1415 29 1 70 110 230 1422 84 1 71 ...

Страница 86: ...12K LP Orifice Holder 9 2K Nat Orifice Holder 9 2K LP MM15TF S Valve Gas Multifunction Jet Hldr Spud Assy Wok Jet Hldr Spud Assy LP Wok NOTE Orifice for MM15TF S Jet Holder is not available order the Jet Holder Simmer 816788 50 50 mm 0197 Main 816731 57 57 mm 0224 Simmer 816538 33 33 mm 0130 Main 817372 38 38 mm 0150 Simmer 816788 50 50 mm 0197 Main 816610 54 54 mm 0213 Simmer 816538 33 33 mm 0130...

Страница 87: ...ARD FAN 4 PIN COMM RED YELLOW YELLOW BLACK RED BLACK RED WHITE 2200W 700W 1200W USER INTERFACE This wiring information is provided for use by qualified service personnel only Disconnect appliance from electrical supply before begining service Be sure all grounding devices are connected when service is complete Failure to observe the above warnings may result in severe electrical shock ...

Страница 88: ...UE 2 PIN NTC BLACK BLACK ORANGE 2 PIN NTC BLACK 4 PIN COMM 2300W COIL 1400W COIL USER INTERFACE X5 X14 N X1 L1 This wiring information is provided for use by qualified service personnel only Disconnect appliance from electrical supply before begining service Be sure all grounding devices are connected when service is complete Failure to observe the above warnings may result in severe electrical sh...

Страница 89: ...WIRE DIAGRAM MODEL CG15TF S CG15TF S LP PART NUMBER 9009763 Rev A This wiring information is provided for use by qualified service personnel only Disconnect appliance from electrical supply before begining service Be sure all grounding devices are connected when service is complete Failure to observe the above warnings may result in severe electrical shock ...

Страница 90: ...HITE WHITE SWITCH LED PCB 4P CONN LIGHTS 1 2 3 4 NC LEFT FRONT SPARK G N L SPLICE SPLICE 1 2 1 2 MOV MOV SPLICE INLET This wiring information is provided for use by qualified service personnel only Disconnect appliance from electrical supply before begining service Be sure all grounding devices are connected when service is complete Failure to observe the above warnings may result in severe electr...

Страница 91: ...T NUMBER 824912 Rev A This wiring information is provided for use by qualified service personnel only Disconnect appliance from electrical supply before begining service Be sure all grounding devices are connected when service is complete Failure to observe the above warnings may result in severe electrical shock ...

Страница 92: ...T NUMBER 824913 Rev A This wiring information is provided for use by qualified service personnel only Disconnect appliance from electrical supply before begining service Be sure all grounding devices are connected when service is complete Failure to observe the above warnings may result in severe electrical shock ...

Страница 93: ...9 CONTROL BOARD USER INTERFACE WIRE DIAGRAM MODEL GM15TF S PART NUMBER 824914 Rev A This wiring information is provided for use by qualified service personnel only Disconnect appliance from electrical supply before begining service Be sure all grounding devices are connected when service is complete Failure to observe the above warnings may result in severe electrical shock ...

Страница 94: ...50 W 230 V 1400 W 208 V 1275 W INDUCTION COIL WITH TEMPERATURE SENSOR Ø 140 mm 240 V 1450 W 230 V 1400 W 208 V 1275 W View from Upside L N GND L1 L2 GND AC240 V AC208 V L N TERMINAL WIRE DIAGRAM MODEL TM15TF S 1 2 1 2 BLUE 1 2 1 2 This wiring information is provided for use by qualified service personnel only Disconnect appliance from electrical supply before begining service Be sure all grounding...

Отзывы: