8
4.
INSTALLATION
4.1
SETUP
The sterilizer has been calibrated and intensively tested in the factory prior to shipping. It does not require
any calibration during installation.
Observe the following environmental conditions:
Working temperature range: from +5°C to +40°C / re lative humidity: 0 - 90%
Storage temperature range: from -20°C to +60°C / r elative humidity: 0 - 90% (empty tanks)
Install the sterilizer as outlined below:
Place the sterilizer on a flat and level surface.
Do not place the sterilizer so that it is difficult to open the service
door and operate on the controls in it (main switch, microbiological
filter, drains)
The maximum weight of the sterilizer with a full clean water tank
and the chamber fully loaded is:
52 kg (Lisa 517)
63 kg (Lisa 522)
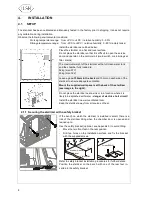
Leave a gap of 50mm in the back and 10mm on each side of the
sterilizer to ensure adequate ventilation.
Mount the supplied wall spacers at the back of the sterilizer
(see image to the right).
Do not place the sterilizer near a sink or in a location where it is
likely to be splashed with water - danger of electric short circuit!
Install the sterilizer in a well-ventilated room.
Keep the sterilizer away from all sources of heat.
4.1.1 Securing the sterilizer with a safety bracket
If the bench on which the sterilizer is installed is small, there is a
risk of the sterilizer tilting when the chamber door is opened and
leaned upon.
Use the safety bracket (optional; see Appendix 9) to avoid tilting.
-
Move the two front feet in the rear position.
-
Drill two holes on the installation surface and fix the bracket
with the supplied screws.
40
113
Refer to safety bracket installation procedures for further details.
Position the sterilizer on the bench with one of the rear feet in-
serted in the safety bracket.
Wall
Minimum distance
(millimeters)
2 holes Ø3x20
Screws Ø4,8x22
Содержание Lisa
Страница 1: ...Instruction for use UM009ENG LISA FULLY AUTOMATIC 201 10 Rev 4...
Страница 2: ......
Страница 77: ......


