


Vertiv
|
NetSure™ 2100 Series -48 VDC Power System Installation Manual (IM582138000)
|
Rev. C
18
Securing the System to a Relay Rack or a Cabinet Equipment Rack (if required)
DANGER!
If the system is mounted in a relay rack, the relay rack must be securely anchored to the floor
before the system is installed.
NOTE!
Refer to “General Requirements” on page 13 for mounting restrictions and ventilation
requirements.
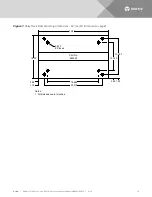
This power system is designed to mount in a standard 19” or 23” relay rack or equipment rack having 1” or 1 3/4”
multiple drillings. Refer to System Application Guide SAG582138000 for overall dimensions and a list of
available relay racks.
Procedure
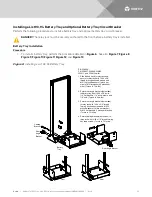
1.
The system is furnished for 19” mounting as standard. For 23” mounting, replace the 19” mounting
brackets on the shelf with the 23” mounting brackets (supplied with the system).
2.
Position the system in the relay rack or cabinet equipment rack.
3.
Secure the system to the relay rack or cabinet equipment rack using hardware as shown in
(see
for recommended torque). Use grounding washers as indicated in
NOTE!
Install (orient) the ground washers so the teeth dig into the mounting angles for a secure
ground connection.
NOTE!
Compliance with Telcordia GR-1089-CORE requires that prior to mounting the system to the
equipment rack:
o
All paint must be removed from the front surface of each equipment rack rail where it mates with a
shelf-mounting bracket, so that good metal-to-metal contact can be established between the shelf
and rack.
o
The shelf-to-rack mating surfaces must be cleaned.
o
Electrical anti-oxidizing compound must be applied to the shelf-to-rack mating surfaces.
Figure 3:
Mounting the System in a Relay Rack or a Cabinet Equipment Rack
Front
Mounting Hardware
12-24 x 3/4" Thread Forming
Hex Head Screw
No. 10/12 Ground Washer
Torque: 65 in-lbs.


