


Vertiv
|
NetSure™ 2100 Series -48 VDC Power System Installation Manual (IM582138000)
|
Rev. C
71
NOTE!
The spacers on the bracket are used to accommodate the various sizes of batteries available.
Install or remove the spacers as required so that the batteries are tight in the battery tray.
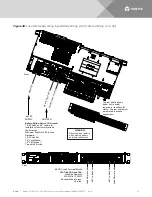
5.
Connect three links supplied by the battery manufacturer between pairs of battery terminals as shown in
. Use hardware furnished by the battery manufacturer. Torque hardware to battery
manufacturer’s recommendations.
6.
Ensure the battery cable ends in all trays are insulated with sleeving before performing the next step.
DANGER!
In multiple-tray installations, when batteries in one tray are connected, the battery cables in
all trays will be energized. Remove sleeving from and connect one cable at a time. Do not allow a cable
end to contact the battery tray or equipment rack.
WARNING!
In the next step, observe correct polarity. Connect only cables labeled “+” to battery
terminals labeled “+”. Likewise, connect only cables labeled “–” to battery terminals labeled “–”.
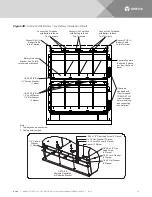
7.
Connect the cables found in the battery tray to the battery terminals, “+” to “+” and “–” to “–”. Observe
correct polarity. Refer to
. Secure with hardware furnished with the battery. Torque hardware
to battery manufacturer’s recommendations.
8.
Repeat steps 1 through 7 for any remaining battery trays.
9.
If Battery Trays Are Equipped With a Circuit Breaker:
To connect the batteries to the power system,
turn ON the battery disconnect circuit breaker located on all battery trays.


