AudioTron
Reference Manual
Page 35
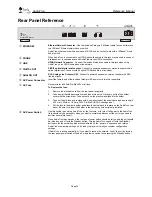
Rear Panel Reference
ANALOG OUT
R
AudioTron
L
LINE
PHONE
DIGITAL OUT
F
U
S
E
1
0
•
ETHERNET
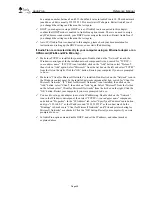
Ethernet Network Connector
- Use the included Category 5 Ethernet cable to connect this jack
to a 10BaseT Ethernet network hub or switch.
AudioTron will also work with a dual speed 10/100 hub, but will not work with a 100baseTX-only
hub or switch.
‚
PHONE
When AudioTron is connected to an HPNA phone line network, this jack may be used to connect
a telephone or to cascade a second AudioTron via the HPNA connection.
ƒ
LINE
HPNA Network Connector
– Connect the included telephone cable to this jack when using
AudioTron on an HPNA home phone line network.
„
DIGITAL OUT
S/PDIF optical digital audio output
- Connect to powered speakers or stereo receiver with an
optical digital input. Connect with an optical TOSlink cable (not included).
…
ANALOG OUT
RCA Analog Line Outputs (L/R)
- Connect to powered speakers or stereo receiver with RCA
line input jacks.
†
AC Power Connector
Insert the female end of the included three-pin IEC power cord into this receptacle.
‡
AC Fuse
Receptacle for a 250mA Slo-Blo 250V mini-fuse.
To Replace the fuse:
1.
Remove the electrical cord from the rear panel receptacle.
2.
Take a small flat-blade screwdriver and insert into notch. Gently pry out the fuse holder
cover with the screwdriver. Take note of how the plastic was aligned in the holder.
3.
Take out the old fuse and replace with a new mini-fuse of the exact same type and rating (5
x 20 mm, 250mA or 1/4 Amp, 250V Slo-Blo® UL/CSA cartridge type).
4.
Put the fuse in the plastic holder and press the holder back into place on the AudioTron rear
panel. Be sure to re-insert the holder in the same way it was originally installed.
ˆ
AC Power Switch
Use this switch to power up AudioTron for the first time, or to turn off all power to the AudioTron
(this should only be necessary when you want to completely disconnect the unit or you need to
perform a complete 'reset').
Once AudioTron is powered on, the rear panel power switch should be left on and the unit should
be turned on and off with the Standby button. Turning AudioTron on and off with the Standby
button avoids the network search process initiated by the “power on” sequence and retains
AudioTron’s temporary settings, so it’s ready to play music with your custom configuration
settings.
If AudioTron is acting erratically, or if you want to rescan the network, “reset” the unit by turning
the rear panel power switch off and on, wait a few seconds, then pressing the Standby button.


