www.Turtle-Beach.com
Page 48
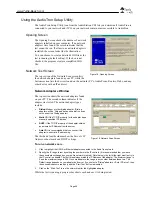
Viewing the Test Results
Clicking the “Next” button on the Directory Scan Screen to view a summary of the test results:
1.
The “View Detailed Result” button is shown if the check
box “Create a detailed LOG file as the test is running” is
checked on the Welcome screen. Click on this button to
view the detailed results of the errors that occurred while
the test was running.
2.
The “View Results” will display the normal test results.
3.
The “E-mail Results” launches your e-mail application,
and attaches the results of the test to your message.
4.
Click on “Finish” to terminate the application.
If the diagnostics did not detect AudioTron
on your network…
ü
Make sure your network adapter drivers are
installed properly by double-clicking on the
“System” icon from the Windows control panel. Click the “Device Manager” tab. Double click
on “Network Adapters”, then select the adapter AudioTron is connected to from the list and
click on the “Properties” button. Check the status of your device. If any problems are
displayed, check your adapter documentation on how to fix them.
ü
Check that your adapter settings are set properly from the network neighborhood by double-
clicking on the “Network” icon from the Windows control panel, select the adapter AudioTron
is connected to, and view its properties. In the “Bindings” tab, make sure that the TCP/IP
option is checked. If TCP/IP is not even available, you need to install is. Check your adapter
documentation on how to install TCP/IP for your adapter. Restart your computer if you were
prompted to do so.
ü
If your network adapter is setup to use a DHCP server, make sure AudioTron is set to use
DHCP. Restart AudioTron if you made any changes.
ü
If your network adapter is set to use static IP, disable DHCP setting in AudioTron, and set the
IP address and subnet mask to match those of your adapter. Restart AudioTron if you made
any changes.
If the diagnostic detected AudioTron, but AudioTron can not find your music files…
ü
Double click on the “Network” icon in the Windows control panel, click the “File and Print
Sharing…” button, and check the “I want to be able to give others access to my files.” Restart
your computer if you were prompted to do so.
ü
Double click on the “Network” icon in the Windows control panel, click on the
“Identification” tab, give your computer a name and workgroup. Restart your computer if you
were prompted to do so.
ü
Double click on the “Network” icon in the Windows control panel, click on the “Access
Control” tab, click on “Share-level access control” radio button. Restart your computer if you
were prompted to do so.
If you’re not sure what kind of a server you have, DHCP or static IP
ü
Check the adapter list in the diagnostics, for each adapter it displays the “type”. The type field
could be one of four types:
ü
Dialup, this is your modem, AudioTron can not communicate with this adapter.
ü
Static IP, your adapter is using static IP. If AudioTron is connected to this adapter, set
AudioTron to use IP address www.xxx.yyy.zzz, and subnet mask aaa.bbb.ccc.ddd.
www.xxx.yyy should be the same as the first three numbers your adapter is using. zzz should
Figure 23:
Test results screen.

