background image

www.Turtle-Beach.com

Page 20

7. 

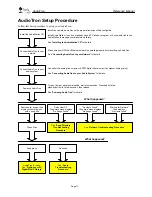
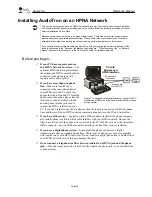
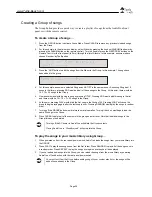
If “No Hosts Found” is displayed, check the suggestions for “No Hosts Found” in the Appendix called
“Troubleshooting Tips”. Reboot AudioTron from step 2 above to repeat the process. If “No Hosts Found” is
again displayed, restore AudioTron’s default settings as described below.

To Restore AudioTron’s Default Settings…

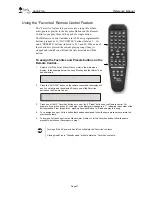
1. 

Press the OPTIONS button. Turn the knob until the “Restore Factory Defaults” menu item is displayed.

2. 

Press the knob to display the “No/Yes” menu screen, turn and press the Knob to select “Yes” to restore the
factory default settings.

3. 

Reboot AudioTron from step 2 above to repeat the process.

4. 

If “No Hosts Found” is again displayed, it is possible that your network does not have a DHCP server (or if it
does, AudioTron can’t find it.) In this case, you must manually assign an IP address using the Static IP
Address procedure as described below:

To assign a Static IP Address…

1. 

Find the addresses of the PCs in your network:

 Run the AudioTron Setup Utility from the CD included

with AudoTron to find the IP address, Subnet IP Mask and Gateway Address for each PC in your network.
These numbers will be used in a later step. See the Appendix called “Network Troubleshooting Procedure”
for details on running the Setup Utility.

2. 

Choose an IP Address that doesn’t conflict with the IP Addresses of the PCs in your network:

Choose an IP Address for AudioTron that won't conflict with any of these addresses. For example, if there
are two PCs with the first set to IP address 192.168.0.1 and the second set to 192.168.0.2, then choose a
number for AudioTron that’s at least 10 higher than the highest IP address already assigned. (e.g.
192.168.0.12 in this example). Choosing a number that’s significantly higher than any of the other IP
Addresses (but no higher than 254) will help assure that AudioTron won’t conflict with other IP Addresses.

3. 

Select the network type (Ethernet or HPNA): 

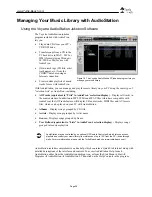
Press the OPTIONS button on the AudioTron front panel.

Turn the knob until the menu displays “Select Network Interface”  “Ethernet/Phone Line”.  Turn and press
the knob to select the appropriate option for your network installation (Ethernet or HPNA).

4. 

Disable DHCP:

 Turn the knob until the “Configure DHCP” menu is displayed. Press the knob to display the

“Configure DHCP” “Enable/Disable” menu.  Turn and press to select “Disable” to turn off the DHCP function.
Note that the Disable DHCP setting will cause AudioTron to ignore the IP Address, Subnet Mask and
Gateway settings assigned by a DHCP server.

5. 

Set the IP Address:

 Turn the knob until the “Configure IP Address” option is displayed. Press the knob to

display the “Configure IP Address” menu. Enter the number you’ve determined above in step 2 by turning
and pressing the knob to advance the numbers. When “Done” is flashing, press the knob to save the
changes.

6. 

Set the Subnet IP Mask:

 Turn and press the knob to select the option “Configure Subnet IP Mask”. Enter

the number obtained from step 1 for your network’s Subnet IP Mask. When “Done” is flashing, press the
knob to save the changes. Note that AudioTron is compatible with Class C networks, and may use a Subnet
IP Mask between 255.255.255.0 and 255.255.255.240.

7. 

Set the IP Gateway:

 Turn and press the knob to select the option “Configure IP Gateway”. Enter the

number obtained from step 1 for your network’s IP Gateway.

8. 

Set the “Sharing” Password (Optional)

: If you have password-protected your Shared directories, the

same password needs to be entered into AudioTron in order for it to access them. In the Options menu, turn
the knob to select the option “Share Password”. Press the knob to display the “Enter Disk Sharing
Password” menu. Enter the desired Password until the word “Done” is flashing. Press the knob and select
“Yes” in the display that follows. Press the knob to save the password. Note that passwords are case
sensitive.

9. 

Set the NT User Name and Password (Optional)

: If you’re running an NT 4 or Win 2000 network, the NT

User Name and Password should match those set in AudioTron. In the Options menu, turn the knob to
select the option “Enter Password for User”. Press the knob and the “NT/Windows 2000  User Password”
display will appear. Enter the desired Password until the word “Done” is flashing. Press the knob and select
“Yes” in the display that follows. Press the knob to save the password.  Repeat for the User Name. Note
that passwords and user names are case sensitive.

10. 

Re-start AudioTron:

 After entering AudioTron's network settings, turn off the power switch on the rear

panel. Turn the power switch back on. Wait a few seconds, then press the front panel Standby switch.
AudioTron will step through its power-on sequence and search for the host computer(s) on the network.  It
will display how many PC hosts it has located and then search for music files on those hosts, finally
reporting the number of music files it has found.

Содержание AudioTron

Страница 1: ...TM Reference Manual Network Digital Music Player Network Digital Music Player TM...

Страница 2: ...icated on the rating label Openings in the product case are provided for ventilation Do not block or cover these openings Make sure you provide adequate space at least 6 inches 15 cm around the system...

Страница 3: ...Beach web site www turtle beach com and click on Sales Support then Files Drivers 2 Scroll down to the A section and click on AudioTron This will bring up the list of files available for download inc...

Страница 4: ...NSE This is a legal Agreement between you either an individual or an entity and VTB that sets forth the license terms and conditions for using the enclosed Software and updates of the Software In this...

Страница 5: ...ernet network with a Hub 17 Configuring AudioTron s Network Settings 19 Before you begin 19 Connecting the Audio Outputs 21 Before you begin 21 Audio Troubleshooting Procedure 22 Playing Your Music Li...

Страница 6: ...t Screen 47 Viewing the Test Results 48 Appendix D Shared Directories 50 Song Directory Troubleshooting Procedure 51 AudioTron Shared Directories Requirements 52 Bypassing AudioTron s Shared Directory...

Страница 7: ...sforming your PC into a powerful jukebox With AudioTron you can enjoy instant playback of any song at any time from anywhere in your home Best of all by installing several AudioTrons throughout your h...

Страница 8: ...he bedroom and living room In this setup the PC Music Server or Host provides several functions The hard drive stores a library of digital music files in MP3 WMA or WAV formats obtained by transferrin...

Страница 9: ...ne cable phone cable Ethernet Cat 5 cable PC with Ethernet interface C AudioTron Ethernet Connection Phone Jack Phone Jack Ethernet Cat 5 cable Figure 2 A basic setup can be achieved with a simple HPN...

Страница 10: ...s networked via HPNA or Ethernet can each play different music at the same time from the music library on the PC Music Server With the music library stored in a single location on the PC Music Server...

Страница 11: ...er systems with 1 8 line input jacks System Requirements One or more networked PCs Recommended Minimum PC System Pentium 233MHz processor 64MB RAM CD drive with digital audio extraction 16 bit color v...

Страница 12: ...to your audio system Use either the analog line outputs or SPDIF digital optical output for highest audio quality See Connecting AudioTron to your Audio System for details Power on AudioTron Turn on...

Страница 13: ...er on sequence and retains AudioTron s temporary settings so it s ready to play music If AudioTron won t power on Check that the rear panel power switch is on Make sure to press and hold the Standby b...

Страница 14: ...f songs found on the PC s in the network After the song search is completed the first song title in the library is displayed under the main menu and AudioTron is ready to play music Waiting for networ...

Страница 15: ...re doing this you should first run the AudioTron Setup Utility to see if the directories are already configured properly AudioTron Setup Utility The AudioTron Setup Utility helps you set up your Audio...

Страница 16: ...Tron and PC from the phone jacks then plug a phone into the jack used to connect AudioTron and another phone into the jack used to connect the HPNA interface on your PC If you can t talk between the t...

Страница 17: ...onnector labeled PHONE This allows you to connect both AudioTron and a telephone to a single phone jack on the wall of the room where you listen to your AudioTron 4 Proceed to the section called Confi...

Страница 18: ...en multiple devices and controls the network traffic There are many types of hubs available and some have enhanced features such as built in switches that intelligently route data in the network to op...

Страница 19: ...ron into the connector labeled ETHERNET on the AudioTron rear panel 2 Insert the other end of the cable into your Ethernet hub which in turn connects to a network interface card in your PC 3 Proceed t...

Страница 20: ...ddress into AudioTron called Static IP addressing If your network has a DCHP server AudioTron will automatically be assigned an IP address when it s connected to the network Since you can t hurt Audio...

Страница 21: ...ect Disable to turn off the DHCP function Note that the Disable DHCP setting will cause AudioTron to ignore the IP Address Subnet Mask and Gateway settings assigned by a DHCP server 5 Set the IP Addre...

Страница 22: ...analog outputs to the line inputs on your stereo receiver or amplifier The line level inputs on your stereo receiver may be labeled AUX CD or LINE IN Please refer to your equipment s documentation for...

Страница 23: ...d on Standby resets the AudioTron s audio outputs Some songs may not play because they may have had formatting problems when originally converted from CD See the Reference Manual for more details Are...

Страница 24: ...Play time status Displays how long the song has been playing from the beginning If the Song s file contained information on its total length this field will display both the current time and the tota...

Страница 25: ...if increased network traffic causes the buffer to empty before new data arrives Note that since MP3 and WMA music files are compressed they require a smaller buffer than WAV files which can be up to 1...

Страница 26: ...etwork drives for music and rebuilds its internal song database To Search for new networked PCs When a new PC is added to the network AudioTron must be powered on with the rear panel power switch in o...

Страница 27: ...and there would be 14 10 1 25 songs in the Group 6 At this point pressing PLAY would start the first song in the Group of 25 Pressing LOOP will cause the group to begin playing again after the last s...

Страница 28: ...song Monkey and the Hitman has been selected 2 Press the ADD FAV button on the remote control and the display will ask if you want to add the selected Song to one of the Favorites buttons on the Remo...

Страница 29: ...will display CD audio tracks MIDI files and AVI movie files which can be played on your PC with AudioStation Albums Displays songs grouped by CD title Artists Displays songs grouped by Artist name Gen...

Страница 30: ...database you can drag and drop files from the right side playlist screen into the appropriate category on the left side library screen and AudioStation will change the tag accordingly This operates l...

Страница 31: ...pressed audio formats For these listeners maximum fidelity will be achieved when playing WAV files through AudioTron s S PDIF optical digital output In most cases the MP3 or WMA formats offer acceptab...

Страница 32: ...extension AudioStation can export M3U playlists for use with the Lists menu item AudioTron s main display AudioTron searches for these M3U playlists in the shared directories where the MP3 WMA and WA...

Страница 33: ...Pause Pauses playback if a Song is playing and resumes playback if a song is Paused Next Selects the next song in a List In the Select menu selects the next item Previous Selects the previous song in...

Страница 34: ...d Share sharename has xx new songs Indicates the number of new songs found on the indicated share Sharename Share Access Denied Indicates that access to this share was denied because the share passwor...

Страница 35: ...files Note that this could significantly increase the search time if the number of files in the shared directories is significant Message Time Out default 1 sec Controls the display time for messages...

Страница 36: ...lectrical cord from the rear panel receptacle 2 Take a small flat blade screwdriver and insert into notch Gently pry out the fuse holder cover with the screwdriver Take note of how the plastic was ali...

Страница 37: ...quivalent to the front panel Random and Repeat buttons Buttons that are not available on the front panel FAVORITES The 16 Favorites buttons work in conjunction with the ADD FAV button to quickly activ...

Страница 38: ...associated with each song e g tag data and directory location Dimensions 17 x 1 75 x 10 inches 430 x 44 x 250 mm Weight 5 2 lbs 2 4 Kg Power Requirements 90VAC 135VAC 50 60Hz 250mA max Remote Control...

Страница 39: ...line with a splitter rather than in series with each other See the section Installing AudioTron on an HPNA Network If only certain songs skip try playing them on your PC with AudioStation to see if th...

Страница 40: ...alog box that will show how the power save features are set If your hard drive or system is set to shut down after a period of time it will be inaccessible to AudioTron Make sure your music files are...

Страница 41: ...and the phone jack Transient protection is built into the AudioTron phone jack so an external filter is not necessary Why do some song titles come up twice in the display Two songs with different file...

Страница 42: ...oes not require new wiring it transfers data at a slower rate than Ethernet and the network components can be more expensive An HPNA network does not affect your phone line or Internet connection You...

Страница 43: ...IP protocol AudioTron won t be able to play music from the PC hard drives To check if your network is running TCP IP in Windows 98 1 Launch the Control Panel Start Settings Control Panel 2 Double clic...

Страница 44: ...HP server Firewalls A Firewall is special security software that keeps unwanted outsiders from breaking into your network Firewalls are primarily used to prevent hackers from accessing your PC hard dr...

Страница 45: ...he IP Address Subnet Mask and default Gateway settings The IP address setting for AudioTron should not conflict with the IP addresses for any of the PCs on your network The Subnet Mask and Default Gat...

Страница 46: ...tions on setting up AudioTron with Static IP Addressing Return to the Setup procedure to see if AudioTron can now log on to the network What happened Click to highlight the network adapter Press Start...

Страница 47: ...rs will be Skipped because AudioTron does not connect to a Dialup adapter Static IP If the TCP IP property for the adapter has a manually specified IP Address DHCP If the TCP IP property of the adapte...

Страница 48: ...s an error message will appear 2 On the Shared Directories screen click on the Configure button to set the drives and file type to search Note For servers the Check Hard Drives and Check CD ROM drives...

Страница 49: ...to install TCP IP for your adapter Restart your computer if you were prompted to do so If your network adapter is setup to use a DHCP server make sure AudioTron is set to use DHCP Restart AudioTron i...

Страница 50: ...lick on Add again Select Microsoft from the list box on the left and select TCP IP from the list on the right Click the OK button Restart your computer if you were prompted to do so Make sure Client f...

Страница 51: ...nt Sharing button 3 In the dialog box that appears check the options I want to give others access to my files 4 Close all of the dialogs To set up a shared directory 1 In the Windows Explorer director...

Страница 52: ...es screen Double click on the heading Files Accessible to AudioTron A Yes in this column indicates music files in the path can be accessed by AudioTron There are paths marked as Yes Double click a Yes...

Страница 53: ...knows about If songs are deleted from the network drives AudioTron must be re booted in order to delete the files from its local database In the following examples AudioTron would find music stored in...

Страница 54: ...ficantly increase the search time For this reason it is suggested that it only be used in cases where AudioTron cannot find music files even though they are assumed to be in the correct directories Fo...

Страница 55: ...es have a Nb0 extension and are typically formatted with a name such as Atronx xx xx nb0 where the x xx xx represents the version number of the firmware 4 If the Options LED is not lit press the Optio...

Страница 56: ...t temporary discontinuance of service may be required The telephone company may request that you disconnect the equipment until the problem is resolved The telephone company may make changes in its fa...

Отзывы: