background image

Toshiba Access Panel

Dashboard Properties Dialog Box

Part II: Technical Reference

358

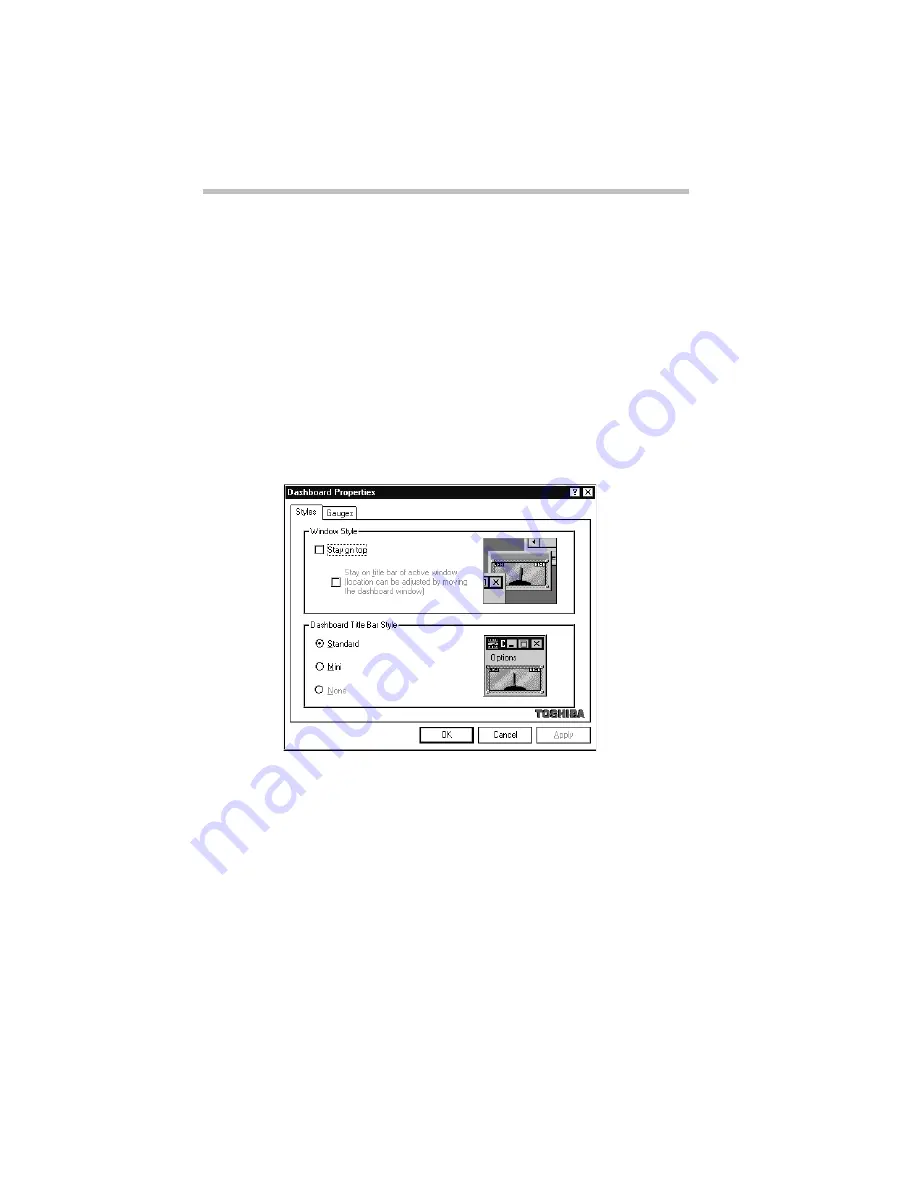
Dashboard Properties Dialog Box

The Dashboard Properties dialog box lets you customize the dash-
board’s position and style. You define these options using the two 
property pages that are part of the Dashboard Properties dialog 
box. They are:

The Styles property page

The Gauges property page

To access this dialog box, click the Dashboard tear-off button to 
separate the dashboard from the panel, and choose Dashboard 
Properties... from the Options menu.

Dashboard Properties dialog box

Styles Property Page

The Styles property page allows you to control the dashboard’s 
overall appearance on the desktop.

Содержание PORTEGE 650CT

Страница 1: ... the computer s features Make Sure You Have Everything Your Portégé 650CT computer comes with everything you need to get up and running quickly However before you rush off it s a good idea to make sure you received everything you were sup posed to This information is listed on the Quick Start Card at the top of the box If any items are missing or damaged notify your dealer immedi ately For additio...

Страница 2: ...ion make sure your work area is free from dust moisture and direct sunlight liquids and corrosive chemicals Don t spill liquids into the computer If you spill a liquid into the keyboard turn the computer off unplug it from the AC power source and let it dry completely before turning it on again If the computer does not operate correctly after you turn it back on contact a Toshiba authorized servic...

Страница 3: ...of books available on ergonomics repetitive strain injury and repetitive stress syndrome Placement of the Computer Proper placement of the computer and external devices is impor tant to avoid stress related injuries Place the computer on a flat surface at a comfortable height and distance Your arms and hands should be in a relaxed posi tion with your forearms parallel to the floor The top of the L...

Страница 4: ...vel of your elbow You should be able to type comfortably with your shoulders relaxed If you are using a conventional chair Your knees should be slightly higher than your hips If neces sary use a foot rest to raise the level of your knees and ease the pressure on the back of your thighs Adjust the back of your chair so it supports the lower curve of your spine If necessary use a cushion to provide ...

Страница 5: ...ngling your wrists Keep them in a relaxed neutral position while typing Exercise your hands wrists and arms to improve circulation Work Habits The key to avoiding discomfort or injury from repetitive strain is to vary your activities If possible schedule a variety of tasks into your work day Finding ways to break up the routine can reduce stress and improve your efficiency Take frequent breaks to ...

Страница 6: ...83 Don t worry if you don t know what some parts of the computer do Some items in this tour support more advanced computing functions that you may want to use as your computing needs and skills increase The Front with the Display Closed The front with the display closed The line in jack provides an audio input connection for an exter nal stereo device like a CD ROM drive The microphone jack provid...

Страница 7: ...he left side Attaching a special cable to the security lock slot lets you anchor your computer to your desk or other large heavy object For more information see Applying Physical Restraints on page 247 The external diskette drive port provides a connection for the external diskette drive The diskette drive is compatible with 1 44MB and 720KB 3 5 inch diskettes For more information see Connecting t...

Страница 8: ...ne line For more information see Connecting to a Telephone Line on page 170 The port cover protects the ports that allow you to connect an external video device PS 2 mouse keyboard and external diskette drive The Back The back To uncover the ports open the port cover by pulling down on its center tab and slide the cover into the slot at the lower edge of the computer The power socket is where you ...

Страница 9: ... Portégé 650CT communicate with another infrared compatible device such as another computer or printer For more information see Transferring Files to Another Computer on page 95 The serial port provides a connection for a serial mouse printer or other serial device For more information see Using a Serial Mouse on page 194 The cooling fan allows the processor to perform at maximum speed by providin...

Страница 10: ...199 or Using the Optional Desk Station V Plus on page 205 There are two keyboard legs on the bottom of the computer Using the legs together lets you adjust the angle of the computer The battery release latch prevents accidental release of the battery cover The memory expansion slot cover protects a slot for adding extra memory to your computer For more information see Adding Memory Optional on pag...

Страница 11: ... panel to the computer The AccuPoint pointing device combines the function of a mouse with the convenience of never having to remove your hands from the keyboard For more information see Using the AccuPoint Pointing Device on page 27 Use the AccuPoint buttons with the AccuPoint to access com mands in your programs The larger primary button acts as the left button on a mouse The smaller secondary b...

Страница 12: ... keyboard including one Windows key and one Applica tions key For more information see How to Save Your Work on page 86 The System Indicator Panel The system indicator panel The AC adapter light glows green when the AC adapter is pro viding power to the computer If the adapter s output voltage is abnormal or if the power supply malfunctions this indicator flashes orange The power light glows green...

Страница 13: ...tter Formore information see The Character Keys on page 81 The cursor control mode light glows when the cursor control overlay is on When the overlay is on pressing an overlay key moves the cursor in the direction shown by the white indicator printed on the left front of the key instead of the letter printed on the top of the key For more information see The Cursor Control Overlay on page 275 The ...

Страница 14: ...ter requires power to operate By connecting the computer to a power source you can provide power to run the computer and charge the battery To provide power to your com puter use the AC adapter and power cord to connect the computer to a live power outlet Before you can use the battery to power the computer you must charge it Leave the computer plugged in for at least three hours with the computer...

Страница 15: ...ecting the AC adapter cord to the computer 2 Connect the DC OUT end of the AC adapter cord to the power socket on the back of the computer 3 Insert the plug end of the power cord into a live wall outlet The AC adapter light on the indicator panel glows green Adding Memory Optional Your computer comes with enough memory to run most of today s popular applications However you may want to increase th...

Страница 16: ... to this section if you decide to add memory at a later time Sizes of Memory Modules Additional memory is easy to install Memory modules available from your dealer come in the following sizes Install the Memory Module The memory module installs into the memory expansion slot on the bottom of the computer You ll need a Phillips screwdriver to install the memory module 1 Click Start then click Shut ...

Страница 17: ...amage the computer the card or both 4 Unplug the computer 5 Close the display and remove any cables you may have connected If you re following the steps in this chapter you haven t con nected any yet 6 Turn the computer upside down Removing the memory slot cover 7 Use a small Phillips screwdriver to remove the screw that secures the memory slot cover 8 Lift up the memory slot cover and remove it S...

Страница 18: ...ay cause memory access problems 10 Gently press down on the memory module until it snaps into place When the module is fully seated the metal clips on either side of the slot snap around the module Do not force the module into position The memory module should be level 11 Replace the slot cover 12 Replace the screw you removed in step 7 and tighten it 13 Turn the computer over When you turn your c...

Страница 19: ...e a small Phillips screwdriver to remove the screw that secures the memory slot cover 6 Lift up the memory slot cover and remove it Removing a memory module 7 Push the metal clips away from the memory module until it pops up 8 Pull the module out of the slot Connecting the External Diskette Drive The Portégé 650CT s external 3 5 inch diskette drive is useful for installing software on the hard dis...

Страница 20: ...diskette Push the diskette eject button to remove a diskette from the drive The disk in use light goes on when the computer is accessing a diskette To attach the external diskette drive to the computer follow these steps Attaching the cable to the external diskette drive 1 Connect the cable to the external diskette drive Diskette insertion slot Disk in use light Connector to drive Diskette eject b...

Страница 21: ...rnal diskette drive 3 Attach the cable from the external diskette drive to the external diskette drive port You may attach the external diskette drive with the computer on or off If you attempt to use the diskette drive when it is not attached to the computer the computer displays an error message The computer automatically recognizes the external diskette drive and calls it the A drive Port cover...

Страница 22: ...ou don t have or don t wish to connect a printer yet don t worry You can always connect one later The most common type of printer is a parallel printer To connect a parallel printer you ll need a standard parallel printer cable You may have received a cable when you purchased your printer Oth erwise printer cables are at most computer and electronics stores To connect the printer to the computer f...

Страница 23: ... 5 Plug the printer s power cable into a live AC outlet The printer must be connected turned on and ready online before you turn the computer on Open the Display The final step before you turn your computer on is to open the display Opening the display panel 1 Facing the front of the computer locate the display latch on the front center of the display panel Parallel port Printer cable Display latc...

Страница 24: ...mputer with Toshiba on line Look for the Registration icon on you desktop if this feature is available to you Completing your product registration card lets Toshiba keep you up to date with information about new products and upgrades Registering your computer extends your Toshiba warranty world wide at no charge to you See the registration card and warranty information for details about the warran...

Страница 25: ... Lock Your Portégé 650CT is equipped with a power button lock that prevents the computer from turning on or off accidently To set the lock to the on position follow these steps 1 Turn the computer upside down The power button lock 2 Locate the power button lock 3 Slide the lock towards the closed lock icon The power button is disabled until the lock is moved to the open lock icon position Power bu...

Страница 26: ...tures All of the information in this manual is valid for Windows 95 If you re using Windows for Workgroups refer to the Win dows for Workgroups documentation and online Help for information specific to Windows for Workgroups Using the AccuPoint Pointing Device The AccuPoint enables you to move the cursor and to select items on the screen If you re familiar with desktop computers you may have used ...

Страница 27: ... To double click press the primary button twice in rapid succession The primary button corresponds to the left button on a mouse The function of the secondary button depends on the program you are using It corresponds to the right button on a mouse Check your programs documentation to find out whether it uses the right mouse button Choose Windows 95 or Windows for Workgroups When the system prompt...

Страница 28: ...indows for Workgroups does not include a Suspend com mand Use Resume Mode instead Windows 95 contains the files your computer needs to com municate with optional PC Cards If you re using Windows for Workgroups use Card Wizard with your optional PC Cards The steps in Changing the Display Mode on page 280 are for Windows 95 To change the display mode in Windows for Workgroups double click the Chips ...

Страница 29: ...ame with your computer then click Next to continue with Configuring Your Computer Setup installs the devices it found on your system and prompts you to restart the computer 8 Click Finish to restart the computer You are now ready to set up Windows 95 for your printer Set Up Windows 95 for Your Printer If you already have a printer choose Next when the system prompts you to set up your printer If y...

Страница 30: ...s 2 Select your printer and choose Next 3 Set the port to LPT1 and choose Next 4 Type a new name for your printer or accept the default and choose Next 5 If your printer is connected and turned on choose Finish to print a test page To finish the setup procedure without printing a test page choose No then Finish Select Date Time Properties As Setup continues Windows 95 displays the Date Time Proper...

Страница 31: ...es to reinstall Windows 95 on your system If this occurs and you haven t made these diskettes you will have to buy a new copy of Microsoft Windows 95 Complete the Initial Startup Procedure After you ve finished making Windows 95 diskettes Windows 95 completes its setup procedure and displays the Welcome to Win dows 95 screen This screen provides the following options The Windows 95 Tour gives you ...

Страница 32: ... diskettes and run Microsoft s Create System Disks program to make a set of Microsoft Windows 95 diskettes There are two ways to obtain program files for your other pre installed software not Windows 95 Buy blank diskettes and run Toshiba s Master Disk Creator programs Purchase the Toshiba drivers utilities using the order form that came with your computer Preparing to Create Master Diskettes Disk...

Страница 33: ...ide to put off the process until later make sure you don t forget You don t want to accidentally delete a program and have no master diskettes available from which to reinstall it quickly Running Microsoft Create System Disks If you chose not to create Windows 95 diskettes when you turned the computer on the first time you should do so now Since Microsoft Create System Disks requires you to make a...

Страница 34: ...programs pre installed on your computer It is a very simple pro gram to use Once you ve started it follow the instructions on the screen inserting and removing diskettes as prompted Make sure you label the diskettes as indicated by Master Disk Creator To run Master Disk Creator follow these steps 1 Make sure the diskette drive is connected to the computer If you re unsure how to do this see Connec...

Страница 35: ...lect All To create program diskettes for only some of the available programs select the program s for which you want to create program diskettes 6 Label the diskettes with the names shown on the screen or click Print Labels to print the labels automatically If you choose to print the labels automatically make sure the computer is connected to a printer and youhave enough printer diskette labels 7 ...

Страница 36: ...l a slight resistance Push the diskette gently into place When the dis kette is securely in the drive the diskette eject button pops out 9 In the MDC Disk Creation Confirmation screen choose a Write method and click Create Disk Master Disk Creator begins copying files to the diskette and displays a meter monitoring the copying process 10 When Master Disk Creator prompts you to press the dis kette ...

Страница 37: ...diskette 12 Continue inserting and removing diskettes according to the instructions on the screen Since creating program diskettes will take some time now is a good time to fill in your registration card if you haven t yet done so It also gives you time to skim through the remainder of this manual and fill in the reader response card Toshiba welcomes your comments and suggestions for improving the...

Страница 38: ...Let s Start at the Very Beginning Create or Purchase Master Diskettes Part I Getting To Know Your Computer 39 ...

Страница 39: ...you will have learned how to use the AccuPoint explored the Windows 95 desktop explored the Toshiba Access Panel created a new document and folder started and closed programs resized reshaped and moved windows on the desktop created and used shortcuts changed the properties of various objects on the desktop set the date and time used Windows Help turned your computer off properly ...

Страница 40: ...ing the Toshiba Access Panel on page 66 and skim others In addition Windows 95 Help discusses a number of the major differences in an easy question and answer format Click Start then Help to open the online Help click the Index tab then type tips and double click for Windows 3 1 users If you ve used the Macintosh operating system you ll find Win dows 95 is similar in many ways For instance the Rec...

Страница 41: ... desktop In this lesson you will learn how to use the AccuPoint Follow these steps to learn what you can do with the AccuPoint 1 Push gently against the left side of the AccuPoint Notice how the pointer moves to the right edge of the desktop 2 Push a bit harder against the right side of the AccuPoint Notice that the pointer moves faster as you increase the pressure on the AccuPoint 3 Practice movi...

Страница 42: ...e names and functions of the various parts of the desktop you will also learn some simple organizing principles for your desktop Each icon on the desktop represents a single object such as a pro gram a folder or a device Programs are sets of instructions for the computer system Folders are containers to store documents programs and other folders Devices are disk drives printers and other periphera...

Страница 43: ...at your system does when you point to each of the items on the Start menu When You Point to The System Programs displays a list of programs you can start Documents displays a list of documents you ve opened previously Settings displays a list of system components for which you can change settings Find allows you to find a folder document shared computer or mail message Help allows you to use the H...

Страница 44: ...ortcut menu for the Start button provides three options 4 Click an empty space in the desktop to close the menu Every time you start a program open a folder or open a docu ment the system displays a button on the taskbar that reminds you the object is open or running You can switch between the programs folders or documents by clicking the buttons on the Suspend saves the current system settings an...

Страница 45: ...ointer to the My Computer icon in the upper left corner of the desktop 6 To open the My Computer window double click the icon When you double click the My Computer icon Windows 95 displays a window with icons for each of the computer s drives along with the Control Panel Folder and the Printers Folder The Control Panel folder contains the programs used to config ure the computer ThePrinters Folder...

Страница 46: ...r desktop or anywhere else You will learn how to create short cuts in Lesson 7 Closing Programs and Documents on page 57 You can also use this menu to rename a folder or document You ll learn how to do this in Lesson 3 Creating a New Doc ument on page 50 You can view an object s properties by clicking Properties in the object s shortcut menu You will learn about properties in Lesson 8 Making Short...

Страница 47: ... move an object on the desktop by clicking the object holding the primary button and dragging the object The taskbar moves from the bottom to the right edge of the desktop The desktop with the taskbar on the right You may move the taskbar to any of the desktop s four edges 10 Click the taskbar once again and drag it back to the bottom of the desktop Now that you have explored the desktop continue ...

Страница 48: ...teps 1 Click an empty area of the desktop with the secondary button Windows 95 displays a menu of commands applicable to the desktop The Desktop shortcut menu 2 Point to New then click Text Document Windows 95 creates an icon on the desktop called New Text Document txt with the icon name highlighted 3 Click the document name The name changes color 4 Give your document a meaningful name like My New...

Страница 49: ...eave Notepad open for now and follow the steps in the next lesson to create a new folder in which to store your document Lesson 4 Creating a New Folder Windows 95 stores documents tools devices and programs in folders It even stores other folders in folders In this lesson you will learn how easy it is to create folders to store your documents To create a new folder follow these steps 1 With the se...

Страница 50: ...moves across the desktop 7 Drop the document icon onto the folder icon The document disappears The folder now contains the document 8 To see your document double click the folder The folder window opens and displays the document icon Now that you have created a folder to store your document go on to the next lesson to learn how to start programs Lesson 5 Starting Programs Another way to begin work...

Страница 51: ...rawing program opens and the taskbar dis plays a new button The desktop with Paint open Your desktop now looks something like the above illustration You can use Paint to draw simple pictures logos maps and symbols Paint allows you to create edit move and size a drawing You can also print the drawing and save it on your disk for later use The tools for Paint are in the tool box To learn more about ...

Страница 52: ... hard drive Notice the taskbar now has buttons for Paint and Windows Explorer 5 Click the Paint button on the taskbar Windows 95 displays the Paint program You can move back and forth between the two programs by clicking their buttons alternately Windows 95 places the active window on top of other win dows on the desktop unless you have resized the windows Now that you have learned how to open pro...

Страница 53: ...e three buttons on the right hand side of the title bar on the Windows Explorer window and the Paint window From left to right these are the minimize maximize and close buttons Most windows have these three buttons To learn how to use these buttons follow these steps 1 To make the Windows Explorer window the active win dow click the Windows Explorer button on the taskbar Windows displays Windows E...

Страница 54: ...ize button has changed It s now called the restore button Maximizing a program is a good way to work when you re only using that program and don t want any other distractions on the desktop 6 To return Paint to its previous size click the restore button The Paint window returns to its previous size and location Notice how the restore button has changed back into the maximize button Now assume that...

Страница 55: ...e got them side by side you can see how you could refer to one window while working in the other When you are working with documents and programs resizing and moving windows allows you to rearrange the desktop to suit what you are doing Experiment with different sizes and place ments of windows to discover the most comfortable and efficient arrangement for your work In this lesson you learned how ...

Страница 56: ... on the desktop Lesson 8 Making Shortcuts In this lesson you will learn how to make shortcuts and to use Find Shortcuts are icons you can click to open aprogram a folder or a document directly from the desktop They are a quick and convenient way of accessing programs and documents you use frequently To make a shortcut follow these steps 1 Click the folder you created in Lesson 4 with the secondary...

Страница 57: ...d box 5 Click the Find Now button Windows 95 displays a list of all the files with Calculator in their names 6 Click the Calculator file with the secondary button and drag it to the desktop A menu appears 7 Click Create Shortcut s here A shortcut to the calculator appears on your desktop 8 Create a shortcut to the Character Map on your computer by following steps 3 through 7 substituting character...

Страница 58: ...een and color One of the properties of the desktop is the wallpaper Your computer came with the Toshiba wallpaper selected In this lesson you will learn how to view the properties associated with the objects on the desktop First you will look at the proper ties of the folder you created Then you will look at the properties of the desktop and change the wallpaper To view and change the properties o...

Страница 59: ... a menu 5 Click Properties The Display Properties dialog box appears The Desktop Properties dialog box By clicking the tabs below the title bar you can select properties for backgrounds screen savers appearances or settings If you tried the other tabs return to the Background tab by clicking it 6 Scroll through the wallpaper options by clicking the scroll arrows in the wallpaper list box 7 Try a d...

Страница 60: ...ns for your desktop wallpaper continue with the next lesson where you will learn how set two other prop erties the date and time Lesson 10 Changing the Date and Time In this lesson you will learn how to change the date and time on your computer You set the computer s date and time properties when you turned the computer on the first time and set up your operating system To change the date and time...

Страница 61: ...g box To open this dialog box more quickly right click the time display on the taskbar then click Adjust Date Time 4 On the Date and Time tab select the correct month year day and time 5 On the Time Zone tab select your time zone by clicking the up and down arrow keys 6 When you re done click OK Now that you have learned how to change the date and time prop erties of your computer continue with th...

Страница 62: ...to remove objects from the desktop with the Recycle Bin To remove the icons you created from the desktop follow these steps 1 Point to the icon for the new folder you created then click and hold the primary button 2 Drag the icon until it s over the Recycle Bin Windows 95 highlights the Recycle Bin icon when the object you are dragging is over the Recycle Bin 3 Release the primary button The My Ne...

Страница 63: ...enu Later on in your real work not in this tutorial you ll use the Recycle Bin to delete other objects such as folders documents and even programs The process is still the same Drag an item s icon to the Recycle Bin and drop it in When you re absolutely certain that you never want to see the item again delete it from there If you change your mind and want to restore something you sent to the Recyc...

Страница 64: ...on line help features and set up separate configurations for working at home at the office or when you are travelling The Toshiba Access Panel The illustration identifies the parts of the panel The following steps demonstrate some of the things you can do with the panel 1 To move the panel from the right side of the desk to the left side click the panel and while holding the primary button drag it...

Страница 65: ...ord when in the office you might have one configuration that turns on all the computer s battery saving features and another configuration that turns off the features You would use the first configuration on the road and the second when in the office One click on a configuration button activates all settings for the selected configuration You can change these settings and cre ate your own configur...

Страница 66: ...The Time Remaining Gauge displays the current battery charge as the amount of time remaining The Power Meter displays the computer s power usage in an LED or needle format The Percent Remaining Gauge displays the percentage of battery charge remaining 5 To hide the Gauge Gallery click its close button The Gauge Gallery window disappears The application icons provide a convenient way to start pro g...

Страница 67: ...ba Access Panel on page 349 Lesson 13 If I m Lost What Do I Do Windows 95 and the Toshiba Access Panel come with excellent online help The panel has video help which not only explains but also demonstrates how to use its features This lesson demonstrates how to use Windows 95 help index and how to access the Toshiba Access Panel help Windows 95 Help To use Windows 95 help follow these steps 1 Clic...

Страница 68: ...raw a picture but don t know how you might type picture Notice as you type that the topic list adjusts to locate what you typed When you type the letter p the topic list moves to the first entry that begins with P and so on There are a number of topics listed under Picture One of them drawing looks promising 4 Next you might double click drawing Help opens a topic window that gives a brief descrip...

Страница 69: ...ean up the desktop close both Help and Paint by clicking their close buttons Toshiba Access Panel Help The Toshiba Access Panel provides three types of help Follow these steps 1 Click the help button at the bottom of the panel The help bar extends to the left displaying the video help general Help and about TAP buttons The help bar 2 Click one of the buttons and follow the instructions on the scre...

Страница 70: ...own The system displays a dialog box similar to the following The Shut Down Windows dialog box 2 Make sure the button next to Shut Down the computer is highlighted If it isn t click it now 3 Click Yes The system displays a message that it is shutting down and turns the computer off When the power is off the power light goes out You have completed the tutorial You should be familiar with the deskto...

Страница 71: ...Getting to Know the Desktop Lesson 14 Turning Your Computer Off Part I Getting To Know Your Computer 73 ...

Страница 72: ...o lists of helpful computing tips By the end of the chapter you ll have developed many of the basic skills that more advanced users take for granted Computing Tips It seems that everybody s grandmother has a list of rules that will make your life better This section presents a few rules that your grandmother would include if she were teaching you how to use your computer ...

Страница 73: ...ice and sooner or later it is bound to have a problem and you can t access the data on your hard disk you ll wish you had taken the time to back it up See the instructions in How to Back Up Your Work on Diskettes on page 93 Six Things Every Computer User Should Do Take frequent breaks to avoid repetitive strain injuries and eye strain As indicated in Keep Yourself Comfortable on page 3 it s import...

Страница 74: ...riends or download from the Internet It s unlikely but pos sible that even new programs you buy from your local computer store may contain a computer virus See Viruses and How to Cure Them on page 248 for information about detecting and removing computer viruses Run Create System Disks to make program diskettes for Windows 95 and either run Master Disk Creator or purchase the master pro gram diske...

Страница 75: ...disks is stored magnetically Getting a magnet too close to a disk can erase important files Don t be afraid to use your computer it s just a machine Many people are so nervous with their first computer that they forget it s merely a tool Provided you follow the advice in this chapter you are unlikely to do your computer any harm So use it and have fun with it When You Turn the Computer On Between ...

Страница 76: ...exiting your software applications When you turn the computer on again the screen display is restored as you left it So you can continue working where you left off These methods provide a sort of electronic bookmark They use the computer s backup battery to store its current state in memory while the power is off The system maintains this information until the backup battery loses its charge after...

Страница 77: ...shuts down Windows 95 and turns the computer off Using Resume Mode There are several ways to turn Resume Mode on and off This sec tion describes how to use a key combination called a hotkey to select Resume Mode This is the quickest method Turn to Start ing Again Using Resume Mode on page 125 for the other methods To select Resume Mode follow these steps 1 Press Fn F3 to display the Resume Mode po...

Страница 78: ...f even when you re suspending the computer How to Use the Keyboard If you ve never used a computer before you re probably asking yourself is this keyboard just like a typewriter And if it is what are all those extra keys for This section describes the keys on the keyboard and the differences between typing on a computer and using a typewriter The Character Keys For these keys typing on a computer ...

Страница 79: ...asks To find out what these keys do refer to the program s documentation The function of the Ctrl key Control key also varies according to the program you re using If you re in Windows pressing the Alt key lets you open menus Pressing the Fn key simultaneously with one of the specially marked keys allows you to emulate a 101 key keyboard turn keyboard overlays on and off page 275 and control vario...

Страница 80: ...y To turn the numeric overlay on and off press Fn F11 The numeric lock light on the indicator panel shows whether the numeric overlay is on or off You can still use the overlaid keys to type alphabetic characters while the numeric overlay is on To do so for lower case letters press and hold Fn while you type the letters for upper case letters press Fn Shift while you type the letters To use the cu...

Страница 81: ...t a program from an icon follow these steps 1 Click Start then point to Programs Windows 95 displays the Programs menu 2 Point to Accessories Windows 95 displays the Accessories menu 3 Click Wordpad Windows 95 opens Wordpad Wordpad is a text editor a scaled down word processor without the frills That s really all there is to it To close Wordpad click the close button at the upper right corner of t...

Страница 82: ...ders contained within the Program File folder 4 Click Accessories The Explorer shows the Accessories files on the right side of the screen 5 Double click Wordpad exe Windows 95 opens Wordpad Starting Some MS DOS Programs To start some MS DOS programs follow these steps 1 Click Start then click Shut Down Windows 95 displays the Shut Down Windows dialog box 2 Click Restart the computer in MS DOS mod...

Страница 83: ...ng hours of work Many programs offer a feature that saves documents after a set periodoftime Checkyourprograms documentationtosee if they have an automatic save feature You use the same procedure to save files in all Windows pro grams This section describes this procedure 1 Choose Save from the File menu If you re working with a previously existing document one that already has a file name that s ...

Страница 84: ...crosoft Word saves files with a DOC extension While you can create your own extension this is usually unwise Using the default for your program is a helpful reminder of where your file came from Also the program is unlikely to recognize a strange extension and may refuse to handle your file correctly How to Print Something You ve Created By this time you ve probably created a document and saved it...

Страница 85: ...r driver This special program acts as a translator that turns your work into a form the printer can understand This section describes how to select a printer driver in Windows 95 If you re using any non Windows programs you ll need to set up a printer driver for each of those programs Refer to your program s documentation for more information You set up a printer with the Add Printer Wizard Follow...

Страница 86: ...rd asks for the printer port 7 Select the port settings according to the instructions in your printer s documentation and to port to which your printer is connected then click Next The Add Printer Wizard asks you to enter a friendly printer name 8 Enter a name for your printer and click Next If you re using more than one printer make sure the name is descriptive enough to help you tell the differe...

Страница 87: ...see different messages indicating the status of your print job How to Prepare Diskettes for Use Formatting makes it possible to use a diskette You don t really need to know what s going on when you format a diskette but if you re interested the details are covered in How Does a Disk Store Information on page 294 Your computer uses high density diskettes There are two types of high density diskette...

Страница 88: ...external diskette drive is connected 2 Insert a write enabled diskette into the diskette drive A write enabled diskette The tab at the left corner of the diskette should cover the square hole Formatting a diskette erases all information currently on the diskette Do not format a diskette unless you re sure it s blank or contains only files you no longer need 3 Double click My Computer Windows 95 op...

Страница 89: ... How to Copy Something To a Diskette Diskettes provide an easy means of transferring files from one computer to another Copying a file to a diskette also gives you a backup copy in case something happens to the original on your hard disk This section describes how to copy a file from the hard disk to a diskette To copy a file from the hard disk to a diskette follow these steps 1 Make sure the exte...

Страница 90: ...ive drive A Windows 95 copies the files How to Back Up Your Work on Diskettes Murphy s law applies to everything even computers Therefore it s a good idea to make periodic copies of everything on your computer s hard disk and store them in a safe place This is called backing up your files That way if you somehow press the Delete key accidentally you ll be able to recover your files quickly and eas...

Страница 91: ...ng up only a portion of the files on your hard disk is in Help and your Windows 95 documentation Backing up all the files on your hard disk takes a considerable amount of time and lots of diskettes However in the unlikely event that you lose some or all of the information on your hard disk you ll be glad you spent the time To back up all the files on your hard disk to diskette follow these steps 1...

Страница 92: ...s the one you want before overwriting the existing file Transferring Files to Another Computer You ve learned how to use diskettes to copy files from one com puter to another One method for transferring files is to copy them to a floppy diskette The drawback to this method is that unfortu nately a high density floppy diskette can only hold 1 44MB a serious limitation if you want to transfer a larg...

Страница 93: ...er 1 Use one of these methods to make the connection between the two computers For a serial connection connect the serial cable to the serial port on the back of the computer Connect the other end of the cable to the serial port on the other computer For a parallel connection connect one end of the parallel cable to the parallel port on the back of the computer Con nect the other end to the parall...

Страница 94: ...choose it and go on to step 9 Otherwise continue with the next step 6 Choose the appropriate type of connection in the Connection Type list 7 Click the Setup Connection button 8 Choose the port setting for the computer and click OK 9 Click the Enable Connection check box An X in the box indicates that a connection is enabled 10 Click OK to accept the current settings 11 Repeat steps 2 through 10 o...

Страница 95: ...t indicates that a connection has not been enabled or no connection has been established A yellow light indicates that TranXit is trying toestablish a connection A green light indicates that a connection has been established 3 When the connection status icon is green open the Options window on one computer 4 If Auto New Window is checked press Esc to close the Options menu If it is not checked cho...

Страница 96: ...you have the computer connected to an optional Desk Station V Plus you can set the computer to perform a Windows 95 shut down automatically when you press the power button Refer to Turning the Computer Off with the Power Button on page 209 for more information about this option Don t turn the power off if the disk in use light on the indicator panel is on Doing so may damage your hard disk or disk...

Страница 97: ...gently wipe the screen Keep liquid including cleaning fluid out of the computer s keyboard speaker grill and other openings Never spray cleaner directly onto the computer Never use harsh or caustic chemical products to clean the computer Ask your Toshiba dealer for suggestions for appropriate clean ing products Moving the Computer As a notebook computer the Portégé 650CT is built to withstand reas...

Страница 98: ... optional devices 6 Close the display panel Do not pick up the computer by its display panel or by the back where the ports are located For long trips transporting the computer in a carrying case is rec ommended You can purchase a carrying case from your Toshiba dealer or through the Toshiba Accessory Catalog ...

Страница 99: ...usion this chapter provides advice about buying programs and equipment that work with your Portégé 650CT computer Buying Programs Before you buy a computer program it helps to understand the different types of programs you can buy the decision between buying integrated programs such as Microsoft Office versus individual programs the information on the program s box The following section describes ...

Страница 100: ...abilities Desktop publishing programs are more sophisticated than word processing programs and are typically more expensive If you want to create professional presentations a presentation package is the kind of program you need These programs help create slide shows handouts with charts and graphics and com puter presentations with sounds music and video clips Graphics Programs If you want to work...

Страница 101: ...e as well as the more common Com puter Aided Design CAD tools On line Programs Online services such as CompuServe America Online and Prod igy provide access to the Internet as well as useful information entertainment and research Reference Programs Many reference publications such as dictionaries encyclopedias atlases and language programs are available to add to your own personal library Database...

Страница 102: ...ies particularly to programs that are widely used in business The combination of word processor drawing program and spread sheet is the most common type of integrated package Some of these also include a database program and or a communications program An integrated package usually provides the same functionality as the manufacturer s individual programs Although there are less expensive packages ...

Страница 103: ...ve Windows Compatibility The Portégé 650CT computer comes with Microsoft Windows 95 Windows 95 can run programs written for Windows version 3 1 or later or Windows for Workgroups 3 11 all versions and MS DOS When possible useprograms written specifically for Windows 95 Processor The Portégé 650CT computer has a 133MHz megahertz Intel Pentium microprocessor It will run programs designed for a 286 3...

Страница 104: ...omputer s performance status including the amount of memory installed in your computer Hard Disk The Portégé 650CT computer comes with a 1 26GB hard disk drive Although this capacity well exceeds the 55MB stated in the system requirements example it is the amount of available hard disk that matters After you have been using your computer for a few weeks much of your hard disk may be filled with pr...

Страница 105: ...ution of 1024 x 768 pixels For pro grams requiringresolutionshigherthan 640 x480 you llprobably want to use an external monitor See Using an External Monitor on page 189 for more information Sound Card Your computer has a SoundBlaster Pro compatible sound card that delivers 16 bit stereo sound capability There are microphone line in and headphone jacks as well as a volume control dial Pointing Dev...

Страница 106: ...o your computer s hard disk easy Most programs come with installation programs on diskette By following the steps in this section you ll ensure thatyourinstallationprograminstallstheprogramfilescompletely and sets them up to run with Windows 95 More and more programs are being written specifically for Windows 95 all the time If you purchase a program designed for Windows 95 follow the installation...

Страница 107: ...all tab The Install Uninstall page moves to the front of the sheet 5 Click Install 6 Insert the program s installation diskette into the drive 7 Click Next Windows 95 searches the installation diskette for the installa tion program If Windows 95 doesn t find the installation program or searches the wrong drive click the Browse button and find the installation program manually 8 Click Finish to run...

Страница 108: ...Place the original diskette into the diskette drive 3 From the desktop double click the My Computer icon Windows 95 opens the My Computer window 4 Click the A icon 5 Click File then click Copy Disk 6 In the Copy Disk dialog box click Start Windows 95 copies the files on the diskette into memory and displays a message asking you to insert the destination diskette the one you re copying to into the ...

Страница 109: ...bout these Toshiba options and other third party devices This manual also lists a large number of available options To find these try looking in the Index under devices Tips on Buying Hardware If a device is cheaper than you think it should be it may be an older version On the other hand depending on you needs an older version may suit you just fine Check the warranty and technical support provide...

Страница 110: ...a partner in the Environmental Protection Agency s EPA Energy Star Program As an Energy Star Partner Toshiba has designed this product to meet the Energy Star guidelines for energy efficiency The Portégé 650CT computer enters a low power standby state when it is not being used thereby conserving energy and saving money in the process It has a number of other features that enhance its energy effici...

Страница 111: ...backup battery provides the power to store information about the system when you suspend the computer using the Windows 95 Suspend command or Toshiba s Resume Mode The backup battery maintains this information for up to eight hours after the battery pack discharges completely The RTC battery stores your system configuration settings and the current timeanddateinformation It maintains this informat...

Страница 112: ... you operate your computer on battery power until the battery pack discharges completely Doing this extends battery life and helps to ensure accurate monitoring of battery capacity You can purchase an optional battery charger that charges up to two batteries at the same time See Charging More than One Bat teryat aTime onpage 138formoreinformation aboutthebattery charger In normal use the main batt...

Страница 113: ...which starts in Toshiba Access Panel on page 349 The computer drains battery power more quickly at low tem peratures Check your remaining charge frequently if you re working in temperatures below 50 degrees Fahrenheit The computer calculates the remaining battery charge as it oper ates based on your current rate of power use With repeated dis charges and recharges the battery s capacity will gradu...

Страница 114: ...on in a different way The Power Meter displays the computer s power usage in digital or analog format The Time Remaining Gauge displays the amount of time remaining before the battery will be completely discharged The Percent Remaining Gauge displays the percentage of battery charge remaining Follow these steps to choose the gauge s you want displayed on the dashboard 1 Click the gauge gallery but...

Страница 115: ...ard for all configurations click Add to All To add the gauge to your current configuration only click the second menu item for example if you are currently using the Home configuration click Add to Home 4 To remove a gauge from the dashboard click it with the secondary button The Toshiba Access Panel displays a shortcut menu prompt ing you to choose whether to remove the gauge from all con figurat...

Страница 116: ...a Access Panel The Dashboard window opens and displays the battery gauges The Dashboard window 2 To return the gauges to the Toshiba Access Panel click the close button What to Do When the Battery Alarm Sounds Don t panic The Portégé 650CT computer has three alarms designed to give you sufficient warning before your battery becomes fully dis charged This section describes the three battery alarms ...

Страница 117: ...w on battery power the system beeps once and displays the Critical Battery Alarm warning Normally this means you have less than 10 battery capacity remaining To change the level of charge that sets off this warning see Setting the Alarms on page 123 The Critical Battery Alarm warning When this alarm goes off start planning your remaining battery time carefully No frantic actions are required yet b...

Страница 118: ... Again Using Resume Mode on page 125 Resume Mode keeps track of where you were so when you turn the power on again you can continue where you left off The computer s backup battery stores this information in memory for about eight hours before it too runs out of power If you ever want to see those unsaved files again replace the battery or find a power outlet before eight hours are up Setting the ...

Страница 119: ...e threshold that will trigger the battery alarms To set the alarm to sound when the battery charge reaches the Time Remaining Threshold click the button next to Based on Time Remaining To set the alarm to sound when the battery charge reaches the Percent Remaining Threshold click the button next to Based on Percent Remaining 6 To change the Time Remaining or Percent Remaining Threshold move the Lo...

Страница 120: ...your infor mation is lost So although suspending your computer tempo rarily stores your work in memory you should still save all your work before you turn the computer off There are two ways to suspend the computer Click the Start button then click Suspend Turn on Toshiba s Resume Mode and press the power button The Windows 95 Suspend feature is the easiest way to suspend the computer However you ...

Страница 121: ...System Control Panel Using a Hotkey To select Resume Mode follow these steps 1 Press Fn F3 to display the Resume Mode pop up window The Resume Mode pop up window 2 While continuing to hold down Fn press F3 repeatedly until the Resume Mode icon is selected and the window displays Resume On 3 Release the Fn key The system is now in Resume Mode Using the Toshiba System Control Panel To select Resume ...

Страница 122: ...Mode section click the button next to Resume 5 Click OK to save your settings and close the Toshiba System Control Panel Replacing Batteries When your battery runs out of power you have two options plug in the computer or replace the battery with a charged spare if you have one You may need to replace the battery if it becomes dam aged or wears out after several years of use When handling battery ...

Страница 123: ...o the instructions in Starting Again Using Resume Mode on page 125 3 Remove all cables connected to the computer 4 Turn the computer over with the front facing you Removing the battery cover 5 Slide the battery cover latch toward the right corner 6 Remove the battery cover Removing the battery 7 Slide and hold the battery latch toward the center Battery cover latch Battery cover Battery Battery la...

Страница 124: ...ttery or RTC battery need to be replaced do not attempt to do so yourself Contact your dealer or a Toshiba service representative Disposing of Used Batteries Safely The life of a battery pack is about 500 recharges so it should last for years When your battery needs to be replaced you ll notice that its ability to stay charged decreases significantly the battery light flashes orange shortly after ...

Страница 125: ... Whether you use any optional devices to which the battery supplies power Where you are working since operating time decreases at low temperatures There are various ways in which you can conserve power and extend the operating time of your battery Enable Resume Mode which saves power when you turn the computer off and back on again Use Toshiba s power saving options Toshiba has developed these opt...

Страница 126: ... in parentheses There is also a Custom Settings option that lets you set the power saving options individually You may set the power usage mode with a hotkey in MaxTime if you re working in Windows 95 or in TSETUP if you re working in MS DOS This chapter covers setting the power save mode with a hotkey and in MaxTime Using TSETUP to set the power usage mode is discussed in TSETUP on page 403 Optio...

Страница 127: ...F2 to display the battery save pop up window The power usage pop up window 3 While continuing to press Fn press F2 repeatedly until you select the desired power usage mode 4 Release the Fn key You re now in the selected mode Using MaxTime To select a power usage mode in MaxTime follow these steps 1 Click Start then point to Settings 2 Click Control Panel Windows 95 displays the Control Panel 3 Dou...

Страница 128: ...n it is running on AC power click the button next to External 5 Click the desired Power Usage Mode setting in the Power Usage Mode list box 6 Click OK to save your settings and exit the MaxTime Control Panel Setting Your Own Power Usage Options If you set the power usage mode to Custom Settings you can set your computer s power saving options individually For example if you want the computer s pro...

Страница 129: ...d the keyboard or AccuPoint for a set period of time To turn the display back on press a key or move the Accu Point You have eight choices Disabled turns the option off 1 Min 3 Min 5 Min 10 Min 15 Min 20 Min and 30 Min set tings blank the display if you haven t used the keyboard or AccuPoint for the set time If you re using an external monitor Display Auto Off blanks the monitor after the selected...

Страница 130: ...is inactive Pressing a key moving the AccuPoint or a signal from a device returns the processor to its normal operating speed You have two choices Enabled turns CPU Sleep Mode on Disabled turns CPU Sleep Mode off Display Brightness LCD Brightness This option saves power by reducing the brightness of the com puter s display You have two choices Semi bright reduces the brightness of the display Brig...

Страница 131: ...e fan Regardless of the cooling option you have selected the cool ing fan turns on when the CPU becomes hot If the CPU over heats the computer will power off in Resume Mode For more information about Resume Mode see Starting Again Using Resume Mode on page 125 Looking After Your Battery It doesn t take much effort but by treating your battery right you can make sure it provides maximum power stora...

Страница 132: ...tery dis charge completely Alternate between batteries if you have a spare Don t touch the metal terminals on the battery with another metal object Always turn your computer off when you re replacing the battery Store spare battery packs in a cool dry place out of direct sunlight Additional Power Options Depending on the amount of time you spend away from external power sources the capacity of one...

Страница 133: ...the battery in your computer This is especially useful if you have one or more extra batteries You can charge your spare s in the battery charger while continuing to work on the computer While the battery charger requires a power source it provides an easy way for you to take more than one charged battery with you when you travel Use only Noteworthy Toshiba battery chargers to charge your battery ...

Страница 134: ...ay to carry your computer with you Toshiba offers four choices of carrying cases for the computer a sturdy fabric carrying case a leather attaché a leather Executive Portfolio a backpack style case All of these cases help protect the computer from the bumps and scratches of normal travel They also provide plenty of extra space for manuals power cords CD ROMS and diskettes ...

Страница 135: ... to see or hear it Your Portégé 650CT is well equipped with a high speed Pentium processor a color display and advanced stereo sound capabilities that enhance your multimedia enjoyment However to take full advantage of your Portégé 650CT s multimedia capabilities you need to purchase an external CD ROM drive and a pair of stereo speakers This chapter provides some options for connecting additional...

Страница 136: ...pped with a PCMCIA Interface PC Card that inserts into your computer s Type II slot Most likely this option is the easiest and fastest way to connect a CD ROM drive to your computer All the hardware drivers and instructions you need to connect the drive come packaged together Your local computer store carries a selection of porta ble CD ROM drives designed to connect to portable computers You can ...

Страница 137: ...k Station V Plus accessory provides several ways to connect a CD ROM drive to your Portégé 650CT In addition to the exceptional expansion capabilities featured on the Desk Sta tion V Plus there is a SCSI connector an IDE interface PC Card slots PCI and ISA slots and a SelectBay All of these expansion options can be used to connect to a CD ROM drive For more information about the Desk Station V plu...

Страница 138: ...w the CD Player window click CD Player on the taskbar CD Player playing a CD To increase or decrease the volume turn the dial on the com puter s chassis located above the keyboard and below the LCD To stop the CD click the stop button The Help facility of CD Player explains in detail how to use each component including how to store the name of each track If you exit from CD Player and want to star...

Страница 139: ...al audio systems sample the waveform at fixed time intervals for example at 30 times per second and reduce the sound to a sequence of numbers When you play back a digital waveform or wave file the software transforms the numeric data back into its original acoustic waveform If you use the microphone to record sounds the computer stores them as wave files Wave files have the extension WAV MIDI File...

Страница 140: ...aying back video requires so much data multimedia appli cations that use film or animation normally play back at 15 frames per second with a resolution of 320 by 200 pixels This is why video images are less smooth on a computer than on television To reduce the storage required all video files must be compressed before they can be distributed and decompressed when you view them Two compression and ...

Страница 141: ...el is the smallest dot on your screen that can be con trolled by software Resolution is the number of pixels on the screen MPEG Files Fifteen frames per second is not adequate for the games and multi media titles the industry wants to produce The Motion Picture Expert Group MPEG has developed compression and decom pression standards that are capable of delivering true full motion video on your com...

Страница 142: ... Card controller then sends a decompressed video stream directly to the video graphics controller which displays it on your screen It sends decompressed audio data directly to the audio sound chip which controls the speakers By bypassing the CPU and system bus the ZV Port can deliver high performance video data at up to 30 frames per second Play Back Programs Windows 95 comes with three programs f...

Страница 143: ...e you want to play in the Look in box 6 To display the list of file types Media Player can play click the down arrow next to the Files of type list box 7 Click the name of the file you want to play Another way to play a multimedia file is to click on the file name with the secondary button This opens a list that includes the Play command Adjusting the Volume You can set the volume in two ways by u...

Страница 144: ...Volume Control mixer window The Volume Control mixer window 4 Move the sliders to adjust the volume for the various types of sound files To avoid confusion set all the mixer sliders in the Volume Control program to their medium settings and adjust the volume with the volume dial Recording Sounds as Wave Files You may record sounds through the built in microphone or using the microphone jack or lin...

Страница 145: ...red circle at the bottom right of the window 5 Speak normally into the microphone Locating the built in microphone 6 When you ve finished recording click the stop button The Audio Recorder window displays a graphical representa tion of the new sound file as a waveform display 7 To hear what you just recorded click the play button 8 To save the file choose Save from the File menu Adjusting Recordin...

Страница 146: ...udio Properties Sound Recorder opens the Audio Properties sheet 6 Adjust the Recording Volume Preferred device and Pre ferred quality according to your needs 7 Click OK Your new settings will take effect the next time you record Using an External Microphone The computer has a built in microphone for recording sounds To record higher quality sounds you may wish to use an external microphone To atta...

Страница 147: ...nput Device To record sounds from an external audio device such as a stereo amplifier tape deck or CD player follow these steps The line in jack 1 Locate the line in jack on the front of the computer 2 Using any necessary adapters plug the cord from the audio device into the line in jack Once the external audio device is connected the recording process is the same as with the built in microphone S...

Страница 148: ...ntage of this feature Be sure to use amplified speakers that require an external power source Using another type of speaker will be inadequate to produce sound from the computer To play back sound files through an external device such as stereo speakers or headphones follow these steps The headphone jack 1 Locate the headphone jack on the front of the computer 2 Using any necessary adapters plug t...

Страница 149: ...ume follow the steps in Adjusting the Volume on page 149 Multimedia Options that Require Additional Equipment You can capture video through your computer s ZV port technol ogy To capture video with the ZV port you would need to pur chase a PC Card called a ZV Port Card and insert it into the PC Card slot on your computer For more information see Full Motion Video on the Portégé 650CT on page 147 Y...

Страница 150: ...mes with one PC Card slot that lets you take advantage of these little cards You can install up to two Type I or Type II cards or one Type III card Type III cards such as hard disk drive PC Cards require extra thickness When you buy a PC Card check the package for the Type of card you re buying Your computer s PC Card slots are Zoomed Video ZV Card and CardBus ready allowing you to use PC Cards th...

Страница 151: ... the card but this chapter will help you get started If your PC Card came with a diskette read Programs that Make Your PC Card Work on page 160 before installing any of its programs The programs on the diskette may conflict with built in Windows 95 drivers What Do PC Cards Do New PC Cards are being introduced every day Among the PC Cards currently available are Modems and fax modems Network adapte...

Страница 152: ...d International Association 2 1 standard or later Cards that do not conform to this standard may work with your com puter but they are likely to be much more difficult to set up and use Cards You Can Buy from Toshiba Toshiba s Noteworthy PC Cards are specifically designed to work with your Portégé 650CT computer and are available from your Toshiba dealer Noteworthy PC Cards include Fax Modems Mode...

Страница 153: ... ensures complete compatibility with all the features of Windows 95 If you do use another manufacturer s Card and Socket Services software instead the system may not recognize your PC Card when you turn the computer on after suspending Shut down and restart the computer and the system will recognize the card To set up the Card and Socket Services programs for your PC Card see Setting Up Your PC Ca...

Страница 154: ...are connected to the network Before removing a PC Card stop the card by clicking the PC Card PCMCIA icon on the taskbar Inserting PC Cards OK You ve bought your first PC Card and want to install it This section describes what to do Before you insert your PC Card read through the documentation that comes with the card to see if you need to do anything before you insert it Windows 95 provides the Ca...

Страница 155: ...r 2 Open the PC Card slot cover Inserting a Type II PC Card into the PC Card slot 3 Insert the PC Card If you have a Type III card insert the connector into the lower part of the socket If you have a Type I or Type II card insert it into either the top or bottom half of the slot 4 When the card is almost all the way into the slot push firmly but gently to ensure a firm connection with the computer...

Страница 156: ...he secondary button then click Properties Windows 95 opens the System Properties sheet 2 Click the Device Manager tab to access the Device Manager page The Device Manager page should contain a PC Card PCMCIA icon If it doesn t refer to the steps under The sys tem does not recognize your PC Card or PCMCIA socket con troller on page 330 to set up PC Card support 3 Click the to the left of the PCMCIA...

Страница 157: ...ng a PC Card Before you eject a PC Card be sure any device connected to the card has stopped operating and is turned off To remove a PC Card follow these steps 1 Click the PC Card button on the taskbar 2 Click Stop xxxx where xxxx is the identifier for your PC Card Windows 95 displays a message that you may safely remove the card Your Portégé 650CT has two eject buttons corresponding to the two PC...

Страница 158: ...r Computer 165 Ejecting a PC Card 3 Position your finger on the edge of the eject button and firmly slide the button to the left The PC Card pops out of the slot 4 Grasp the edges of the PC Card and slide it out of the slot 5 Close the PC Card slot cover PC Card eject buttons ...

Страница 159: ...r more additional computers through a modem or network connection can you begin to recognize its full potential This chapter explains how to use your computer s built in fax modem and to fax a document directly from your computer It describes the many ways you can use your modem to connect to other computers and services such as the Internet ...

Страница 160: ... designed for Windows 95 your program may determine the COM port automatically For more information see Faxing a Docu ment on page 174 2 Install the communications program This may be a general purpose communications program or one supplied by a specific service provider For more informa tion see Choosing the Communications Program on page 170 3 Sign up If you re planning to use an online service ...

Страница 161: ...odem follow the steps in Using an External Modem on page 172 Determining the COM Port Your modem is connected to one of the computer s COM com munications ports Although the terms are often used interchangeably the serial port and COM port are really two different things The serial port is the physical port on the back of the computer The COM port is a unique identifier the computer uses to commu ...

Страница 162: ... re planning to do For example to access the Internet you ll need some form of Internet access program To transfer files from your office network you ll need a remote access program To log on to an online service or the Internet see What Do You Need on page 182 General purpose programs are discussed in Connecting Directly to Another Computer on page 185 Connecting to a Telephone Line You need to c...

Страница 163: ...on If you have a modem that is capable of transmitting over the cellu lar network you can use any cellular line You need to remain sta tionary while transmitting data over a cellular phone Transmitting data while you are moving will cause problems when the cellular network hands off the call to the next cell Now that you re set up it s time to communicate You re ready to send a fax see the followi...

Страница 164: ... an External Modem To connect an external modem to the computer follow these steps Connecting the cable to the serial port 1 Plug one end of the serial cable into the modem and the other end into the computer s serial port 2 Plug one end of the modem s power cable into the modem and other end into a live wall outlet 3 Plug one end ofthe telephone cable into the line out jackon the modem and the ot...

Страница 165: ... Click Control Panel Windows 95 displays the Control Panel 3 Double click the Add New Hardware icon Windows 95 opens the Add New Hardware Wizard 4 Click Next The Add New Hardware Wizard asks if it should detect the new hardware for you 5 Select No then click Next The Add New Hardware Wizard displays a menu of different hardware types 6 Select Modem then click Next The Add New Hardware Wizard asks ...

Страница 166: ...ram as if it is another printer To send a fax 1 Choose Print Setup from within the program you re using to prepare your document 2 Select your fax printer driver from the list of available printers If you re using MS Fax set the printer to MS Fax For more information about using MS Fax refer to the MS Fax online Help program 3 Choose Print If you re using MS Fax it prompts you for a telephone numb...

Страница 167: ...refer to the Multime dia Connect documentation provided with your computer The Internet and Other Fascinating Places If you ve never used a modem before you may not be aware of the vast array of possibilities that await you There are four basic options You can Subscribe to an online service Explore the vastness of the Internet Log on to an electronic Bulletin Board Service BBS Communicate directly...

Страница 168: ...delivers an elec tronic version of the Wall Street Journal containing only articles that match conditions you set up to suit your interests Exploring the World of the Internet This section contains only a brief overview of the Internet For more information look through the books on the Internet that are available at your local book or computer store The Internet is a network of computer networks l...

Страница 169: ...e of the things you can do on the Internet Send and receive electronic mail e mail Join a written conversation in progress with one or more other people Shop and do your banking Get computer programs and other information files Search for information on any topic Publish your own articles books and multimedia works Listen to the radio Play games with people from around the world Watch live concert...

Страница 170: ...This way one person can correspond with lots of people all at once Mailing lists are different from news groups in that you receive all messages automatically Chat sites allow people to talk in real time Compared to a newsgroup that requires you to send a written message that is read later a chat session allows you to send your message and get a response immediately Gopher sites provide lists of w...

Страница 171: ...ne service or Internet access provider See What Do You Need on page 182 for information about Internet access providers host is the computer on which your Internet account is located subdomain is a local network or computer within the host s system Many addresses do not include a subdomain domain indicates the type of host In the United States there are six domains com is for commercial hosts gov ...

Страница 172: ...ing a decision consider the following Online services combine an easy to use interface and a wide range of useful services with full Internet access Each online service has a different flavor Look at advertising material for more than one service to see what each provides Then decide which service seems most suitable to you http is the resource type indicating that the site is designed in hypertex...

Страница 173: ...nternet access providers in your area check with your computer store look in computer magazines and local newspapers or ask a friend who s already connected What Will it Cost When you call to sign up to an online service or Internet access provider make sure you have a credit card handy Even if your service offers an initial free period your credit card will be billed for use beyond that time When...

Страница 174: ... Internet access provider you need one or more third party commercial programs Your access provider may supply a collection of shareware programs for accessing the Internet You may also purchase a separate program such as Netscape Navigator that combines the functions of the entire collection into one consistent interface Shareware programs are copyrighted programs that you can try out free of cha...

Страница 175: ... there or making a social blunder Whenever you post something on the Internet include your name and e mail address It s a common courtesy to let others know who they re dealing with and gives them a chance to respond Be considerate Just as nobody likes being insulted face to face it s no fun online either This isn t to say you can t dis agree with anybody on the Internet A wide variety of differin...

Страница 176: ... albany edu www otherwx html provides a complete list of WWW sites dedicated to weather information and forecasts http www epicurious com presents a delicious array of reci pes and information on food and drink A Few Newsgroups alt comedy british is for fans of British humour alt sports badminton lets you keep current with information about badminton news newusers questions is dedicated to informa...

Страница 177: ...oshiba computing information and is a good source of Toshiba utilities files and technical bulletins Complete information about accessing Toshiba s BBS is found in Toshiba s Bulletin Board Service on page 336 To access a BBS you ll need a general purpose communications program See the following section for information about using such programs Connecting Directly to Another Computer If you re conn...

Страница 178: ... parity seven data bits and 2 stop bits You set each of these in your communications program Each parameter must be set the same on both computers or you won t be able to connect File Transfer Protocols File transfer protocols are standards that govern how computers transfer files between modems over a telephone line Protocols determine what type of error checking and data compression if any occur...

Страница 179: ...s to which you can con nect These sites can provide information about Toshiba products help with technical questions and keep you up to date with future upgrades On CompuServe type go toshiba On the Microsoft Network type go toshiba On the Internet World Wide Web type http www toshiba com tais To access Toshiba s BBS set your modem to N81 and call either 714 837 4408 or 714 837 4409 ...

Страница 180: ...s chapter describes how to connect several optional devices that can make your Portégé 650CT computer at home on your desk Using an External Monitor You can easily attach an external monitor to your computer External monitors that support video modes greater than 600 x 800 resolution can display more information than the computer s built in screen Also having an external monitor makes the entire d...

Страница 181: ...omputer uses the external monitor If your external monitor can display high resolution video modes greater than 640 x 480 you can take advantage of this feature by changing the video mode To do this see Changing the Display Mode on page 280 Directing the Display When You Turn the Computer On When you turn the computer on it sends information to the exter nal monitor To send information to the buil...

Страница 182: ...m your notebook Simultaneous mode won t work if your external monitor or other projection device can t display resolutions of 800 x 600 or higher or if you re using a display mode not supported by the built in display adapter This section explains how to change this option using the hotkey Fn F5 To set the Power On Display option using TSETUP see the DISPLAY section of the TSETUP chapter on page 4...

Страница 183: ... and audio connectors For more information contact your dealer You can only connect one PS 2 device at a time unless you purchase a special Y cable to allow you to connect both simultaneously If you re already using a PS 2 mouse you must turn the computer off and remove the mouse before connecting a PS 2 keyboard Connecting the Keyboard To connect an external keyboard follow these steps 1 Turn the...

Страница 184: ...l Keyboard Pretend it Has the Fn Key An external keyboard doesn t have the Fn key contained on the Portégé 650CT built in keyboard If you use the computer s hot keys or have set up key combinations in Fn esse you ll probably miss these features when using an external keyboard Don t worry with the Fn Key Equivalent option you can make your external keyboard act as though it had an Fn key For more i...

Страница 185: ... icon Windows 95 displays the Keyboard Properties dialog box 4 Click the Toshiba tab to bring it to the front 5 Click the circle to the left of the desired Fn Key Equivalent for External Keyboard setting 6 Click OK to close the dialog box with your setting in effect Using a Serial Mouse You may want to use a mouse instead of the AccuPoint You can use a serial mouse or a PS 2 mouse See the next sec...

Страница 186: ...u prefer to use a PS 2 compatible mouse you can attach one to your computer The computer s PS 2 mouse keyboard port sup ports any PS 2 compatible mouse You can only connect one PS 2 device at a time unless you purchase a special Y cable to allow you to connect both simultaneously If you re already using a PS 2 keyboard you must turn the computer off and remove the keyboard before connecting a PS 2...

Страница 187: ...s off before you attach the mouse Connecting a mouse with the computer s power on may dam age the mouse the computer or both Connecting a PS 2 mouse 2 Pull down the port cover on the left side of the computer to expose the PS 2 port 3 Attach the PS 2 mouse connector to the PS 2 port 4 See your mouse documentation for additional configuration steps 5 Turn the computer on Port cover PS 2 port PS 2 m...

Страница 188: ... Click Start then point to Programs 2 Double click the Toshiba System icon The Toshiba System Control Panel opens with the Start Up Options tab on top 3 Click the Miscellaneous tab to bring it to the front The Miscellaneous tab of the Toshiba System Control Panel 4 In the Pointing Devices section of the tab click the button next to the desired option 5 Click OK The Toshiba System Control Panel dis...

Страница 189: ...your Portégé 650CT so that you can connect your computer to the NoteDock II Enhanced Port Replicator or the Desk Station V Plus a docking station with great expansion capability Attaching the Docking Adapter To connect your Portégé 650CT to the docking adapter follow these steps 1 With the power off and computer display closed place the docking adapter and the computer on a flat level surface Atte...

Страница 190: ... it firmly connects to the expansion connector Do not push down on the top of the computer when connect ing to the docking adapter Pushing down risks permanent damage to the computer s display Using the Optional NoteDock II Enhanced Port Replicator By attaching the docking adapter to your computer s expansion port you can connect your computer to the NoteDock II Enhanced Port Replicator The NoteDo...

Страница 191: ...er to the NoteDock II Enhanced Port Replicator and have immediate access to the devices NoteDock II Enhanced Port Replicator Features This section identifies and describes the features of the NoteDock II Enhanced Port Replicator The rear of the NoteDock II Enhanced Port Replicator Use the security lock slot to attach a Noteworthy Computer Lock cable to the NoteDock II Enhanced Port Replicator This...

Страница 192: ...e pointing device Use the monitor port to connect an external monitor Use the parallel port to connect a parallel printer or other parallel device Use the AC IN socket to connect the NoteDock II Enhanced Port Replicator to AC power using the AC adapter The right and left sides of the NoteDock II Enhanced Port Replicator Use the two PC Card slots to install Type III PC Cards The slot on the right s...

Страница 193: ...your computer the guide pins that help align the computer with the NoteDock II Enhanced Port Replicator ensuring a proper connection Connecting the Computer to the NoteDock II Enhanced Port Replicator To attach the computer to the NoteDock II Enhanced Port Repli cator follow these steps 1 Remove all cables from the back of the computer 2 Connect the computer to the docking adapter For instruc tion...

Страница 194: ... the bottom of the docking adapter over the pegs on the NoteDock II Enhanced Port Replicator Placing the docking adapter over the pegs locks the computer to the docking adapter Locking the computer to the NoteDock II Enhanced Port Replicator 6 Gently press the locking latch down The docking adapter with the computer slides into place and connects to the NoteDock II Enhanced Port Replicator Locking...

Страница 195: ...Every time you connect the computer to a different NoteDock II Enhanced Port Replicator Windows 95 creates a new hardware profile that remembers all the devices connected to that particular port replicator This feature is extremely useful if you have a NoteDock II Enhanced Port Replicator both at home and at the office Since Windows 95 automatically determines which port replicator the computer is...

Страница 196: ...CMCIA icon 4 Follow the setup instructions Using the Optional Desk Station V Plus The optional Desk Station V Plus docking station provides excep tional expansion capability By docking the computer in the Desk Station V Plus you have immediate access to external devices that are connected to the docking station for example printers SCSI devices network adapters external keyboards pointing devices ...

Страница 197: ... Physical Restraints on page 247 Use the volume dial to adjust the loudness of the system speaker Use the two standard type III PC Card slots to connect up to two standard PCMCIA compatible PC Cards such as modems net work cards ATA devices and CardBus ready cards Use the two full length expansion slots for most standard ISA and PCI expansion cards A half length expansion slot provides space for a...

Страница 198: ...eo system or CD ROM drive Use the audio line out jack to connect your computer to a tape recorder or a stereo amplifier to record or play sounds from your computer Use the AC IN socket to connect the Desk Station V Plus to AC power using a power cord Docking to the Desk Station V Plus Before docking your computer make sure the AC power cord and all peripheral devices are connected to the Desk Stat...

Страница 199: ...nch from the expansion connector Docking the computer to the Desk Station V Plus 4 With both hands slide the computer toward the Desk Station V Plus until the docking indicator starts to blink green The Desk Station V Plus continues sliding the computer inward until the connection is made The docking indicator stops blinking when the computer is securely connected Guide rails Expansion connector D...

Страница 200: ...n connector 2 Remove the computer from the docking station Turning the Computer Off with the Power Button If you press the computer s power button without turning Resume Mode on first the system shuts off immediately creating the pos sibility of lost data and corrupted files When you have the computer docked in the Desk Station V Plus you can set your computer to perform the Windows 95 shutdown pr...

Страница 201: ... Click Start then click Settings 2 Click Control Panel Windows 95 opens the Control Panel The Control Panel 3 Double click the Toshiba Services icon Windows 95 opens the Toshiba Power and Desk Station Service Configuration property sheet on the Power page The Power page 4 Check the box next to Enable Power Off software shutdown service ...

Страница 202: ...uspend command or Resume Mode some devices may not operate correctly You can solve these two difficulties by following a few simple rules Disabling Devices in the Desk Station V Plus Turning the Auto Device Disabling option on enables your system to keep track of all the devices available to it but distinguishes between the devices connected to the Desk Station V Plus and the devices connected dir...

Страница 203: ...el The Control Panel 3 Double click the Toshiba Services icon Windows 95 opens the Toshiba Power and Desk Station Service Configuration property sheet on the Power page 4 Click the Desk Station tab to move to the Desk Station page The Desk Station page 5 Click the box next to Enable Auto Device Disabling ser vice for desk station devices 6 Click OK ...

Страница 204: ...tate of all your programs and returns them to that state when you power your computer on The Desk Station V Plus can use devices that are not APM com pliant Suspending your system with one or more of these devices installed may result in system halts or other erratic system behavior If you have devices connected to the Desk Station V Plus you can save power and avoid the problems By enabling the P...

Страница 205: ...ower Resume event and enter the name of the desired WAV file 5 Click OK Now when you turn the computer off with the Suspend com mand or with Resume Mode turned on while the computer is connectedtotheDesk Station V Plus thedisplay and hard disk shut down but the rest of the system stays on This ensures a continuous powered connection between the computer and all connected devices Desk Station V Plu...

Страница 206: ...o turn on the Undock Password follow these steps 1 Click Start then point to Settings 2 Click Control Panel Windows 95 opens the Control Panel 3 Double click the Toshiba System icon The Toshiba System Control Panel opens with the Start Up Options tab on top 4 Click the Security tab to bring it to the front The Security tab of the Toshiba System Control Panel 5 If you haven t registered a System Pa...

Страница 207: ...ou may use any combination of letters and numbers in your password 7 Type the password again in the Re enter new password box If the passwords match the OK button is enabled 8 Click OK The Toshiba System Control Panel displays the Security tab with the System Password listed as Registered 9 In the Undock Password section of the dialog box click Enable 10 Click OK The Undock Password is registered ...

Страница 208: ... Password screen If you have not turned this option on the system beeps three times and appears to hang when you attempt to remove the computer from the Desk Station V Plus The system remains in this state until you enter the correct password To turn on the Password Prompt option follow these steps 1 Click Start then point to Settings 2 Click Control Panel Windows 95 opens the Control Panel 3 Doub...

Страница 209: ... Computer on Your Desktop Using the Optional Desk Station V Plus Part I Getting To Know Your Computer 218 The Desk Station page 5 Click the box next to Enable Password Prompt service for undock events 6 Click OK ...

Страница 210: ...Using Your Computer on Your Desktop Using the Optional Desk Station V Plus Part I Getting To Know Your Computer 219 ...

Страница 211: ...s that can help you keep your computer and files safe from unwanted intrusion This chapter describes the security options for your Portégé 650CT notebook computer Using a Password Setting a password lets you leave your computer secure in the knowledge that nobody can access your files When you set a password you must enter the password before you can work on your computer again ...

Страница 212: ...the optional Desk Station V Plus Working with System Passwords The user level password is the basic level of password security For most users this is all the password security you ll need You may create a user level password in either Toshiba System Control Panel or TSETUP This section describes how to create a user level password in Toshiba System Control Panel and how to use it as an instant and...

Страница 213: ...Click Control Panel Windows 95 opens the Control Panel 3 Double click the Toshiba System icon The Toshiba System Control Panel opens with the Start Up Options tab on top 4 Click the Security tab to bring it to the front The Security tab of the Toshiba System Control Panel 5 Click the Set button in the System Password section of the tab The Toshiba System Control Panel displays the Set Password dia...

Страница 214: ...gain in the Re enter new password box If the passwords match the OK button is enabled 8 Click OK The Toshiba System Control Panel displays the Security tab with the System Password listed as Registered 9 If you would like you may also enter a Password Prompt in the Prompt text box This text will appear with the password message any time you start or restart the computer Protecting Against Forgetfu...

Страница 215: ...etup TSETUP displays a screen similar to the following A sample first page of the System Setup screen 6 Press p to highlight the Password section 7 Press the spacebar TSETUP asks you to enter a new password SYSTEM SETUP 1 2 BIOS VERSION X XX Select items Space BkSp Change Values PgDn PgUp Change pages Esc Exit without saving Home Set default values End Save changes and Exit PASSWORD Not Registered...

Страница 216: ...on on the pass word service diskette Make sure the diskette you use does not contain any important information TSETUP asks you to enter the type of diskette you re using 12 Press 2 if you re using a 1 44MB diskette or press 1 if you re using a 720KB diskette TSETUP creates the password service diskette and displays a message when it s finished 13 Remove the diskette and press any key to continue T...

Страница 217: ...rd the computer beeps After three incorrect attempts the beep sounds continuously and the computer turns off automatically If you ve forgotten your password follow these steps 1 Make sure you ve attached the external diskette drive 2 Press the reset button The system prompts you for your password 3 Insert the write enabled password service diskette into the diskette drive and press Enter The syste...

Страница 218: ... the password follow these steps 1 Press Enter If you ve registered a password the screen remains blank If you haven t registered a password the computer returns to where it was when you pressed the hotkey 2 Enter your password and press Enter If you enter the password correctly the computer returns to where it was when you pressed the hotkey Disabling a System Password To disable your password fo...

Страница 219: ...ted as Not Registered 8 Click OK to exit the Toshiba System Control Panel Using a Hard Disk Drive Password Setting a hard disk drive password prevents an unauthorized user from accessing your hard disk even if it is removed and installed on another computer The password option is stored on the hard disk and requires a password to be entered before any data on the disk can be accessed Setting a Har...

Страница 220: ...is not responsible for any data loss lack of use inability to access the hard disk drive or any other loss to you or any other person or organization that results from an inaccessible hard disk drive Setting a Hard Disk Drive Master Password If you choose to set a hard disk drive Master password you must set it before setting the hard disk drive User password To set a hard disk drive Master passwo...

Страница 221: ...his file if you are running Windows 95 5 Double click the hddpwd file that is best for you The HDD Password utility displays a warning box Read this information carefully The HDD Password warning box 6 Click OK to continue To exit without setting a hard disk drive password click Cancel The HDD Password utility displays a dialog box that lists the hard disk drives installed in the system Your dialo...

Страница 222: ...displays a Register Password dia log box that lists all the unregistered hard disk drives available for password assignments The Register Password dialog box 9 Select one or more of the hard drives listed by clicking in the box next to the drive To use the same password for all drives click the box next to the message Use the same password for all devices A check mark appears in the box when it is...

Страница 223: ...The Register Master Password warning box 11 Click Yes to continue registering the Master password The Register Password dialog box displays the name of the drive being registered after the message Enter the password for The Register Password dialog box 12 Type the password in the New Password field 13 Confirm the password by typing the password again in the Confirm new password field 14 Click OK T...

Страница 224: ...ssword for each hard disk drive the HDD Password utility prompts you to enter the next password 16 Repeat steps 12 through 15 for each drive that requires a new password Once you have entered a password for all selected hard disk drives the HDD Password utility prompts you to create a pass word backup diskette For instructions see Creating a Password Backup Diskette on page 239 Setting a Hard Disk...

Страница 225: ... displays all the folders in the Windows directory 4 Double click the HDDPWD folder The right side of the Explorer window displays the two HDD Password programs They are hddpwd16 exe choose this file if you are running Windows for Workgroups hddpwd32 exe choose this file if you are running Windows 95 5 Double click the hddpwd file that is best for you The HDD Password utility displays a warning bo...

Страница 226: ...talled in the system Your dialog box may differ from the one shown The Toshiba HDD Password Utility dialog box 7 Click User The HDD Password utility displays the User Password dialog box The User Password dialog box 8 Click Register The HDD Password utility displays a Register Password dia log box that lists all the unregistered hard disk drives available for password assignments ...

Страница 227: ... for all drives click the box next to the message Use the same password for all devices A check mark appears in the box when it is clicked 10 Click OK to continue setting the password The Register User Password warning box informs you that the User password is used to protect against unauthorized access to your drive Read this information carefully The Register User Password warning box 11 Click Y...

Страница 228: ...word field 14 Click OK To exit without setting a hard disk drive password click Cancel The HDD Password utility warns you for the last time that you are about to register a User password Read this carefully The Register User Password warning box 15 Click Yes to register the password Click No to cancel the password registration The HDD Password utility registers the password If you chose more than ...

Страница 229: ...h selected hard disk drive the HDD Password utility prompts you to create a password backup file called an HDD key file The Create HDD Key file dialog box 1 Click Yes to backup your password to diskette HDD Password utility displays the Creating HDD Key file sta tus window while copying the Key file to the diskette drive The Creating HDD Key file status window 2 Insert a formatted blank diskette i...

Страница 230: ...s successful Once this procedure is completed for all selected drives the following dialog box displays The Register User Password dialog box 5 Click OK The Toshiba HDD Password Utility dialog box displays An assigned password is indicated by the word Registered under the type of password Master or User Toshiba HDD Password Utility dialog box 6 Click Exit to finish registering the assigned passwor...

Страница 231: ...click Yes for your password changes to take effect Deleting a Hard Disk Password To delete a hard disk drive password follow these steps 1 Click Start then point to Programs 2 Click Windows Explorer The Windows Explorer windows opens 3 Double click the Windows folder in the C drive directory The right side of the Explorer window displays all the folders contained in the Windows directory 4 Double ...

Страница 232: ...Cancel allows you to exit the program The HDD Password utility displays the Toshiba HDD Pass word Utility dialog box The hard disk drives with a registered password display Registered under the Master or User col umns Your dialog box may differ from the one shown The Toshiba HDD Password Utility dialog box You must delete the hard disk drive User password before you can delete the hard disk drive ...

Страница 233: ...log box displays all the hard disk drives with registered passwords The Delete Password dialog box 9 Select one or more of the hard drives listed by clicking the box next to the drive 10 Click OK The Delete Password dialog box displays the name of the drive for which the password is being deleted after the message Enter the password for The Delete Password dialog box 11 Type the password for the d...

Страница 234: ...ssed the HDD Password utility displays the following dialog box The Delete Master Password pending dialog box 14 Click OK The Toshiba HDD Password Utility dialog box displays those drives with deleted passwords as Deleted Pending in the status column 15 Click Exit If you try to change the password before restarting the com puter the password that was in place the last time the com puter was starte...

Страница 235: ...a system password in the Toshiba System Control Panel or TSETUP before you can use an undock password option This section provides instructions for setting an undock password through the Toshiba System Control Panel For information about setting an eject password in TSETUP refer to TSETUP on page 403 Setting an Undock Password To turn the undock password option on follow these steps You must regis...

Страница 236: ...assword section of the dialog box click Enable 6 Click OK The Undock Password is registered Removing the Undock Password To turn the undock password option off follow these steps 1 Click Start then point to Settings 2 Click Control Panel Windows 95 opens the Control Panel 3 Double click the Toshiba System icon The Toshiba System Control Panel opens with the Start Up Options tab on top 4 Click the ...

Страница 237: ... password matches the one you set the OK button is enabled 7 Click OK The Toshiba System Control Panel displays the Security tab with the Undock Password listed as Password not required Applying Physical Restraints The Noteworthy Computer Lock You can connect the optional Noteworthy Computer Lock cable to deter theft Follow these steps 1 Wrap the cable around the leg of your desk or other heavy ob...

Страница 238: ...les one for the com puter and another for the NoteDock II Enhanced Port Replicator Viruses and How to Cure Them Over the last few years there have been a number of computer virus scares Pranksters seem to find pleasure in unleashing these potentially destructive programs on the general public Viruses while a potential problem need not have a devastating effect on your computer By taking a few simp...

Страница 239: ...oft Antivirus for Windows MWAV EXE and DOS MSAV EXE Windows 95 does not provide any virus protection software If you chose Windows 95 you ll need to purchase a third party virus detection removal program There are many virus detection removal programs available Ask your dealer for help in selecting one that adequately meets your needs ...

Страница 240: ...one correct way to use the computer Toshiba s built in configuration options make it possible to customize the way the computer works to meet your needs Saving Time with Multiple Configurations Imagine it s time to go home at the end of the day s work You ve been using your computer all day with a docking station to send financial data to corporate headquarters access the corporate data base and r...

Страница 241: ...ations three of which come already named and preset with options and settings as follows Home launches the programs you use most when at home Office is the configuration you use at work Travel might be a different configuration from both Home and Office You would use this configuration when on the road A configuration specifies the basic features of your system A Toshiba Access Panel configuration...

Страница 242: ... the configuration click one of the other buttons More Reasons to Use Configurations There are any number of reasons for using multiple configurations to simplify using the computer For example if you are a student or an instructor and you use your computer to take notes or to illustrate your lectures you might want to decrease the volume of the battery alarm so as not to interrupt a lecture or di...

Страница 243: ...m for the road Managing Configurations To access the configuration options follow these steps 1 Click the Options button at the lower end of the Toshiba Access Panel A bar of options slides out 2 Click the Configuration Management button on the slider bar The panel opens the Configuration Management dialog box Configuration Management dialog box 3 To modify an existing configuration click its butt...

Страница 244: ...en that the system can control Some screens contain a total of 640 x 480 pixels Others contain 800 x 600 pixels All information displayed consists of combinations of colored or black and white pixels Clip art is the term that refers to computer ready graphics you can buy from a graphics company or over the Internet A bitmap is drawing that consists of tiny dots in this case pixels that when viewed...

Страница 245: ... a different icon click Change Image The Change Configuration Image dialog box opens The Change Configuration Image dialog box The example above shows the name of the bitmap file for the Travel configuration icon 5 Change the Files of type list to display either bitmapped files or icon files 6 To view a bitmap or icon before you commit to using it click Preview The system displays the icon to the ...

Страница 246: ...ic Windows 95 hardware configuration if multiple configurations exist To define when you want the configuration change to occur 1 Click Advanced on the Configuration Management dialog box The Advanced Configuration Management dialog box opens The Advanced Configuration Management dialog box 2 Select the appropriate setting Choose Disable automatic configuration switching if you plan to change the ...

Страница 247: ...nter a name for the configuration in the Name box 4 Assign the icon for the button The procedure for assigning the icon using this dialog box is the same as the procedure for assigning the icon using the Con figuration Properties dialog box See Creating Your Own But ton Icon on page 255 5 Choose one of the existing configurations from which to copy the hardware and application settings You must co...

Страница 248: ...x Time Wizard which selects power settings based on how you pre fer to work and assigns the settings to the appropriate configurations If you prefer to control each power saving option individually you can do so through the MaxTime Control Panel To access the MaxTime Control Panel follow these steps 1 Click Start then point to Settings 2 Click Control Panel Windows 95 opens the Control Panel 3 Dou...

Страница 249: ...by a tab 6 Click the tab for the configuration you want to change 7 Choose one of the Power Usage Modes from the list box Low Power mode conserves power when you re using the battery Full Power mode maximizes system performance Custom Settings lets you decide how to configure each of the Power Usage Details below the list box See Conserv ing Power on page 130 for more information on what each of t...

Страница 250: ...ion follow these steps 1 Click Start then point to Settings 2 Click Control Panel Windows 95 opens the Control Panel 3 Double click the Toshiba System icon The Toshiba System Control Panel opens 4 Click the Miscellaneous tab to bring it to the front The Miscellaneous tab of the Toshiba System Control Panel 5 Click the Configuration button in the Warnings section of the tab The Toshiba System Contr...

Страница 251: ...and want to open a different program you must click Start point to Programs and click on the program you want to open Not nec essarily Windows 95 shortcuts and Toshiba s Fn esse program provide quick ways to open programs documents and folders from within any Windows program For more information on making Windows 95 shortcuts see Lesson 8 Making Shortcuts on page 58 The following section describes...

Страница 252: ...Access Panel Fn esse displays the Fn esse keyboard The Fn esse keyboard The keys are coded as follows black keys are available keys not yet assigned colored keys are assigned blue is the default color dark gray keys are not assignable keys with a small triangle on the upper left corner open either a program folder or a custom folder To view an existing key assignment position the pointer over the ...

Страница 253: ...king a file or folder with the secondary button then choos ing Assign to Fn key from the shortcut menu that appears The following sections discuss the first two methods listed above Assigning a Key to a Program or a File To assign a key combination the task of opening a program or file and its associated program follow these steps 1 Open Fn esse 2 Click the desired key in the Fn esse keyboard Fn e...

Страница 254: ... the Programs menu Clicking Browse displays the Open dialog box which allows you to select your file from a directory tree 6 Click the folder which contains the program or file you want to assign Fn esse displays the selected folder s contents 7 Click the program icon or the file icon to which you want to assign the Fn key combination 8 Exit the dialog box Click OK if you re in the Programs Browse...

Страница 255: ...on click the check box next to Switch to running target application if one exists This option does not function with the Windows Explorer 11 Click OK to save your key assignment and exit the dialog box The program or document is now associated with the key you just selected To open the program or file press Fn plus the appropriate key from within Windows Assigning a Key to a Program Folder To assi...

Страница 256: ...ded background indicating the individual programs and folders are unavailable 7 Click OK Fn esse displays the Assignment dialog box with the Descrip tion and Target text boxes filled in 8 Click OK to save your key assignment and exit the dialog box The program folder is now associated with the Fn key combi nation To open the program folder press Fn plus the appropri ate key from within Windows Ass...

Страница 257: ...u want to add to your custom folder The browser displays the file name you select in the text field 8 Click Open Fn esse displays the Assignment dialog box and adds the selected program or file to the list of files in the custom folder The Assignment dialog box with the added files 9 In the Popup display options section of the dialog box select how the items in the pop up list will display To disp...

Страница 258: ...esse key board To use the drag and drop method to assign tasks to keys follow these steps 1 Open both Fn esse and the Windows Explorer 2 Resize the Explorer window so you can see both the Fn esse keyboard and the Explorer at the same time If you re unsure how to do this refer to Lesson 5 Starting Programs on page 52 3 In the Explorer window highlight the program or docu ment file you wish to assig...

Страница 259: ...on for assigning that task 3 To move the existing key assignment to another key click Move and click the new key The previously assigned key becomes black The newly assigned key changes color indicating it is now an assigned key 4 To remove the key assignment click Clear Fn esse displays a dialog box prompting you to confirm the clearing of the key assignment 5 Click Yes The key becomes black Sett...

Страница 260: ...e assigned key tasks follow these steps 1 Click the scroll arrow to see the available colors As you scroll down the list of colors the keys or the popup changes color 2 To set the color for the assigned keys use Assigned Keys triangle at the left top of keys assigned the task of opening a program folder use Program Folder triangle at the left top of keys assigned the task of opening a custom folde...

Страница 261: ...ombination you wish to emulate the Fn key 4 Click OK The key combination is assigned When you use the external keyboard use this key combination instead of pressing Fn Making the Key Assignment Configuration Aware You can assign key combinations to different tasks in each of your Toshiba Access Panel configurations To remove a key assign ment from one or more of the configurations follow these ste...

Страница 262: ...ings and exit this dialog box Using Device Manager to Configure the Computer The Windows 95 Device Manager lets you set up many of the individual components of your system You ll need to use it if for example you want to change the COM port name assigned to the serial port or the range of memory reserved for the display adapter This section gives a brief overview of how to use Device Manager To ch...

Страница 263: ... want to modify For example if you want to modify the serial port settings double click Ports 5 Click the Resources tab to move to the Resources page 6 Make the desired changes If you re unused to working with the computer s configuration it s a good idea to leave the Use Automatic Settings box checked These settings were chosen to work together within the system and with most available optional d...

Страница 264: ...e right and left Ctrl and Alt keys or to the regular and numeric pad Enter keys on the enhanced keyboard The Fn key allows the built in keyboard to simulate these separate keys as follows To simulate the Ctrl key on the right side of the enhanced keyboard press Fn Ctrl Alt key on the right side of the enhanced keyboard press Fn Alt Enter key on the numeric pad of the enhanced keyboard press Fn Ent...

Страница 265: ... the indicator panel glows when the cursor control overlay is on You can use the overlaid keys to type alphabetic characters while the overlay is on To do this for lower case letters press and hold Fn while you type for upper case letters press and hold Fn Shift while you type Release Fn to continue using the overlay The keys of the cursor control overlay also act as a numeric over lay providing t...

Страница 266: ...n This option not only makes it easier to turn the computer s power on but makes it impossible to close the display panel while the com puter is on This option is only available if you turn Resume Mode on turn the computer on whenever it detects an incoming call through the internal serial modem If the Alarm Power On option starts the computer in Resume Mode and you have a password registered the ...

Страница 267: ...p Mode section click the check box next to Resume Mode 5 To turn the computer on when your internal modem detects an incoming call click the check box next to Trig ger resume when modem receives an incoming call An X in the check box turns the option on 6 To set the computer to turn on or off when you open or close the display panel click the check box next to Trigger suspend resume when panel clo...

Страница 268: ...en click the up and down arrow buttons until the Time field displays the time at which you want the computer to turn on You may also set a specific date using the Month and Date fields Do not disconnect the computer from both AC and battery power when you use any of these features Otherwise the time settings and data saved by Resume Mode will be lost and when you restore power you must reset this ...

Страница 269: ...lay Properties sheet To change your display mode follow these steps 1 With the pointer positioned over a blank area of the desk top click the secondary button 2 Click Properties Windows 95 opens the Display Properties sheet The Display Properties sheet 3 Click the Settings tab to move to the Settings page 4 Change the number of colors the display can show by changing the Color palette setting 5 Ch...

Страница 270: ...re space than the built in display has available the display goes into virtual display mode In this mode the display pretends it s bigger than it really is by stretching the Windows desktop so that part of it is off the screen To see the remainder of the desktop move the pointer to the edge of the display and keep moving it in the direction of the part of the desktop you would like to see Display ...

Страница 271: ...the computer so you don t have to take the printed documentation with you when you travel The electronic User s Guide is a copy of this printed book This chapter explains how to us the electronic version of the guide Opening the Book To open the book follow these steps 1 Click Start then point to Programs 2 Point to Toshiba Utilities then click User s Guide Windows 95 opens the guide ...

Страница 272: ...normally find at the back of the book Find lets you input a term and search for it in the book Go Back retraces your steps through the book History shows a list of all the places you have been Help explains how to use the book s features Bookmark marks a topic so you can return to it in the future Copy copies selected text to the clipboard Print prints the current topic Preferences lets you custom...

Страница 273: ...k If the index and table of contents do not contain the word you re looking for try the Find option You can search the current topic or the entire User s Guide Follow these steps 1 Click Find The book displays a box for you to enter the word or phrase 2 Enter the word or phrase and press Enter or click Search Find displays a list of all the sections that contain this term 3 Select the section you ...

Страница 274: ...ed Cross references are shown in green underlined text To view a cross reference follow these steps 1 Position the pointer over the cross reference The pointer changes to a pointing hand symbol Using a cross reference 2 Click the cross reference The program displays the section that contains the information relating to the cross reference you selected When you have finished reading the cross refer...

Страница 275: ...Bookmark The bookmark dialog box 3 Enter a name for the bookmark This can be any name you choose 4 Press Enter or click the X in the upper right corner of the box The program places a small mark at the bottom of the window Viewing the Topic Marked by a Bookmark To view a marked topic click its bookmark Moving the pointer over the bookmark displays the name you assigned Another way to locate the to...

Страница 276: ...Keeping Track of Where You ve Been An electronic book can keep track of what you ve already read If you wish you could go back to the page you read five minutes ago but you don t remember where you were follow these steps 1 Click History The program displays a list of all the topics you ve viewed in this session A history list 2 Click the topic s title 3 Click the top box and you re back where you...

Страница 277: ... the Help text changes to describe the current feature you are pointing at with your pointer Using Material from the Book Though this book is copyrighted you may select text and copy it to the clipboard for use in your own projects You may also print individual topics or selected text Copying a Selection To copy a selection follow these steps 1 Click Copy The book displays the Copy dialog box Sele...

Страница 278: ...ext you selected Click Print the Current Topic to print the whole topic The program prints to the current printer Before you click Print make sure the printer s is on line ready and the printer has paper Changing How the Book Works The Preferences command lets you customize the electronic book s features to meet your preferences The preferences dialog box Audible Alerts sound for various functions...

Страница 279: ...you must use the master program diskette that contains the book files For more information about master program diskettes see Create or Purchase Master Diskettes on page 33 Follow these steps to reinstall online documentation 1 Be sure you have connected the external diskette drive to the diskette drive port To connect the external diskette drive see Connecting the External Diskette Drive on page ...

Страница 280: ...g away at the keyboard This chapter gives you all the details of how your computer works What Is a Computer In one sense your Portégé 650CT is a computer Technically speaking however the processor chip where the actual computing takes place is the computer Everything else either provides infor mation to the processor or receives the results of the processor s computations ...

Страница 281: ...maintains the computer s configuration information which is stored in the RTC mem ory When you make changes in TSETUP the MaxTime Con trol Panel or the Toshiba System Control Panel this memory keeps track of those settings The RTC battery also operates the computer s internal clock The main battery charges the backup and RTC batteries How Does a Disk Store Information Like a tape recorder a disk d...

Страница 282: ...e of this all numbers in computing are based on powers of two One megabyte is actually equal to 1 048 576 bytes 220 the closest binary number to 1 000 000 In the early days of personal computers the difference was very minor because hard disks were small and computers didn t have much memory As hard disk capacities and memory sizes have increased the difference has become much more significant One...

Страница 283: ...olors to create other colors A pel formed by several pixels The smallest element that your programs can control is called a pel Pels are arranged on the screen in a grid like fashion Depend ing on the video mode a program selects a pel may be a single pixel or several pixels The pel size determines the clarity of the image called screen resolution Larger individual pels reduce the total number of ...

Страница 284: ...ay adapters provide several video modes The Portégé 650CT SVGA compatible display adapter supports all VGA modes and some SVGA modes The video mode required by a program depends on whether the program displays graphics or text the resolution required for the text or graphics the number of colors used the font size in pixels of the text Based on these requirements computers recognize two categories...

Страница 285: ... to the program s documentation for a list of available characters What Is Plug and Play Plug and Play is a clever name for a new technology developed jointly by Intel and Microsoft that seeks to make upgrading a com puter system easy Computer systems such as the Portégé 650CT operating software and add on products that are designed according to this standard work together the first time you conne...

Страница 286: ...rap program This program named from the expression pull yourself up by your bootstraps checks and displays the amount of memory in the system before proceeding 2 The bootstrap program attempts to load Windows 95 It looks first for a diskette in the diskette drive and then at the hard disk If a diskette without the necessary startup files is in the drive the bootstrap program displays an error mess...

Страница 287: ...p you solve many problems yourself with out needing additional help It covers the problems your are most likely to encounter Read the section headings on the opposite page then turn to the section that covers the type of problem you are having Read the section and see if it describes your problem If so follow the steps for solving it If all else fails contact Toshiba You will find information on T...

Страница 288: ... exit the failed program without shutting down Windows 95 or closing other programs To close a program that has stopped responding follow these steps 1 Press Ctrl Alt Del once Windows 95 displays the Close Program dialog box The box lists all the programs and processes currently in operation If a program has stopped responding the words not responding appear beside its name in the list 2 Select th...

Страница 289: ...an ille gal operation you should record the details of the message and consult the software manufacturer To record the details 1 Click the Details button and select the text Windows 95 displays The Details button displays information that the software man ufacturer needs to help you solve your problem 2 Press Ctrl c to copy the text to the clipboard 3 Open Notepad click the Start button point to P...

Страница 290: ...rogram 1 Press Ctrl Alt Del The Close Program dialog box displays listing all the pro grams and processes currently in operation If the program has stopped responding the words not responding appear beside it 2 Click End Task then click Cancel You disable sleep mode in MaxTime or TSETUP Continue with these steps to disable sleep mode using MaxTime 3 Click Start then point to Programs 4 Point to To...

Страница 291: ...ror message displays while you are using a program Refer to the program s documentation Typically this includes a troubleshooting section or a summary of error messages Hardware Problems If your computer or one of the devices connected to it isn t work ing properly try this procedure first 1 Turn off the computer and any peripheral devices con nected to it This includes your printer and any other ...

Страница 292: ...few seconds The computer starts but then shuts down and the power indicator glows orange and blinks The computer is too hot so it has automatically entered Resume Mode and shut down Leave the computer turned off until its interior has reached room temperature The computer starts but when you press a key on the keyboard or touch the AccuPoint nothing happens You are probably in Resume Mode and have...

Страница 293: ...reate System Disks program 2 Restart your computer and press F10 when the system starts Pressing F10 changes the Boot Priority option setting in TSETUP This command instructs the computer to start from the diskette drive The message Starting Windows 95 displays followed by the MS DOS prompt a 3 Remove the startup diskette from the diskette drive and insert Windows 95 disk 1 4 Type setup then press...

Страница 294: ...ce has failed these problems usually occur when you change the system configuration add a device install a new pro gram or do something that changes the system s established routine If you experience any of these problems use the startup options in the Windows 95 Startup Menu to fix them Using Startup Options to Fix Problems If Windows 95 fails to start properly you may have to change your system ...

Страница 295: ... Windows 95 under normal conditions Start the computer in Normal mode when there are no apparent problems with the system Logged BOOTLOG TXT Selecting Logged starts Windows 95 under normal conditions and creates a startup log file named C BOOTLOG TXT This records every step of the system s startup process You or a qualified Windows 95 expert can use this log file to check the loading and initializ...

Страница 296: ...display Once you have done this Windows 95 will start correctly Other problems may involve a device driver See Windows 95 Can Help You on page 312 to fix the problem Windows 95 automatically starts in Safe Mode if it detects that system startup failed or the Windows 95 Registry the file that defines how Windows 95 is set up is corrupted Step by Step Confirmation When you turn your computer on Wind...

Страница 297: ... backward com patible with earlier versions of Windows This lets you use older programs in Windows 95 Most of the information in these files is now stored in the Win dows 95 Registry However they are still processed during star tup BOOTLOG TXT file contains a record of all the components and drivers being loaded during startup and the status of each When you select Step by Step Confirmation you ca...

Страница 298: ...dows 95 Help can assist you in solving the problem To open the Windows 95 troubleshooting aid follow these steps 1 Click the Start button and click Help 2 Click the Contents tab and double click Troubleshooting 3 Double click a problem you would like help with and follow the steps Resolving a Hardware Conflict If you receive an error message telling you there is a device driver conflict or a gener...

Страница 299: ...est it to make sure it and all previously connected devices work The device most recently connected to the system is the one most likely to be causing the conflict A word to the wise if you get too tired take a break Having a meal or a good night s sleep refreshes you mentally as well as physically Talking the problem over with a friend can help too Resolving Hardware Conflicts on Your Own Just as...

Страница 300: ...conflicts is easy Plug and Play is a computer standard that helps the system BIOS basic input output system and Windows 95 to automati cally assign system resources to Plug and Play compliant devices In theory if every device connected to the computer is Plug and Play compliant no two devices will compete for the same system resources You simply plug in the device and turn your computer on Windows...

Страница 301: ... the device s documentation for instructions about changing settings on the device Fixing a Problem with Device Manager Device manager provides a way to check and change the configuration of a device Using Device Manager to change the default settings can cause other conflicts that make one or more devices unus able Device Manager is a tool for advanced users who under stand configuration paramete...

Страница 302: ...ck the My Computer icon with the secondary button then click Properties Windows 95 displays the System Properties dialog box 2 Click the Device Manager tab 3 To view the device s installed double click the device type the device properties double click the device Windows 95 displays the Device Properties dialog box which provides up to three tabs to choose from The General tab provides basic infor...

Страница 303: ...m Then read the relevant parts of this section which describes prob lems and solutions related to specific devices Running the System Verification Test To verify the system when Resume Mode is off follow these steps 1 Turn the computer off 2 Hold the spacebar while you press the power button To verify the system when Resume Mode is on hold down the spacebar while you press the reset button System ...

Страница 304: ...est again If the test fails a second time you have demonstrated that you can repro duce the problem and it s time to contact a trained technician Other Circumstances The computer normally beeps at the conclusion of a successful system verification If the system speaker is set to Disabled in MaxTime or TSETUP this beep will not occur If the speaker is turned on enabled and the system verification c...

Страница 305: ...ves 324 Optional Devices 327 PC Cards 327 Printers 331 Modems 332 Memory Card Problems Incorrectly connected or faulty memory cards may cause errors that seem to be device related So it s worthwhile checking for these first 1 Make sure the computer isn t in Resume Mode ForinformationaboutturningResumeModeoff See Starting Again Using Resume Mode on page 125 2 Click Start then click Shut Down 3 Remo...

Страница 306: ...e them The power light doesn t come on when you plug in the AC adapter Make sure the AC adapter is firmly plugged into both the wall out let and the computer If the power light still does not come on check that the wall outlet is working properly by plugging in an electrical device such as a lamp The AC adapter works correctly but the battery won t charge The main battery may not be inserted corre...

Страница 307: ... long the charge lasts If you frequently recharge a partially charged battery it may not charge fully Always let the battery discharge completely then charge it again For more information on maximizing battery power refer to Looking After Your Battery on page 136 and Conserving Power on page 130 The Keyboard If when you type strange things display on your screen or nothing happens the problem may ...

Страница 308: ...S 2 keyboard in while the computer was turned on Press Ctrl Alt Del or press the reset but ton to restart the computer so it recognizes the device The keyboard locks and the computer will not start Make sure the power is on and press the reset button The AccuPoint Some of the keyboard conditions listed above may also affect the AccuPoint In addition consider the following Your finger easily slides...

Страница 309: ...he computer is not set for an external moni tor To do this press Fn F5 If you are using an external monitor Check that the monitor is turned on Check that the monitor s power cord is firmly plugged into a working power outlet Check that the cable connecting the external monitor to the computer is firmly attached Try adjusting the contrast and brightness controls on the exter nal monitor Press Fn F...

Страница 310: ... 640 x 480 Low resolution monitors only work in Internal External mode The Disk Drives Problems with the hard disk or with a disk drive usually show up as an inability to access the disk or as sector errors Sometimes a disk problem may damage one or more files You are having trouble accessing a diskette or one or more files appear to be missing Make sure you re identifying the drive by its correct...

Страница 311: ...plorer window doesn t display all the files you think should be stored in the directory recovering data is unlikely Some programs run correctly but others do not This is probably a configuration problem When a program doesn t run properly refer to its documentation and check that the hardware configuration meets its needs A diskette won t go into the external disk drive You may already have a disk...

Страница 312: ...Run ScanDisk on the faulty diskette If the problem occurs with each diskette you attempt to access run the diagnostic test to check the diskette drive Refer to The Diag nostic Test on page 427 CD ROM Drives You cannot access a compact disc in the drive Make sure the drawer has closed properly Examine the disc to see whether it is dirty If necessary wipe it from the center to the outside edge with ...

Страница 313: ...d Monitor feature in the Recording Control Utility default Off or the mute feature in the Mixer Utility default Enabled these may cause feedback Revert to the default settings Optional Devices Optional devices can include a printer PC Cards an external mon itor or any other device you connect to your computer to expand its capabilities This section begins with some general comments and continues w...

Страница 314: ...lled enablers to support their cards Enablers result in nonstandard configurations that can cause problems when installing another PC Card If Windows 95 doesn t have built in drivers for your PC Card and the card didn t come with a Windows 95 driver it may not work under Windows 95 Contact the manufacturer of the PC Card for information about operating the card under Windows 95 PC Card Checklist M...

Страница 315: ...his dialog box contains information about your PC Card con figuration and status The computer stops working hangs when you insert a PC Card The problem may be caused by an I O input output conflict between the PCMCIA socket and another device in the system Make sure each device has its own I O base address Since all PC Cards share the same socket each card is not required to have its own address H...

Страница 316: ...C Card or PCMCIA socket controller There is still a yellow exclamation point over the PCMCIA con troller icon in Device Manager You ve gone through the PCMCIA Wizard in Windows 95 as described in Setting Up PC Card Support in Windows 95 on page 163 but the system still reports the controller with a yellow Your computer may not be firmly attached to the optional NoteDock II Enhanced Port Replicator...

Страница 317: ...documentation which should contain a trouble shooting section Printers This section lists some of the most common printer problems The printer doesn t print Check that the printer is connected to a working power outlet and is turned on Check that the printer has plenty of paper Some printers won t start printing when there are just two or three sheets of paper left in the tray Make sure the printe...

Страница 318: ...ansmit properly Make sure the RJ 11 cable the one that goes from the modem to the telephone line is firmly connected to the modem s RJ 11 jack and the telephone line socket Check the serial port setting to make sure the hardware and soft ware are referring to the same COM port in Device Manager under modem Check the communications parameters baud rate parity data length and stop bits specified in ...

Страница 319: ...ly prepare for the problems that inevitably occur This section suggests some good habits to develop so you are prepared when things go wrong Save your work often You can never predict when your computer will lock forcing you to close a program and lose unsaved changes Many software pro grams build in an automatic backup but you shouldn t rely solely on this feature Save your work On a regular basi...

Страница 320: ... the manuals provided with your computer as well as the manuals that come with the programs and devices you purchase Your local computer store or book store sells a variety of self help books you can use to supplement the information in the manuals If problem solving is taking a long time take a break If you ve been fighting to solve a problem for a long period of time you re probably frustrated b...

Страница 321: ...ur dealer is your best source for current information For the number of a Toshiba dealer near you in the United States call 1 800 457 7777 Contacting Toshiba If you still need help and suspect that the problem is hardware related Toshiba offers a variety of resources to help you Start with the Automated Fax Service Chances are you are not the only person to experience this problem Toshiba has prep...

Страница 322: ...n you need press 2 4 Follow the automated instructions provided by the system When entering the area code for your fax number do not include the 1 prefix The AUTOFAX System automatically calls your fax number and sends the requested information The process usually takes min utes but load conditions can vary So please allow up to 24 hours to receive the information If your fax machine telephone num...

Страница 323: ... To access the Toshiba Forum 1 Log on to Compuserve 2 From the CIS prompt type go Toshiba Toshiba s World Wide Web Site To access the Toshiba World Wide Web site Use any World Wide Web browser to access the World Wide Web then type http www toshiba com tais csd support Toshiba Voice Contact To aid Toshiba make sure you have The computer and any optional devices related to the problem The Microsoft...

Страница 324: ... Product Support at 714 859 4273 Toshiba s Worldwide Offices For additional help contact one of these Toshiba offices Argentina Smart S A Mexico Street 630 Buenos Aires 1097 Argentina Australia Toshiba Australia Pty Limited Information Systems Division 84 92 Talavera Road North Ryde NSW 2113 Sydney Australia Austria A D Lindenrabengasse 21 A 1238 Wien Austria Belgium Toshiba Information Systems Be...

Страница 325: ...dex France Germany Toshiba Europe I E GmbH Leibnizstraße 2 D 93055 Regensburg Germany Greece Ideal Electronics S A 109 Syngrou Avenue 176 71 Kalithea Athens Greece Hungary Technotrade Kft Ov utca 185 1147 Budapest Hungary Ireland Same as United Kingdom Italy Pregetto Elettronica 92 s r l Via Galliari 1 A 20156 Milano Italy Japan Toshiba Corporation International Operations Personal Computers 1 1 S...

Страница 326: ... Toshiba PC Service Stalfjaera 20 Posboks 51 Kalbakken N 0901 OSLO 9 Norway Papua New Guinea Fujitsu PNG Pty Ltd P O Box 4952 Boroko NCD Papua New Guinea Poland Wittelsbach Service Polska ul Okopowa 47 01 059 Warszawa Poland Portugal Quinta Grande Assistencia Tecnica Informatica Lda Av Moinhos no 15A Ur Quinta Grande 2720 Alfragide Portugal Slovakia HTC s r o Kukucinova 26 831 03 Bratislava Slovak...

Страница 327: ...ibona TPC AB Sundbybergsväegen 1 Box 1374 Solna 171 27 Sweden Switzerland Ozalid AG Herostrasse 7 Postfach 8048 Zürich Switzerland United Kingdom Toshiba Information Systems U K Ltd Toshiba Court Weybridge Business Park Addlestone Road Weybridge Surrey KT15 2UL United Kingdom United States Toshiba America Information Systems Inc 9740 Irvine Boulevard Irvine California 92718 United States ...

Страница 328: ...em functions on and off Hotkeys have a white legend on the front of the key indicating the option or feature the key controls Instant Password Security Fn This hotkey locks the keyboard and blanks the dis play You must enter your password if registered or press Enter to begin work again F1 ...

Страница 329: ...ve modes Full Power Low Power and User Settings Fn This hotkey displays the power up pop up win dow in Windows 95 with MaxTime running and turns Resume Mode on and off Fn This hotkey cycles the alarm volume through Off Low Medium and High Off is always first Fn This hotkey alternates among the following dis play options built in display only external moni tor only and simultaneous display F2 F3 F4...

Страница 330: ...d Part II Technical Reference 347 Keyboard Fn This hotkey turns the cursor control overlay on and off Fn This hotkey turns the numeric overlay on and off Fn This hotkey turns the scroll lock feature on and off F10 F11 F12 ...

Страница 331: ...ar the TAP can be permanently visible on your desktop or can be hidden auto matically Additionally you can customize the TAP so your com puter can meet your needs at home at work or while you travel This chapter identifies the parts of the Toshiba Access Panel and documents each button dialog box and menu The buttons and dialog boxes are in alphabetical order The menus are documented in the sectio...

Страница 332: ... the primary Accu Point button The configuration slider bar appears Select a configuration by clicking one of the configuration icons Selecting a configuration or clicking outside the configu ration slider bar hides the slider bar Gauge Gallery button This button displays the Gauge Gallery dia log box Configuration button Gauge gallery button Dashboard Dashboard tear off button Application icons O...

Страница 333: ... appears below the battery gauge s Click this arrow to see the remaining gauge s Splitter This bar separates the dashboard from the applications You can click and drag this bar to change the sizes of the dashboard and application area Application icons This area provides space forthe icons usedto start programs To add a program to the applicationarea dragtheprogramicontothe application area and re...

Страница 334: ...tton on a component displays a menu of options Each menu varies The following table lists all the menu options that may appear Options button This button displays the Options slider bar From this bar you can customize the Toshiba Access Panel Help button This button displays the Help slider bar From this bar you can access text and video help Component Menu Item Usage TAP gauge Remove from All rem...

Страница 335: ...ccess Panel Properties dialog box on page 378 TAP gauge when the Dashboard is undocked Remove From configuration name removes selected gauge from the current configuration Remove from All removes selected gauge from all configurations Gauge gallery allows gauges to be added to the dash board by dragging and dropping them into the dashboard or by right clicking on an item in the gallery window Titl...

Страница 336: ...nfiguration Management dialog box Option Usage Disable automatic con figuration switching disables all automatic switching The system will change configuration only when you select a new configuration from the configuration slider bar on the Toshiba Access Panel Switch when docking state changes enables the system to switch configurations when you connect or disconnect your computer from a NoteDoc...

Страница 337: ...ondisplays two drop down lists allowing you to select the A C power configuration name and the battery power configuration name Switch configuration based on hardware profile enables the system to select the configuration based on the current Windows 95 hardware profile This option appears only if you have multiple Win dows 95 Hardware Profiles on your computer Selecting this option enables two li...

Страница 338: ...ffects dialog box Option Usage Dialog open and close when selected dialog boxes in the Toshiba Access Panel animate when opened and closed List box drop down and retract when selected lists in the Toshiba Access Panel ani mate when opened and animate when a selection is made Configuration button displays the Animation Effects window and allows you to set unique animation effects for each TAP confi...

Страница 339: ... use the Windows 95 Open File dialog box Browse for Sound dialog box Option Usage File name is the name of the sound file Files of type selects the type of sound file to use Play button sideways facing triangle plays the selected sound file so you can see if you want to assign it Stop button solid square stops playing the selected sound file ...

Страница 340: ...the two property pages that are part of the Dashboard Properties dialog box They are The Styles property page The Gauges property page To access this dialog box click the Dashboard tear off button to separate the dashboard from the panel and choose Dashboard Properties from the Options menu Dashboard Properties dialog box Styles Property Page The Styles property page allows you to control the dash...

Страница 341: ...ion Stay on top This is a check box that determines the relative posi tion of the dashboard window Checked causes the dashboard to become a standard window It can be placed in front of or behind other windows on the desktop Unchecked causes the dashboard to become the top window when possible The system determines whether the dashboard belongs on top of a currently active window For normal program...

Страница 342: ...oved to another posi tion on the title bar by dragging and dropping The background color of the dashboard matches the active title bar color making the battery gauges look like part of the current caption Option Description Standard This style displays the dashboard with a caption that includes a system menu minimize button and a close button Mini This style displays a small caption with no button...

Страница 343: ... Layout section defines which TAP gauges are displayed on the dashboard at one time Option Description Display all gauges All battery gauges are displayed at one time Enable Cycle Mode This option allows you to cycle through TAP gauges one at a time The method of doing this is determined by the set of controls under this option Auto Cycle This option causes the system to cycle through the gauges a...

Страница 344: ... manually cycle through the gauges by clicking the button This option is enabled automatically if Enable Cycle Mode is selected and Auto Cycle is turned off Option Description Small Displays the dashboard gauges in a smaller window Large Displays the dashboard gauges in a larger window Configuration button Displays the Gauge Size dialog box that allows you to set the dashboard gauge size for each ...

Страница 345: ...ith the configuration To access this dialog box click the Configuration button with the secondary AccuPoint button click Configuring Management click Properties and click Change Image Change Configuration Image dialog box Option Usage File name is the name of the file that contains the icon Files of type selects the type of file to use for the icon Preview displays the currently selected file so y...

Страница 346: ... applications If any are found the Close TAP Applications dialog box appears The Close TAP Applications dialog box allows you to switch to an open application close one application or close all open applications Close TAP Applications dialog box Option Usage Currently Active TAP Applications lists the titles of any Toshiba Access Panel applica tion currently running Switch to brings into view the ...

Страница 347: ... currently Active TAP Applications window If you switch to an application and close it theclosedapplicationmayberemovedimmediately from the active list If thishappens clicktheRefresh button to display the list Option Usage Configuration slider bar contains a button for each configuration The sys tem comes with three preset configurations You can add two of your own or modify the preset con figurat...

Страница 348: ...s this dialog box is to click the Options button at the bottom of the panel and the Configuration Management icon Configuration Management dialog box Pressing the arrow keys on your keyboard changes the configura tion selection Option Usage Move Left moves the selected configuration image on the configuration slider bar one position to the left Move Right moves the selected configuration image on ...

Страница 349: ... dialog box when an inac tive configuration button is selected This allows you to create a new Toshiba Access Panel configuration Close applies all changes and closes the dialog box Advanced displays the Advanced Configuration Management dialog box for the selected configuration For more information see Advanced Configuration Management Dialog Box on page 354 Option Usage Name provides a place to ...

Страница 350: ...heme present on the system to create new schemes or remove any scheme other than Default Edit Sound Schemes dialog box Sound Schemes Option Usage Save saves your changes and closes the dialog box Cancel discards your changes and closes the dialog box Option Usage Scheme text box displays the currently selected scheme name You can see all the available sound schemes by pressing the down arrow to di...

Страница 351: ...isplays all possible sound events in the selected scheme A loudspeaker icon indicates the event is currently enabled The full path to the sound file associated with the sound event is displayed in the Sound section below Disable Enable changes the state of the event If the selected event is enabled this button has the caption Disable If the event is disabled this button has the caption Enable Opti...

Страница 352: ...g box by clicking the Configuration button with the second ary AccuPoint button Select one of the blank configuration but tons and click Enable Enable Configuration dialog box General Properties Section Play button sideways facing triangle plays the sound file currently listed in the Sound box Stop button solid square stops playing the sound file Option Usage Name is a text box where you enter the...

Страница 353: ...e TAP simply drag and drop it on the dashboard area To access this window click the gallery gauge button on the TAP Gallery Gauge window Image displays the image you selected Change Image displays the Change Configuration Image dialog box Option Usage Copy from identifies the existing configuration which you plan to use to form the new configuration When you cre ate a new configuration you must ba...

Страница 354: ...ic configurations To access this dialog box click the configuration management icon in the Gauge Icon Size section Gauge Icon Size dialog box The options are the same as for the Gauge Icon Size Section of the Toshiba Access Panel Properties dialog box Options Button The Options button displays the Options slider bar This bar pro vides access to the panel s customization features The Options slider...

Страница 355: ...n The Sound Effects Dialog Box The options are the same as the Sounds dialog box Option Usage Properties displays the Toshiba Access Panel Properties dialog box For more information see Toshiba Access Panel Properties Dialog Box on page 378 Window styles displays the Toshiba Access Panel Windows Styles dialog box For more information see TAP Win dow Styles Dialog Box on page 376 Configuration Mana...

Страница 356: ...e Enable sound effects enables sounds defined by the chosen sound scheme Sound Scheme displays a drop down list of all the sound schemes present on the system You may select any scheme on the list Configuration button displays the Sound Effects dialog box and allows you to make the settings for sound effects unique for each configuration Edit Schemes displays the Edit Sound Schemes dialog box For ...

Страница 357: ...d Schemes dialog box Save Scheme As dialog box Special Effects Dialog Box This dialog box lets you associate Toshiba Access Panel sounds and animations with specific configurations To access this dialog box click the configuration button in the Special Effects section Special Effects dialog box The options are the same as for the Special Effects section of the Toshiba Access Panel Properties dialo...

Страница 358: ...e Toshiba Advanced Dialog Interface or the Windows 95 window style for the TAP system components To access this dialog box click the Options button and click the Window styles button TAP Window Styles dialog box The images in the TAP Window Styles dialog box are exam ples of the two windows styles that you can choose from They do not contain active controls ...

Страница 359: ... error message Option Usage Toshiba Advanced Dialog Interface displays panel applications with the Toshiba Advanced Dialog Interface graphic styles sounds and animation Sounds displays the Sounds dialog box Animation displays the Animation dialog box Standard Windows 95 Settings displays panel applications with the normal Win dows 95 style OK saves your changes and closes the dialog box Cancel dis...

Страница 360: ...g box click the Configuration button using the secondary AccuPoint button and click Properties Toshiba Access Panel Properties dialog box Panel Display Section Option Usage Always on top displays the panel on top of all other windows If thisboxisunchecked thepanelmaybeobscuredby other windows Auto hide causes the panel to recede into the edge of the desk top Selecting one of the options in the Dis...

Страница 361: ...ter you place the cursor over the thin edge of the recessed panel and click the sec ondary AccuPoint button Schemes This list box shows a list of overall looks for the Toshiba Access Panel Click a scheme and the panel changes when you click OK or Apply OK saves your changes and closes the dialog box Cancel discards your changes and closes the dialog box Apply applies your changes Option Usage Use ...

Страница 362: ...s with the follow ing system events Bar reappear from auto hide Sliderbar slideout options help configurations Dashboard undock Dashboard redock Use TAP animation effects automaticallyanimatesactionsforthefollowingsystem events Bar auto hide Bar reappear from auto hide Sliderbar slideout options help configurations Slidebar retract options help configurations Dashboard undock Dashboard redock Opti...

Страница 363: ... videos that demonstrate how to use the Toshiba Access Panel General Help displays a standard Windows 95 help dialog box About displays the About dialog box showing the product name the version the amount of physical memory installed and the free disk space Option Usage Play Selection starts running the selected video Close closes the dialog box Option Usage ...

Страница 364: ...e MaxTime Wizard click its button on the Toshiba Access Panel and follow the instructions on the screen To enter your power settings using the MaxTime Control Panel follow these steps 1 Click Start then point to Settings 2 Click Control Panel Windows 95 opens the Control Panel 3 Double click the MaxTime icon The MaxTime Control Panel opens ...

Страница 365: ... or change these options click the corresponding tab In addition to the three tabs there are four buttons located at the bottom of the MaxTime Control Panel The following table sum marizes these buttons Button Function OK saves current settings and exits the dialog box Cancel ignores current settings and exits the dialog box Apply applies the settings to the current session Help access online help...

Страница 366: ... external power usage Option Settings Usage Power Settings Battery External Lets you choose the powersourceforwhich youareselectingpower usage settings Power Usage Mode Full Power default Low Power Custom Settings Allows you to select a preset battery save mode or customize the battery save options For more information aboutchoosingapower usage mode see The Easy Way Choosing a Power Usage Mode on ...

Страница 367: ...e custom settings for each power source may be different The Modify Custom Settings dialog box To change an option setting move the slider next to the option The following table explains the available settings for each option Option Settings Usage Hard Disk Auto Off 01 Min 03 Min Low Power default 05 Min 10 Min 15 Min 20 Min 30 Min Full Power default Turns the hard disk drive off if it is not used...

Страница 368: ... System Auto Off 10 Min 20 Min 30 Min 40 Min 50 Min 60 Min Disabled default Turns the system off if you haven t used the computer for the speci fiedtime Thisoptionis available only if Resume Mode is on For more information see System Auto Off on page 134 Processing Speed High Full Power default Low Low Power default Sets the speed at which the Central Processing Unit CPU processes information High...

Страница 369: ...s Bright Full Power default Semi Bright Low Power default Sets the brightness of the display For more information see Dis play Brightness LCD Brightness on page 135 Cooling Mode Performance Full Power default Quiet Low Power default Sets the cooling method Performance mode uses the fan to cool theprocessor chip maintaining maximum system performance Quiet mode cools the system by temporarily reduc...

Страница 370: ...s for Low Battery Alarm and the Critical Battery Alarm Option Settings Usage Battery Alarm Thresholds Based on Percent Remaining Based on Time Remaining Triggers the alarm based on either the Per cent Remaining or Time Remaining Threshold Sliders to the right of this option let you set the thresh olds for the Low and Critical Battery Alarms ...

Страница 371: ...ges These options are identi cal for both the Low Battery Alarm and the Critical Battery Alarm Option Settings Usage Display an alarm message Enabled check Disabled no check Enables and disables the battery alarm message If you enable the alarm message you can choose the sound that occurs when the alarm mes sage appears No Sound Play System Beep or Play wav file ...

Страница 372: ...gs Usage Power Source Change Automatically adjust the Power Usage Mode Prompt to adjust the Power Usage Mode Controls how the sys tem behaves when you change the com puter from battery power to AC power or vice versa Enable the power source indicator on the Windows 95 taskbar Enabled check Disabled no check Turns the Toshiba power source indicator on the taskbar on and off ...

Страница 373: ...shiba System Control Panel follow these steps 1 Click Start then point to Settings 2 Click Control Panel Windows 95 opens the Control Panel 3 Double click the Toshiba System icon The Toshiba System Control Panel opens The Toshiba System Control Panel ...

Страница 374: ...ions click the corresponding tab In addition to the four tabs there are four buttons located at the bottom of the Toshiba System Control Panel The following table summarizes these buttons The Start Up Options Page The Start Up Options page Button Function OK saves current settings and exits the dialog box Cancel ignores current settings and exits the dialog box Apply applies the settings to the cu...

Страница 375: ...DD or the diskette drive FDD when you turn the computer on This option is equivalent to theBootPriorityoption in TSETUP Start Up Mode Boot Resume Alternates between Resume Mode and Boot Mode This option is equivalent to the Power up Mode option in TSETUP Trigger suspend resume when panel closes opens Enabled check Disabled no check Turns the computer on or off when you open or close its display pa...

Страница 376: ... on Timer page Trigger resume when modem receives an incoming call Enabled check Disabled no check Turns the computer on when the built in modem detects an incoming call This option is only available when Resume Mode is selected This option is equivalent to the Auto Power On Ring feature in TSETUP Option Settings Usage ...

Страница 377: ...ays the scheduled start up time This option is equiva lent to the Auto Power On option in TSETUP Time xx xx Lets you specify the time at which the sys tem turns on Click the up and down arrow keys to change the time displayed in the box Time Format AM PM 24 Hour Lets you select the for mat in which you want the time to display Set time for specific date Enabled check Disabled no check Enabling thi...

Страница 378: ...k Password that prevents an unauthorized user from remov ing your notebook from its docking station Option Settings Usage System Password Registered Not Registered Shows whether you ve set a system password For informa tion about using a system pass word refer to Using a Password on page 221 Play sound file when resuming a docked machine Enabled check Disabled no check When enabled this option let...

Страница 379: ...n about using an undock password refer to Setting an Undock Password on page 245 Play sound file when undocking Enabled check Disabled no check When enabled this option lets you assign a sound file to play when you undock your com puter from the Desk Station V Plus Password Prompt This option lets you type in the text you wish the system to display when it starts and prompts you for your pass word...

Страница 380: ... Warning Volume Off Low Medium High Sets the volume at which the low battery alarm and other system alarms beep This also affects sounds generated by any PC Card modem installed This option is equivalent to the Alarm Volume option in TSETUP Enable audible warning for emergency battery condition Enabled check Disabled no check Enables and disables the system s built in audible battery alarm This op...

Страница 381: ...ffects alarms and system beeps but not the sound system This option is equivalent to the System Beep option in TSETUP Pointing Devices Enable Accu Point only if PS 2 mouse is not connected at power on time Enable both AccuPoint and PS 2 mouse simultaneously Selects whether an external point ing device disables the Accupoint This option is equivalent to the Pointing Devices option in TSETUP This op...

Страница 382: ...he Shut Down Windows dialog box 2 Click Restart the computer in MS DOS mode then click Yes Windows 95 shuts down the computer then restarts it in MS DOS mode and displays a system prompt 3 At the system prompt type c dos tsetup and press Enter TSETUP displays the first page of the System Setup screen The TSETUP options are arranged on two pages The following sections describe how to make changes i...

Страница 383: ...otifying you of the conflict Change the set tings to resolve the conflict before saving your changes and exiting TSETUP Closing TSETUP To close TSETUP and keep your changes press End When TSETUP asks you to confirm your action press Y TSETUP closes with your changes in effect and restarts the computer or returns you to the system prompt depending on the changes you made Key s Result and Moves betw...

Страница 384: ...ype Description Total displays the total amount of memory installed in the computer SYSTEM SETUP 1 2 BIOS VERSION X XX Select items Space BkSp Change Values PgDn PgUp Change pages Esc Exit without saving Home Set default values End Save changes and Exit PASSWORD Not Registered BATTERY Battery Save Mode Full Power MEMORY Total 16384KB OTHERS Power up Mode Boot CPU Cache Enabled L2 Cache Enabled Aut...

Страница 385: ...omputer s internaldisplayadapteron or off Y LCD Display Colors 256K Colors 16M Colors Gives the number of colors available to the display N A Power On Display Internal Exter nal default Simultaneous Internal External sends output to the external dis play if one is connected when you turn the com puter on Otherwise it sends output to the internal display panel Simultaneous sends out puttoboththeint...

Страница 386: ...ures Text Mode Stretch Enabled default Disabled The screen has a height of 600 pixels In text mode whichuses400pixels this leaves a blank space above and below the text on the screen Enabling this mode stretches the text to fill more of the screen This mode only has an effect when you run the computer in DOS mode N Settings Usage Restart Registered Not Registered default Shows whether a password h...

Страница 387: ...k in the optional Desk Station V Plus it s settings will be under Ext SelectBay Formats for Enhanced IDE and Standard IDE are different so if you change the setting you will have to reformat the hard disk for the new setting Option Settings Usage Restart Mode Enhanced IDE Normal default Standard IDE Use Enhanced for MS DOS Windows or OS 2 Use Standard for Novell Netware or Unix environ ments that ...

Страница 388: ... more information about choos ing a battery save mode see The Easy Way Choosing a Power Usage Mode on page 131 N When you select the Battery Save Mode a drop down box appears with the battery save options You can change these option settings only if you chose User Settings for the Battery Save Mode Processing Speed High Full Power default Low Low Power default Sets the speed at which the Central P...

Страница 389: ...ocessing requests such as keyboard input or pointing device move ment For more informa tion see Sleep Mode CPU Sleep Mode on page 135 N Display Auto Off 01 Min 03 Min Low Power default 05 Min 10 Min 15 Min 20 Min 30 Min Full Power default Disabled Turns the display off if it is not used for the speci fied time For more infor mation see DisplayAuto Off on page 134 N Option Settings Usage Restart ...

Страница 390: ...n 20 Min 30 Min 40 Min 50 Min 60 Min Disabled default Turns the system off if you haven t used the com puter for the specified time This option is avail ableonlyifResumeMode is on For more informa tion see System Auto Off on page 134 N LCD Brightness Bright Full Power default Semi Bright Low Power default Sets the brightness of the display For more infor mation see Display Brightness LCD Bright ne...

Страница 391: ...ow Power default Sets the first choice of cooling method Performance mode uses the fan to cool the proces sor chip maintaining maximum system perfor mance Quiet mode cools the sys tem by temporarily reduc ing processing speed in preference to using the fan conserving battery life If the CPU is still too hot the fan turns on as well N Option Settings Usage Restart Power up Mode Resume Boot default ...

Страница 392: ...ts you set the Write Policy option Write Policy Write back default Write through Write back provides max imum performance Write through reduces performance to offer com patibility with older pro grams that may not run on a fast system Y L2 Cache Enabled default Disabled Improves performance whenenabled Thisoption only appears if the CPU Cache option is Enabled Disable this option only if your prog...

Страница 393: ... signal to turn the com puter on For more information see Different Ways to Turn the Computer On on page 277 N Alarm Volume Off Low Medium High default Sets the volume at which the low battery alarm and other system alarms beep This also affects sounds generated by any PC Card modem installed N When you highlight the Alarm Volume option a box appears that lets you set Low Battery Alarm and Panel C...

Страница 394: ...nd disables your software s use of the sys tem speaker This affects alarms and system beeps but not the sound system N Panel Power On Off Enabled Disabled default Turns the computer on or off when you open or close its display panel This option is only avail able when Resume Mode is selected For more information see Differ ent Ways to Turn the Computer On on page 277 N When you highlight the Keybo...

Страница 395: ...s you to use the selected key combination to emulate the computer s Fn key on an external keyboard For more infor mation see MakingYour External Keyboard Pre tendit Has the Fn Key on page 193 N Boot Priority FDD HDD default HDD FDD Determines whether the system looks for the oper ating system first on the hard disk HDD or the diskette drive FDD when you turn the com puter on N Option Settings Usag...

Страница 396: ...on does not affect serial pointing devices Y PC Card Con troller Mode PCIC Compati ble default CardBus 16bit Sets up the PC Card con troller This option affects all PC Card slots in the system including any installed in an optional NoteDock II Enhanced Port Replicator or Desk Station V Plus Sets this option to Card Bus 16bit only if you are using a PC Card that is CardBus compatible Y Option Setti...

Страница 397: ... memory block memory If your application is hav ing video problems try using the E000 EFFF setting Y BIOS VERSION X XX Select items Space BkSp Change Values PgDn PgUp Change pages Esc Exit without saving Home Set default values End Save changes and Exit SYSTEM SETUP 2 2 PCI BUS PCI BUS IRQ Not Used FLOPPY DISK I O Floppy Disk 3F2H IRQ6 CH2 DRIVES I O Internal HDD Primary IDE 1F0H IRQ14 Int Selecta...

Страница 398: ... Replicator or Desk Station V Plus Option Settings Usage Restart Serial COM1 3F8H IRQ4 default COM2 2F8H IRQ3 COM3 3E8H IRQ4 COM3 3E8H IRQ5 COM3 3E8H IRQ7 COM4 2E8H IRQ3 COM4 2E8H IRQ5 COM4 2E8H IRQ7 Not Used Sets the serial port name through which your com munications software sends output to the serial port Also sets the inter rupt request level IRQ If your new setting con flicts with the settin...

Страница 399: ...8H IRQ7 COM4 2E8H IRQ3 COM4 2E8H IRQ5 COM4 2E8H IRQ7 Not Used Sets the COM port name your modem fax and tele phony software uses to send and receive informa tion Also sets the inter rupt request level IRQ If your new setting con flicts with the Serial Port settings the conflicting port name is changed to Not Used Y Option Settings Usage Restart ...

Страница 400: ...ce between ECP and Std Bi directional If you choose ECP you may also set the DMA channel Set this option to Std Bi directional if the docu mentation for your parallel device instructs you to do so or you are having problems with your printer or other parallel device Sound Enabled default Not Used Lets you turn the sound system on or off Y The following sound system options are in a drop down list ...

Страница 401: ...ess used by the synthesizer This cannot be changed N A WSS SBPro IRQ Level IRQ5 default IRQ7 IRQ9 IRQ11 IRQ15 Lets you set an interrupt request level for the Win dows Sound System SoundBlaster Pro compat ible mode of the sound system Y WSS SBPro DMA Playback Channel 0 Channel 1 default Channel 3 Lets you set a DMA chan nel to be used for play back of the Windows Sound System Sound Blaster Pro comp...

Страница 402: ...he same channel the Record option will display its setting as same as playback and full duplex will not be supported for speakerphone operation Control I O Address 120H Displays the address used to control the sound device This cannot be changed N A MPU401 MIDI I F Not Used default 330H IRQ9 330H IRQ11 330H IRQ15 330H IRQ5 330H IRQ7 Enables the joystick port on the NoteDock II Enhanced Port Replic...

Страница 403: ... Used When this happens you cannot use the Desk Station s PCI bus slots ISA bus slots PCMCIA card slots or SCSI port Option Settings Usage Restart PCI BUS IRQ Not Used IRQ11 typical This automatically defaults to IRQ11 when you connect the computer to an optional Desk Sta tion V Plus If IRQ11 is being used by an expan sion card in the Desk Sta tion V Plus this IRQ level will change according to cu...

Страница 404: ...e drive Option Settings Usage Restart Internal HDD Primary IDE 1F0H IRQ14 default Not Used No Drive Sets the I O address and interrupt for the drive Setting this option to Not Used disables the drive If a drive is not installed this option is automati cally set to No Drive Y Option Settings Usage Restart Floppy Disk 3F2H IRQ6 CH2 default No Drive Displays diskette drive resource assignments If the...

Страница 405: ... have a problem you could not iden tify with the tips listed in the chapter If Something Goes Wrong The test verifies that the following system components hardware are in working order system the computer s internal hardware memory video diskette drive hard disk drive printer if you have one attached This chapter explains each of these tests in detail The DiagnosticTest ...

Страница 406: ...ctions again To start the test follow these steps 1 Make sure the external diskette drive is connected 2 Click Start then click Shut Down Windows 95 displays the Shut Down Windows dialog box 3 Click the button next to Restart the computer in MS DOS mode then click Yes Windows 95 shuts down the computer then restarts it in MS DOS mode and displays a system prompt 4 Put the Toshiba Companion Diskett...

Страница 407: ...uter displays Test the FDD Y N 2 To test the diskette drive s type Y and press Enter To bypass the test type N and press Enter The FDD floppy disk drive test checks the internal diskette drive and the external drive if you have one Attach the exter nal drive before running this test The test writes test patterns on any diskette in the drive These patterns destroy all information on the diskette s ...

Страница 408: ...re beginning the test make sure the printer is connected to the computer the power is turned on and the printer is on line If you chose to test the printer the prompt displays Compatible with IBM printer Y N 5 To test an IBM or an IBM compatible printer type Y and press Enter To test a non IBM compatible printer type N and press Enter If you choose an IBM printer when your printer is not an IBM or...

Страница 409: ...e drive if tested and the second SS indi cates the hardware status This message may remain on the screen for a moment The following sections describe each subtest System Functions and Memory The system functions and the memory tests run together for approximately two seconds The system functions test doesn t display any messages The memory test displays the following message PROGRESS xxxxxx where ...

Страница 410: ... Display The next test is the 320 x 200 GRAPHIC DISPLAY 13 test The test screen displays 16 colored horizontal bars with the name of the color Go to the next test by pressing Enter Character Sets The next two tests are character set tests The first checks that the screen can display characters in a 40 column by 25 row format the characters are wider than normal CHARACTER ATTRIBUTES NEXT LINE SHOWS...

Страница 411: ...MNOPQRSTUVWXYZ _ abcdefghijklmnopq 3 0123456789 ABCDEFGHIJKLMNOPQRSTUVWXYZ _ abcdefghijklmnopqr 0123456789 ABCDEFGHIJKLMNOPQRSTUVWXYZ _ abcdefghijklmnopqrs 0123456789 ABCDEFGHIJKLMNOPQRSTUVWXYZ _ abcdefghijklmnopqrst 0123456789 ABCDEFGHIJKLMNOPQRSTUVWXYZ _ abcdefghijklmnopqrstu 0123456789 ABCDEFGHIJKLMNOPQRSTUVWXYZ _ abcdefghijklmnopqrstuv 0123456789 ABCDEFGHIJKLMNOPQRSTUVWXYZ _ abcdefghijklmnopqr...

Страница 412: ...he mode number The illustration below shows the test image for one of the 320 x 200 graphics modes mode 4 Graphics capabilities test screen A similar screen appears for each of the computer s graphics modes Press Enter to proceed with the next screens Each screen has a similar image three boxes of different shades of gray differing primarily in resolution If a different image appears on your scree...

Страница 413: ...sert the diskette in the drive press Enter The test begins and displays this message FLOPPY DISK IN PROGRESS 503000 If an error occurs the test displays the ABORTED message Write down the highlighted numbers and return to the main menu by pressing Ctrl Pause If a diskette drive fails the test check the following Does the drive contain a diskette Is the diskette properly formatted Is the diskette w...

Страница 414: ...K TEST IN PROGRESS 805100 If an error occurs the test displays the ABORTED message Write down all messages and highlighted numbers and consult your dealer Your computer or your drive may need service To return to the main menu press Enter The hard disk test does not destroy all of the information stored on the hard disk However this test overwrites a small portion of the disk Back up any important...

Страница 415: ... printer turned on Is the printer ready on line or selected PRINTER TEST 1 THIS LINE SHOWS NORMAL PRINT 2 THIS LINE SHOWS DOUBLE WIDTH PRINT 3 THIS LINE SHOWS COMPRESSED PRINT 4 THIS LINE SHOWS EMPHASIZED PRINT 5 THIS LINE SHOWS DOUBLE STRIKE PRINT 6 ALL CHARACTERS PRINT 0123456789 ABCDEFGHIJKLMNOPQRSTUVWXYZ _ abcdefghijklmn opqrstuvwxyz 0123456789 ABCDEFGHIJKLMNOPQRSTUVWXYZ _ abcdefghijklmno 0123...

Страница 416: ...er tests successfully the test displays the COM PLETED message Press Enter to return to the TDIAGS screen To exit TDIAGS continue with the next section Exiting the Diagnostic Menus To exit the diagnostic menu follow these steps 1 When TDIAGS completes system components testing type N and press Enter TDIAGS returns you to the Main menu 2 Remove the Toshiba Companion Diskette from the dis kette driv...

Страница 417: ...The Diagnostic Test ExitingtheDiagnosticMenus Part II Technical Reference 439 ...

Страница 418: ...tions Built in Features This section lists the Portégé 650CT features Technology and Processor Microprocessor 133MHz Intel Pentium with Voltage Reduction Technology LSI and CMOS large scale integrated and complementary metal oxide semiconductor technology providing mini mum size and weight low power usage and high reliability ...

Страница 419: ... to 240 volts alternating current 50 or 60 hertz cycles per second Main battery removable rechargeable lithium ion battery pack Backup battery provides power for special memory features such as Resume Mode RTC battery provides power for the internal real time clock and calendar Intelligent power supply detects low battery charge and displays the time remaining in MaxTime Automatic power off saves ...

Страница 420: ...l device Serial port 9 pin RS 232 C compatible high speed buffered serial port lets you connect an external modem mouse serial printer or other serial device Monitor port 15 pin analog VGA port lets you connect an external SVGA monitor color or monochrome Expansion port 240 pin port lets you connect an optional Desk Station V Plus or NoteDock II Enhanced Port Replicator with the docking adapter Ex...

Страница 421: ...e matrix Thin Film Transistor TFT color LCD that displays up to 16M colors simultaneously at 800x600 resolution Keyboard enhanced 84 key 86 key in Europe keyboard emulates the IBM PS 2 keyboard and includes embedded numeric and cursor control overlays and dedicated cursor control keys AccuPoint and buttons providesthecompletefunctionofamouseorother pointing device from within the keyboard External...

Страница 422: ...rbo CCIT V 34 MicroCom Net work Protocol MNP classes 1 4 MNP class 5 for up to 2x data compression CCIT V 42bis for up to 4x data compression The fax modem supports the following protocols V 21 ch2 V 27ter V 29 V 17 Fax Class 1 Class1 ECM Operating System Microsoft Windows 95 or Windows for Workgroups 3 11 Configuration Programs Toshiba Access Panel Toshiba System Control Panel MaxTime and TSETUP ...

Страница 423: ...and automat ically configures the computer for maximum power savings Security instant and power on passwords help protect your files User s Guide explains how to set up the computer gives instruc tions for basic computing tasks and documents all system components and features Online Documentation provides the Portégé 650CT User s Guide in hypertext form Load this manual intomemoryandrefertoit when...

Страница 424: ...ery packs Additional battery packs use as spare or replacement packs to extend the time you can operate the computer away from a live wall outlet 8MB expands the computer s memory to 24MB 16MB expands the computer s memory to 32MB 32MB expands the computer s memory to 48MB 64MB expands the computer s memory to 80MB PC Card slot lets you install up to two Type I or Type II PC Cards or one Type III ...

Страница 425: ...Bay for a Toshiba 3 5 diskette drive mod ule or CD ROM module 5 25 bay for an IDE or SCSI drive hard disk tape or CD ROM security lock slot system speaker volume dial two type III PC Card slots two full length ISA PCI expansion slots one half length PCI expansion slot ECP EPP parallel port MIDI joystick port SCSI II port 9 pin RS 232C serial port video port PS 2 mouse port microphone jack headphon...

Страница 426: ...tery Size width x depth x height 9 88 x 7 91 x 1 89 261mm x 208mm x 48mm Condition Ambient Temperature Relative Humidity Altitude From Sea Level Operating 41 to 95 F 5 to 35 C 20 to 80 non condensing 200 to 10 000 feet 60 to 3 000 meters Nonoperating 4 to 149 F 20 to 65 C 10 to 90 non condensing 200 to 30 000 feet 60 to 10 000 meters Wet bulb temperature 79 F 26 C maximum ...

Страница 427: ...niversal power supply you can use worldwide This appendix shows the shapes of the typical AC power cord connectors for various parts of the world USA and Canada UL approved CSA approved United Kingdom BS approved Australia AS approved Europe VDA approved NEMKO approved ...

Страница 428: ...following tables are provided IRQ Line Assignments The direct lines to the CPU are called an Interrupt ReQuest IRQ lines To find an IRQ for a device select an available IRQ if possi ble otherwise select an IRQ that is normally reserved for a device you are not using The following table lists the IRQ line assign ments for the Portégé 650CT computer IRQ decimal Status Device Notes 0 Reserved Program...

Страница 429: ...mally reserved COM1 Serial Port 5 Available 6 Reserved 3 5 inch diskette drive Internal Select Bay External FDD or Desk Station V Plus SelectBay Resources are always reserved even when drive is not installed 7 Normally reserved LPT1 ECP Parallel Port 8 Reserved Real time clock RTC 9 Available 10 Available 11 Available 12 Reserved PS 2 mouse Resources are always reserved even when drive is not inst...

Страница 430: ... names and their assigned I O addresses for the Portégé 650CT computer DMA Status Device Notes 0 Available 1 Available 2 Reserved 3 5 inch diskette drive Internal SelectBay External FDD or Desk Station V Plus SelectBay Resources are always reserved even when drive is not installed 3 Available 4 Reserved Cascade from DMA Controller 1 5 Available 6 Available 7 Available Input Output address I O in h...

Страница 431: ...hed to Desk Station V Plus or Note Dock II 3E0 3E1 PCMCIA1 1 only in PCIC COMPATIBLE mode 3E2 3E3 PCMCIA2 1 only when attached to Desk Station V Plus or NoteDock II only in PCIC COMPATIBLE mode 5 9 10 11 or 15 this resource is set by the BIOS at startup and cannot be changed Desk Station V Plus or NoteDock II PCI Bus Shared by all PCI and CardBus devices 3F2 3F5 3F7 External Diskette Drive or Desk...

Страница 432: ...96 110 117 316 180 187 3D6 150 157 356 or 130 137 336 3 4 5 7 9 10 11 14 or 15 2nd Hard Disk Drive 2 in Desk Station V Plusor5 25 inchdrive bay 1F0 1F7 3F6 170 177 376 190 197 396 110 117 316 180 187 386 150 157 356 or 130 137 3B6 3 4 5 7 9 10 11 14 or 15 Built in Modem 1 3F8 3FF COM1 2F8 2FF COM2 3E8 3EF COM3 2E8 2EF COM4 3 4 5 or 7 CD ROM 1 Desk Station V Plus SelectBay or Desk Station V Plus 5 ...

Страница 433: ...ory Access Controller DMAC 00 0F 81 83 87 89 8B 8F and C0 DF External Diskette Drive or Desk Station V Plus Selectbay Resources are always reserved even when drive is not installed 3F2 3F5 and 3F7 6 2 IrDA Communica tions Port SIR 1 3F8 3FF COM1 2F8 2FF COM2 3E8 3EF COM3 2E8 2EF COM4 2C8 2CF Other 2A8 2AF Other 3A8 3AF Other 3 4 5 7 9 10 11 14 or 15 5 6 or 7 Joystick 1 Only when attached toDeskSta...

Страница 434: ...1 Only when attached toDeskStationVPlus or NoteDock II Only in PCIC COMPATIBLE mode 3E2 3E3 Usable Interrupts 3 4 5 7 9 10 11 14 or 15 Printer Bi Direc tional Setting 1 378 37A LPT1 278 27A LPT2 3BC 3BE LPT3 5 or 7 Printer ECP Setting 1 378 37A 778 77A LPT1 278 27A 678 67A LPT2 3BC 3BE 7BC 7BE LPT3 2BC 2BF 6BC 6BE Other 39A 39C 79A 79C Other 29A 29C 69A 69C Other 5 7 9 10 11 14 or 15 1 2 or 3 Prog...

Страница 435: ... 38B 220 24F 608 60B 388 38B 220 22F 608 60B 388 38B 220 24F E84 E87 388 38B 220 22F E84 E87 388 38B 220 24F F44 F47 388 38B 220 22F F44 F47 388 38B 220 24F 5 7 9 11 or 15 0 1 or 3 two used for full duplex operation Speaker 61 Special Purpose Registers Toshiba Specific 24 25 2E 2F E0 EF 80 84 86 88 8C 8E B0 B2 1882 1885 1888 188D 480 48F CF8 CFF System VGA 2 3B0 3BB 3C0 3DF Device I O Address in h...

Страница 436: ...installed in PCI ISA slot Device Memory Addresses in Hex System BIOS 0F0000 0FFFFF FFF000 FFFFFF high memory copy System Memory 000000 09FFFF Conventional memory base 640K 100000 xxxxxx Extended memory System VGA BIOS 2 E000 EFFF E400 EFFF default or C000 CBFF System VGA RAM 2 A000 BFFF FE000000 FEFFFFFF High memory linear buffer System VGA 2 3BO 3BB 3CO 3DF ...

Страница 437: ...ources for the fol lowing devices VGA BIOS Address Communication Ports Serial I O and IRQ IrDA I O IRQ and DMA Built in modem I O and IRQ Bi Directional Parallel I O IRQ and DMA ECP Parallel I O IRQ and DMA Sound System WSS I O SBPro I O Synthesizer I O WSS and SBPro IRQ WSS and SBPro DMA Control I O PCI Bus IRQ Disk Drives HDD and CD ROM for Desk Station V Plus SelectBay and 5 25 inch Drive Bay M...

Страница 438: ...anel The following sec tions provide instructions for viewing and changing system resources Viewing System Resources To view system resources running Windows 95 follow these steps 1 Click Start and point to Settings and click Control Panel 2 Double click the Toshiba System icon Windows 95 displays the System Properties dialog box Sample System Properties dialog box 3 Click the Device Manager tab ...

Страница 439: ...rties dialog box Sample Computer Properties dialog box 5 Click the View Resources tab Depending on which resource is selected the Computer Prop erties window displays the settings assigned to the enabled sys tem devices Clicking a different resource button displays the settings assigned for that specific resource Resources not displayed can be assigned to optional devices Device Manager tab Resour...

Страница 440: ...es cannot be changed due to limited sup port for devices and or drivers To change system resources fol low these steps 1 Click Start and point to Settings and click Control Panel 2 Double click the System icon Windows 95 displays the System Properties dialog box Sample System Properties dialog box 3 Click the Device Manager tab 4 Double click the device icon that you want to change ...

Страница 441: ...esource tab Windows lists the resources assigned to the device The Resources tab for the ESS sound controller 6 Uncheck the Use automatic settings box by clicking in the box 7 Click the Change Setting button Windows 95 displays an Edit dialog box specific to the resource you want to change 8 Enter a new value and click OK Automatic settings box Change Setting button ...

Страница 442: ...System Resources Viewing and Changing System Resources Part III Appendixes 469 ...

Страница 443: ...hether the mode is text or graphics Resolution is the measure of the screen s dimensions in terms of horizontal and vertical pixels in graphics modes or rows and columns of characters in text modes Grid is the default number of pels per character LCD Colors is the maximum number of simultaneous colors or shades of gray that the mode can display on the built in screen CRT Colorsis the maximum numbe...

Страница 444: ...Hz 31 5kHz Non 4 5 VGA Graph 320 x 200 pels 8x8 pels 4 256K 16 256K B8000 70Hz 31 5kHz Non 6 VGA Graph 640 x 200 pels 8x8 pels 2 256K 2 256K B8000 70Hz 31 5kHz Non 7 VGA Text 80 x 25 char 8 9 x 14 Mono Mono B0000 70Hz 31 5kHz Non 7 VGA Text 80 x 25 char 8 9 x 16 Mono Mono B0000 70Hz 31 5kHz Non D VGA Graph 320 x 200 pels 8x8 pels 16 256K 16 256K A0000 70Hz 31 5kHz Non E VGA Graph 640 x 200 pels 8x...

Страница 445: ...K A0000 87Hz 35 5kHz Interlace 40 SVGA Graph 640 x 480 pels 8x16 pels 32K 32K 32K 32K A0000 60Hz 75Hz 85Hz 31 5kHz 37 6kHz 43 2kHz Non Non Non 41 SVGA Graph 640 x 480 pels 8x16 pels 64K 64K 64K 64K A0000 60Hz 75Hz 85Hz 31 5kHz 37 6kHz 43 2kHz Non Non Non 42 SVGA Graph 800 x 600 pels 8x16 pels 64K 64K 64K 64K A0000 60Hz 75Hz 85Hz 37 9kHz 46 9kHz 53 7kHz Non Non Non 43 SVGA Graph 800 x 600 pels 8x16...

Страница 446: ...e instructions for Windows 95 procedures are very similar to those you use in Windows for Workgroups This appendix tells you how to carry out the procedures described in this guide if you re using Windows for Workgroups Using Windows for Workgroups This section gives a brief introduction to Windows for Work groups For more information click Help then click Contents to access the online help ...

Страница 447: ...kgroups This section describes the features of Program Manager Many of these features such as the menu bar and minimize button are also present in other pro grams you run under Windows for Workgroups When you start Windows for Workgroups you see a screen simi lar to the following The Program Manager window Clicking the control menu icon opens the control menu This menu lets you set features such a...

Страница 448: ... the icon Program groups contain one or more icons representing related programs For example the Toshiba Utilities program group contains Toshiba programs such as MaxTime and Hardware Setup Double clicking a program group icon opens the program group represented by the icon There is no close button in Windows for Workgroups Starting Programs To start a program in Windows for Workgroups double clic...

Страница 449: ...ograms that come with your computer Using these programs under Windows for Workgroups is almost the same as using them under Windows 95 This section lists each of the programs describes the differences between the Windows 95 and Windows for Workgroups versions and points to the instructions for using them Master Disk Creator Master Disk Creator works as described in Running Master Disk Creator on ...

Страница 450: ...dware Setup go into Program Manager and double click the Hardware Setup icon in the Toshiba Utilities program group Use Hardware Setup to control your hardware configuration These options are also available through TSETUP For informa tion about what each option does read TSETUP on page 403 TSETUP To open TSETUP follow these steps 1 Close any programs you are running and exit Windows if it s open R...

Страница 451: ... you may select a program in the ProgMan Browser dialog box To use this box to assign a key to a program or document follow these steps 1 Click the desired key in the Fn esse keyboard with the secondary button Fn esse displays the Assignment Type dialog box 2 Click Direct Fn esse displays the Add Edit Command dialog box 3 Click ProgMan Fn esse displays the ProgMan Browser dialog box The ProgMan Br...

Страница 452: ...you must use Resume mode instead You can turn Resume Mode on in any of the ways described in this guide MaxTime a hotkey or TSETUP Turning the Computer Off When you re ready to turn the computer off assuming Resume Mode isn t turned on follow these steps 1 Save your files and close any programs you re using 2 In Program Manager press Alt F4 to exit Windows 3 Wait for MS DOS to display the command ...

Страница 453: ...s the CardWizard software supplied with your computer provides the Card and Socket Services pro grams you need to use PC Cards on your system See the Card Wizard documentation for instructions for setting up PC Card support The CardWizard programs were specifically designed for your Toshiba computer Even if your PC Card comes with its own Card and Socket Services programs try CardWizard first Reso...

Страница 454: ...teps 1 Open the Toshiba Utilities program group 2 Double click the Windows QuickStart 3 11 Edition icon Windows opens the book at the table of contents Reading a Selected Topic To read a section of the Windows QuickStart 3 11 Edition Select a part of the book click its index tab or click Contents and select the section from the list displayed To move to the beginning of the table of contents click...

Страница 455: ...a name for your bookmark and choose OK If you choose OK without typing a name the current chapter name becomes the bookmark If the name is already assigned to another bookmark the pro gram displays a message Type in a new bookmark name and choose OK The electronic book program creates a consecutively numbered bookmark and places it in the text at the upper edge of the book To view a marked section...

Страница 456: ...he cross reference The program displays the section containing the information that relates to the cross reference you selected When you have finished reading the cross referenced material clicking Go Back returns you to the original topic Searching for a Topic The QuickStart book has a full text search feature which can locate every topic that contains a word or phrase you are looking for To use ...

Страница 457: ...program diskettes see Create or Pur chase Master Diskettes on page 33 Follow these steps to reinstall the Windows QuickStart 3 11 Edition 1 Be sure your diskette drive is connected to the diskette drive port For more information about connecting the dis kette drive see Connecting the External Diskette Drive on page 20 2 Choose Run from the File menu and type the command line a install Windows for ...

Страница 458: ...Using Windows for Workgroups GettingHelp Part III Appendixes 487 ...

Отзывы: